 Great Sword
 Long Sword
 Sword and Shield
 Dual Blades
 Hammer
 Hunting Horn
 Lance
Lance Gunlance
 Switch Axe
 Charge Blade
 Insect Glaive
 Bow
Bow Light Bowgun
 Heavy Bowgun
Full Map Guide & List for Monster Hunter Wilds (MH Wilds). Guide includes all latest maps, how to look at the map, list of monsters, materials and map icons.
Table of Contents
Maps Information
All Map List
| Name | Description |
|---|---|
| [Unlocked from the Beginning] The Windward Plains are a diverse region filled with deserts, grasslands, and other natural features. This is the first hunting locale you'll visit. This land experiences an Inclemency known as the Sandtide, a great "sandstorm" roiling with thunder. | |
| [Unlocked after Ch.1-2] Following the river found in the Windward Plains will lead you to the verdant Scarlet Forest, with its towering trees and abundant water. This land experiences an Inclemency known as the Downpour, a torrential rainstorm that floods the surrounding area. | |
| [Unlocked after Ch.1-5] A unique locale where, as its name suggests, oil wells up from the ground and accumulates in deep pools of oilsilt. This land experiences an Inclemency known as the Firespring, a phenomenon in which fierce fires blaze. | |
| [Unlocked after Ch.2-2] A frigid land swept with snowy blizzards. A blizzard occurs during an Inclemency. | |
| [Unlocked after Ch.2-3] A map that looks like a ruined city. Unique environments feature such as "Wyvern's Tranquility" and "Wyvern's Stirring". | |
 Suja Suja | A field with a lush village. Inhabited by a long-eared Wyverian, you can use Melding at Suja. |
  Wounded Hollow Wounded Hollow*Arena | This location serves as the Arena for Wilds. It can be visited outside of Quests with Monsters that can be hunted roaming the area. |
 Windward Plains


There are seven maps in Monster Hunter Wilds: Windward Plains, Scarlet Forest, Oilwell Basin, Iceshard Cliffs, Ruins of Wyveria, Suja, and Wounded Hollow (Arena).
How to Open and Use Map
Open Map with Touchpad or M Key

| Controller | Press |
|---|---|
| Keyboard & Mouse | Press the M Key on keyboard |
The Map can be displayed by pressing the touchpad on the controller, or by pressing the M key if using a keyboard and mouse. You can tap the button to display the Partial Screen or hold the button for the full screen display
How to Use After Opening the Map
| Button | Effect |
|---|---|
| Move cursor | |
| Rotate map | |
| Switch between upper and lower layers | |
| Zoom in / Zoom out | |
| Set waypoint | |
| Move cursor to player location | |
| Switch between Full/Partial Screens | |
| Environment Overview | |
| Menu Switching - Fast Travel list - Filter icons - Environmental Overview - Monster threat level |
| Button | Effect |
|---|---|
| Ctrl + Mouse | Rotate map |
| Q | Zoom out |
| E | Zoom in |
| X | Set waypoint |
| Shift | Move cursor to player location |
| N | Switch between Full/Partial Screen |
| G | Environmental Overview |
Fast Travel from the Map

If you select the "Fast Travel List" on the Map screen, you can Fast Travel to a village or any unlocked camp. It can significantly reduce your travel time, so take advantage of it. Fast Travel can also be used during combat.
How to Fast Travel GuideMove to Waypoint Automatically

Icons that exist on the Map can be set as waypoints. If you set it as a waypoint, it will automatically take you there when you ride a Seikret. A place without an icon cannot be set as a waypoint, so if there is a place you want to go to, we recommend setting a nearby icon as a waypoint.
Seikret GuideHide/Show Icons with Filters

By using the Filter Icon option, you can filter the icons on the map. This will help you adjust the map depending on your preference, whether it's for hunting or gathering. By turning on the Monster Threat Level, it will mark the difficulty of the monsters with a colored circle on the map!
Check Weather & Forecast

By opening the Environment Overview, you can check information such as the large monsters currently appearing and any Outbreaks. You can also see a forecast of future environments and events, so use this to make your exploration more efficient.
How to Check Weather EnvironmentFix Mini Map Rotation

The Mini Map can be fixed in place by opening the menu, going to Options → Game Settings, and changing the Mini Map rotation setting. However, the entire world Map cannot be fixed in place.
Map Icon List
Material & Items
| Bonepile | Mining Outcrop | Special Items | Insect |
| Honey | Plants | Seeds | Mushroom |
| Slinger Ammo | Dung Pod |
Environmental Features
Endemic Life
| Icon | Description |
|---|---|
| Paratoad | Toads containing a paralytic gas. Hitting them will release the gas, which is powerful enough to stop large monsters in their tracks. |
| Vigorwasp | Insects that carry restorative nectar. A light impact causes the nectar to scatter, producing continued healing effect. |
| Flashflies | Insects that flash when struck. The larger their colony, the brighter they shine. They can be used to blind large monsters. |
| Vigormantle Bug | Insects that wear healing herbs like cloaks, producing a restorative nectar that can be collected from them using the Hook Slinger. |
| Wiggly Litchi | Insects that thrive in rotting wood and soil. Highly nutritious, they can be consumed to increase stamina and halve its depletion rate. |
Environmental Interactables
| Icon | Description |
|---|---|
| Wedge Beetle | Shoot it with the Slinger to swing around. |
| Great Thunderbug | A colony of thunderbugs that have been galvanized by sandstorm lightning. A population this dense can stop even large monsters in their track. *Can only be used during Inclemency |
| Brush | An area covered in tall grass that can conceal a crouching hunter from sight. |
| Vitality | A plant that releases a healing nectar into the air when struck. |
| Giant Sand Pit | Where Balahara awaits. If you get caught, you will be pulled underground. |
| Lightning Rod | Spots where thunder frequently strikes. |
| Grounding Rock | A rock that prevents thunder from striking into the surrounding area. |
| Unstable Ground | A strong impact will make the ground underneath collapse. |
| Falling Boulder | Crumbles on impact, collapsing atop anything caught beneath. |
| Vine Trap | An enourmous mass of overgrown vines. They'll fall when struck, and monsters caught underneath will temporarily be unable to move. |
Windward Plains Map Guide

"Windward Plains" is a vast sandy field that the research team will first investigate when they set foot on the Forbidden Land. This field is made up of multiple areas with different characteristics, such as deserts, grasslands, and rocky areas, and there are 17 areas in total.
Windward Plains Map GuidePop-Up Camp Locations
 See Detailed Directions
| Location | Details | |
|---|---|---|
| 1 |  | [Area 9 Lookout Hill] Safety Level: Insecure Cost: 150pts |
| 2 |  | [Area 10 Southeast] Safety Level: Dangerous Cost: 200pts |
| 3 |  | [Area 8 Southeast] Safety Level: Dangerous Cost: 200pts |
| 4 |  | [Area 8 Southwest] Safety Level: Dangerous Cost: 200pts |
| 5 |  | [Area 3 South] Safety Level: Insecure Cost: 150pts |
| 6 |  | [Area 6 Valley Hideaway] Safety Level: Safe Cost: 100pts |
| 7 |  | [Area 13 West] Safety Level: Insecure Cost: 150pts |
| 8 |  | [Area 13 Oasis] Safety Level: Dangerous Cost: 200pts |
| 9 |  | [Area 16 Northwest] Safety Level: Insecure Cost: 150pts |
| 10 |  | [Area 16 Bone Desert] Safety Level: Insecure Cost: 150pts |
| 11 |  | [Area 4 Mineral Cave] Safety Level: Safe Cost: 100pts |
| 12 |  | [Area 4 West] Safety Level: Dangerous Cost: 200pts |
| 13 |  | [Area 14 Underground Water Vein] Safety Level: Safe Cost: 100pts |
*Safety Level: possibility of Pop-Up Camp being destroyed
Ores Found in Windward Plains
| Low Rank | High Rank |
|---|---|
| Iron OreMachalite OreEarth Crystal | Iron OreEarth CrystalCarbalite OreLightcrystalNovacrystal |
Bone Materials Found in Windward Plains
| Low Rank | High Rank |
|---|---|
| Mystery BoneSturdy Bone | Sturdy BoneQuality BoneDragonbone Relic |
Fish Found in Windward Plains
| How to Get to Fishing Spot | Fish able to Catch |
|---|---|
 | Virid BowfinWhetfishSushifishGravid Bowfin(Plenty) |
 | Virid BowfinSushifishGoldenfishPlatinumfish |
Scarlet Forest Map Guide

Scarlet Forest is a forest filled with rich waters that spread up the river that flows even through "Windward Plains". It is characterized by a waterside filled with red water. A home to the apex monster Uth Duna, Lala Barina, and other monsters.
Scarlet Forest Map GuidePop-Up Camp Locations
 See Detailed Directions
| Location | Details | |
|---|---|---|
| 1 |  | (Area 6 Flowering Rocks) Safety Level: Safe Cost: 25pts |
| 2 |  | Area 10 Southwest Safety Level: Dangerous Cost: 75pts |
| 3 |  | [ Area 7 Bower of the Great Tree Camp Location] Safety Level: Dangerous Cost: 75pts |
| 4 |  | [Area 8 South] Safety Level: Dangerous Cost: 75pts |
| 5 | 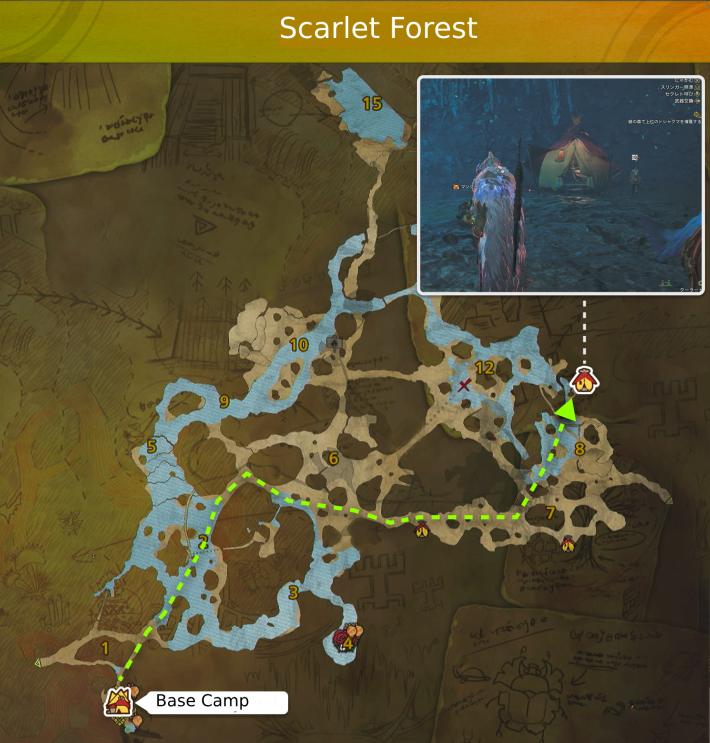 | [Area 8 Underground Lake] Safety Level: Dangerous Cost: 25pts |
| 6 |  | [ Area 12 Northeast] Safety Level: Insecure Cost: 50pts |
| 7 |  | [Area 18 West] Safety Level: Dangerous Cost: 25pts |
| 8 |  | [ Area 18 Treetop Hill] Safety Level: Safe Cost: 25pts |
| 9 |  | [Area 14 Southwest] Safety Level: Dangerous Cost: 75pts |
| 10 |  | [Area 17 Great Lake Shore] Safety Level: Insecure Cost: 50pts |
| 11 |  | [Area 16 Hidden Waterfall] Safety Level: Safe Cost: 25pts |
| 12 |  | [ Area 16 Ruin Interior] Safety Level: Safe Cost: 25pts |
*Safety Level: possibility of Pop-Up Camp being destroyed
Ores Found in Scarlet Forest
| Low Rank | High Rank |
|---|---|
| Iron OreMachalite OreEarth Crystal | Machalite OreEarth CrystalCarbalite OreLightcrystalNovacrystalFucium Ore |
Bones Material Found in Scarlet Forest
| Low Rank | High Rank |
|---|---|
| Mystery BoneSturdy Bone | Sturdy BoneQuality BoneDragonbone Relic |
Fish Found in Scarlet Forest
| How to Get to Fishing Spot | Fish able to Catch |
|---|---|
 | Virid BowfinGravid Bowfin(Plenty)SushifishBomb Arowana |
 | GunpowderfishGoldenfryGoldenfishPlatinumfish |
 | EscuniteVirid BowfinGrand EscuniteGoldenfishPlatinumfish |
 | Virid BowfinWhetfishBurst ArowanaGreat Trevally |
 | Virid BowfinSushifishGastronome Tuna(Plenty)Gajau (Plenty) |
 | GunpowderfishGoldenfryGoldenfishPlatinumfishPetricanths (Inclemency/Night) |
 | EscuniteVirid BowfinSushifishBomb ArowanaGastronome Tuna(Plenty)Gajau (Fallow)Speartuna (Fallow)Great TrevallyGoliath Squid (Inclemency/Night) |
Oilwell Basin Map Guide

As the name suggests, Oilwell Basin is a field where oil comes up from the ground and accumulates depending on the weather. In this area, there is an abnormal event called Firespring where fierce flares blaze. Large monsters such as Rompopolo and Nu Udra are found here.
Oilwell Basin Map and Location GuidePop Up-Camp Locations
 See Detailed Directions
| Location | Details | |
|---|---|---|
| 1 |  | [Area 4: Dilapidated Roadway] Safety Level: Dangerous Guild Pts. Cost: 75pts |
| 2 |  | [Area 2: Canyon Divide] Safety Level: Safe Guild Pts. Cost: 25pts |
| 3 |  | [Area 8: Middle Strata North] Safety Level: Dangerous Guild Pts. Cost: 75pts |
| 4 |  | [Area 9: Middle Strata South] Sefety Level: Insecure Guild Pts. Cost: 50pts |
| 5 |  | [Area 13: Limestone Cavern] Safety Level: Safe Guild Pts. Cost: 25pts |
| 6 |  | [Area 15: Lower Strata North] Safety Level: Dangerous Guild Pts. Cost: 75pts |
| 7 |  | [Area 12: Crimson Rivulet] Safety Level: Safe Guild Pts. Cost: 25pts |
| 8 |  | [Area 14: Mining Cave] Safety Level: Safe Guild Pts. Cost: 25pts |
*Safety Level: possibility of Pop-Up Camp being destroyed
Ores Found in Oilwell Basin
Ore Locations & How to FarmBones Material Found in Oilwell Basin
Bonepile Locations & How to Get BonesFish Found in Oilwell Basin
| How to Get to Fishing Spot | Fish able to Catch |
|---|---|
 | WhetfishGravid BowfinBurst ArowanaBomb Arowana |
Iceshard Cliffs Map Guide

"Iceshard Cliffs" is a cold field blown by a heavy snowstorm. The Apex monster "Jin Dahaad", as well as "Hirabami, Nerscylla, "Gore Magala, and "Blangonga can be found.
Iceshard Cliffs Map and Location GuidePop Up-Camp Locations
 See Detailed Directions
| Location | Details | |
|---|---|---|
| 1 |  | [Area 7: Watchtower Campsite] Safety Level: Safe Guild Pts. Cost: 25pts |
| 2 |  | [Area 19: Floating Rock Wall Campsite] Safety Level: Safe Guild Pts. Cost: 25pts |
| 3 |  | [Area 15: Upper Corridor Campsite] Safety Level: Safe Guild Pts. Cost: 25pts |
| 4 |  | [Area 6: North Campsite] Safety Level: Dangerous Guild Pts. Cost: 75pts |
| 5 |  | [Area 18: Sinkhole Campsite] Safety Level: Safe Guild Pts. Cost: 25pts |
| 6 |  | [Area 20: Ancient Room] Safety Level: Safe Guild Pts. Cost: 25pts |
| 7 |  | [Area 1: Icy Shore Campsite] Safety Level: Safe Guild Pts. Cost: 25pts |
*The Safety Level notes how likely the Pop-Up Camp can be destroyed by a large monster
Ores Found in Iceshard Cliffs
| High Rank | Low Rank |
|---|---|
| Machalite OreDragonite OreIcium | Carbalite OreLightcrystalIciumGracium |
Bones Material Found in Iceshard Cliffs
Bonepile Locations & How to Get BonesFish Found in Iceshard Cliffs
| How to Get to Fishing Spot | Fish able to Catch |
|---|---|
 | Glass ParexusGunpowderfishBlind PerchGoldenfry |
 | Glass ParexusGunpowderfishBlind PerchGoldenfry |
Ruins of Wyveria Map Guide

"Ruins of Wyveria" is a field that looks like a ruined city. It is inhabited by Guardian monsters created by the hands of an ancient civilization.
Ruins of Wyveria Map GuidePop Up-Camp Locations
 See Detailed Directions
| Location | Details | |
|---|---|---|
| 1 |  | [Area 2 Collapsed Remains] Safety Level:Safe Cost:25pts |
| 2 |  | [Area 6 Trace Trees] Safety Level:Dangerous Cost:75pts |
| 3 |  | [Area 6 Southeast] Safety Level:Safe Cost:25pts |
| 4 |  | [Area 6 Abandoned Club Secret Area] Safety Level:Safe Cost:25pts |
| 5 |  | [Area 8 Rubble Gap] Safety Level:Safe Cost:25pts |
| 6 |  | [Area 9 Entangled Canopy] Safety Level:Safe Cost:25pts |
| 7 |  | [Area 13 Hidden Hole] Safety Level:Safe Cost:25pts |
*The Safety Level notes how likely the Pop-Up Camp can be destroyed by a large monster
Ores Found in Ruins of Wyveria
| Low Rank | High Rank |
|---|---|
| Machalite OreDragonite OreLightcrystal | Fucium OreLightcrystalCarbalite OreNovacrystal |
Bones Material Found in Ruins of Wyveria
| Low Rank | High Rank |
|---|---|
| Mystery BoneSturdy BoneTough Guardian Bone | Tough Guardian BoneQuality BoneDragonbone Relic |
Fish Found in Ruins of Wyveria
| How to Get to Fishing Spot | Fish able to Catch |
|---|---|
 | Gravid BowfinGlass ParexusGunpowderfishBlind PerchGoldenfry |
 | Gravid BowfinGlass ParexusGunpowderfishBlind Perch |
Wounded Hollow Map
"Wounded Hollow" is the arena map of this game. Unlike the arena in previous games, you can visit it outside of quests, and you can also defeat the monsters wandering around the arena.
Monster Hunter Wilds Related Articles
Useful Tips
| Story | Quest List | All Monsters List | Full Map Guide |
| Side Mission | Cooking | Character Presets | |
| Armor List | Charm List | Decoration List | |
| Skill List | Best Skills | Set Bonus | Group Skill |
| Layered Armor Outfit | |||
 | |||
Monster
Quest Information
Palico・Seikret
| Palico | Seikret | Palico Equipment | Palico Layer Armor |
Map
| Locations | |||
|---|---|---|---|
| - | |||
| Facilities | |||
 Windward Plains
 Scarlet Forest
 Oilwell Basin
 Iceshard Cliffs
 The Grand Hub
