 Great Sword
 Long Sword
 Sword and Shield
 Dual Blades
 Hammer
 Hunting Horn
 Lance
Lance Gunlance
 Switch Axe
 Charge Blade
 Insect Glaive
 Bow
Bow Light Bowgun
 Heavy Bowgun
Camp Guide for Monster Hunter Wilds (MH Wilds). Guide includes all camp locations, how to build camps, how to fix camps, uses, features, and more!
Table of Contents
All Camp List and Best Locations
| Table of Contents | |
|---|---|
| ▼Windward Plains | ▼Scarlet Forest |
| ▼Oilwell Basin | ▼Iceshard Cliffs |
| ▼Ruins of Wyveria | |
Windward Plains - Pop-Up Camp Locations

 See Detailed Locations
| Map | Details | |
|---|---|---|
| 1 |  | [Area 9: Lookout Hill] Safety Level: Insecure Cost: 150pts |
| 2 |  | [Area 10: Southeast] Safety Level: Dangerous Cost: 200pts |
| 3 |  | [Area 8: Southeast] Safety Level: Dangerous Cost: 200pts |
| 4 |  | [Area 8: Southwest] Safety Level: Dangerous Cost: 200pts |
| 5 |  | [Area 3: South] Safety Level: Insecure Cost: 150pts |
| 6 |  | [Area 6: Valley Hideaway] Safety Level: Safe Cost: 100pts |
| 7 |  | [Area 13: West] Safety Level: Insecure Cost: 150pts |
| 8 |  | [Area 13: Oasis] Safety Level: Dangerous Cost: 200pts |
| 9 |  | [Area 16: Northwest] Safety Level: Insecure Cost: 150pts |
| 10 |  | [Area 16: Bone Desert] Safety Level: Insecure Cost: 150pts |
| 11 |  | [Area 4: Mineral Cave] Safety Level: Safe Cost: 100pts |
| 12 |  | [Area 4: West] Safety Level: Dangerous Cost: 200pts |
| 13 |  | [Area 14: Underground Water Vein] Safety Level: Safe Cost: 100pts |
*Safety Level = An indicator of the likelihood that the Pop-Up Camp will be destroyed.
There are 13 Pop-Up Camps locations in Windward Plains. You can have up to 5 active camp locations at a time once you progress the game.
Windward Plains Map GuideWindward Plains - Recommended Camp Locations
| Location | Details |
|---|---|
| [Area 4: Mineral Cave] Safety Level: Safe Cost: 100pts |
| [Area 14: Underground Water Vein] Safety Level: Safe Cost: 100pts |
The recommended locations for setting up a Pop-Up Camp in Windward Plains are 'Area 4: Mineral Cave' and 'Area 14: Underground Water Vein.' Both locations are safe, so they're unlikely to get destroyed once you set up your camp.
Camps in Area 16 are Also Possible
| Location | Details |
|---|---|
| [Area 16: Northwest] Safety Level: Insecure Cost: 150pts |
| [Area 16: Bone Desert] Safety Level: Insecure Cost: 150pts |
Any remaining camp slots should be used to place a camp in either location within Area 16. While the security level is Insecure and there is a risk of destruction, the advantage is that it allows for Fast Travel to distant areas from the Base Camp.
Scarlet Forest - Pop-Up Camp Locations
 See Detailed Locations
| Location Image | Details | |
|---|---|---|
| 1 | 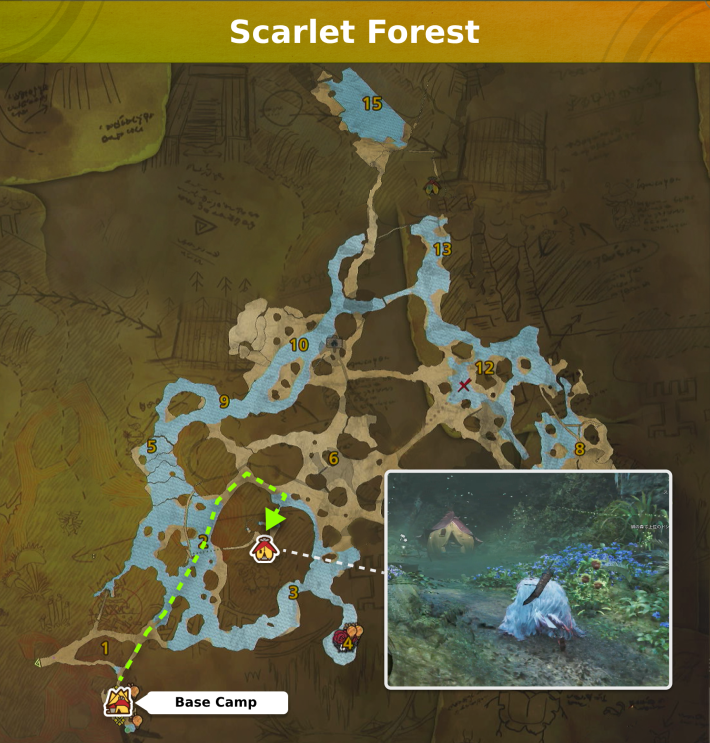 | [Area 6 – Flowering Rocks] Safety Level: Safe Cost: 25 pts |
| 2 |  | [Area 10 – Southwest] Safety Level: Dangerous Cost: 75 pts |
| 3 |  | [Area 10 – Bower of the Great Tree] Safety Level: Dangerous Cost: 75 pts |
| 4 |  | [Area 8 – South] Safety Level: Dangerous Cost: 75 pts |
| 5 |  | [Area 8 – Underground Lake] Safety Level: Safe Cost: 25 pts |
| 6 |  | [Area 12 – Northeast] Safety Level: Unstable Cost: 50 pts |
| 7 |  | [Area 18 – West] Safety Level: Safe Cost: 25 pts |
| 8 |  | [Area 18 – Tree Platform] Safety Level: Safe Cost: 25 pts |
| 9 |  | [Area 14 – Southwest] Safety Level: Dangerous Cost: 75 pts |
| 10 |  | [Area 17 – Great Lakeside] Safety Level: Unstable Cost: 50 pts |
| 11 | 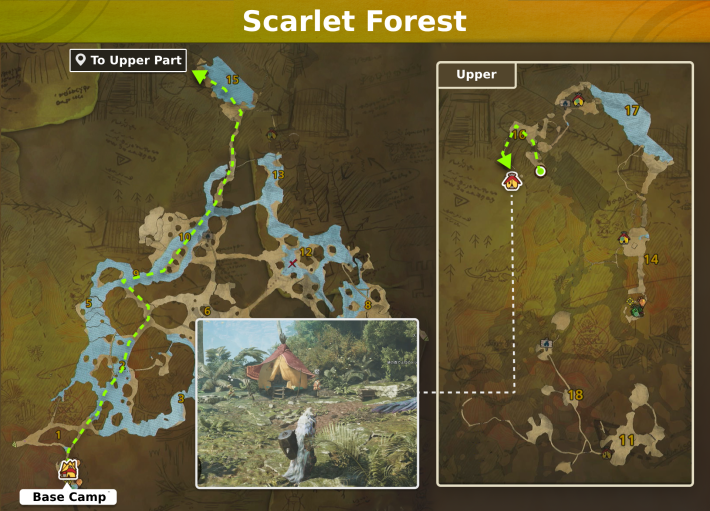 | [Area 16 – Hidden Waterfall] Safety Level: Safe Cost: 25 pts |
| 12 |  | [Area 16 – Ruin Interior] Safety Level: Safe Cost: 25 pts |
*Safety Level = Indicates the likelihood of a Pop-Up Camp being destroyed.
There are 12 potential locations to set up Pop-Up Camps in the Scarlet Forest area of Monster Hunter Wilds. As the story progresses, you can have up to five Pop-Up Camps active at the same time.
Scarlet Forest Map GuideCamp Locations Useful for Farming Guild Points / Money
| Location Image | Details |
|---|---|
| [Area 8 – Underground Lake] Safety Level: Safe Cost: 25 pts |
| [Area 16 – Ruin Interior] Safety Level: Safe Cost: 25 pts |
The recommended camp locations in Scarlet Forest for Monster Hunter Wilds are "Area 8 Cave Lake" and "Area 16 Ruins Interior." At the lake inside the cave, Platinumfish and Goldenfish appear frequently and can be captured with the Capture Net, making it an excellent place to farm both Guild Points and money.
How to Farm Guild PointsCamp Locations Convenient for Traveling
| Location Image | Details |
|---|---|
| [Area 6 – Flowering Rocks] Safety Level: Safe Cost: 25 pts |
| [Area 12 – Northeast] Safety Level: Unstable Cost: 50 pts |
| [Area 18 – Tree Platform] Safety Level: Safe Cost: 25 pts |
| [Area 17 – Great Lakeside] Safety Level: Unstable Cost: 50 pts |
If you want to move around Scarlet Forest comfortably, the four locations above are recommended. They make it easier to access different areas, allowing you to pursue monsters even if they move long distances quickly.
Oilwell Basin - Pop-Up Camp Locations
 See Detailed Location
| Location Image | Details | |
|---|---|---|
| 1 |  | [Area 4 - Dilapilated Roadway] Safety Level: Dangerous Cost: 75pts |
| 2 |  | [Area 2 - Canyon Divide] Safety Level: Safe Cost: 25pts |
| 3 |  | [Area 8 - Middle Strata North] Safety Level: Dangerous Cost: 75pts |
| 4 |  | [Area 9 - Middle Strata South] Safety Level: Unstable Cost: 50pts |
| 5 |  | [Area 13 - Limestone Cavern] Safety Level: Safe Cost: 25pts |
| 6 |  | [Area 15 - Lower Strata North] Safety Level: Dangerous Cost: 75pts |
| 7 |  | [Area 12 - Crimson Rivulet] Safety Level: Safe Cost: 25pts |
| 8 | 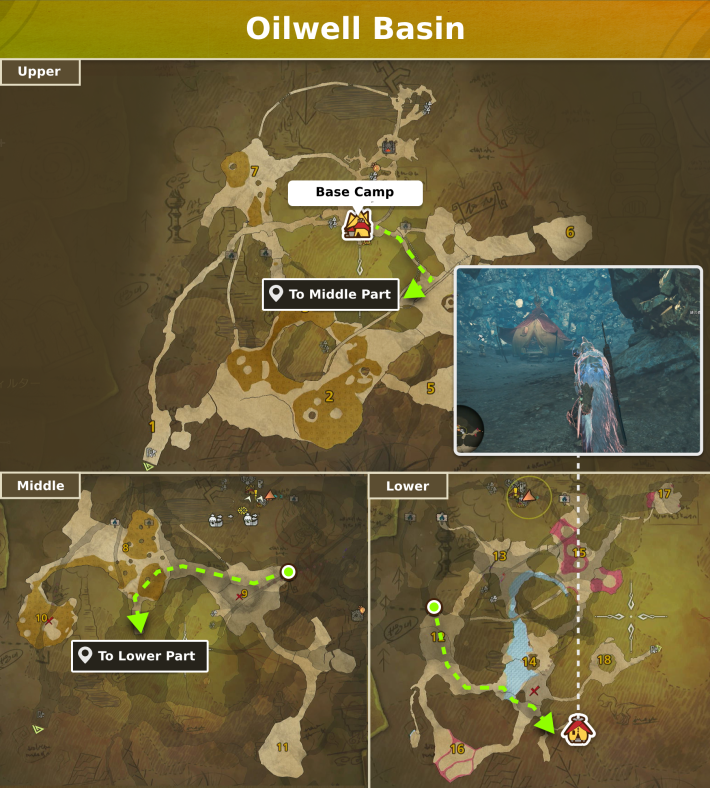 | [Area 14 - Mining Cave] Safety Level: Safe Cost: 25pts |
* Safety Level = A rough indication of how likely the Pop-Up Camp is to be destroyed
There are 8 possible Pop-Up Camp locations in Oilwell Basin in Monster Hunter Wilds. You can set up to 5 Pop-Up Camps simultaneously depending on your story progress.
Oilwell Basin Map GuideOilwell Basin - Recommended Camp Locations
| Location Image | Details |
|---|---|
| [Area 8 - Middle Strata North] Safety Level: Dangerous Cost: 75pts |
| [Area 9 - Middle Strata South] Safety Level: Unstable Cost: 50pts |
| [Area 12 - Crimson Rivulet] Safety Level: Safe Cost: 25pts |
| [Area 14 - Mining Cave] Safety Level: Safe Cost: 25pts |
If you want to travel comfortably through Oilwell Basin, the above four locations are highly recommended. They provide easier access to each area, making it simpler to track monsters when they move across large distances.
Iceshard Cliffs - Pop-Up Camp Locations
 See Detailed Locations
| Location Image | Details | |
|---|---|---|
| 1 |  | [Area 7 - Watchtower] Safety Level: Safe Cost: 25pts |
| 2 |  | [Area 19 - Floating Rock Wall] Safety Level: Safe Cost: 25pts |
| 3 |  | [Area 15 - Upper Corridor] Safety Level: Safe Cost: 25pts |
| 4 |  | [Area 6 - North] Safety Level: Dangerous Cost: 75pts |
| 5 |  | [Area 18 - Sinkhole] Safety Level: Safe Cost: 25pts |
| 6 |  | [Area 20 - Ancient Room] Safety Level: Safe Cost: 25pts |
| 7 |  | [Area 1 - Icy Shore] Safety Level: Safe Cost: 25pts |
*Safety Level = Indicator of the likelihood of Pop-Up Camp destruction
There are 7 locations where you can set up a Pop-Up Camp in Iceshard Cliffs in Monster Hunter Wilds. Depending on story progression, you can have up to 5 camps set up at the same time.
Iceshard Cliffs Map GuideRecommended Camps Near Ancient Relics
| Location Image | Details |
|---|---|
| [Area 20 - Ancient Room] Safety Level: Safe Cost: 25pts |
| [Area 18 - Sinkhole] Safety Level: Safe Cost: 25pts |
The recommended camp locations in Iceshard Cliffs are "Area 18 Sinkhole" and "Area 20 Ancient Room". Both locations are close to Ancient Relics, making them convenient for collecting "Dragonscale Vases." Dragonscale Vases are used to exchange for "Suja Textiles," a material required to craft the armor piece Suja Sash α.
Area 7 "Watchtower" Has Nearby Honey
| Location Image | Details |
|---|---|
| [Area 7 - Watchtower] Safety Level: Safe Cost: 25pts |
At "Area 7 Watchtower," you’ll find Honey, which is an important item for crafting, right in front of you. There are also two nearby Mining Outcrops, making it a great spot for gathering materials.
The Rest Are Safe Except Area 6 North
| Location Image | Details |
|---|---|
| [Area 1 - Icy Shore] Safety Level: Safe Cost: 25pts |
| [Area 19 - Floating Rock Wall] Safety Level: Safe Cost: 25pts |
| [Area 15 - Upper Corridor] Safety Level: Safe Cost: 25pts |
In Iceshard Cliffs, all Pop-Up Camp locations are safe except "Area 6 North." To avoid having your camp destroyed, it's better to set up in one of the safer areas. Area 1 Ice by Water is slightly farther from the Base Camp, making it useful as a travel hub.
Ruins of Wyveria - Pop-Up Camp Location
 See Detailed Location
| Location Image | Details | |
|---|---|---|
| 1 |  | [Area 2 - Crumbling Structures ] Safety Level: Safe Cost: 25pts |
| 2 |  | [Area 6 - Remnant Grove] Safety Level: Dangerous Cost: 75pts |
| 3 |  | [Area 6 - Southeast Section] Safety Level: Safe Cost: 25pts |
| 4 |  | [Area 6 - Secluded Ruins] Safety Level: Safe Cost: 25pts |
| 5 |  | [Area 8 - Gap in Rubble] Safety Level: Safe Cost: 25pts |
| 6 |  | [Area 9 - Entangled Canopy] Safety Level: Safe Cost: 25pts |
| 7 |  | [Area 13 - Hidden Cave] Safety Level: Safe Cost: 25pts |
*Safety Level = Indicator of the likelihood of Pop-Up Camp destruction
There are seven locations where you can set up a Pop-Up Camp in Ruins of Wyveria in Monster Hunter Wilds. You can have up to four camps simultaneously as you progress through the story.
Ruins of Wyveria Map GuideLocations Near Bonepiles
| Location Image | Details |
|---|---|
| [Area 8 - Gap in Rubble] Safety Level: Safe Cost: 25pts |
| [Area 6 - Remnant Grove] Safety Level: Dangerous Cost: 75pts |
The recommended Pop-Up Camp locations in Ruins of Wyveria are [Area 8 Gap in Rubble] and [Area 6 Remnant Grove]. You can occasionally obtain "Tough Guardian Bone", a material used for crafting and upgrading armor, from nearby Bonepiles. However, Remnant Grove has nearby Bonepiles and Honey spots but is more prone to camp destruction, making it less ideal for players who want to avoid frequent repairs.
Fishing Spot Right in Front
At [Area 13 Hidden Cave], there’s a fishing spot right in front of the camp. Since the fish are extremely close, you can capture them using a Capture Net without needing a Fishing Rod.
Locations Near Honey
| Location Image | Details |
|---|---|
| [Area 2 - Crumbling Structures ] Safety Level: Safe Cost: 25pts |
[Area 2 Crumbling Structures] has several Honey gathering points nearby. If you’re short on Honey, setting up camp here is highly recommended.
Honey - How to Get & UseWhat to Do if Your Camp is Destoyed
Wait for It to be Automatically Repaired

Destroyed Pop-Up Camps automatically get repaired after a certain amount of time. If you don't have anything urgent to do, head somewhere else and wait for the camp to be repaired.
Instantly Repair with Research Points

If you want to repair a Pop-Up Camp right away, head to its location and ask the Palico next to the camp to repair it immediately. This will use Research Points, but you can use it as a camp without having to wait.
Cannot be Repaired with Monsters Nearby
If there are monsters nearby, the Palico will not appear and the camp cannot be repaired. If you defeat the monsters or drive them away with a Dung Pod, the Palico will appear to repair it.
Remove & Build Somewhere Else

If you don't need the destroyed Pop-Up Camps, you can just remove it. If removed, the amount of points required to build the camp in the same location will increase until a certain period of time has passed.
Rebuild in a Safe Location

If you do not want your camp to be destroyed, it's recommended to avoid building it in a location deemed 'insecure' or 'dangerous'. Remove the camps that are frequently destroyed and no longer unusable, and then move it to a safe location.
How to Set Up Camp
Go to the Site and Use the Camping Kit

Pop-Up Camps can be set up by going to the proposed camp site and using the "Camping Kit". You can only place up to 4 Pop-Up Camps, so it's recommended placing them in a location that will be useful to use as a base.
Removing Camps
Pop-Up Camps can be removed by talking to the Palico found next to the camp. The Palico can only remove the camp in that spot, so you will have to travel there.
Pop-Up Camp - How to Return/Fast Travel

| Method 1 | Select from Fast Travel List |
|---|---|
| Method 2 | Select a Fast Travel Point on the Map |
| Method 1 | Select from Fast Travel List M → A or D → F → Choose Destination → F |
|---|---|
| Method 2 | Hover Over a Fast Travel Destination on the Map & Select It M → Place Cursor on Destination → F |
On the Map screen, open the Fast Travel destination list and select either the Base Camp or a Pop-Up Camp to return easily. You can also Fast Travel by moving the cursor directly over the camp icon on the map.
How to Fast Travel GuideSet a Waypoint

If you set the camp icon as a Waypoint on the Map, you can return using Seikret's auto-movement. However, you need to ride the Seikret to the destination, so it will take longer than using Fast Travel. This method is useful if you want to gather materials on your way back or if you wish to pass some time.
Pop-Up Camp - Uses & Features
Functions Similar to the Base Camp
| Function | Details |
|---|---|
| Item Related | - Place/Remove Items from Item Pouch - Craft Items - Check/Sell Items - Item Shortcut Changes |
| Equipment Related | - Change Armor/Weapon (▶ All Weapon Types List) |
| Palico Related | - Palico Standby Settings - Change Palico Armor/Weapon |
| Food Related | - Cook/Eat Food |
| Quest Related | - Select/Start Quests |
| Time Change | - Change in-game time (Night to Day, etc.) |
| Appearance Related | - Change Hunter Appearance - Change Palico Appearance |
The Pop-Up Camps offer similar functions to the Base Camp. This is a convenient version since you can use all the functions at different locations on the map!
There is a Limit to How Many Can Be Set Up
There can only be up to 4 active Pop-Up Camps around the map at a time. Use this when you're hunting for Monsters that only appear under certain season conditions!
Change the Time & Weather
When you take a break at a Pop-Up Camp, you can spend Guild Points to change the time of day and related to this, the season. Use this when you're hunting for Monsters that only appear under certain conditions!
How to Check & Change Weather EnvironmentCan be Used as a Fast Travel Point
Pop-Up Camps can be used to fast travel across the map. If you set up a camp near a monster's location or materials, you can easily get to them!
How to Fast Travel GuideCan be Destroyed by Monsters

Unlike in previous games, the Pop-Up Camps can be destroyed by monsters. If it is destroyed, it will no longer function as a camp. Destroyed Pop-Up Camps will be automatically repaired after a certain amount of time or can be fixed immediately if you use points.
Customize the Camp
- Pop-Up Camp Design
- Pop-Up Camp & Surrounding BGM
Change the Design

You can change how the camp looks in various ways. You can change the color and style for each of the parts.
Design Examples
| Overall Design | |
|---|---|
 |  |
| Surroundings | |
 |  |
Change the Music

You can change the music that plays near and inside the camp. Choose the music to your liking!
Monster Hunter Wilds Related Articles


