 Great Sword
 Long Sword
 Sword and Shield
 Dual Blades
 Hammer
 Hunting Horn
 Lance
Lance Gunlance
 Switch Axe
 Charge Blade
 Insect Glaive
 Bow
Bow Light Bowgun
 Heavy Bowgun
Chapter 1 Quest Guide for Monster Hunter Wilds (MH Wilds). Read to learn about mission details, unlock conditions, and monster strategies to assist in your hunting adventures.
| Current | Next▶ |
|---|---|
| Chapter 1 | Chapter 2 |
Table of Contents
Chapter 1-1: Desert Trotters Guide
Chapter 1-1 Strategy Chart
- Rescue the girl.
- Stagger the monster.
- Shake off the monsters.
- Talk to Alma *Select your preferred weapon type
- Optional: Try out other weapons
▶List of Weapon Types. - Ride Seikret.
- Track the scent of her brother.
- Defeat Chatacabra.
- See how the two are doing
- End of Tutorial. - Talk to Y'sai and Nono.
- Clear Chapter 1-1.
Rescue the Girl

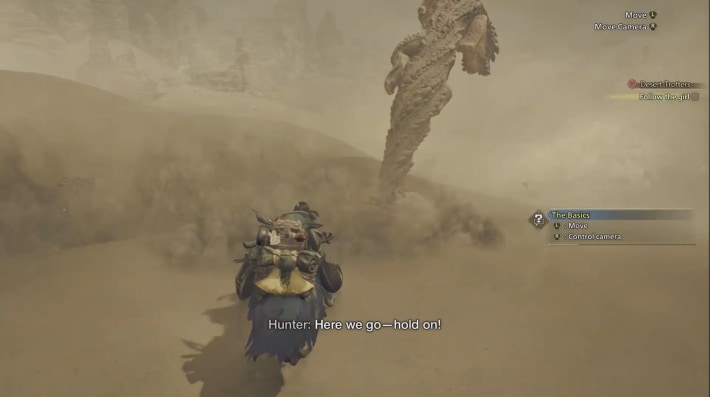
The game starts with you riding the Seikret, your trusty mount, as it automatically navigates you towards the checkpoint. You can perform minor left and right movements and adjust the camera, but you cannot move freely.
Stagger the Monster

| Controls 1 | Hold + |
|---|---|
| Controls 2 | Hold + |
Rescue the girl being pursued by the monster. Aim at the Wyvern and use the Hook Slinger to obtain a Screamer Pod. Aim at the Balahara and shoot a Screamer Pod at the monster and help the girl.
Shake Off the Monsters

After rescuing the girl, the Seikret will automatically run to the next checkpoint. You can use Screamer Pods to stagger the monsters but you can clear this part without doing anything.
Talk to Alma

You can change weapons by talking to Alma. You can choose your favorite weapon, or if you're undecided, answer Alma's questions to get a recommended weapon. You can still acquire weapons you didn't select here, so you can choose later if you want.
Weapon Type Tier ListPractice Using Other Weapons

To the right of Alma, you'll find barrels for practicing weapon controls and combos.
| How to Use Each Weapon Type | |||
|---|---|---|---|
Ride the Seikret and Track the Scent of Her Brother

| Controls | Ride the Seikret (Auto-Move) |
|---|
Approach Seikret and press up on the D-pad to ride. It will automatically track the brother's scent to reach the objective.
Seikret Mount GuideDefeat Chatacabra

The battle with Chatacabra in Chapter 1 serves as a tutorial for combat. You can follow the on-screen instructions to easily defeat the monster or use this opportunity to practice using your weapon.
Chatacabra Strategy Tips
Most of Chatacabra's attacks have a short range and can be easily avoided by stepping away. Be cautious though, some of its attacks have a slightly long range.
Chatacabra GuideDon’t Forget to Carve Chatacabra

| Controls | Sheathe Weapon Carve |
|---|
You can harvest materials from the carcass of the defeated Chatacabra. These materials can be used to craft weapons and armor, so don't forget to collect them.
| Related Articles | |
|---|---|
| Best Build for Each Weapon | Weapon Types List |
See How the Two Are Doing

Go to the hole where the two are hiding to check on them. You can follow the yellow light to reach it, but if you're not sure where it is, you can ride Seikret to move there automatically. This completes the tutorial.
Chapter 1-1 Rewards
Mission Reward
| Chatacabra Hide×3 Lifepowder×5 |
Chapter 1-2: Village of Whispering Winds Guide
Chapter 1-2 Strategy Chart
- Talk to guild members (3 people)()└Optional: Talk to Nata
└Optional: Head to Training Area
Unlocks
- Support Desk (DLC Content)
- Training Area / Smithy - Go to the Expedition Command Tent
- Enter your personal tent
Unlocks
- Multiplayer / Lobby / Link Party - Talk to Alma.
- Follow Y'sai
└Optional: Observe monsters. - Harvest honey.
- Follow Y'sai.
- Follow Alma.
- Slay Bulaqchi (Small monster).
- Return to Base Camp.
- Talk to Jack, the Supply Officer
Unlocks
- Ghillie Mantle - Talk to Gemma
[Unlocks]
- Weapon Enhancement - Get ready and talk to Alma.
- Head to the location where the distress signal was raised.
- Hunt Quematrice
└Optional: Use Paratoad
└Optional: Use VineTrap
[Unlocks]
- HR1→2
- Seikret
・Secondary weapon switching - Talk to Tom, the food distributor()
Unlocks
- Ingredient Center - Talk to Ferdinand the Researcher.()
Unlocks
- Monster Compendium - Talk to Y'sai.
└Optional: Talk to Nata
└Optional: Talk to Alma - Follow Y'sai.
- Talk to Elder Ela.
- Talk to the woman tending the fire.
- Talk to Y'sai.
- Complete Chapter 1-2 with a Meal after talking to Y'sai.
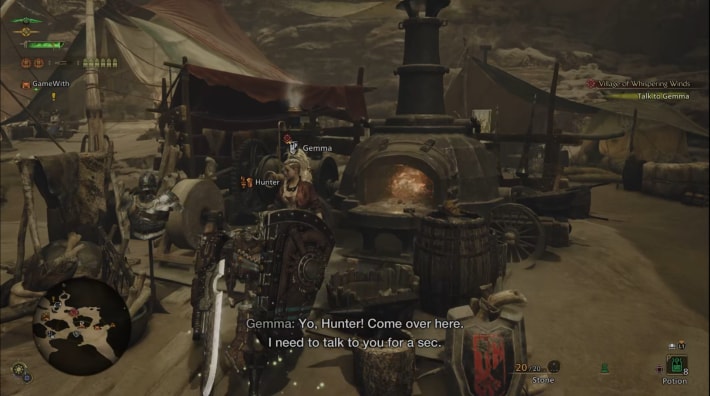
Talk to guild members

Talk to the three guild members inside the Base Camp, Olivia, Gemma, and Jack. It's optional, but you can also engage in a conversation with Nata to enhance your story experience. The target character is marked with a red icon and appears on the map.
NPC Appearance
| Olivia | Gemma (Smithy) |
|---|---|
 |  |
| Jack (Provisions Stockpile) | Nata |
 |  |
Talk to Olivia to unlock the Training Area, where you can practice with your weapon. Meanwhile, talking to Gemma will unlock the Smithy, allowing you to enhance and produce Equipment.
Go to the Expedition Team Headquarters Tent

Enter the Expedition Team Headquarters tent located at the back of the base camp.
Enter the tent

Exit the Expedition Team Headquarters tent and enter your personal tent on the left. Here, you can "organize items" and "accept and participate in quests."
Tent Guide - Location and FeaturesMultiplayer and Other Online Features

Once you exit the tent, multiplayer, lobby, friend, and Link Party online features will be unlocked. This will allow you to accept multiplayer quests.
How to Play in MultiplayerFollow Y'sai

| Controls | Sprint |
|---|
Ride the Seikret and follow Y'sai. It will move automatically, so there's no need for you to control it. During conversations with NPCs, the movement will be slow, but after the conversation ends, you can press the R1 button to sprint.
Collect Honey

| Controls | Press to Gather |
|---|
If you follow Y'sai, you will automatically arrive at the point where you get off from Seikret. There are three spots around where you can gather freshly harvested Honey, so approach them and press the ◯ button to gather them.
Follow Y'sai
| Controls | Ride the Seikret |
|---|
Get back on Seikret and follow Y'sai. Once again, it will move automatically, so there's no need to control it yourself.
Follow Alma

After the event, Alma will start moving, so follow her. From this point, you cannot use auto-movement with Seikret, so you'll need to control your character manually.
Slay Bulaqchi

As you follow Alma, you will encounter insect-like monsters called Bulaqchi in battle. Defeating seven of them will clear the mission and trigger a cutscene.
Return to Base Camp

Return to the Base Camp. Alma will lead the way, but if you can't find the path, follow the yellow path markers emitted by "Scoutflies."
Talk to Jack, the Supply Officer

After returning to camp, talk to Jack, the provisions officer directly to your left. He'll give you hunting tools that are useful for your hunts, and the Provisions Stockpile will be unlocked, allowing you to purchase items.
Provisions Stockpile Guide| Hunting Tools | |
|---|---|
| Portable BBQ Grill | Fishing Rod |
| Binoculars | Capture Net |
| Throwing Knife | Paint Pod |
| Ghillie Mantle | |
Talk to Gemma
Talk to Gemma, the Smithy, who is near Jack. You'll receive 2 Iron Ores, allowing you to upgrade your current weapon by one level. You'll soon be facing a large monster, so make sure to upgrade your preferred weapon type.
Upgrading Weapons Are Optional
This weapon upgrade tutorial is optional, so you can cancel it by exiting the upgrade screen. The materials used are easy to acquire, so upgrading is not an issue, but if you haven't chosen your weapon type and want to save materials, you can postpone the upgrade.
Get ready and talk to Alma

Talk to Alma outside of the Base Camp. Since a large monster battle is coming up, make sure to refill recovery items at the Provisions Stockpile and upgrade your equipment at the Smithy.
Head to the Location Where the Distress Signal Was Raised

Once the cutscene has ended, go to the area where the distress signal was raised. It's located on the southern side of Area 8, so follow the Scoutflies or refer to the map above.
You Can Dash Off the Cliff

| Dash Controls | Hold |
|---|
You can easily reach the Waypoint by leaping off the cliff just behind Alma. When you dash towards the cliff, you'll automatically jump off.
Hunt Quematrice

Upon reaching the Waypoint, a battle with "Quematrice" will begin. Watch out for its tail attack, which ignites Fire and inflicts Fireblight, leading to damage-over-time (DOT). Focus on evading this attack to reduce unnecessary damage.
Seikret and Secondary Weapons
Defeating Quematrice will automatically return you to the Base Camp. After that, you will be able to freely ride the Seikret and equip a secondary weapon.
Hunter Rank Increased to 2
By increasing your Hunter Rank, you will unlock the next chapters, Quests, and various features. As you progress the story, your rank will automatically go up, so prioritize advancing the story.
How to Raise Hunter RankTalk to Tom and Ferdinand

Supply Officer Tom is located near the Provisions Stockpile, while Ferdinand the Researcher can be found inside the Expedition HQ Tent. Refer to the image above to find them.
Cooking Meals

Talk to Tom to unlock cooking. This will enhance your Health, Stamina, and Attack, allowing you to take on quests in a fortified state. Don’t forget to cook meals before battling tough opponents.
How to Cook Meals GuideHunter's Notes
Talking to Ferdinand will unlock the Hunter's Notes. This will provide you with information on the monster's weaknesses and features, as well as the materials you can carve from them.
List of All MonstersFollow Y'sai
Talk to Y'sai at the entrance of the Base Camp and follow him. The Seikret will automatically begin moving, so there's no need for you to control it.
Talk to Elder Ela and the Woman Tending the Fire

Talk to Elder Ela and Amone, the woman tending the fire. Use the image above to find their location.
NPC Appearance
| Elder Ela | Woman Tending the Fire |
|---|---|
 |  |
Talk to Y'sai

Head north from Amone to find Y'sai and talk to him. Finishing the event will complete Chapter 1-2 .
Chapter 1-2 Rewards
Mission Reward
| Kunafa Cheese Bitterbug Broth×5 Earth Crystal×3 Guild Points×20 Gestures “Seikret Stand” Gestures “Tend to Seikret” Gestures “Tend to Seikret" variant |
Other Rewards
| Portable BBQ Grill Fishing Rod Binoculars Capture Net Throwing Knife Paint Pod Ghillie Mantle |
Features Unlocked in Chapter 1-2
| - Training Area (Olivia) - Smithy (Gemma) - Support Desk (Claim DLC) - Link Party - Lobby - Multiplayer - Ghillie Mantle After defeating Quematrice - HR1→2 - Seikret - Weapon Switching - Ingredient Center (Tom) - Hunter's Notes (Ferdinand) |
Chapter 1-3: Forest Findings Guide
Chapter 1-3 Strategy Chart
- Head toward the forest()└Optional: Explore the area to find the monster to hunt.
- Head to the forest
Unlocks
- Scarlet Forest Map
- Ingredient Center (Support Desk). - Talk to Eric
└Optional: Talk to Nata. - Head to the camp site.
Unlocks
- Pop-Up Camp. - Follow Doshaguma traces.
- Hunt the Lala Barina.
- Talk to Gemma.
- Return to the Pop-up Camp.
- Go with the Lynians
└Optional: Survey the forest. - Talk to the Lynian Negotiator.
- Search for the Congalala.
- Hunt the Congalala.
- Clear Chapter 1-3 by talking to Plumpeach
Unlocks
- Side Missions.
Head Toward the Forest

You can clear the path to the forest by moving through the trail in Area 10 of Windward Plains. If you need help finding the Waypoint, use the route provided above.
Head Toward the Forest Quest GuideYou Can Arrive Easily With Auto-Movement

If you set a map marker near area 10 as a waypoint, you can easily reach it using Seikret's auto movement.
Steps
- Open Windward Plains Map
- Set map marker.
- Navigate using Seikret's auto movement.
Restart the Game if Seikret’s Auto-Move Isn’t Working
There is a bug where you may lose control of Seikret while heading towards the forest. Restarting the game will fix the issue if you can't move.
Aim for the Forest

Upon arriving at the point leading to the forest, you will automatically move towards the forest. Seikret will handle the auto-movement, so no player control is necessary.
Talk to Eric

Talk to Eric near the exit of the Base Camp.
Head to the Camp Site

Head to the camp site. Follow behind Eric and Olivia, but if you happen to lose track of them, use the Scoutflies to find your way.
Pop-Up Camp

When you reach the camp site, Pop-Up Camp will be unlocked. A Pop-Up Camp serves as a Fast Travel point, a place to change Equipment, and a revival point if you faint. Setup locations are fixed, and the total number is limited, so choose a convenient location whenever you set these camps up.
List of the Best Camping LocationsFollow Doshaguma Traces

Follow the traces of Doshaguma scattered across the field. If you have trouble locating them, use the Scoutflies as a guide.
Hunt the Lala Barina

Upon entering Scarlet Forest, you'll face Lala Barina. In its enraged state, its torso blooms like a rose. During this phase, it scatters cotton and causes Paralysis. Recover from Paralysis quickly by repeatedly moving the L-stick.
Talk to Gemma

Talk to Gemma at the Smithy. You'll receive materials for weapon upgrades, so enhance your current equipment.
Return to the Pop-up Camp

Return to the Pop-Up Camp you set up earlier. Open the Map and Fast Travel to the Pop-Up Camp in Area 7.
Go with the Lynians
Arriving at the Pop-Up Camp will trigger the event. Afterward, you will ride Seikret and follow the Lynians automatically.
Talk to the Lynian Negotiator

Enter the Lynians' base and talk to the negotiator Plumpeach located in the back left corner of the base.
Search for the Congalala
Find Congalala using Seikret's auto-movement to navigate the map. As you near the destination, you will automatically be dismounted from Seikret, and when you walk closer, a cutscene will start.
Hunt the Congalala

You'll face Congalala. Its notable attacks involve farting and breath attacks. Getting hit by these attacks causes the Stench status ailment, which disables the use of consumable items. This status ailment wears off in time, but using a Deodorant will instantly cure it.
Side Mission
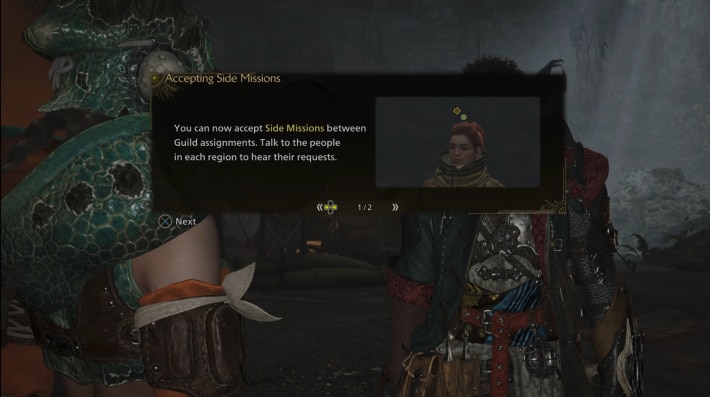
Defeat Congalala and watch the cutscene to clear Chapter 1-3. From this point, you can accept Side Missions, so take on challenges between story segments.
Side Mission “Fishing: Life in Microcosm”

After defeating Congalala, you can accept the Side Mission, "Fishing: Life in Microcosm" by speaking with Kanya near the water at the Base Camp in Scarlet Forest.
Fishing StrategiesChapter 1-3 Rewards
Mission Reward
| Droolshroom×3 Lifepowder×5 Sturdy Bone×3 Guild Points×30 |
Features Unlocked in Chapter 1-3
| - Scarlet Forest Map - Ingredient Center (Support Desk) - Pop-Up Camp After defeating Congalala - Side Quests - Side Quest Fishing: Life in Microcosm |
Chapter 1-4: The Investigation Continues
Chapter 1-4 Strategy Chart
- Talk to Alma.
- Head to the oasis.
- Escape from the Balahara.
└Drive off the Balahara. - Hunt Balahara.
- Follow the pack.
- Draw the attention of Doshaguma (Alpha).
- Hunt Doshaguma (Alpha).
- Return to Windsong Village Kunafa
Unlocks
- HR2→3
- Side Quest: Dareel's Research Report
- Seikret Customization
- Item Trade
Talk to Alma

Talk to Alma at the Base Camp in Scarlet Forest. A cutscene will begin, and you will automatically be transported to Kunafa in Windward Plains.
Head to the Oasis
You will automatically ride Seikret and move towards the oasis. It will automatically navigate to the objective, so no player control is needed.
Escape from the Balahara

A cutscene will start shortly after leaving the village. You will be chased by a herd of Balahara, but the Seikret will automatically head towards the object, so there's no need for player control.
Hunt Balahara

Engage in a battle with Balahara in the oasis. If Balahara dives into the sand, use a Slinger: Screamer Pod or Item: Sonic Bomb to pull it back to the surface. It will be vulnerable for a limited time, so make sure you're properly equipped and prepared before the fight.
Follow the Pack

Defeating Balahara will trigger a cutscene, and afterward, you will chase a herd of Doshaguma. Seikret will automatically head to the objective, but there is an instance in the game where a giant rock will be dropped, so be alert.
Draw the Attention of Doshaguma (Alpha)

Alpha Doshaguma will appear. Doshaguma is focused on small monsters, so deal some damage to get its attention. Afterward, ride the Seikret to automatically escape from Alpha Doshaguma.
Hunt Doshaguma (Alpha)

You'll face Alpha Doshaguma right after the cutscene ends. Its hind legs are its weakest parts and easy to wound. Focusing attacks on the wounds creates greater chances to exploit openings.
Return to Windsong Village Kunafa

Ride Seikret back to Kunafa. Watching the cutscene in the village will complete Chapter 1-4.
Item Trade

Talking to a woman named Kilama in Kunafa will unlock "Item Trade," where you can barter items. NPCs that offer Item Trade exist in various locations, and as you progress through the story, the trade list will expand, so be sure to check regularly.
Item Trade GuideChapter 1-4 Rewards
Mission Reward
Features Unlocked in Chapter 1-4
| After completion - HR2→3 ・Seikret Customization (Nono) ・Item Trade(Kilama) |
Chapter 1 - 5: Pursuit of Solitude
Chapter 1 - 5 Strategy Chart
- Talk to Nata in the Plains Base Camp
- Head deep into the Scarlet Forest.
- Hunt Uth Duna
- Talk to Olivia
└Optional: Carve Uth Duna for material - Complete Chapter 1-5
Talk to Nata in the Plains Base Camp

Fast travel to the Base Camp in the Plains Base Camp and talk to Nata near the entrance.
Side Mission “Dareel’s Research Report”

The Side Mission "Dareel's Research Report" can be accepted after Chapter 1-5 by talking to Dareel at the Base Camp in Windward Plains.
Side Mission: Samin's Special Research Report

The Side Mission "Samin's Research Report" can be accepted after completing "Dareel's Research Report" by talking to Samin at the Base Camp in Windward Plains.
Head Deep Into the Scarlet Forest
Ride the Seikret to automatically navigate deeper into the Scarlet Forest.
Hunt Uth Duna

In Chapter 1-5’s finale, a fight against Uth Duna will take place. When you attack the Water veil surrounding Uth Duna, the damage indicator will turn blue, and the damage received by Uth Duna is reduced. However, if you persist and keep on attacking the veil, it can be broken and Uth Duna's control of water will also be suppressed.
Talk to Olivia

Once you defeat UthDuna, carve the materials before speaking to Olivia. Pay attention because if you talk to her first and chosen the option "Let's depart," you will be sent back to the camp without getting any materials.
Chapter 1-5 Rewards
Mission Reward
Features Unlocked in Chapter 1-5
| - Side Quest Daryl's Research Report - Side Quest Samin's Special Research Report |
| Current | Next▶ |
|---|---|
| Chapter 1 | Chapter 2 |
Summary of Unlocked Features in Chapter 1
Unlocked Features and HR
| Features Unlocked via Quest or Dialogue | |
|---|---|
| 1-2 | - Training Area (Olivia) - Smithy (Gemma) - Support Desk (Claim DLC) - Link Party - Lobby - Multiplayer - Ghillie Mantle After defeating Quematrice - HR1→2 - Seikret - Weapon Switching - Ingredient Center (Tom) - Hunter's Notes (Ferdinand) |
| 1-3 | - Scarlet Forest Map - Ingredient Center (Support Desk) - Pop-Up Camp After defeating Congalala - Side Mission - Side Mission Fishing: Life in Microcosm |
| 1-4 | After completion - HR2→3 ・Seikret Customization (Nono) ・Item Trade(Kilama) |
| 1-5 | - Side Mission Daryl's Research Report - Side Mission Samin's Special Research Report |
List of Unlocked Side Missions
- Fishing: Life, in MicrocosmConditionChapter 1-3LocationScarlet Forest(NPC:Kanya)TargetCatch a fishReward
- Dareel's Research ReportConditionChapter 1-5LocationWindward Plains(NPC:Dareel)TargetCapture a 「Tracktail Lizard」RewardHoneyx10
- Samin's Research ReportConditionChapter 1-5:
Cleared Dareel's Research ReportLocationWindward Plains(NPC:Samin)TargetCapture a 「Dapperwing」Reward
Monster Hunter Wilds Related Articles

Story & Optional Quests
| Main Quest Guides | |||
|---|---|---|---|
| All Quests | Events | Optional Quests | High Rank Quest |
| Field Surveys | Raise HR | End-Game Contents | |
| Quest List by Level Difficulty | |||
| 1 Star Quest | 2 Star Quest | 3 Star Quest | 4 Star Quest |
| 5 Star Quest | 6 Star Quest | 7 Star Quest | |
Walkthrough per Chapter
Full Story Walkthrough and Guide Chapter 1
 Chapter 2
 Chapter 3
 Chapter 4
 Chapter 5
 Chapter 6
Other Quest Guides
| Quest Related | |
|---|---|
| ▶ Collaboration | ▶ Multiple Monster Quests |
| ▶ Gold Crown Quest | ▶ Estimated Clear Time |
| Story Related | |
| ▶ Head Toward the Forest | ▶ Search for the Black Flame |
| ▶ View the Forest from Atop a Tree | ▶ Ferdinand's Location |
| ▶ Olivia's Location | ▶ Murtabak's Location |
| ▶ Tasheen's Location | ▶ Rosso's Location |
| ▶ Zato's Location | ▶ Rove's Location |
| ▶ Rhino's Location | ▶ Werner's Location |
| ▶ Plumpeach's Location | ▶ Estimated Completion Time |

