 Great Sword
 Long Sword
 Sword and Shield
 Dual Blades
 Hammer
 Hunting Horn
 Lance
Lance Gunlance
 Switch Axe
 Charge Blade
 Insect Glaive
 Bow
Bow Light Bowgun
 Heavy Bowgun
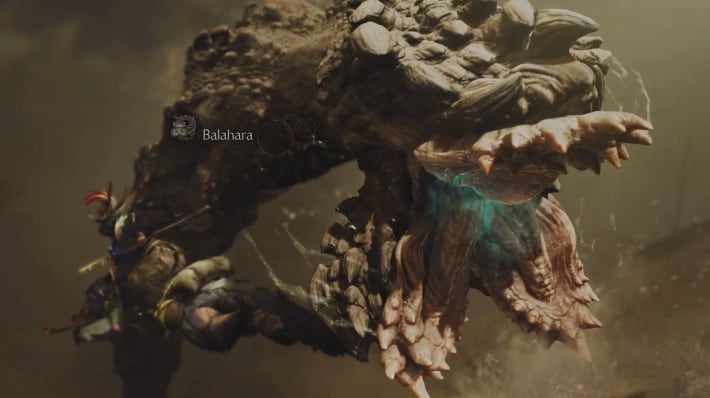
Balahara is a monster in Monster Hunter Wilds (MH Wilds). See weakness, how to unlock, spawn locations, and materials dropped by Balahara.
List of All MonstersTable of Contents
Balahara Weaknesses and Breakable Parts
Balahara Info


Low
None
None
-
-
| Main Habitat | Windward Plains |
|---|---|
| Status Ailments | Waterblight |
| Breakable Parts | Head, Tail |
Weaknesses and Breakable Parts
Hide (Hitzone)
| Parts | | | | | ||||
|---|---|---|---|---|---|---|---|---|
| Head | ||||||||
| Neck | ||||||||
| Torso | ||||||||
| Left Foreleg | ||||||||
| Right Foreleg | ||||||||
| Left Foreleg | ||||||||
| Right Foreleg | ||||||||
| Tail |
Status Ailments Resistances
| Poison | Paralysis | Sleep | Blast | Stun |
|---|---|---|---|---|
| Flash Pod | Shock Trap | Pitfall Trap | Dung Pod | Screamer Pod | Trap Meat |
|---|---|---|---|---|---|
Breakable Parts and Obtained Extracts
| Breakable Parts | Extract | |
|---|---|---|
| Head Region | Head | Red |
| Neck | - | Red |
| Torso | - | Green |
| Leg | - | White |
| Tail | Tail | Orange |
Balahara Unlock Conditions
| ▼ Low Rank | Appears in Chapter 1-4 |
|---|---|
| ▼ High Rank | [HR10~]Unlocked after completing Chapter 4-1 |
Unlocked After Chapter 1-4
Balahara is first hunted in Chapter 1-4: The Investigation Continues. They can be hunted or turned into Investigations or Field Surveys after the chapter.
Chapter 1 Walkthrough and GuideCannot be a Quest Until You Defeat It in the Story
Balahara will start appearing in the field after Chapter 1-2: Village of Whispering Winds. However, they cannot be turned into Investigations until you defeat them in the story first.
High Rank Balahara Unlocked at HR10

High Rank Balahara is unlocked after clearing Chapter 4-1: New Ecosystems, which can be done at HR10. They will start appearing in the field and can then be turned into Investigations.
Chapter 4 Walkthrough and GuideLocations & Conditions
| Map | Plenty | Fallow | Inclemency |
|---|---|---|---|
| ✓ | ✓ | ✓ |
| ‐ | ‐ | ‐ |
| ‐ | ‐ | ‐ |
| ‐ | ‐ | ‐ |
| ‐ | ‐ | ‐ |
*Only those confirmed by the team are posted here
Balahara can only be found in Windward Plains. This applies to both normal and Tempered Balahara.
Balahara Strategy & Tactics
| Table of Contents (Tap to Jump) | |
|---|---|
| ▼Strategy Tips | ▼How to Fight |
Balahara Strategy Tips
How to Fight Balahara
Predict Attacks by Watching Head and Tail Movements
| When Raising Its Head | - Forward Bite Attack - Slow, Wide-Range Bite Attack - Arm Swipe - Left and Right Tracking Bite Attack - Charge Before Spitting Mucus - Side Mucus Spray - Tracking Mucus Attack |
|---|---|
| When Raising Its Tail | - Wide-Range Attacks Like Tail Sweep - Tracking Tail Thrust Stab |
Balahara’s attacks can be predicted based on whether it raises its head or tail. Some attacks slightly track the player, so it's important to constantly reposition, increase Guard or Evade Window, or fight while staying in a fixed position.
Dealing with Attack Combinations from the Monster’s Side
Balahara seamlessly combines attacks from when it raises its head and when it raises its tail. If Balahara moves unpredictably and keeps changing direction, stay on its side to make dodging easier.
Wound the Neck and Legs When Near the front Legs
Since the hitzone from the head to the belly is soft, take advantage of moments when the attacks are not too aggressive to fight near the front legs and wound the neck and legs.
Evade Left or Right After a Rolled-Up Dash Attack
When Balahara curls up, it signals an incoming Dash Attack. Right after the Dash Attack, it will immediately follow up with a mucus attack, so be sure not to lose sight of Balahara.
Move Away When It Starts Charging
The mucus attack after Balahara raises its head and charges is more powerful than its usual mucus attacks. If you are in front of it, evade by moving far away.
Escape Quicksand by Riding Seikret
▲ Seikret allows you to maneuver within the quicksand.
When the ground begins to ripple significantly, it's a sign of an incoming quicksand attack. If you get caught, Balahara will repeatedly perform Dash attacks, so quickly escape by riding Seikret. The camera automatically tracks Balahara, so if escaping on your own, use side evasions effectively.
Seikret - Mount Features, Abilities and Controls GuideScreamer Pod or Sonic Bomb Helps for Escaping
You can also use Screamer Pod or Sonic Bomb to force Balahara out of the quicksand. Utilize this method when you need to rescue immobilized allies.
Balahara Materials and Forgeable Equipment
High Rank Materials
| Target Rewards | Balahara Scale+(20%) Balahara Carapace(20%) Balahara Skull+(13%) Balahara Tail(7%) Torrent Sac(18%) Balahara Certificate S(8%) Balahara Black Pearl(11%) Wyvern Gem(3%) |
|---|---|
| Body | Balahara Scale+(30%) Balahara Carapace(23%) Balahara Skull+(17%) Balahara Tail(11%) Balahara Black Pearl(14%) Wyvern Gem(5%) |
| Tail | Balahara Tail(93%) Wyvern Gem(7%) |
| Rotten Carcass | Monster Keenbone |
Low Rank Materials
| Target Rewards | Balahara Scale(20%) Balahara Shell(20%) Balahara Skull(15%) Balahara Tail(11%) Aqua Sac(18%) Balahara Certificate(8%) Balahara Black Pearl(8%) |
|---|---|
| Body | Balahara Scale(33%) Balahara Shell(25%) Balahara Skull(18%) Balahara Tail(13%) Balahara Black Pearl(11%) |
| Tail | Balahara Tail(100%) |
Monster Hunter Wilds Related Guide

 Mizutsune
 Arch-Tempered Rey Dau
 Lagiacrus
