 Great Sword
 Long Sword
 Sword and Shield
 Dual Blades
 Hammer
 Hunting Horn
 Lance
Lance Gunlance
 Switch Axe
 Charge Blade
 Insect Glaive
 Bow
Bow Light Bowgun
 Heavy Bowgun
Walkthrough guide for the entire main story of Monster Hunter Wilds. Read ahead to see a list of all chapters, what they unlock, and step-by-step guides for the story!
Table of Contents
Story Walkthrough List
Low Rank Story Walkthrough
Chapter 1 Progression
| Monster and Weakness | HR | |
|---|---|---|
| 1-1 |  Chatacabra Chatacabra | - |
| 1-2 | Quematrice | - |
| 1-3 | Lala Barina | - |
| Congalala | - | |
| 1-4 | Balahara | - |
| Doshaguma | - | |
| 1-5 | Uth Duna | - |
HR1→3, Windward Plains, Scarlet Forest, Side Missions, Ghillie Mantle, Smithy, Provisions Stockpile, Ingredients Center, Secondary Weapon, Seikret, Camp Guide, Training Area, Multiplayer...
Chapter 2 Progression
HR3→5, Oilwell Basin, Iceshard Cliffs, Charm (Talisman), Decorations, Armor Upgrade, Rocksteady Mantle...
Chapter 3 Progression
| Monster and Weakness | HR | |
|---|---|---|
| 3-1 | Guardian Doshaguma | - |
| Guardian Rathalos | - | |
| Guardian Arkveld | - | |
| 3-2 | Jin Dahaad | - |
| 3-3 | Guardian Ebony Odogaron | - |
| 3-4 | Xu Wu | - |
| 3-5 | Zoh Shia | - |
HR5→8, Ruins of Wyveria, Melding, Guardian Arkveld Armor, Support Ship, Mending Mantle, Palico Level 25...
High Rank Story Walkthrough
Chapter 4 Progression
* EX stands for Extra Mission
| Monster and Weakness | HR | |
|---|---|---|
| 4-1 | Yian Kut-Ku | 10 |
| 4-2 | Frenzied Nerscylla | 15 |
| 4-3 | Tempered Lala Barina Guardian Fulgar Anjanath | 20 |
| EX | Mizutsune | 21 |
HR8→10 (HR cap raised to 40), High Rank, Wounded Hollow, Frenzy Monsters, Tempered Monsters, Evasion Mantle...
[High Rank Monsters Unlocked]
Chatacabra, Quematrice, Balahara,Congalala, Doshaguma, Rompopolo, Ajarakan, Hirabami, Guardian Ebony Odogaron
[New High Rank Monsters]
Guardian Fulgur Anjanath, Gravios, Rathian, Rathalos, Blangonga, Gypceros
[Unlocked Upon Clearing]
Chatacabra, Quematrice, Lala Barina, Congalala, Balahara, Rompopolo, Nerscylla, Yian Kut-Ku, Gypceros, Rathian
Chapter 5 Progression
| Monster and Weakness | HR | |
|---|---|---|
| 5-1 | Jin Dahaad | HR32 |
| 5-2 Part 1 | Uth Duna [ Rey Dau Nu Udra | HR35 |
| 5-2 Part 2 | Tempered Blangonga Gore Magala | After part 1 | 5-3 | Increase Hunter Rank to 40 | After 5-2 Part 2 |
Artian Weapons, Corrupted Mantle
High Rank Monsters Unlocked
Guardian Doshaguma, Guardian Rathalos,Xu Wu
New High Rank Monsters
Jin Dahaad, Rey Dau, Uth Duna, Gore Magala
Tempered Monsters Unlocked at HR 32
Chatacabra, Quematrice, Lala Barina, Congalala, Balahara, Rompopolo, Nerscylla, Yian Kut-Ku, Gypceros, Rathian
Chapter 6 Progression
HR cap raised to 999, Rarity 8 equipment, Decoration Melding
New High Rank Monsters
Arkveld, Zoh Shia
Unlocked After Completing the Game
All Tempered Monsters unlocked.
The story of Monster Hunter Wilds consists of six chapters. Additionally, from Chapter 4 onward, you can progress by increasing your HR.
How Long is Monster Hunter Wilds Story?
| Time to Complete | 20 to 30 Hours |
|---|
It takes about 20 to 30 hours to complete the story of Monster Hunter Wilds. If you enjoy the story, raise your HR, and progress smoothly, it will take roughly 20 hours. If you decide to play at your own pace, it will take about 30 hours.
Chapter 1 Story Walkthrough
 Chapter 1 Walkthrough
Chapter 1-1 Desert Trotters
- Chase the girl
- Stagger the monster
- Shake off the monsters
- Talk to Alma*Choose your weapon type
- Optional: Try different weapons
Weapon Type Tier List - Ride on Seikret
- Follow the brother's scent
- Defeat Chatacabra
- Check on them
*Tutorial end - Talk to Y'sai and Nono
- Chapter 1-1 Cleared
How to Stagger Balahara and Controls

| Step 1 | Hold +Press + |
|---|---|
| Step 2 | Hold +Press + |
Use the Hook Slinger to obtain a Screamer Pod from a nearby Baunos, then aim at Balahara and fire it to save the girl.
Slinger and Hook Slinger GuideTalk to Alma

You can change weapons by talking to Alma. You can choose your favorite weapon, or if you're undecided, answer Alma's questions to get a recommended weapon. You can still acquire weapons you didn't select here, so you can choose later if you want.
Ride the Seikret and Track the Scent of Her Brother

| Controls | Ride the Seikret (Auto-Move) |
|---|
Riding Seikret will be the main transporation in the game. Player can Auto-move, collect Supply Items and more whiole riding, so make sure to check what player can do while riding and controls.
Seikret Mount Features, Abilities & Controls GuideFollow the Tutorial to Defeat Chatacabra

The battle with Chatacabra in Chapter 1 serves as a combat tutorial. Following the on-screen instructions will make the fight smoother, but you can defeat it without them. This is a great opportunity to practice using your weapon.
Chapter 1-2 Village of Whispering Winds
- Talk to your Guildmates (3 people)
()- Optional: Talk to Nata
- Optional: Head to the Training Area
【Features Unlocked】
- Support Desk (Get DLC)
- Training Area / Smithy - Enter the Expedition Command Tent
- Enter the Tent
Features Unlocked
- Multiplayer / Lobby / Squad - Talk to Alma
- Follow Y'sai
- Optional: Observe Monsters - Gather Honey
- Follow Y'sai
- Follow Alma
- Defeat Bulaqchi
- Return to Base Camp
- Talk to Jack the Provisions Manager
Features Unlocked
- Ghillie Mantle - Talk to Gemma
Features Unlocked
-Weapon Upgrade - Get ready and talk to Alma
- Head to the SOS Flare
- Defeat Quematrice
- Optional: Use Paratoad
- Optional: Use Vine Traps
Features Unlocked
- HR1→2
-Seikret
-Secondary Weapon - Talk to Tom at the Ingredient Center
()
Unlocked Features
- Ingredient Center - Talk to Ferdinand the Researcher
()
Features Unlocked
- Monster Field Guide - Talk to Y'sai
- Optional: Talk to Nata- Optional: Talk to Alma - Follow Y'sai
- Talk to Elder Ela
- Talk to the woman tending the fire
- Talk to Y'sai
- Chapter 1-2 Cleared
Talk to Guild Members

Talk to the three guild members inside the Base Camp, Olivia, Gemma, and Jack. It's optional, but you can also engage in a conversation with Nata to enhance your story experience. The target character is marked with a red icon and appears on the map.
Able to Practive Weapon Controls at Training Area

| Location / How to Go | Entrance |
|---|---|
 |  |
After talking to Olivia, training area will be unlocked. Training Area can be accessed from Base Camp. Try using different weapons to found out which weapon fits you, and practice for the hunt.
Training Area GuideTalk to Jack to Unlock Ghillie Mantle

After speaking with Jack, the Provisions Stockpile will become available. You'll also receive a tool set, allowing you to use the Ghillie Mantle from that point on.
Talk to Gemma
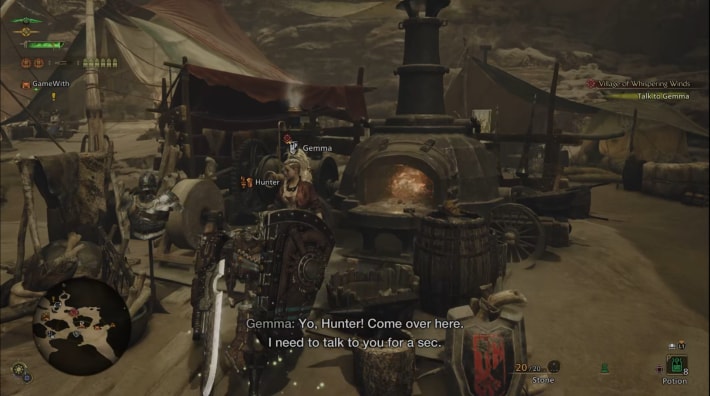
Talk to Gemma, the Smithy, who is near Jack. You'll receive 2 Iron Ores, allowing you to upgrade your current weapon by one level. You'll soon be facing a large monster, so make sure to upgrade your preferred weapon type.
Blacksmith (Smithy) GuideSecondary Weapons Unlocked

Defeating Quematrice unlocks secondary weapons. At the same time, Seikret will become available, allowing you to switch weapons from your weapon bag while riding it.
Tom and Ferdinand's Location

Tom is near the Provisions Stockpile, while Ferdinand is in the expedition headquarters tent. Refer to the image above for their locations. Speak to Tom to unlock the Ingredient Center and Ferdinand to unlock the Monster Field Guide.
Cooking Meals

Talk to Tom to unlock cooking. This will enhance your Health, Stamina, and Attack, allowing you to take on quests in a fortified state. Don’t forget to cook meals before battling tough opponents.
Chapter 1-3 To the Forest
- Head toward the forest()- Optional: Explore the field and search for hunting targets
- Go to the forest
Features Unlocked
- Map Scarlet Forest
- Ingredients Center(Support Desk) - Talk to Erik
- Optional: Talk to Nata - Head to the campsite
Features Unlocked
- Pop-Up Camp - Follow the Doshaguma traces
- Hunt the Lala Barina
- Talk to Gemma
- Head to the Pop-Up Camp
- Go with the Lynians
- Observe the forest - Talk to the Lynian Negotiator
- Search for the Congalala
- Hunt the Congalala
- Speak with the Lynians to clear Chapter 1-3
Features Unlocked
- Side Missions
Head Toward the Forest

You can clear the path to the forest by moving through the trail in Area 10 of Windward Plains. If you need help finding the Waypoint, use the route provided above.
Head Toward the Forest Quest GuideUnlock New Map Scarlet Forest

During the quest, if you follow Nata and Alma, you will arrive at new map Scarlet Forest. Initially, only area around Base Camp is unlocked, but after hunting Uth Duna at Chapter 1-5 will unlock entire map.
Scarlet Forest Map GuidePop-Up Camp

When you reach the camp site, Pop-Up Camp will be unlocked. A Pop-Up Camp serves as a Fast Travel point, a place to change Equipment, and a revival point if you faint. Setup locations are fixed, and the total number is limited, so choose a convenient location whenever you set these camps up.
Camping Kit - How to Get & UseHunting Lala Barina
Upon entering Scarlet Forest, a battle with Lala Barina will begin. When enraged, its torso opens like a rose, dramatically increasing the frequency of its Paralysis attack. If you get paralyzed, rapidly press the L stick to break free faster.
Talk to Gemma

Talk to Gemma at the Smithy. You'll receive materials for weapon upgrades, so enhance your current equipment. Materials you will get can be obtained easily, so there is no problem using it on the weapon you're using the most now.
Hunting Congalala
Congalala is fought at the end of Chapters 1–3. Its most notable attacks inflict Stench on the Hunter, rendering most consumable items unusable. While the effect fades over time, it can be cured instantly with Deodorant.
Chapter 1-4 The Investigation Continues
- Talk to Alma
- Head to the Oasis
- Escape from the Balahara
- Repel Balahara - Hunt the Balahara
- Follow the pack
- Get the Alpha Doshaguma's attention
- Hunt the Alpha Doshaguma
- Return to Kunafa
Features Unlocked
- HR2→3
- Side Mission
- Dareel's Research Report
- Seikret Customization
- Item Trade
Hunting Balahara
A battle with Balahala will take place in the oasis. If Balahala is buried in the sand, you can drag it to the surface using a Screamer Pod. This will leave it vulnerable for a short period of time, so be prepare some before starting the battle.
Hunting Doshaguma
At the end of Chapter 1-4, you will battle Doshaguma. Aim for its hind legs, as they are the easiest to attack, making them ideal for inflicting wounds. Performing a Focus Strike will also create a sizable damage window.
We recommend following this gameplay loop to make Doshaguma easier to defeat: Attack the hind legs → Destroy the wound to knock it down → Open the wound while enraged → Destroy the wound.
Chapter 1-5 Pursuit of Solitude
- Talk to Nata in the Plains Base Camp
- Head to the Depths of the Scarlet Forest
- Repel the Uth Duna
- Talk to Olivia
- Optional: Carve Uth Duna Materials - Chapter 1-5 cleared
Talk to Nata in the Plains Base Camp

After fast travel to the Base Camp in the Plains Base Camp and talk to Nata near the entrance, prepare to fight Uth Duna. Uth Duna has Waterblight attack and effect stamina alot. To avoid not having enaugh stamina to Evade, having Nulberry is recommended.
Hunting Uth Duna
The battle with Uth Duna begins at the end of Chapter 1-5. While its veil is active, it reduces incoming damage but can be destroyed with continuous attacks. The veil will fall away once Uth Duna loses enough water, making it more agile and aggressive.
Chapter 2 Story Walkthrough
 Chapter 2 Walkthrough
Chapter 2-1 Toward Fervent Fields
- Finish your preparations and talk to Alma
Features Unlocked
- Charms (Talisman) - Go to the Wudwuds
- Head to Azuz, the Everforge
- Talk to Yabran
- Optional: Explore Azuz
Feature Unlocked
- Armor Upgrade - Talk to Alma
- Search for Maki
- Hunt the Rompopolo
- Chapter 2-1 cleared
Charm (Talisman) Unlocked

Charms (Talismans) are unlocked by talking to Gemma at the start of Chapter 2-1. Charms are items that gives you additional skills when equipped. You can only wear one Charm at a time.
Charm (Talisman) ListUnlock New Map Oilwell Basin

While talking with Zatoh and his friends, head to Azuz, the village of Everforge. Here, you can go to Azuz Village just by following Zatoh, so you won't get lost. Initially only part of the map is unlocked but after hunting Ajarakan at quest 2-1, entire map is unlocked.
Oilwell Basin Map and Camp Location GuideArmor Upgrade Unlocked

Armor Upgrades are unlocked after arriving at Azuz, the Everforge, in Chapter 2-1. After arriving, talk to Gemma to see the tutorial and strengthen your armor.
Hunting Rompopolo
At the end of Chapter 2-1, you will encounter Rompopolo. It fights using poison-imbued attacks and tail swings. While its movements are not very fast, it has tricky techniques, such as time-delayed area explosion attacks.
Chapter 2-2 An Unforeseen Storm
- Talk to Alma
Features Unlocked
- Side Mission Seeking the Goldenfish
*Fishing: Life, in Microcosm must be completed - Head to the Wind's Gasp
- Slay the Rey Dau (HR3→4)
- Talk to Werner to clear Chapter 2-2
After Talking to Alma, Prepare to hunt Rey Dau

As you approach Area 17, a battle with Rey Dau will occur. When attacked by Rey Dau's Thunder Element, it becomes Thunderblight. In the state if Thunderblight, it is easy to stun when attacked. Repeat Evade or Nulberry is recommended to remove Thunderblight.
Hunting Rey Dau
A battle with Rey Dau occurs at the end of Chapter 2-1. Its attacks inflict Thunderblight, increasing the likelihood of being stunned. Evade repeatedly or use a Nulberry to remove the effect.
Chapter 2-3 A Desolate Destination
- Talk to Werner in Azuz()
- Follow Satesh
Features Unlocked
- Map Iceshard Cliffs - Mount your Seikret
- Gather Hot Pepper - Head to the top of the wall
- Hunt the Nerscylla
- Talk to Rove()- Optional: Get Ready
- Talk to the other Avis Unit members
- Sit and rest
- Hunt the Hirabami
- Chapter 2-3 cleared
Prepare for Hunt Before Talking to Werner

After talking to Wernar, the story progress automatically so mae sure to prepare for hunt before talking. To prepare for Nerscylla having Antidote, Cleanser and Energy Drink is recommended.
Werner is Near the Stairs at Base Camp

Werner in 2-3, "A Desolate Destination," is located near the stairs of the Base Camp in Oilwell Basin. You can also set a Waypoint from the map to move there automatically.
Iceshard Cliffs

Follow Satesh and the new Map area "Iceshard Cliffs will be unlocked. Initially only the lower floor is unlocked but by hunting Hirabami will unlock Iceshard Cliffs has particularly cold area, where the Stamina limit decreases faster. It is possible to counter this by mixing Hot Drink or Endemic Life's Heatmantle Bug or Hot Pepper.
Iceshard Cliffs Map Location GuideHunting Nerscylla
During Chapter 2-3, you will encounter a Nerscylla. Be wary as Nerscylla is agile and has many fast attacks, so it's best to wait for an opening rather than attacking constantly and leaving yourself open to damage.
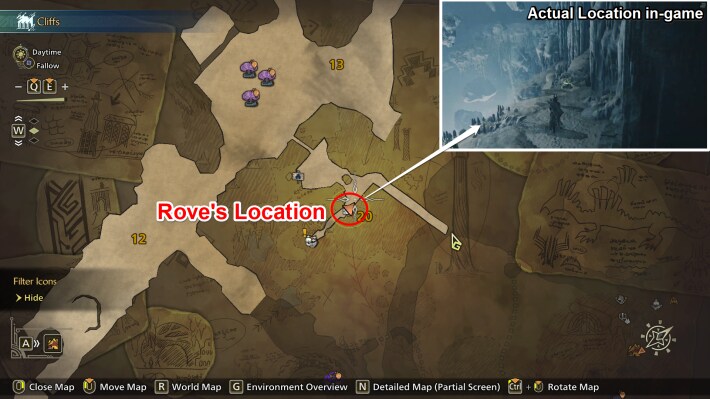
Rove's Location

In Chapter 2-3, Rove can be found in Area 1 of the Iceshard Cliffs. He may move around slightly, but he never leaves the base camp area. If he's not in his usual spot, check nearby.
Hunting Hirabami
Hirabami is encountered at the end of Chapter 2-3. Its ice attacks apply a restraining effect and will leave you vulnerable to a follow-up attack. Struggle to escape as quickly as possible before the follow-up strike lands.
Chapter 2-4 Long-forgotten Flame
- Search for Warner in Azuz()
- Repel Ajarakan
- Search for the Black Flame()
- Hunt: Nu Udra(HR4→5)
Features Unlocked
- Decorations
- Rocksteady Mantle (Talk to Gemma) - Chapter 2-4 cleared
Werner can be Found Near Azuz

In Chapter 2-4, Werner can be found close to the fast travel point of Azuz, the Everforge in Oilwell Basin.
Hunting Ajarakan
During chapter 2-4, you will encounter and hunt an Ajarakan. When enraged, its attacks will become more powerful and deals more damage. If you accumulate enough damage, Ajarakan will be staggered giving you a sizable damage window.
The Black Flame in Area 15

The Black Flame can be found by going to Area 15. You can set an an item or creature as a Waypoint in Area 15 to easily reach the destination with Seikret's auto movement.
Hunting Nu Udra
Nu Udra is fought at the end of Chapter 2-4. Severing Nu Udra's tentacle will decrease its attack range making it easier to hunt. It is recommended to aim for the tentacles that are easy to reach.
Decoration

Normal Decoration, which activates one skill, can be obtained as a reward for defeating the monster. Available as a reward from various monsters after hunting Nu Udra Chapter 2-4
Talk to Gemma After Defeating Nu Udra to Unlock Rocksteady Mantle

After hunting Nu Udra, talk to Gemma at the Smithy to unlock Rocksteady Mantle. However, Gemma at Oilwell Basin will not let you unlock Rocksteady Mantle, so talk to Gemma at other maps.
Rocksteady MantleChapter 3 Story Walkthrough
 Chapter 3 Walkthrough
Chapter 3-1 Born from the Flame
- Talk to Rosso in Windward Plains ()
[Features Unlocked]
- New Area Ruins of Wyveria
- Unlock Limit for Armor Upgrade
- Smelt Armor Sphere+
- Festival Shares
- Item Trade with Azuz - Follow Nata
- Slay the Guardian Doshaguma
- Talk to Nata
- Slay the Guardian Rathalos
- Follow Tasheen and Talk to him
- Optional: Stroll around the guardian village - Follow Tasheen
- Repel the Guardian Arkveld
[Feature Unlocked]
- Guardian Armor
- Guardian Doshaguma/Guardian Rathalos Encyclopedia
- Item Trade with Ruins of Wyveria - Chapter 3-1 Cleared
Rosso is in the Base Camp Tent

Talk to Rosso in Windward Plains. Rosso is in front of the tent near Base Camp in Windward Plains. When Rosso is not there, check around the tent.
New Area 'Ruins of Wyveria'

The new area, 'Ruins of Wyveria,' will unlock additional areas as you progress through the story. Initially, the accessible range is limited, but as you advance through the chapters, more areas will be unlocked.
Ruins of Wyveria Map Guide: Camp LocationsHunting Guardian Doshaguma
After talking with Rosso in Windward Plains, you will be automatically moved to "Ruins of Wyveria". If you follow Nata in Ruins of Wyveria, a battle with Guardian Doshaguma will occur. Guardian Doshaguma's weak elements are Fire, Thunder, Ice, and Dragon Element.
Hunting Guardian Rathalos
After defeating Guardian Doshaguma, talk to Nata again and a battle with Guardian Rathalos will occur. Guardian Rathalos' weak elements are Thunder and Dragon Element.
Hunting Guardian Arkveld
After defeating Guardian Rathalos, talk to Tasheen and follow him, and a battle with Guardian Arkveld will occur. Guardian Arkveld's weak elements is Dragon Element only. Defeating it will clear Chapter 3-1.
Chapter 3-2 Indomitable Spirit
- Talk to Olivia in the Iceshard Cliffs()
- Listen to Rove()
- Continue toward Suja
- Repel the Jin Dahaad
[Feature Unlocked]
- Increase number of Pop-up camp in Iceshard Cliffs from 2→3 - Chapter 3-2 Cleared
Olivia is at Base Camp

Talk to Olivia at Iceshard Cliffs. Olivia is near Base Camp in Iceshard Cliffs.
Rove is in Area 20
| How to Use |
|---|
Talk to Rove in area 20 of Iceshard Cliffs. You can move to the location using Seikret's auto-travel, so you don't have to worry about getting lost if you use auto-move.
Hunting Jin Dahaad
Follow the part to Suja and you'll encounter a battle with Jin Dahaad. You can use the camp before challenging Jin Dahaad, so prepare well. Jin Dahaad's weak element is Fire Element only. Defeating it will clear Chapter 3-2.
Chapter 3-3 Through the Dusk
- Talk to the Allhearken
- Talk to the Villages - Talk to Vio the Melder
[Feature Unlocked]
- Melding - Go to dinner (* HR5→6)
- Optional: Talk to your Guildmates - Talk to Tasheen
- Head to the Campsite
- Set out to Investigate
- Slay the Guardian Ebony Odogaron
- Hunt the Xu Wu
[Feature Unlocked]
-Mending Mantle (Talk to Gemma)
- Increase number of Pop-up camp in Ruins of Wyveria from 2→3 - Chapter 3-3 Cleared
Unlocked Melding

Melding will be unlocked after talking to Vio in Chapter 3-3. Element that can meld random decoration etc. Items and rarities that can be melded will be gradually unlocked as the story progresses.
Melding Pot GuideHunting Guardian Ebonoy Odoragon
- Guardian Ebonoy OdoragonTypeSevering ◯Blunt ◯Ammo ◯WeakFireWaterThunderIce
After talking with Tasheen, head to the campsite and continue investigating, and a battle with Guardian Ebony Odoragon will occur. Guardian Ebony Odoragon's weak element is Water Element. After defeating it, you will continue to fight again Xu Wu
Hunting Xu Wu
- Xu WuTypeSevering ◎Blunt ◎Ammo ◯WeakIce
After defeating Guardian Ebony Orodagon, a battle against Xu Wu will occur. Since it will be a series of battle, consider returning to camp once to prepare. Xu Wu's weak element is Ice Element. Defeating it will clear Chapter 3-3
Chapter 3-4 Dawn Breaks
- Talk to Nata
- Head to the lower stratum of Wyvern's Rest
- Slay the Guardian Arkveld (* HR6→7)
- Chapter 3-4 Cleared
Hunting Guardian Arkveld
After talking with Nata, head to the lower level stratum of Wyvern's Rest and a battle with Guardian Arkveld will occur. Guardian Arkveld's weak element is Dragon Element. Defeating Guardian Arkveld will clear Chapter 3-4 and unlocks Hunter Rank 7.
Chapter 3-5 Visions of Hope
- Talk to Nata
- Slay Zoh Shia (* HR7→8)
[Feature Unlocked]
- Palico Level 25
- Support Ship
- Increase Limit of Armor Upgrade - Chapter 3-5 (Low Rank) Cleared
Hunting Zoh Shia
- Zoh ShiaTypeSevering ◎Blunt ◎Ammo ◎WeakDragon
After talking with Nata, you will automatically move to a different location and a battle with Low rank's final boss Zoh Shia will occur. Zoh Shia's weak element is Dragon Element. Defeating Zoh Shia will clear Chapters 3-5 and unlock Hunter rank 8.
Unlocked Support Ship

The support ship will appear at Base Camp in Windward Plains after clearing Chapters 3-5. The support vessel will stay at Base Camp for 3 days. Support Ship will disappear from camp after 3 days. but will return to Base Camp 3 days later.
Support Ship GuideChapter 4 Story Walkthrough
 Chapter 4 Walkthrough
Chapter 4-1 A Visitor from the West
- Talk to Olivia
- Talk to Alma
- Survey the Scarlet Forest
- Listen to Wudwud and his friends - View the forest from atop of a tree ()
- Capture a Yian Kut-Ku (* HR10)
[Feature Unlocked]
- High Rank
- HR Limit 15
- High Rank Enviroment
- Unlock trade with Suja
- Increase the max number of Pop-up Camp able to build
- Extra Quest Reward
- Rest at Camp
- Able to Save Field Survey Quest
- High Rank Armor
- Smelt Advanced Armor Sphere - Chapter 4-1 Cleared
Survey the Scarlet Forest

Refer to the image above and explore Scarlet Forest. While there is a lot of ground to cover, you can easily reach your destination using Seikret's auto-move function. Additionally, talking to the Wudwuds is an optional objective.
Observing Forest from the top of a tree in Area 18

The objective "Observe the forest from the top of a tree" can be achieved by climbing the tree in Scarlet Forest Area 10 (Area 18). You can easily get there by setting a waypoint at the camp site in the western part of Area 18 and use Seikret's auto-travel.
Capture a Yian Kut-Ku

At the end of the Chapter 4-1, Yian Kut-Ku's Capturing Mission will occur. Capturing requires special Traps and Tranq items. After weakening Yian Kut-ku, use the provided Shock Trap and Tranq ball to capture it.
- Weaken the Monster
- Bait Yian Kut-Ku into shock trap
- Hit Tranq Bomb twice
* Can be applied before baiting into a trap
Unlocked High Rank Environment

After capturing Yian Kut-Ku, the High Rank environment will be unlocked from and High Rank monsters will appear in the field. Materials obtained from High Rank monsters can be used to create stronger equipment than before.
Hunter Rank (HR) Leveling GuideChapter 4-2 Chasing Change
- Investigate the regions and raise your HR to 15
- Talk to Fabius in Suja, Peaks of Accord (2 twice)
- Head to the depths of the Wounded Hollow
[Feature Unlocked]
- Wounded Hollow (Arena) is Unlocked - Hunt the Frenzied Nerscylla
[Feature Unlocked]
- Frenzied Monster appears
- Side Mission Unlocked
- Evasion Mantle (Talk with Gemma)
- HR20 Limit
- Grand Hub(HR16〜)
- Arena Quest and Challenge Quests - Chapter 4-2 Cleared
Investigate the regions and raise your HR to 15

In Chapter 4-2, you need to raise your Hunter Rank to 15. It is recommended to raise your Hunter Rank while creating equipment in a High Rank Environment.
▼Recommended Side Mission at Chapter 4-2
| Side Mission Name | Rewards |
|---|---|
| Aida's Apprehensions | Material Retrieval (Sabar) |
| Beware the Gypceros | Material Retrieval (Murtabak) |
| Healing Help | Unlock Support Action |
| "Flash Course | Unlock Support Action |
Wounded Hollow (Arena)

A new map "Wounded Hollow" will be unlocked in Chapter 4-2. It is an arena map, and monsters do not move to other fields, so you can concentrate on fighting in the same area.
Hunting Frenzied Nerscylla
In Chapter 4-2, the story progresses when you raise your HR to 15. After speaking with Fabius, head to the back of Wounded Hollow and a battle with Frenzied Nerscylla will occur. Nerscylla's Health is low due to her Frenzied stat, but her Attack is increased.
When attacked by a Frenzied monster, a status effect called Frenzy will be applied. It is a special status effect that cannot be healed with items, and the stage changes by hitting it with an attack. At the time of onset, there is a disadvantage of increased damage taken and no natural recovery, but once you overcome it, it will turn into a positive effect of Affinity UP.
Unlock Grand Hub (HR16+)

Grand Hub will be unlocked after talking to Tetsuzan at Suja. After Grand Hub has been unlocked, player can visit by opening map and selecting Grand Hub.
Grand Hub - How to Unlock and What You Can DoChapter 4-3 Touring History
- Investigate the regions and raise your HR to 20
- Talk to Olivia at the Ruins of Wyveria (twice)
- Follow the Tempered Lala Barina traces
- Hunt the Tempered Lala Barina
- Unlocks Artian Weapon
Hunt the Guardian Fulgur Anjanath
[Features Unlocked]
- Tempered Monsters appears in various places
- Side Missions are unlocked
- After HR21 Extra Mission Occurs
Requirement: Complete one of Kanya's Side Mission - Chapter 4-3 Cleared
Raise Your Hunter Rank to 20

To continue the story quest, you need to raise your Hunter Rank to 20. We recommend the Optional Quest 'Secure Wounded Hollow'. Since it takes place in an arena, there is less movement involved, and you can always use an SOS Flare to call for support hunters, even when playing solo.
▼Recommended Side Mission at Chapter 4-3
| Side Mission Name | Rewards |
|---|---|
| Make Fluffy Dealings | Material Retrieval (Plumpeach) |
| Rath-from-Above, Go! | Unlock Support Action |
| Secure Wounded Hollow *Recommended for Increasing HR | Armorcharm |
Hunting Lala Barina and Guardian Fulgur Anjanath
- Guardian Fulgur AnjanathTypeSevering ◎Blunt ◎Ammo ◎WeakWaterIce
At the end of Chapter 4-3, a battle will occur with Tempered Lala Barina and Guardian Fulgur Anjanath at the same time. Lala Barina is a Tempered Monster and has greatly increased health and attack, so you need to be especially careful.
Artian Weapon Unlocked

Artian Weapons will be unlocked after hunting Lala Barina and Guardian Fulgur Anjanath. It is a special weapon that can be produced by combining three parts, and its performance changes depending on the parts and bonuses.
Artian Weapons GuideTempered Monsters Appear in Various Places

After hunting Lala Barina and Guardian Fulgur Anjanath, Tempered Monsters will appear in various places. If you defeat it, you can get rewards such as Artian parts and composite decorations.
Tempered Monsters GuideChapter 5 Story Walkthrough
 Chapter 5 Walkthrough
Chapter 5-1 Premonitions
- Investigate the regions and raise your HR
How to Increase HR
Features Unlocked
- Side Missions
- Increase Limit of Armor Upgrade
- Smelt Hard Armor Sphere and Oricalcite
- Limited Bountie's 3rd - 5th mission
- Unlock Multiple Side Mission - Talk to Olivia at the Ruins of Wyveria
- Investigate the regions and raise your HR (32)
How to Increase HR - Talk to Nata at the Oilwell BasinOilwell Basin
- Talk to Alma
- Slay the Jin Dahaad
- Chapter 5-1 completed
Investigate the regions and raise your HR to 31

To proceed to the next Mission, you need to raise your HR to 31. By increasing your HR, the story will progress and the next Quest will be triggered. Gather materials for Equipment creation, complete Optional Quests, and clear Side Missions to raise your Hunter Rank.
How to Increase HR▼Recommended Side Mission at Chapter 5-1
| Side Mission Name | Rewards |
|---|---|
| Astonishing Adaptability | Material Retrieval (Rysher) |
| Purrfect Plundering | Unlock Support Action |
| As Gatekeeper | Powercharm |
Hunting Jin Dahaad
The battle with Jin Dahaad begins after speaking with Alma in Chapter 5-1. Jin Dahaad is weak to Fire, and defeating it will clear the chapter, so prepare accordingly.
Jin Dahaad GuideChapter 5-2 A World Turned Upside Down
*Steps 3,4 5 can be done in any order.
- Investigate the regions and raise your HR (35)
Features Unlocked
- Increase Limit of Armor Upgrade - Talk to Olivia at the Ruins of Wyveria
- Go to the Base Camp in Scarlet Forest
- Talk to Sassafrill
- Slay the Uth Duna - Go to the Base Camp in Oilwell Basin
- Talk to Maki
- Slay the Nu Udra - Go to the Base Camp in Windward Plains
- Talk to Alma
Head to Kunafa
- Slay the Rey Dau - Talk to Fabius at Iceshard Cliffs
- Slay the Gore Magala and Frenzied Blangonga
Features Unlocked
- Corrupted Mantle (Talk to Gemma) - Chapter 2 Cleared
Hunting Uth Duna
After talking to Sassafrill at Scarlet Forest Base Camp, move towards Uth Duna to defeat it. While its veil is active, it reduces incoming damage but can be destroyed by attacking it continuously .The veil will fall away once Uth Duna loses enough water, making it more agile and aggressive.
Hunting Nu Udra
After talking to Maki at the Base Camp in Oilwell Basin, head out to defeat Nu Udra. It is only weak to water element so prepare beforehand.
Hunting Rey Dau
After speaking with Alma at Base Camp in Windward Plains, head to Kunafa Village, After the cutscene in Kunafa, head to defeat Rey Dau. It is only weak to ice element so prepare beforehand.
Gore Magala and Frenzied Blangonga
For the finale of Chapter 5-2, you will fight two monsters simultaneously: Gore Magala and a Frenzied Blangonga. Frenzied monsters generally have low health but deal increased damage. Since both are weak to Fire, prepare accordingly.
Chapter 5-3 A Break in the Clouds
- Investigate the regions and raise your HR (40)
How to Increase HR
Features Unlocked
- Side Missions
Investigate the regions and raise your HR (40)

After defeating Gore Magala, you will need to raise your Hunter Rank to 40. If you want to create Artian weapons, it is recommended to hunt Tempered Monsters. After reaching Hunter Rank 40, Chapter 6 will automatically start.
How to Increase HR▼Recommended Side Mission at Chapter 5-3
| Side Mission Name | Rewards |
|---|---|
| A Gutsy Move | Unlocks Support Action |
Chapter 6 Story Walkthrough
 Chapter 6 Walkthrough
Chapter 6-1 Links in a Chain
- Talk to Nata in the Windward Plains (2 times)
- Investigate Arkveld
- Optional: Observe the Corpse - Slay Arkveld
Features Unlocked
- HR cap raised to 999
- Palico level cap raised to 30
- Decorations added to Melding Pot
- Max No. of Pop-Up Camps 4→ 5
-Windward Plains/Scarlet Forest/Oilwell Basin/Iceshard Cliffs
- Max No. of Pop-Up Camps 3→ 4
- Ruins of Wyveria
- Unlocked Limit for Armor Upgrade
Hunting Arkveld

In Chapter 6, you will fight the high rank final boss Arkveld. When enraged, Arkveld emits a red lightning enhances its attacks and adds an explosion effect, so be careful while hunting.
HR Limit Unlocked to 999

After clearing Chapter 6-2 "A First Cry", the upper limit of HR will be unlocked to 999. There is a possibility that quests may require Hunter Rank will appear in the future updates, etc., so let's raise the HR steadily.
How to Increase HRMeld Decorations Added to Melding Pot

After clearing Chapter 6-2 "A First Cry", Meld Decorations will become available allowing you to create decorations listed in the Melding Pot. High level Decorations aren't available, but it is recommended when you need a specific skill.
Melding Pot GuideChapter 6-2 A First Cry
- Talk to Werner in Suja
*Have to be at HR 50+ - Head to Suja
- Talk to Alma
- Slay the Zoh Shia
*All chapters completed
Talk to Werner in Suja

Travel to Suja and locate Werner standing near the camp tent. Choosing the "Let's hear it." triggers a bit of dialogue between the Hunter, Alma, Werner, Olivia and the Allhearken. Because this quest eventually leads to combat, it's best to prepare your equipment and items accordingly before departing, which the game gives you time to do so.
Hunting Zoh Shia
Zho Shia's weakness is Dragon element, and defeat the mosnter to complete Chapter 6-2.
- Zoh ShiaTypeSevering ◎Blunt ◎Ammo ◎WeakDragon
Defeat Zoh Shia to Complete the Story

Currently, the story ends after the Zoh Shia hunt in Chapter 6-2. New monsters and quest will be added in the future update so prepare by increasing HR and upgrading your armor.
How to Increase HRAfter Completing the Story

After you complete the story, you can get into the end-game content. This includes farming for the best Artian weapon and Decoration or completing Awards and Trophies.
End-Game Contents GuideHow to Play Story in Multiplayer
- Create a Link Party
- Progress individually until the quest starts
- Everyone but one returns when quest starts
- Join the remaining Quest
- Clear the quest with everyone
- Repeat steps 2 to 5
Create a Link Party

Create a Link Party with the players you want to progress the story with.
Progress Individually Until the Quest Starts

After creating a Link Party, each player will progress through the story individually. Watch any cutscenes, and proceed on your own up until the quest actually begins.
Everyone but One Returns When Quest Starts

When the monster appears and the quest begins, everyone but one player should return.
Join the Remaining Quest

Returning player should join the remaining Quest after. You can join the quest from the NPC Alma or the tent's Link Members Quest.
Clear the Quest With Everyone
Once you've joined the quest, work together to complete it. When the quest is cleared, it will count as completed for everyone, allowing all players to progress in the story.
Repeat Steps 2 to 5
After clearing the quest, continue progressing through the story to trigger the next quest. By repeating steps 2 to 5, you can advance the story together in multiplayer.
Key Points for Story Walkthrough
- Master your Weapon
- Learn Characteristics and Patterns
- Review the Equipped Weapons and Armor
- Eat Meals and Activate Food Skills
- Use Items such as Capturing and Traps
- Note Environmental Traps and Hazards
- Use Dung Pods When Surrounded
- Call other Players or Support Hunter
The key points for conquering the story of Monster Hunter Wilds include remembering how to use the weapons you use, learn the characteristics of monsters and attack patterns, review your equipped weapons and armor, and activate meal skills by eating food.
Master your Weapon

The important thing in combat in Monster Hunter Wilds is to become familiar the weapons you use. As you master the unique actions that exist for each weapon, the efficiency with which you deal damage will increase, so practice wielding your weapon in the training area where you can practice freely.
Learn Characteristics and Patterns

Hitzone, weak points, resistance, and parts that can be broken differ depending on the monster. Also, by learning the monster's tells, you can telegraph their next move based on the previous actions to reduce the number of attacks you receive. Once you get used to basic weapon controls, you can shift your focus to the movements of monsters.
Monster List GuideReview your Equipment

If a particular monster is giving you trouble, or you find that monsters are dealing too much damage, check your equipment. Note that some pieces of armor have skills that increase survivability or damage dealt, so when there is an enemy you cannot defeat, we recommend forging stronger armor before challenging it again.
Weapon Type Tier ListEat Meals and Activate Food Skills

| Ration | Fixed Effect: Physical Strength +50, Stamina +150 Effects by Ingredient: Status Boost |
|---|---|
| Additional Ingredients | Fixed Effect: Effect Duration +20:00 Effects by Ingredient: Adds 1 meal skill |
| Finishing Ingredients | Fixed Effect: Attribute Resistance +5 Effects by Ingredient: Adds 1 meal skill |
By eating cooked meals, you can activate various Food Skills and increase your health and resistance. Although the duration is limited, it's an easy way to boost your Hunter's stats..
How to Cook Meals GuideUse Support Items

By bringing in items that are useful in battle, such as Shock Traps and Barrel Bombs, you can gain an advantage in battle. If you bring Crafting Materials, you can even replenish the items mid-hunt.
Items and Materials ListNote Environmental Traps and Hazards
In Monster Hunter Wilds, you can use the environment to deal heavy damage, or immobilize monsters. Environmental Traps can't be found everywhere, but if you manage to utilize them, it will give you the advantage in battle, so remember the location of the environmental traps in each locale and use them when you can.
Full Map GuideUse Dung Pods When Surrounded
Dung Pod can move the monster it hits to another area. During times when the terrain is disadvantageous, or if you are being swarmed by multiple monsters, use Dung Pods to move the fight to a favourable area of the map.
Slinger and Hook Slinger GuideCall other Players or Support Hunter

If you are having difficulty completing solo hunts, you can get help from other players or NPC Support Hunter by sending an SOS Flare signal. SOS Flare signal settings can be finely adjusted from Alma's Quest Counter, so use it to suit your play style.
Basic Story Details
- Story progresses by chapters
- Chapters are separated into missions
- Earn rewards for each mission cleared - Move to a Waypoint automatically using Seikret
- HR cap increases as you progress
- View cutscenes in the gallery
Story Progresses by Chapters

In Monster Hunter Wilds, the story progresses in chapters. Instead of accepting quests from a quest board or receptionist, progression happens more naturally through conversations and interactions with characters throughout the world.
Some Missions Have Optional Objectives
Missions will occasionally have optional objectives that are not essential for story progression and can be ignored. However, these objectives may contribute to storytelling and worldbuilding, enhancing the overall experience.
Chapters are Separated Into Missions
Each chapter consists of multiple missions, and you can progress to the next chapter by completing them all. Completeing missions also grants rewards, including materials and Hunter Profile medals.
Hunter Profile GuideAuto-Move to Waypoint with Seikret

You can set the quest destination as a Waymark to automatically navigate to your target, making progression smoother.
HR Cap Increases as You Progress

In Monster Hunter Wilds, Hunter Rank cap increases as you progress through the story. Reaching specific Hunter Rank levels unlocks new quests and hunts, allowing you to access a variety of content by advancing through the game.
How to Raise Hunter RankView Cutscenes in the Gallery

Cutscenes that have already played can be rewatched from the Gallery on the Title Screen. If you missed a scene or want to view a favorite moment again, you can do so there.
Movie Can be Skipped

| Control | Hold |
|---|
| Control | Hold M |
|---|
The short movie played in Monster Hunter Wilds story can be skipped. I It can be skipped by holding the touchpad for the controller and the M button for the keyboard.
Monster Hunter Related Articles
Useful Tips
| Story | Quest List | All Monsters List | Full Map Guide |
| Side Mission | Cooking | Character Presets | |
| Armor List | Charm List | Decoration List | |
| Skill List | Best Skills | Set Bonus | Group Skill |
| Layered Armor Outfit | |||
 | |||
Monster
Quest Information
Palico・Seikret
| Palico | Seikret | Palico Equipment | Palico Layer Armor |
Map
| Locations | |||
|---|---|---|---|
| - | |||
| Facilities | |||
 Windward Plains
 Scarlet Forest
 Oilwell Basin
 Iceshard Cliffs
 The Grand Hub
