
Spiral Abyss Floor 12 Guide in Genshin Impact for 6.3 (Luna 4). See strategies and how to 9 stars, tips, enemies, f2p teams, best characters & rewards for Spiral Abyss Floor 12!
All Spiral Abyss Floor Guides
Check Out The Spiral Abyss GuideSpiral Abyss Floor 12 - Guide Overview


| Ley Line Disorder |
|---|
| [ First Half ] - The active character's Charged Attack DMG is increased by 75%. |
| [ Second Half ] - Lunar Reaction DMG is increased by 75%. |
| Enemy Levels |
| - 95 ~ 100 |
| Challenge Goal |
| [ Chamber 1 ] - Defeat all enemies, Remaining challenge longer than 180 seconds (★ 1) / 300 seconds (★ 2) / 420 seconds (★ 3) |
| [ Chamber 2 ] - Defeat all enemies, Remaining challenge longer than 180 seconds (★ 1) / 300 seconds (★ 2) / 420 seconds (★ 3) |
| [ Chamber 3 ] - Defeat all enemies, Remaining challenge longer than 180 seconds (★ 1) / 300 seconds (★ 2) / 420 seconds (★ 3) |
| Blessing of the Abyssal Moon |
| When a character triggers a Lunar reaction (Lunar-Bloom, Lunar-Charged, or Lunar-Crystallize) on an opponent, a shockwave will be unleashed at the opponent's position, dealing True DMG. This effect can be triggered once every 3s. |
Spiral Abyss Floor 12 - Recommended Characters & Party
Recommended Team Comp
First Half Team
| Ley Line Disorder |
|---|
| The active character's Charged Attack DMG is increased by 75%. |
| Freeze Neuvillette | |||
|---|---|---|---|
| Neuvillette | Escoffier | Furina | Citlali |
| Chasca Freeze | |||
| Chasca | Furina | Charlotte | Ganyu |
| Sethos Freeze-Bloom Team (F2P) | |||
| Sethos | Xingqiu | Diona | Dendro Traveler |
Choose A DPS with Charge Attack As Main Source Of DMG
To make use of the Ley Line Disorder, the it is recommended that the on-field character use Charge Attack as the their main source of damage.
Freeze Works Extremely Well Against First Half Enemies
From Chamber 2 and beyond, all of the enemies in the first half can be frozen completely stopping the enemies from moving making the battle less challenging. It is recommended to add a Hydro and Cryo in the team because of this.
Second Half Team
| Ley Line Disorder |
|---|
| Lunar Reaction DMG is increased by 75%. |
| Flins Lunar-Charged | |||
|---|---|---|---|
| Flins | Ineffa | Columbina | Sucrose |
| Sucrose On-Field | |||
| Sucrose | Fischl | Ineffa | |
| Ifa F2P Electro-Charged | |||
| Xingqiu | Ororon | Iansan | |
Lunar-Charge Quickly Clears The Second Half Easily
The enemies in the second half of Floor 12 are all weak against Lunar-Charge and Electro-Charge. Because of this, it is recommended to use characters that enables the reaction.
Spiral Abyss Floor 12 - Enemies & Tips
Floor 12 Chamber 1
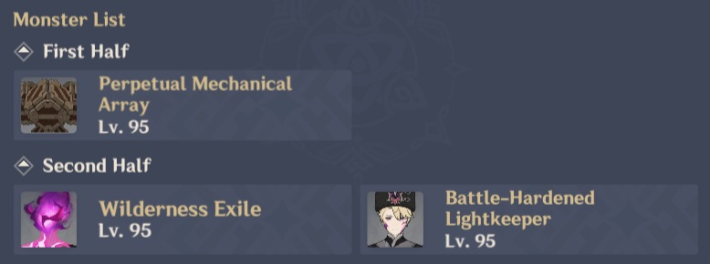
| First Half Tips |
|---|
| - Once the boss split into parts, defeat the part that is circled by the light to stun the boss. |
| Second Half Tips |
| - 2 Moonsign will reduce the damage needed to be dealt to the enemy by half. - Freeze is an amazing option to stop the movement of the boss. |
Floor 12 Chamber 2
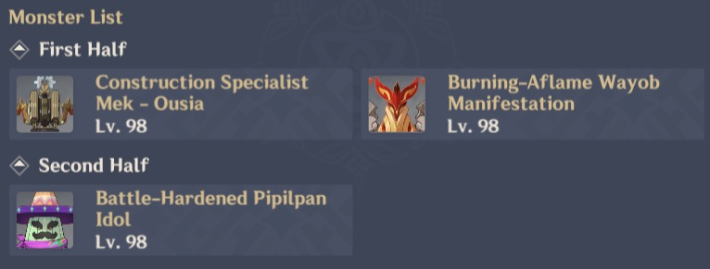
| First Half Tips |
|---|
| - All of the enemies can be frozen stopping their mechanics and movement. - Use characters that does not rely on Energy against the Wayob Manifestation. |
| Second Half Tips |
| - Electro-charge can stun the Pipilpan Idol while dealing powerful damage. - You can find the "real" Pipilpan during its hat phase by checking the hat with a face. |
Floor 12 Chamber 3

| First Half Tips |
|---|
| - You can ignore the mechanics of the enemies by freezing them. |
| Second Half Tips |
| - Electro-charged can easily stun the Knuckle Duckle when it summon mechanical chicks. |
Spiral Abyss Floor 12 - Rewards & Primogems
Chamber Rewards
| Chamber 1 | Adventurer's Experience x 3 Mystic Enhancement Ore x 6 |
|---|---|
| Chamber 2 | Adventurer's Experience x 3 Mystic Enhancement Ore x 6 |
| Chamber 3 | Adventurer's Experience x 3 Mystic Enhancement Ore x 6 |
Stars (Primogems) Rewards
Check Out The Primogems Farm GuideGenshin Impact Related Articles
| Related Guides | |||||
|---|---|---|---|---|---|
| 6.7 Update (Luna 8) | |||||
| New & Rerun Characters | |||||
| Sandrone | Citlali | ||||
| Columbina | Raiden Shogun | ||||
| Heavenlit Prophecy Rate-Up Characters | |||||
| Yae Miko | Wriothesley | ||||
| Mizuki | |||||
| Useful Tools | |||||
| Best Girl Ranking Tool | Best Boy Ranking Tool | ||||
| Item Locations & Databases | |||||
| Interactive Map Guide Of All Items & Chests | |||||
| Anemoculus | Geoculus | ||||
| Electroculus | Dendroculus | ||||
| Hydroculus | Pyroculus | ||||
| Crimson Agate | Key Sigil | ||||
| Lunoculus | - | ||||
| Other Popular Guides | |||||
| Best Character Tier List | Reroll Tier List | ||||
| Best Team Comp | - | ||||
| Other Guides | |||||
| Artifact List + Set Bonuses | Artifacts Guide | ||||
| How To Reroll Fast | All Characters List | ||||
| All Weapons List | How To Download Genshin? | ||||

