
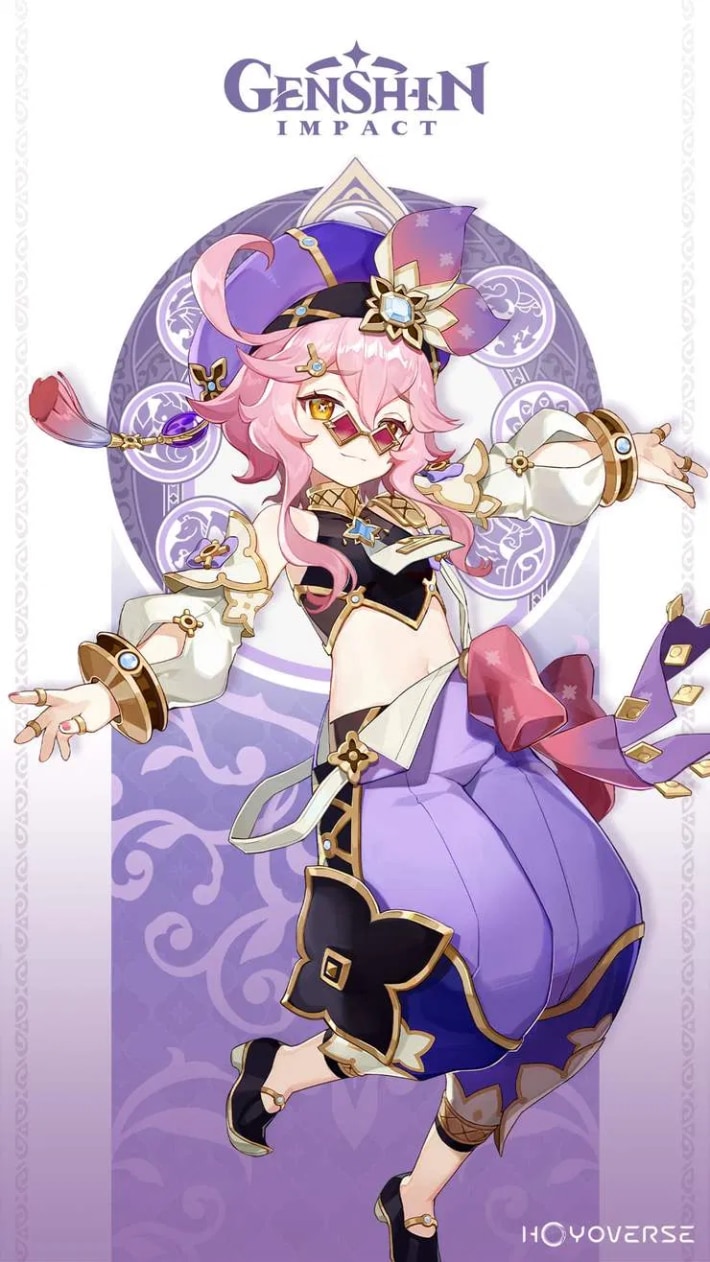
Comprehensive Dori guide for Genshin Impact. Learn Dori's best build, team, kit, and materials for this 4-Star Electro Support Claymore user.
| Dori Related Articles | ||||||||
|---|---|---|---|---|---|---|---|---|
 Best Build Best Build | Best Team | Specialty | ||||||
Table of Contents
Dori Character Overview, Base Stats, and Tier
Character Profile
 | Rarity | | |
|---|---|---|---|
| Element | Electro | ||
| Weapon | Claymore | ||
| Ascend Stat | HP% 24.0% | ||
| Region | Sumeru | ||
| Birthday | December 21 | ||
| Roles | | ||
| How To Get | Available in all Banners at a low drop rate | ||
Base Stats
| Base HP | Base ATK | Base DEF | |
|---|---|---|---|
| Lvl. 90 | 12,397 | 223 | 723 |
| Lvl. 80 (Ascended) | 11,539 | 208 | 673 |
Dori is a 4-star Electro character that wields a Claymore in Genshin Impact. Her gameplay focuses on being an energy battery and support healer, capable of restoring energy for the team while providing healing and Electro application. Her Elemental Skill, "Sparkling Scatter," fires an Electro projectile that deals AoE Electro damage and generates elemental particles. Her Elemental Burst, "Illuminated Path," creates a field that continuously regenerates energy for allies and heals them based on Dori's max HP, while also applying AoE Electro damage to nearby enemies. Lore-wise, Dori is a savvy and resourceful merchant from Sumeru, known for her shrewd bargaining skills and cheerful personality despite her constant financial troubles.
Dori's Tier & Rating
| Overall Tier | ||||||||||||||
|---|---|---|---|---|---|---|---|---|---|---|---|---|---|---|
| B | ||||||||||||||
| On-Field | Off-Field | DPS | Support | Sustain | ||||||||||
| - | C | - | - | B | ||||||||||
In battle, Dori is an
Rate Dori!
Roles & Playstyle Of Dori and Its Strengths and Weakness
Healer Dori
Dori's intended role is to be a healer. While she is able to apply Electro Off-Field, building her as a Hyperbloom Sub-DPS requires the use of a character like Sayu or Jean to spread it and her Healing will be lower.
Pros and Cons of Healer Dori
| Pros |
|---|
| - Able to restore Energy to the active character while healing. |
| Cons |
| - Requires a lot of Energy Recharge to maintain uptime for her Healing. |
| - Needs both Energy Recharge and HP to be built. |
Best Build for Dori
Dori only needs two stats to maintain her Healing and its uptime. Since she needs HP and Energy Recharge, her build is focused on boosting both. But if you want to use her for Hyperbloom, build EM instead.
| Weapon | Sacrificial Greatsword |
|---|---|
| Best Artifact | Any Energy Recharge x2 Any HP% x2 |
| Artifact Main Stats | Sands: Energy Recharge or HP% Goblet: HP% Circlet: Healing Bonus |
| Priority Sub-Stats | Energy Recharge > HP% > Elemental Mastery > Flat HP |
| Recommended Team | |
Stat Goals for Healer Dori
| Energy Recharge | 210%+ |
|---|---|
| HP | 20,000 |
Since Dori is an Elemental Burst-reliant healer, Energy Recharge is the stat with higher priority than HP even though she needs it for healing. But you don't need to build too much on her Energy Recharge since she has a Passive that gives her additional Energy.
Dori 's Recommended Talent Priority
| Talent | Level Up Priority |
|---|---|
| Normal Attack: Marvelous Sword-Dance (Modified) | ★・・・・ |
| Spirit-Warding Lamp: Troubleshooter Cannon (Elemental Skill) | ★★★・・ |
| Alcazarzaray's Exactitude (Elemental Burst) | ★★★★★ |
Related Links:
Best Weapon for Dori
Dori is best used with Energy Recharge weapons due to her Elemental Burst's high cost. HP can be built from her Artifacts instead.
Premium Weapons for Dori
| Weapon | How to Get Rating | |
|---|---|---|
| Best | Sacrificial Greatsword | Get from Banners - Increases Energy Recharge of Dori. - Allows Dori to spam her skill allowing generation of more Electro Particles. |
| 2nd | Favonius Greatsword | Get from Banners - Huge Energy Recharge Buff. - Allows you to provide more energy for the team. - Requires you to invest on CRIT Rate for consistency. |
| 3rd | The Bell | Get from Banners - Amazing HP Stat stick boosting the healing of Dori. - Able to provide shields and buff to team. - Requires you to invest more Energy Recharge on Artifacts. |
Dori's best weapon is Sacrificial Greatsword since it allows her to spam her Skill more for Energy. If you don't have it, Favonius Greatsword can be used. The Bell is a niche pick for Dori since it buffs HP and not Energy Recharge.
Free-to-Play Friendly (F2P Weapons) for Dori
| Weapon | How to Get Rating | |
|---|---|---|
| Best F2P | Master Key | Nod-Krai Craftable (Forgeable) Weapon - Gives 15% more Energy Recharge than Katsuragikiri Nagamasa. - Used as a stat stick since the EM buff effect doesn't matter to Dori. |
| 2nd (Forge) | Katsuragikiri Nagamasa | Inazuma Craftable (Forgeable) Weapon - Has a decent ER substat and restores Energy. - Elemental Burst should be used first before Dori's Skill since this weapon drains her Energy. |
The new Nod-Krai craftable weapon is the best F2P weapon for Dori. It has the same ER stat as Favonius Greatsword and doesn't need changing her rotation to use. The Inazuma craftable weapon can be used as alternative to Dori but you will have to change her rotation.
All Weapon ListDori Best Artifacts
The preferred Artifact Set Effects for Dori are Energy Recharge and HP%. Since there's no 4-pc set effect for it yet, her best Artifact Sets are 2-pc set effects with Energy Recharge and HP boosting.
| Artifact | Recommendation Details |
|---|---|
| Any Energy RechargeAny HP% | ★★★★★ - Best set effects for boosting both stats that Dori needs for her healing. |
| Noblesse Oblige | ★★★★ ・ - Support set that can be used by Dori if no one else holds Noblesse set. |
Recommended Artifact Stats
| Main: Flat HP Sub: HP% / Energy Recharge / Elemental Mastery |
|---|---|
| Main: Flat ATK Sub: HP% / Energy Recharge / Elemental Mastery / Flat HP |
| Main: HP% / Energy Recharge Sub: HP% / Energy Recharge / Elemental Mastery / Flat HP |
| Main: HP% Sub: Flat HP / Energy Recharge / Elemental Mastery |
| Main: Healing Bonus Sub: HP% / Energy Recharge / Elemental Mastery |
Prioritize Increasing Energy Recharge over HP
Dori can already heal pretty well without putting much investments on HP but she have a very high burst cost. The amount of energy she provides also increases from Energy Recharge making ER the more valuable stat.
Related Articles
Best Team Comp Dori
Dori Can Be Used as Healer in Any Team
| Healer | DPS | Support | Sub-DPS |
|---|---|---|---|
| Raiden Shogun | |||
| Details | |||
| - Dori's role on this team is provide Eletro application and healing. She can also increase the Energy of the On-field DPS. - Raiden Shogun is an additional source of Electro application while Mika serves as a Physical Support for Eula. - Raiden Shogun can be switched out for Zhongli if you want shields instead. | |||
Dori doesn't have a best team but certain characters can make use of her Self-Elemental Application. Jean for example can use it to spread Electro via her Elemental Burst. But this is only great for Electro-Charged or Hyperbloom comps since they don't knock back characters.
Other Team Comps For Dori
Lunar-Charged Team with Dori
| Team | Detail | |
|---|---|---|
| Flins | - Dori can be used as 2nd Electro for a Lunar-Charged/Electro-Charged team. - Since Flins can easily use his Burst multiple times and generate a lot of Particles, Dori will be able to benefit from them. | |
| Sucrose | ||
Hyperbloom Team with Dori
| Team | Detail | |
|---|---|---|
| Lauma | - Hyperbloom Team with Lauma as On-Field Reaction Driver. - Dori's Electro application is spread out by Jean's Burst. - Yelan's Off-Field Hydro is triggered by Lauma's Normal Attacks. - Dori has to be built on EM instead of HP for Hyperbloom Damage. | |
| Yelan | ||
Free To Play Friendly Party
| Team | Detail | |
|---|---|---|
| Barbara | - F2P Hyperbloom with Barbara as the On-Fielder. - Fischl generates Energy Particles while Dendro Traveler applies Dendro. - Dendro Traveler can be replaced by Yaoyao or Collei. | |
| Dendro Traveler | Fischl | |
Team Rotation of Dori and Combos
Basic Team Rotation with Healer Dori
| Basic Rotation with Healer Dori |
|---|
| 1. Use other Support/Sub-DPS characters' abilities. 2. Use Elemental Burst then use Elemental Skill. 3. Switch to On-Field character. |
Dori's rotation is straightforward and simple. Since she gets extra Energy from her Skill, she can use it after using her Elemental Burst. If using Sacrificial Greatsword, you can use her Skill twice. This weapon also helps in allowing Dori to use her Elemental Burst immediately in Stygian Onslaught.
Basics of Using Dori (Beginner Guide)
Elemental Burst Reliant Healer
Dori is an Electro healer that is reliant on her Elemental Burst to heal and buff the active character. Her Elemental Skill is primarily used to funnel Energy to her so she can use her Burst.
Healing Scales on her Max HP
The healing provided by Dori's Elemental Burst scales on her Max HP. It is also able to restore Energy to the active character.
Needs Both Energy Recharge and HP
Dori's Elemental Burst has a high Energy cost of 80. Her Passive allows her to gain more Energy per 100% Energy Recharge she has but her healing does not scale on her ER, making building HP still important for her.
Elemental Skill, Burst and Abilities Guide for Dori
How To Use Dori's Skills & Passives?
Electro Healer With Unique Elemental Application

Dori is an Electro Healer who can apply Electro on the active character when her Elemental Burst is active. As one of the few character who can have a longer Self-Application of an Element, this makes her compatible with Jean's Self-Anemo with her Elemental Burst.
Elemental Burst Is Her Source Of Healing And Application
▲ Electro is continuously applied to the active character when Dori's Burst is active.
Dori's Healing is from her Elemental Burst. It's also where her Self-Electro Application comes from. She can also restore Energy to the active character with her Burst.
Elemental Skill Used For Energy
Dori's Elemental Skill is a multi-hit attack that works great with Sacrificial Greatsword. It's primarily used to regenerate Energy for Dori's Burst. One of her Passives allows her get more Energy from her Skill.
Requires Good Energy Recharge And Hp For Healing
Since Dori is reliant on her Elemental Burst for healing, she needs a good amount of Energy Recharge. Additionally, HP is another stat she needs since her Healing scales from it.
Should You Pull for Dori's Constellation Or Best Weapon?
Aim for C6 if You're Able To
| Constellation Priority |
|---|
| C6 > C4 > C1-C3 > C5 |
C6 Unlocks Dori's On-Field Potential
Prior to activating C6, you would mainly use Dori as a healer that can apply Electro, albeit unreliably. Her C4 makes her supportive capabilities a lot better by increasing her healing and giving her teammates Energy Recharge, which is always nice to have in teams that could find usage out of her. Her C6, however, is where Dori can perform decently as the on-field Electro character in an Aggravate or Hyperbloom team. If you would like Dori to reach her maximum potential, consider getting her C6 if you have the means to do so.
Dori's Constellations & Effects
| Rating | Constellation Effect |
|---|---|
| ★★・・・ | C1: Additional Investment The number of After-Sales Service Rounds created by Troubleshooter Shots is increased by 1. |
| ★・・・・ | C2: Special Franchise When you are in combat and the Jinni heals the character it is connected to, it will fire a Jinni Toop from that character's position that deals 50% of Dori's ATK DMG. |
| ★★★・・ | C3: Wonders Never Cease Increases the Level of Alcazarzaray's Exactitude by 3. Maximum upgrade level is 15. |
| ★★★★・ | C4: Discretionary Supplement The character connected to the Jinni will obtain the following buffs based on their current HP and Energy: - When they HP is lower than 50%, they gain 50% Incoming Healing Bonus. - When their Energy is less than 50%, they gain 30% Energy Recharge. |
| ★★★・・ | C5: Value For Mora Increases the Level of Spirit-Warding Lamp: Troubleshooter Cannon by 3. Maximum upgrade level is 15. |
| ★★★★★ | C6: Sprinkling Weight Dori gains the following effects for 3s after using Spirit-Warding Lamp: Troubleshooter Cannon: - Electro Infusion - When Normal Attacks hit opponents, all nearby party members will heal HP equivalent to 4% of Dori's Max HP. This type of healing can occur once every 0.1s. |
Dori's Constellation Name is Magicae Lucerna
| Magicae Lucerna |
|---|
 |
Ascension Materials for Dori Talents & Level
Materials Per Ascension Level
| Lvl 20 | Vajrada Amethyst Sliver x1Kalpalata Lotus x3Faded Red Satin x3 |
|---|---|
| Lvl 40 | Vajrada Amethyst Fragment x3Thunderclap Fruitcore x2 Kalpalata Lotus x10Faded Red Satin x15 |
| Lvl 50 | Vajrada Amethyst Fragment x9Thunderclap Fruitcore x4 Kalpalata Lotus x20Rich Red Brocade x12 |
| Lvl 60 | Vajrada Amethyst Chunk x6Thunderclap Fruitcore x8 Kalpalata Lotus x30Rich Red Brocade x18 |
| Lvl 70 | Vajrada Amethyst Chunk x3Thunderclap Fruitcore x12 Kalpalata Lotus x45Trimmed Red Silk x12 |
| Lvl 80 | Vajrada Amethyst Gemstone x6Thunderclap Fruitcore x20 Kalpalata Lotus x60Trimmed Red Silk x24 |
| Level 1 | Default |
|---|---|
| Level 2 | Teachings Of Ingenuity x3Faded Red Satin x6 |
| Level 3 | Guide To Ingenuity x2 Rich Red Brocade x3 |
| Level 4 | Guide To Ingenuity x4Rich Red Brocade x4 |
| Level 5 | Guide To Ingenuity x6 Rich Red Brocade x6 |
| Level 6 | Guide To Ingenuity x9 Rich Red Brocade x9 |
| Level 7 | Philosophies Of Ingenuity x4 Trimmed Red Silk x4 Bloodjade Branch x1 |
| Level 8 | Philosophies Of Ingenuity x6 Trimmed Red Silk x6 Bloodjade Branch x1 |
| Level 9 | Philosophies Of Ingenuity x12 Trimmed Red Silk x9 Bloodjade Branch x2 |
| Level 10 | Philosophies Of Ingenuity x16 Trimmed Red Silk x12 Bloodjade Branch x2 Crown of Insight x1 |
| Level 11 | Unlocked via Constellation |
| Level 12 | Unlocked via Constellation |
| Level 13 | Unlocked via Constellation |
Related Links
Dori Skills & Talents Details
Normal Attack: Marvelous Sword-Dance (Modified)
Normal Attack
| Effect |
|---|
| Performs up to 3 consecutive strikes. |
| Lv1 | Lv2 | Lv3 | Lv4 | Lv5 | Lv6 | Lv7 | Lv8 | Lv9 | Lv10 | Lv11 | |
|---|---|---|---|---|---|---|---|---|---|---|---|
| 1-Hit DMG | 90.2% | 97.6% | 104.9% | 115.4% | 122.7% | 131.1% | 142.7% | 154.2% | 165.7% | 178.3% | 190.9% |
| 2-Hit DMG | 41.1%+43.1% | 44.4%+46.6% | 47.8%+50.1% | 52.5%+55.2% | 55.9%+58.7% | 59.7%+62.7% | 65%+68.2% | 70.2%+73.7% | 75.5%+79.2% | 81.2%+85.2% | 86.9%+91.3% |
| 3-Hit DMG | 128.4% | 138.8% | 149.3% | 164.2% | 174.7% | 186.6% | 203% | 219.5% | 235.9% | 253.8% | 271.7% |
▲Use side-scroll to see percentage per level.
Charged Attack
| Effect |
|---|
| Drains Stamina over time to perform continuous spinning attacks against all nearby opponents. At the end of the sequence, performs a more powerful slash. |
| Lv1 | Lv2 | Lv3 | Lv4 | Lv5 | Lv6 | Lv7 | Lv8 | Lv9 | Lv10 | Lv11 | |
|---|---|---|---|---|---|---|---|---|---|---|---|
| Charged Attack Spinning DMG | 62.5% | 67.6% | 72.7% | 80% | 85.1% | 90.9% | 98.9% | 106.9% | 114.9% | 123.6% | 133.6% |
| Charged Attack Final DMG | 113% | 122% | 132% | 145% | 154% | 164% | 179% | 193% | 208% | 224% | 242% |
| Stamina Cost | 40/s | 40/s | 40/s | 40/s | 40/s | 40/s | 40/s | 40/s | 40/s | 40/s | 40/s |
| Max Duration | 5s | 5s | 5s | 5s | 5s | 5s | 5s | 5s | 5s | 5s | 5s |
▲Use side-scroll to see percentage per level.
Plunging Attack
| Effect |
|---|
| Plunges from mid-air to strike the ground below, damaging opponents along the path and dealing AoE DMG upon impact. |
| Lv1 | Lv2 | Lv3 | Lv4 | Lv5 | Lv6 | Lv7 | Lv8 | Lv9 | Lv10 | Lv11 | |
|---|---|---|---|---|---|---|---|---|---|---|---|
| Plunge DMG | 74.6% | 80.7% | 86.7% | 95.4% | 101.5% | 108.4% | 118% | 127.5% | 137% | 147.4% | 157.8% |
| Low Plunge DMG | 149% | 161% | 173% | 191% | 203% | 217% | 236% | 255% | 274% | 295% | 316% |
| High Plunge DMG | 186% | 201% | 217% | 238% | 253% | 271% | 295% | 318% | 342% | 368% | 394% |
▲Use side-scroll to see percentage per level.
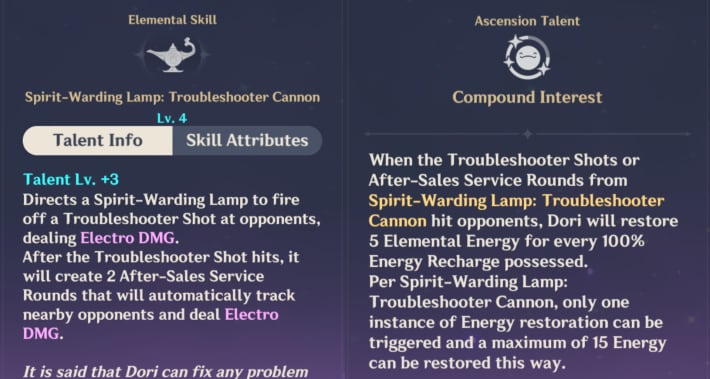
Spirit-Warding Lamp: Troubleshooter Cannon (Elemental Skill)
| Effect |
|---|
| Directs a Spirit-Warding Lamp to fire off a Troubleshooter Shot at opponents, dealing Electro DMG. After the Troubleshooter Shot hits, it will create 2 After-Sales Service Rounds that will automatically track nearby opponents and deal Electro DMG. |
| Lv1 | Lv2 | Lv3 | Lv4 | Lv5 | Lv6 | Lv7 | Lv8 | Lv9 | Lv10 | Lv11 | Lv12 | Lv13 | |
|---|---|---|---|---|---|---|---|---|---|---|---|---|---|
| Troubleshooter Shot DMG | 147.3% | 158.3% | 169.4% | 184.1% | 195.1% | 206.2% | 220.9% | 235.6% | 250.4% | 265.1% | 279.8% | 294.6% | 313% |
| After-Sales Service Round DMG | 31.6% | 33.9% | 36.3% | 39.5% | 41.8% | 44.2% | 47.3% | 50.5% | 53.7% | 56.8% | 60% | 63.1% | 67.1% |
▲Use side-scroll to see percentage per level.
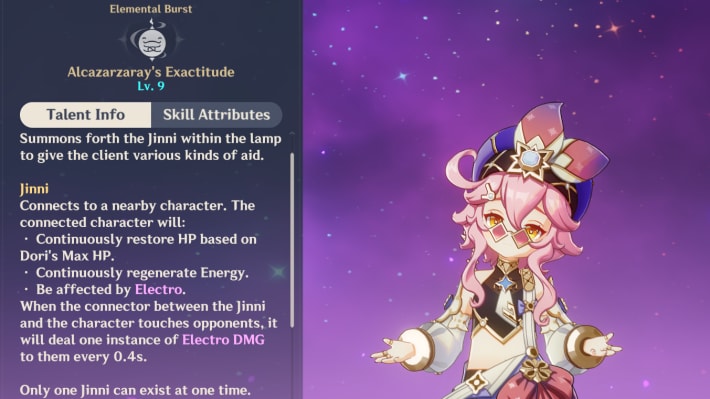
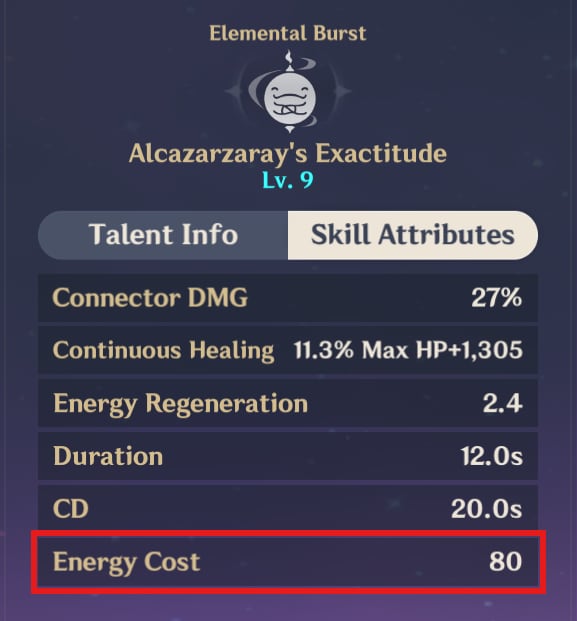
Alcazarzaray's Exactitude (Elemental Burst)
| Effect |
|---|
| Summons forth the Jinni within the lamp to give the client various kinds of aid. |
Jinni
| Effect |
|---|
| Connects to a nearby character. The connected character will: · Continuously restore HP based on Dori's Max HP. · Continuously regenerate Energy. · Be affected by Electro. When the connector between the Jinni and the character touches opponents, it will deal one instance of Electro DMG to them every 0.4s. Only one Jinni can exist at one time. |
| Lv1 | Lv2 | Lv3 | Lv4 | Lv5 | Lv6 | Lv7 | Lv8 | Lv9 | Lv10 | Lv11 | Lv12 | Lv13 | |
|---|---|---|---|---|---|---|---|---|---|---|---|---|---|
| Connector DMG | 16% | 17% | 18% | 20% | 21% | 22% | 24% | 25% | 27% | 29% | 30% | 32% | 34% |
| Continuous Healing | 6.7% Max HP+641 | 7.2% Max HP+706 | 7.7% Max HP+775 | 8.3% Max HP+850 | 8.8% Max HP+930 | 9.3% Max HP+1016 | 10% Max HP+1107 | 10.7% Max HP+1203 | 11.3% Max HP+1305 | 12% Max HP+1412 | 12.7% Max HP+1524 | 13.3% Max HP+1642 | 14.2% Max HP+1765 |
| Energy Regeneration | 1.6 | 1.7 | 1.8 | 1.9 | 2 | 2.1 | 2.2 | 2.3 | 2.4 | 2.5 | 2.5 | 2.5 | 2.5 |
| Duration | 12s | 12s | 12s | 12s | 12s | 12s | 12s | 12s | 12s | 12s | 12s | 12s | 12s |
| CD | 20s | 20s | 20s | 20s | 20s | 20s | 20s | 20s | 20s | 20s | 20s | 20s | 20s |
| Energy Cost | 80 | 80 | 80 | 80 | 80 | 80 | 80 | 80 | 80 | 80 | 80 | 80 | 80 |
▲Use side-scroll to see percentage per level.
An Eye for Gold
| Effect |
|---|
| After a character connected to the Jinni triggers an Electro-Charged, Superconduct, Overloaded, Quicken, Aggravate, Hyperbloom, or an Electro Swirl or Crystallize reaction, the CD of Spirit-Warding Lamp: Troubleshooter Cannon is decreased by 1s. This effect can be triggered once every 3s. |
Compound Interest
| Effect |
|---|
| When the Troubleshooter Shots or After-Sales Service Rounds from Spirit-Warding Lamp: Troubleshooter Cannon hit opponents, Dori will restore 5 Elemental Energy for every 100% Energy Recharge possessed. Per Spirit-Warding Lamp: Troubleshooter Cannon, only one instance of Energy restoration can be triggered and a maximum of 15 Energy can be restored this way. |
Unexpected Order
| Effect |
|---|
| Has a 25% chance to recover some of the materials used when crafting Character and Weapon Materials. |
Who Is Dori?
Owner Of The Palace Of Alcazarzaray
Dori is a wealthy merchant from Sumeru who owns the Palace of Alcazarzaray that Kaveh designed. Dori can be encountered in the Sumeru Archon Quest selling canned knowledge that the Traveler and Alhaitham needed.
Acquaintances With Alice and Skirk
In Dori's Profile, it was mentioned that the two met and had a promise. Alice became a supplier of inventions to Dori while Skirk supplied Dori with rare monster carcasses.
A Mora Lover

Dori's main goal in life to make Mora. This desire started when her elder sister became very ill when their family was impoverished. It was the same desire that granted Dori a Vision.
Dori Voice Actor & Their Notable Roles

English Voice Actor: Anjali Kunapaneni
| Notable Roles | |
|---|---|
| Alma | Monster Hunter Wilds |
| Ayaka Sajou | Fate/strange Fake |
| Sushang | Honkai: Star Rail |
| Sakura | Goddess of Victory: Nikke |
| Cardigan | Arknights |
Japanese Voice Actor: KANEDA Tomoko
| Notable Roles | |
|---|---|
| Chiyo Mihama | Azumanga Daioh |
| Nel Tu | Bleach |
| Cabbage | Konosuba |
| Gudako | Learn with Manga! FGO |
Character Related Articles
Character Tier Lists
All Characters
| Characters By Rarity | |||||||||||
|---|---|---|---|---|---|---|---|---|---|---|---|
| Characters By Roles | |||||||||||
| DPS List | Support List | Sustain List | |||||||||
| On-Field List | Off-Field List | ||||||||||
| Characters By Element | |||||||||||
| Hydro | Anemo | Electro | |||||||||
| Dendro | |||||||||||
| Characters By Nation | |||||||||||
| Mondstadt | Liyue | ||||||||||
| Fontaine | Natlan | ||||||||||
| Snezhnaya | Nod-Krai | ||||||||||


