Best Character Tier List for July 2026 for Genshin Impact. See the strongest meta characters, latest character tiers, best characters for version 6.6 Luna 7 Sandrone Tier.
| Ranking Related Guide | ||
|---|---|---|
 Character CharacterTier List | Best Team Build | Weapon Tier List |
Other Recommended Guide
Latest Rank Changes to the Tier List & Notable Characters
Current Featured Characters
| Featured Characters | |
|---|---|
| Sandrone | On-Field: SS - An on-field Stellar Conduct DPS. - Enables the Stellar-Conduct reaction. - While only competitive in Electro / Cryo teams, recent character buffs gave her decent F2P options. - She is very powerful upon release and is expected to become even more powerful with future updates. |
Buffed Characters
Rank Change History & Adjustments
| Date | Change Details |
|---|---|
| 7/1 | Added Sandrone to SS Tier. Adjusted tiers of Stellar Related characters. |
| 6/9 | Added Lohen to S Tier. Moved Varesa from SS to S. |
| 5/20 | Added Nicole and Prune to Tiers Varka moved to SS. |
| 4/8 | Added Linnea to Tiers. |
| Date | Change Details |
|---|---|
| 2/25 | Added Varka to Tiers. Adjusted On-field Characters for more clarity between their standing. |
| 2/3 | Illuga and Zibai added to tiers. |
| 1/14 | Columbina added to tiers |
| 12/03 | Durin and Jahoda added to Tiers. Sucrose moved to SS in Support, Fischl moved to SS in DPS. Albedo moved to S in DPS and Support. Venti moved to S in Support and DPS. Klee moved to S in DPS. Mona moved to A in Off-Field and S in Support. |
| 10/22 | Nefer added to Tiers. |
| 9/30 | Flins added to Tiers. Aino moved to A in Support. |
| 9/10 | Aino and Lauma added to Tiers. Nahida moved to S in Support. |
| 7/30 | Ineffa added to Tiers. |
| 6/18 | Skirk and Dahlia added to Tiers. |
| 6/4 | Ranking Category "Overall" has been removed. Thank you for your feedback. |
| 5/30 | Format of Tier List has been changed to cater to the in-game roles of the characters. |
| 5/8 | |
| 5/7 | Escoffier added to SS |
| 3/26 | Added Iansan to SS Added Varesa to S |
| 1/21 | Added added to A |
| 1/1 | Added & added to SS |
| 11/20 | SS → S Alhaitham, while still a powerful DPS, is more difficult to use than other SS-tier characters. The release of Xilonen, who further buffed other top-class DPS, led us to move Alhaitham to S. S → A- Recent buffers like Xianyun and Xilonen have caused these DPS to underperform compared to their competitors. B → C- As a DPS, Kachina performs poorly in higher-level content compared to others in the tier. S → SS- Given Emilie's separate niche from Nahida and the recent popularity of Burning comps, we decided to move her to SS. A → S- Chiori's sheer damage, ease of use, and status as the preferred option for any Geo team make her outperform her competitors. - The buff Chevreuse provides at C0, while restrictive, is extremely powerful and opens up many team options. C → BWith the growing importance of off-field Pyro application and the popularity of Burning teams, Dehya stands out as a unique off-field character who uses her Elemental Skill for this purpose. |
| 10/9 | Xilonen added to SS support. |
| 9/17 | Kinich added to S. |
| 8/28 | added to S. Kachina added to A. |
| 8/6 | added to S. |
| 6/28 | Tier list format revised for easier viewing. |
| 6/25 | added to A. |
| 6/5 | added to S. added to A. |
| 4/28 | moved to SS. |
| 4/24 | added to S temporarily. |
| 3/13 | moved to A added to A |
| 2/2 | |
| 1/31 | added to Tiers. |
| 1/9 | added to Tiers. |
| 1/4 | moved to S |
Best Character Tier List Summary Table
For Role Description & Basis, check below: Role Explanation
Role Explanation & Tier Basis
Role Explanation| On-Field | Description: - These are characters that stay on-field the longest during combat. Rating Basis: - The character's strength as an on-field unit. - The character's ease of use. - The character's flexibility. |
|---|---|
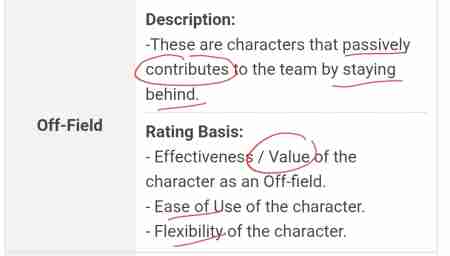
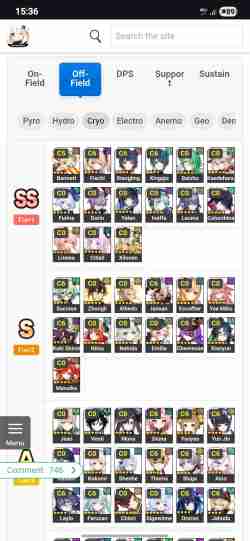
| Off-Field | Description: - These are characters that contribute to the team passively while off-field. Rating Basis: - The character's effectiveness and value as an off-field unit. - The character's ease of use. - The character's flexibility. |
| DPS | Description: - These are characters that have high damage-dealing capabilities in their kit. - Includes both On-Field DPS (Main DPS) and Off-Field DPS (Sub-DPS). Rating Basis: - The amount of damage the character contributes to the team. - The character's flexibility in various team comps. - The character's impact on team comps. |
| Support | Description: - These are characters that provide damage-increasing abilities (including buffs and debuffs). Rating Basis: - The effectiveness of the buffs they provide. - The character's flexibility in various teams. - Other aspects of the character's kit are also taken into consideration. |
| Sustain | Description: - These are characters that help your team survive incoming enemy damage. Rating Basis: - The effectiveness of the character's ability to keep the team healthy. - The ease of using their sustain abilities. - The character's other contributions to the team. - The character's flexibility in various team comps. |
Character Top Tier Rankings With Evaluations
The character explanations are found at their highest rank. For example, if Albedo's Highest Ranking is A, he will be placed in the A Tab.
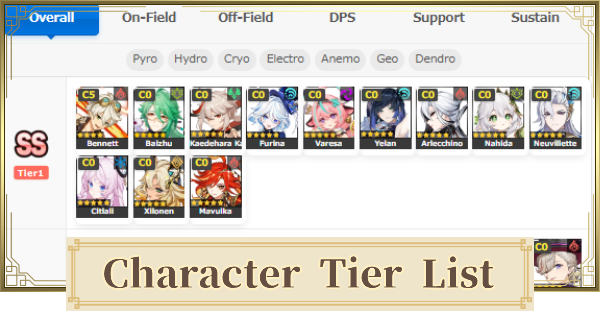
SS (Tier 1)
| Baizhu | DPS | Support | Sustain |
|---|---|---|---|
| - | |||
| On-Field | Off-Field | - | |
| - | - | ||
| - Outstanding heals and ability to buff Dendro reaction makes him a powerful support. - Shields provide resistance making him amazing for characters like Cyno that needs resistance to interruption and off-field Dendro. - Off-field Dendro is very minimal and considered as a bonus most of the time. - C1 and C2 gives more energy and Dendro infliction. | |||
| Bennett | DPS | Support | Sustain |
| - | |||
| On-Field | Off-Field | - | |
| - | - | ||
| - Extremely flexible and can fit any team comp easily. - When played correctly, he can easily add 1000 ATK to your team. - Easy to build Burst since there is no RNG aspect needed to maximize his buff. - Without C1, his buff has HP restriction. | |||
| Citlali | DPS | Support | Sustain |
| - | |||
| On-Field | Off-Field | - | |
| - | - | ||
| - Unique support that can boost Hydro and Pyro damage through her passive. - Good Cryo sub-DPS that scales on EM, allowing for higher reaction damage. | |||
| Columbina | DPS | Support | Sustain |
| - | |||
| On-Field | Off-Field | - | |
| - | |||
| - Amazing as a Lunar reaction support and helps apply Hydro to trigger reactions. Columbina also enables Lunar-Charged, Lunar-Bloom and Lunar-Crystallize to happen. - Can be used as On-Fielder as well since she has innate Hydro infusion on her attacks. | |||
| Durin | DPS | Support | Sustain |
| - | |||
| On-Field | Off-Field | - | |
| - | - | ||
| - A powerful Sub-DPS that is able to shred various elemental resistance of enemies. - Easy to use and fits multiple teams. | |||
| Escoffier | DPS | Support | Sustain |
| On-Field | Off-Field | - | |
| - | - | ||
| - Full potential is in Cryo/Hydro only teams but is great as a standalone character for healing. - Can be built as sub-DPS or healer easily since her damage and healing both scale on her Attack. | |||
| Fischl | DPS | Support | Sustain |
| - | |||
| On-Field | Off-Field | - | |
| - | - | ||
| - One of the best character to use for Aggravate reaction. - Provides huge damage, energy and frequent Electro attacks even at C0. - At C6, Fischl gives more coordinated Electro DMG furthering her personal damage and sub-DPS potential. | |||
| Flins | DPS | Support | Sustain |
| - | - | ||
| On-Field | Off-Field | - | |
| - | - | ||
| - An Electro DPS specializing in Lunar-Charged reactions. - Enables the Lunar-Charged reaction for the team and deals direct Lunar-Charged DMG. - Synergizes well with Ineffa, as they both boost its damage. | |||
| Furina | DPS | Support | Sustain |
| On-Field | Off-Field | - | |
| - | - | ||
| - Powerful Sub-DPS and can provide a high amount of DMG buff for the team. - Also acts as a healer but you will sacrifice the damage from Skill. - As a Sub-DPS, she drains the life of the whole team so AoE healers is a must. - Works amazing at various comps. - With C2, the amount of DMG bonus it gives increases. | |||
| Iansan | DPS | Support | Sustain |
| - | |||
| On-Field | Off-Field | - | |
| - | - | ||
| - Amazing side-grade to Bennett providing powerful ATK buff and weaker healing. - Can be used at various team comps. - Can wield Scrolls Set or Noblessed Oblige with ease furthering her buffing. | |||
| Ineffa | DPS | Support | Sustain |
| On-Field | Off-Field | - | |
| - | - | ||
| - An Electro Sub-DPS and Shielder that can enable Electro-Charged to CRIT and deal more damage. - Due to the split scaling needed for her (both Elemental Mastery and ATK is needed), she can be somewhat difficult to build since you also have to focus on her CRIT stats due to how Lunar-Charged works. | |||
| Kaedehara Kazuha | DPS | Support | Sustain |
| - | - | ||
| On-Field | Off-Field | - | |
| - | - | ||
| - Greatly increase Elemental DMG Bonus and reduce resistance of enemies with Viridescent Venerer. - Can easily gather enemies using Elemental Skill. - Elemental Burst can inflict the absorbed Element which is great for reaction teams. - C2 gives additional Elemental Mastery to the team. | |||
| Lauma | DPS | Support | Sustain |
| - | - | ||
| On-Field | Off-Field | - | |
| - | - | ||
| Tier description is being prepared! | |||
| Linnea | DPS | Support | Sustain |
| - | |||
| On-Field | Off-Field | - | |
| - | - | ||
| - Deals high, consistent damage and can also inflict powerful burst damage with her Elemental Skill. - Provides buffs, healing, and decent personal damage, making her a valuable upgrade for various teams, not just those centered around Zibai. - Excellent for mining ores in the overworld. | |||
| Mavuika | DPS | Support | Sustain |
| - | |||
| On-Field | Off-Field | - | |
| - | |||
| - Amazing Pyro DPS that utilizes the Nightsoul consumption of teammates. - Can apply Pyro damage off-field using tap Skill. - Her Elemental Burst can be used to buff the damage dealt of the active character. | |||
| Nefer | DPS | Support | Sustain |
| - | - | ||
| On-Field | Off-Field | - | |
| - | - | ||
| - Lunar-Bloom DPS that can deal powerful damage with her Shadow attacks. - Reliant on Ascendant Gleam for buffs but can do amazingly in a good team comp. | |||
| Nicole | DPS | Support | Sustain |
| - | |||
| On-Field | Off-Field | - | |
| - | - | ||
| - Consolidates the sustain and buffing roles into a single slot. - Provides a valuable teamwide ATK buff, ideal for teams with multiple ATK-scaling damage dealers. - Her durable shield prevents interruptions, allowing the on-field DPS to execute their full damage combo. - A direct upgrade for Hexerei teams, especially when paired with Durin. | |||
| Sandrone | DPS | Support | Sustain |
| - | - | ||
| On-Field | Off-Field | - | |
| - | - | ||
| - Dedicated Stellar-Conduct On-Field DPS with long-range Cryo attacks - Performance is comparable to Lunar DPSes but her team is still likely to gain new teammate upgrades. - Since the cooldown of her Skill is so short, she has no issues with uptime. | |||
| Skirk | DPS | Support | Sustain |
| - | - | ||
| On-Field | Off-Field | - | |
| - | - | ||
| - Great On-Field DPS for Cryo teams. - Has a wide range for her AoE Normal Attacks in Seven-Phase Flash mode. - Reliant on teamates to give her stacks to increase her damage. | |||
| Varka | DPS | Support | Sustain |
| - | - | ||
| On-Field | Off-Field | - | |
| - | - | ||
| - A Powerful DPS and exploration character weilds 2 Elements: Anemo & PECH.- He features several team-building constraints that, when satisfied, grant him a 100% damage boost.- Amazing for exploration especially when paired with Mondstadt characters. | |||
| Xilonen | DPS | Support | Sustain |
| - | |||
| On-Field | Off-Field | - | |
| - | - | ||
| - Amazing support that shreds resistance of enemies allowing your characters to deal more damage. - Also has the ability to heal and sustain the team. - Abilites are reliant on team mates. | |||
| Yae Miko | DPS | Support | Sustain |
| - | - | ||
| On-Field | Off-Field | - | |
| - | - | ||
| - Amazing off-field Electro DMG from Elemental Skill. - Scales amazingly with Elemental Mastery making Yae Miko amazing at Dendro comps. - Elemental Burst for instantaneous damage. - C2 greatly increases the range of Elemental Skill and also the damage of it. | |||
| Yelan | DPS | Support | Sustain |
| - | - | ||
| On-Field | Off-Field | - | |
| - | - | ||
| - Amazing personal damage and Hydro infliction off-field. - Elemental Skill is both powerful and useful for Exploration. - Also provides DMG Bonus for the on-field character. - High Elemental Burst Cost. - C1 is recommended for more energy for Elemental Burst. | |||
| Zhongli | DPS | Support | Sustain |
| - | |||
| On-Field | Off-Field | - | |
| - | - | ||
| - Zhongli has the strongest shield in-game and shreds the all DMG resistance of enemies around it. - Can petrify enemies with Elemental Burst. - Long animations for Elemental Burst and split scaling between DMG and shields. - Sometimes the pillar summoned disrupts battles but it is good for exploration. - C2 allows you to form shields with Elemental Burst. | |||
| Zibai | DPS | Support | Sustain |
| - | - | ||
| On-Field | Off-Field | - | |
| - | - | ||
| - On-Field Lunar-Crystallize focused attacker that deals powerful damage with Elemental Skill-based Normal Attack and Elemental Burst. - Powerful character that has limited teams but produce top-level damage even with F2P Teams. | |||
S (Tier 2)
| Albedo | DPS | Support | Sustain |
|---|---|---|---|
| - | |||
| On-Field | Off-Field | - | |
| - | - | ||
| - Amazing damage support as a Hexerei character, giving 42% damage bonus buff to the active Hexerei character (12% if non-Hexerei). - Can also buff Elemental Mastery by 125 with his Burst. | |||
| Arlecchino | DPS | Support | Sustain |
| - | - | ||
| On-Field | Off-Field | - | |
| - | - | ||
| - A Main DPS that deals powerful damage to single and multiple targets. - Works amazing in various Pyro teams from Mono-Pyro to Overload. - Very Powerful but not beginner friendly. Recommended to use a shielder in her comps. - C1 gives a much needed resistance to interruption. | |||
| Chasca | DPS | Support | Sustain |
| - | - | ||
| On-Field | Off-Field | - | |
| - | - | ||
| - Great on-field driver for Rainbow Swirl teams - Allows for support Pyro/Hydro/Electro/Cryo characters because she can convert her bullets to their element and use it for attacking | |||
| Chevreuse | DPS | Support | Sustain |
| - | |||
| On-Field | Off-Field | - | |
| - | - | ||
| - Limits the team comps you can use but gives powerful buff and enemy resisitance shred in exchange. - With Max Constellation, Chevreuse allows Overload teams to be competitive against other team comps. | |||
| Clorinde | DPS | Support | Sustain |
| - | - | ||
| On-Field | Off-Field | - | |
| - | - | ||
| - Powerful personal damage that further increases with reaction. - Frequent self-heals making her not require shields despite having times that she does not receive healings from allies. - Flexible team comp and has a lot of Built-in CRIT Rate in her kit making Clorinde really easy to build. - C1 and C2 are amazing DMG increase that directly increases the damage produced by Clorinde. | |||
| Emilie | DPS | Support | Sustain |
| - | - | ||
| On-Field | Off-Field | - | |
| - | - | ||
| - Powerful off-field Dendro that is great at wave of enemies. - Further increase damage when Burning happens. | |||
| Gaming | DPS | Support | Sustain |
| - | - | ||
| On-Field | Off-Field | - | |
| - | - | ||
| - Great 4-Star Pyro DPS for reactions. - Plunging Attack gameplay allows for easy dodging of enemy attacks and his HP drain/self healing allows him to use Marechaussee set for easier CR/CD building. | |||
| Jean | DPS | Support | Sustain |
| - | - | ||
| On-Field | Off-Field | - | |
| - | - | ||
| - Her Elemental Burst provides powerful AoE healing and self-cleansing. - As an Anemo character, she can reduce Elemental RES of enemies with the Viridescent Venerer artifact set. - Her 4th Constellation also shreds Anemo RES of enemies. | |||
| Kinich | DPS | Support | Sustain |
| - | - | ||
| On-Field | Off-Field | - | |
| - | - | ||
| - Amazing movement and powerful raw Dendro DMG. - Most of the damage comes from one-shot so building CRIT Rate is important. - Amazing even outside at Natlan. | |||
| Klee | DPS | Support | Sustain |
| - | - | ||
| On-Field | Off-Field | - | |
| - | - | ||
| - Powerful Charged Attack and Pyro DMG. -Long animations making her feel clunky to play. - Elemental Burst deals powerful damage but has random targetting. - C2 can provide DEF Shred which is amazing for various comps. | |||
| Kuki Shinobu | DPS | Support | Sustain |
| - | - | ||
| On-Field | Off-Field | - | |
| - | - | ||
| - Amazing healer / Sub-DPS for Hyperbloom and other Dendro reaction teams. - Scales amazingly with Elemental Mastery so she produces great damage through reactions while also healing a decent amount to sustain the team. - Inflicts self-damage so you need to be careful when using. - Constellation 2 is recommended so you have 0 down-time of Elemental Skill. | |||
| Lan Yan | DPS | Support | Sustain |
| - | |||
| On-Field | Off-Field | - | |
| - | - | ||
| - Anemo Shielder who can use VV in both support and DPS build. - A powerful shielder and a decent enabler. | |||
| Lohen | DPS | Support | Sustain |
| - | - | ||
| On-Field | Off-Field | - | |
| - | - | ||
| - A Cryo on-field DPS who enables Durin (in his Denial of Darkness mode) to trigger Melt reactions thanks to his consistent elemental application. - He synergizes extremely well with the Durin-Nicole pairing, as he also benefits from Nicole's ATK buffs and shield as a Normal and Charged Attack-based DPS. - He can also perform well in a Freeze team with Escoffier and Mona. | |||
| Mualani | DPS | Support | Sustain |
| - | - | ||
| On-Field | Off-Field | - | |
| - | - | ||
| - A character that deals powerful damage with fairly long set-up time. - Amazing at Vaporize damage comps since it doublles her big damage. - Very convinient for exploration especially at Natlan. | |||
| Nahida | DPS | Support | Sustain |
| - | - | ||
| On-Field | Off-Field | - | |
| - | - | ||
| - Amazing Off-Field Dendro that has 100% up-time. - Great character to support any Dendro Comps. - Can also buff the Elemental Mastery of the on-field character with her Elemental Burst. - Slightly struggles against waves of enemies and requires reactions to produce damage. - C2 greatly increases the damage potential of all Dendro Comps. | |||
| Navia | DPS | Support | Sustain |
| - | - | ||
| On-Field | Off-Field | - | |
| - | - | ||
| - Tons of Frontload damage from Elemental Skill that utilizes Crystalize. - Can apply consistent geo with Elemental Burst. - Navia does not produce much damage when E. Skill is on cooldown. - Constellations of Navia focuses on increasing her personal damage. | |||
| Neuvillette | DPS | Support | Sustain |
| - | - | ||
| On-Field | Off-Field | - | |
| - | - | ||
| - One of the best DPS in-game that is flexible in reaction and team comp. - Great at dealing against both Solo or Multiple enemies. | |||
| Nilou | DPS | Support | Sustain |
| - | |||
| On-Field | Off-Field | - | |
| - | - | ||
| - Powerful & easy to build because Talent Level is optional. - Blooms produced have bigger damage and AoE. - Restricted to Dendro and Hydro to activate ability. - Works amazing even with F2P characters. - C2 shreds Hydro and Dendro Resistance for further damage. | |||
| Prune | DPS | Support | Sustain |
| - | - | ||
| On-Field | Off-Field | - | |
| - | - | ||
| - Swirl support that can buff the active character's damage based on Prune's ATK. └ Reactions triggered by Hexerei characters give Prune a 60% ATK buff. If the reaction is Swirl, the triggering character also gains a 30% ATK buff. - Reliant on Elemental Burst for her buffs. | |||
| Qiqi | DPS | Support | Sustain |
| - | |||
| On-Field | Off-Field | - | |
| - | - | ||
| - Consistent healing through Elemental Skill and Burst. - Long cooldowns for Elemental Skill. - Poor Cryo application and does not provide other benefit / buffs than healing. - Constellations are mostly DMG reducing buffs. | |||
| Sangonomiya Kokomi | DPS | Support | Sustain |
| - | |||
| On-Field | Off-Field | - | |
| - | |||
| - Very versatile character since she can deal damage, provide off-field Hydro, and heals. - Especially shines at Hydro reaction comps like Bloom. - As a DPS, she can be paired with Furina to deal powerful damage. - Constellations mainly boost Main DPS capabilities. | |||
| Sigewinne | DPS | Support | Sustain |
| - | |||
| On-Field | Off-Field | - | |
| - | - | ||
| - Amazing AoE healing from Elemental Skill. - Has the ability to buff Skill Damage. - Decent damage with Elemental Burst but it does not last long. | |||
| Sucrose | DPS | Support | Sustain |
| - | - | ||
| On-Field | Off-Field | - | |
| - | - | ||
| - Buffs Elemental Mastery of Swirled Element. - Has decent but inconsistent crowd control. - C1 is very important because of her high Elemental Burst cost. - C6 makes her competitive to top-class buffers like Kazuha and is better than him in Hexerei teams. | |||
| Varesa | DPS | Support | Sustain |
| - | - | ||
| On-Field | Off-Field | - | |
| - | - | ||
| - Amazing damage from Plunging attacks and can work with various Electro reaction. - Easy to use and is amazing for both early and end-game. - Amazing at travelling as well because of it skill especially at Natlan. | |||
| Venti | DPS | Support | Sustain |
| - | |||
| On-Field | Off-Field | - | |
| - | |||
| - Best Crowd-Control in-game that can easily gather enemies in one group. - Does not provide huge buff or damage but can debuff with Viridescent Venerer. - Energy Recharge scaling makes his Elemental Burst spammable. - Elemental Skill and passive is great for travelling. - C2 provides a rare Anemo Resistance Shred for the team. | |||
| Xiangling | DPS | Support | Sustain |
| - | - | ||
| On-Field | Off-Field | - | |
| - | - | ||
| - Amazing off-field Pyro application from Elemental Burst & Skill. - High Burst cost but also provide powerful damage especially with reactions. - Very useful in late-game against harder contents. - C4 is amazing for increased duration of Elemental Burst. | |||
| Xianyun | DPS | Support | Sustain |
| - | |||
| On-Field | Off-Field | - | |
| - | - | ||
| - Amazing healer that can boost the DMG of Plunge Attacks. - Allows every character to do Plunge Attack because of her Elemental Burst. - Can jump really high with Elemental Skill making her a great character for Exploration. - C2 greatly increases the DMG buff provided by Cloud Retainer to plunge attacks. | |||
| Xingqiu | DPS | Support | Sustain |
| - | |||
| On-Field | Off-Field | - | |
| - | - | ||
| - Elemental Burst provides huge damage and Hydro application. - Elemental Skill slightly heals and reduce damage taken. Long cooldown but can be supported with Sacrificial Sword. - At C6, Xingqiu has the most frequent Hydro application in-game. | |||
| Yaoyao | DPS | Support | Sustain |
| - | - | ||
| On-Field | Off-Field | - | |
| - | - | ||
| - Powerful healing and decent Dendro infliction. - Elemental Burst heals the whole team while inflicting plenty of Dendro. - Elemental Burst has high cost and requires you to stay on-field however. - C4 increases Elemental Mastery allowing you to focus on HP & Energy only. | |||
A (Tier 3)
| Aino | DPS | Support | Sustain |
|---|---|---|---|
| - | - | ||
| On-Field | Off-Field | - | |
| - | - | ||
| Tier description is being prepared! | |||
| Alhaitham | DPS | Support | Sustain |
| - | - | ||
| On-Field | Off-Field | - | |
| - | - | ||
| - Powerful AoE and Single Target damage from additional attacks from Passive. - Scales with Elemental Mastery so reactions are very powerful. - Tricky to use because specific combos are required. - Constellations are mostly DMG increase but not necessary for a powerful Alhaitham. | |||
| Barbara | DPS | Support | Sustain |
| - | - | ||
| On-Field | Off-Field | - | |
| - | - | ||
| - Decent healer that uses both Elemental Skill and Burst. - Does not produce damage from abilities outside reactions. - Has decent Hydro infliction making her amazing at Bloom Teams. - C2 is decent when putting Barbara in Hydro Comps. - C6 for a free Revive. | |||
| Charlotte | DPS | Support | Sustain |
| - | - | ||
| On-Field | Off-Field | - | |
| - | - | ||
| - Powerful healing but is limited by high Energy cost in her Elemental Burst. - Elemental skill is pretty clunky but deals consistent Cryo DMG. - C4 gives more energy to Charlotte for a higher up-time of Elemental burst. - C6 provides a more consistent Cryo infliction for the team. | |||
| Childe | DPS | Support | Sustain |
| - | - | ||
| On-Field | Off-Field | - | |
| - | - | ||
| - Amazing Hydro infliction through his special mark that explodes and that transfers to enemies. - Works amazing against Multiple enemies and Hydro reaction comps. - Amazing one-shot potential from Elemental Burst. - Cooldown management is required when playing Childe. - C1 decreases cooldown for a bit allowing more space for mistakes in rotation. | |||
| Chiori | DPS | Support | Sustain |
| - | - | ||
| On-Field | Off-Field | - | |
| - | - | ||
| - Amazing Geo Sub-DPS that deals periodic damage. Amazing at Geo teams that has Geo Constructs summoned. - C1 no longer requres you to have Geo Constructs making the team options of Chiori more flexible. | |||
| Cyno | DPS | Support | Sustain |
| - | - | ||
| On-Field | Off-Field | - | |
| - | - | ||
| - Wide AoE from E. Skill while on buffed form from Elemental Burst. - Amazing Elemental Mastery scaling allows him to be amazing at reaction teams. - High Burst Cost despite being reliant on Elemental Burst. - Prone to interruption. - C4 is recommended for energy gain. | |||
| Diona | DPS | Support | Sustain |
| - | - | ||
| On-Field | Off-Field | - | |
| - | - | ||
| - Provides decent healing and shields for the team. - Long cooldown for Skill and requires a lot of energy so Sacrificial Bow is important for Diona. - With Constellations, Diona can provide Movement Speed and Elemental Mastery Buff. | |||
| Faruzan | DPS | Support | Sustain |
| - | - | ||
| On-Field | Off-Field | - | |
| - | - | ||
| - Amazing Anemo Support that can shred Anemo Resistance, Buff Anemo DMG and provide slight Crowd Control. - Pre-C6, she requires a lot of Energy Recharge to be stable. - Pre-C6, Faruzan is pretty inconsistent to use but at C6 she is a must have for Anemo Team Comps. | |||
| Hu Tao | DPS | Support | Sustain |
| - | - | ||
| On-Field | Off-Field | - | |
| - | - | ||
| - Deals powerful Charged Attack damage. - Further increase damage when at low HP. - Has Self DMG and self healing. - Shields and reactions is important when playing Hu Tao. -Consumes stamina a lot without Constellation 1. | |||
| Illuga | DPS | Support | Sustain |
| - | - | ||
| On-Field | Off-Field | - | |
| - | - | ||
| - Illuga is a support for Lunar-Crystalize DMG and a general DEF buffer. - Zibai benefits the most from Illuga, but he can also be used in other DEF-scaling Geo team comps. | |||
| Jahoda | DPS | Support | Sustain |
| - | |||
| On-Field | Off-Field | - | |
| - | - | ||
| - Anemo healer for Nod-Krai teams that can hold Viridescent Venerer for shred. Her ability to increase Moonsign level allows for more flexibile comps without 5 star Nod-Krai characters. - Elemental Burst-reliant and her Skill requires On-Field time. | |||
| Kamisato Ayaka | DPS | Support | Sustain |
| - | - | ||
| On-Field | Off-Field | - | |
| - | - | ||
| - 100% up-time of Cryo Infusion making her amazing for Freeze Comps. - Elemental Burst deals very powerful damage but difficult to hit outside Freeze Comps. - C2 is good for increasing rang eof Elemental Burst while C4 Provides DEF shred for the team. | |||
| Kirara | DPS | Support | Sustain |
| - | - | ||
| On-Field | Off-Field | - | |
| - | - | ||
| - Decent character for Exploration since she allows you to climb cliffs faster. - Tanky shields that can easily sustain the whole team. - Elemental Burst is also powerful especially for Dendro reactions. - C4 gives coordinated attack while C6 gives DMG bonus for teammates. | |||
| Layla | DPS | Support | Sustain |
| - | - | ||
| On-Field | Off-Field | - | |
| - | - | ||
| - Powerful shield that can easily sustain teams at harder contents. - Inflicts frequent Cryo through Skill and Burst. - Layla has small personal damage. - C4 gives Layla additional buff for the team. | |||
| Lyney | DPS | Support | Sustain |
| - | - | ||
| On-Field | Off-Field | - | |
| - | - | ||
| - Amazing Pyro DPS that does not rely on reactions to deal powerful damage. - Shines best at Mono-Team Comps. - Charged Attacks summons decoys that also provide additional damage. - Has self heal and life drain in his kit making him perfect for Marechaussee Hunter Set. | |||
| Mika | DPS | Support | Sustain |
| - | |||
| On-Field | Off-Field | - | |
| - | - | ||
| - Provides AoE healing and movement speed buff for the team. - High Energy Cost for Elemental Burst. - With Constellation 6, he is able to greatly buff Physical DMG. | |||
| Mona | DPS | Support | Sustain |
| - | - | ||
| On-Field | Off-Field | - | |
| - | |||
| - Great for Hydro Application and damage boosting via Omen debuff on enemies. - With Hexerei: Secret Rite, Mona can greatly amplify Vaporize reactions. | |||
| Ororon | DPS | Support | Sustain |
| - | - | ||
| On-Field | Off-Field | - | |
| - | - | ||
| - With a good team comp, Ororon can be a good Electro sub DPS. - He can also recover Energy for the on-field character. - Access to Cinder City set allows him to be a good support | |||
| Raiden Shogun | DPS | Support | Sustain |
| - | |||
| On-Field | Off-Field | - | |
| - | |||
| - 100% up-time of E. Skill allows consistent Electro infliction. - Amazing as a DPS and a Sub-DPS. - Can provide energy for the team. - C2 is a must for Main DPS which allows her to be competitive against other top-class DPS. | |||
| Shenhe | DPS | Support | Sustain |
| - | - | ||
| On-Field | Off-Field | - | |
| - | - | ||
| - Flexible playstyle both in controls and teams. - Elemental Mastery scaling makes his reaction damage huge. - C4 allows Sethos to buff EM of the whole team. | |||
| Thoma | DPS | Support | Sustain |
| - | - | ||
| On-Field | Off-Field | - | |
| - | - | ||
| - Powerful shields that stacks and decent off-field Pyro infliction. - Amazing at Pyro reaction teams like Burgeon and overload. - At C6, he can be put on various teams as a buffer. | |||
| Wriothesley | DPS | Support | Sustain |
| - | - | ||
| On-Field | Off-Field | - | |
| - | - | ||
| - Fast Cryo Infliction and deals amazing damage with Normal Attack. - Has self damage and healing but can be inconsistent. - Amazing at both Melt and Freeze teams. - C1 is recommended making the self healing more consistent. | |||
| Yun Jin | DPS | Support | Sustain |
| - | - | ||
| On-Field | Off-Field | - | |
| - | - | ||
| - Greatly buff the Normal Attack DMG of the team. - Requires quite a lot of Energy Recharge because of her high Burst Cost. - C6 provides a rare Movement speed buff for the team. | |||
B (Tier 4)
| Arataki Itto | DPS | Support | Sustain |
|---|---|---|---|
| - | - | ||
| On-Field | Off-Field | - | |
| - | - | ||
| - Deals powerful Geo DMG with Charged Attack. - Moves fast for a Claymore character and has decent AoE. - Amazing at Mono-Geo Comps. - Constellation 2 is recommended for smoother rotations. | |||
| Beidou | DPS | Support | Sustain |
| - | |||
| On-Field | Off-Field | - | |
| - | - | ||
| - Elemental Skill is powerful and recovers alot of energy when timed right. - Elemental Burst deals powerful damage to multiple enemies and a decent shield. - High Burst cost when building makes her difficult to use. - C2 allows more enemies to be affected by Elemental Burst. | |||
| Candace | DPS | Support | Sustain |
| - | - | ||
| On-Field | Off-Field | - | |
| - | - | ||
| - Decent damage buff from Elemental Burst. - Can be a DPS if built correctly. - At C6, Candace shines since she can provide consistent AoE Hydro infliction. | |||
| Collei | DPS | Support | Sustain |
| - | - | ||
| On-Field | Off-Field | - | |
| - | - | ||
| - Elemental Skill provides decent Dendro infliction. - Elemental Burst inflicts multiple hit of Dendro making her great at reaction comps. - C2 allows more off-field dendro from Elemental Skill. | |||
| Dendro Traveler | DPS | Support | Sustain |
| - | - | ||
| On-Field | Off-Field | - | |
| - | - | ||
| - Decent Dendro Off-field through Elemental Burst. - Amazing choice for Dendro Off-field especially against wave of enemies. - High Burst Cost and you need to look out for Elements inflicted by enemies since Pyro makes the Burst explode. | |||
| Diluc | DPS | Support | Sustain |
| - | - | ||
| On-Field | Off-Field | - | |
| - | - | ||
| - Deals high damage by combining Normal Attacks and his Elemental Skill. - His Elemental Burst has amazing damage, but it pushes enemies out of his attack range. - High Plunging Attack damage makes him an ideal DPS for teams with Xianyun. - All of his Constellations provide a gradual damage increase. | |||
| Dori | DPS | Support | Sustain |
| - | - | ||
| On-Field | Off-Field | - | |
| - | - | ||
| - Great Battery especially at Superconduct or Dendro teams. - Can heal and spread Electro enabling her to take on 2 roles. - Off-field Electro has weak damage and is pretty difficult to use. - C4 increases the Energy Recharge and Healing under certain conditions. | |||
| Eula | DPS | Support | Sustain |
| - | - | ||
| On-Field | Off-Field | - | |
| - | - | ||
| - Amazing dealer of Physical DMG. - Elemental Burst provides powerful one-hit damage but takes a lot of combo to maximize. - At End-game, Eula is often played with Hyperbloom teams. - All Constellation mainly increases personal damage of Eula. | |||
| Ganyu | DPS | Support | Sustain |
| - | - | ||
| On-Field | Off-Field | - | |
| - | - | ||
| - Powerful damage from Charged Attack but takes a while to charge. - Amazing Elemental Burst that has low cost and can be used as an off-field Cryo support. - Easy to build thanks to Crit DMG ascension scaling and easy Crit Rate passive. - C1 shreds Cryo Resistance of enemies. | |||
| Gorou | DPS | Support | Sustain |
| - | - | ||
| On-Field | Off-Field | - | |
| - | - | ||
| - Can provide Defensive and Geo Buffs for the whole party. - While the buff he can provide is very powerful, he can only be used at a certain niche and has very limited team comp. | |||
| Kachina | DPS | Support | Sustain |
| - | - | ||
| On-Field | Off-Field | - | |
| - | - | ||
| - An amazing character for exploration since she climbs walls quick. - With Scroll Of The Hero Of Cinder CIty Artifact, she can act as a powerful support. - Can also provide powerful damage. | |||
| Kujou Sara | DPS | Support | Sustain |
| - | - | ||
| On-Field | Off-Field | - | |
| - | - | ||
| - Greatly increases the ATK of the team but for a short duration. - Amazing sub-DPS because of high damage from Elemental Burst. - C2 for comfort when using buffs and C6 allows Sara to greatly increase the power of Electro characters. | |||
| Lynette | DPS | Support | Sustain |
| - | - | ||
| On-Field | Off-Field | - | |
| - | - | ||
| - Her Skill is useful for exploration allowing you to move quicker. - Elemental Burst allows easier spreading of Elements and resistance shred with Viridescent Venerer. - C4 gives another charge of Elemental Skill allowing more energy and travel distance. | |||
| Mizuki | DPS | Support | Sustain |
| On-Field | Off-Field | - | |
| - | |||
| - AFK Anemo DPS that can heal and deal powerful Swirl damage. - Elemental Mastery-scaling is already great for Swirl DMG and her Elemental Skill allows her to increase it even more. - Snacks created from her Elemental Burst can trigger continuous healing or deal DMG depending on the HP of active character. - Snacks can be created without Mizuki being on the field. | |||
| Noelle | DPS | Support | Sustain |
| - | |||
| On-Field | Off-Field | - | |
| - | - | ||
| - A versatile all-rounder who can function as a support, healer, and DPS. - Her Elemental Burst has a wide range and deals decent damage. - Before C6, her abilities scale with both ATK and DEF (split scaling). - For end-game content, C6 is highly recommended to enable a build focused entirely on DEF. | |||
| Pyro Traveler | DPS | Support | Sustain |
| - | - | ||
| On-Field | Off-Field | - | |
| - | - | ||
| - Decent Pyro Off-field through Elemental Skill. - Can increase damage dealt by active character. - Gains Pyro infusion after unlocking C6, making them a viable Pyro DPS. | |||
| Razor | DPS | Support | Sustain |
| - | - | ||
| On-Field | Off-Field | - | |
| - | - | ||
| - Hexerei buffs make him into a great Electro DPS but can still be used as Physical DPS. - Has lower Energy requirements since his Hexerei changes restore a lot of Energy during his Burst duration. - Great for beginners and usable in endgame content. | |||
| Rosaria | DPS | Support | Sustain |
| - | - | ||
| On-Field | Off-Field | - | |
| - | - | ||
| - Elemental Burst provide constant off-field Cryo DMG for the team. - Can buff the CRIT Rate of the team. - Does not produce much damage. - Amazing for exploration at night. - C2 is great for lengthening the Elemental Burst duration. | |||
| Sayu | DPS | Support | Sustain |
| - | - | ||
| On-Field | Off-Field | - | |
| - | - | ||
| - Elemental Burst heals every member during activation and can also be used for Viridescent Venerer. . - Amazing for travelling since E. Skill makes her move faster & passive prevents some creatures from running away. - C1 removes HP restrictions of Elemental Burst. | |||
| Sethos | DPS | Support | Sustain |
| - | - | ||
| On-Field | Off-Field | - | |
| - | - | ||
| - Flexible playstyle both in controls and teams. - Elemental Mastery scaling makes his reaction damage huge. - C4 allows Sethos to buff the Elemental Mastery of the team. | |||
| Tighnari | DPS | Support | Sustain |
| - | - | ||
| On-Field | Off-Field | - | |
| - | - | ||
| - Easy to use yet very powerful Dendro DPS. - Has a short on-field time so you can use other DPS like Yae Miko with him. - Has issues when fighting multiple enemies. - All constellations are gradual increase to his damage. | |||
| Wanderer | DPS | Support | Sustain |
| - | - | ||
| On-Field | Off-Field | - | |
| - | - | ||
| - Amazing Anemo DPS that can fight against range enemies or close combat. - Prone to interruption but has additional attacks activated through dodging. - One of the best characters for exploration. - C2 greatly increases the damage from Elemental Burst. | |||
| Xiao | DPS | Support | Sustain |
| - | - | ||
| On-Field | Off-Field | - | |
| - | - | ||
| - Provides powerful AoE and Single Target damage with Plunge Attacks. - Greatly increases DMG Bonus in his kit. - Drains his life gradually so healer in his teams is a must. - C1 for more Skill attacks for Energy regeneration. - C6 changes main source of damage to Elemental Skill. | |||
C (Tier 5)
| Dahlia | DPS | Support | Sustain |
|---|---|---|---|
| - | |||
| On-Field | Off-Field | - | |
| - | - | ||
| - Good ATK Speed support for Freeze teams, allowing the DPS to hit faster. - ATK Speed buff is reliant on Shield uptime and can disappear if the shield is broken though it can be refreshed with Benison stacks. | |||
| Dehya | DPS | Support | Sustain |
| - | |||
| On-Field | Off-Field | - | |
| - | - | ||
| - A decent shield substitute that greatly increase the resistance of the team. - Provides decent off-field Pyro especially good for teams that only needs a bit of infliction like Burning Teams. - Elemental Burst is an automatic attack that deals decent damage. - Dehya at C1 fixes the split scaling with HP and ATK. | |||
| Ifa | DPS | Support | Sustain |
| - | |||
| On-Field | Off-Field | - | |
| - | - | ||
| - Great on-fielder driver for Electro-Charged with Ororon but his Healing is low compared to Mizuki who has a similar role. - Nightsoul access and synergy allows him to be suitable with Natlan Sub-DPS characters. | |||
| Kaeya | DPS | Support | Sustain |
| - | - | ||
| On-Field | Off-Field | - | |
| - | - | ||
| - Elemental Burst provide consistent hits of Cryo despite small AoE. - Elemental Skill can be used to travel across waters. - Passive decreases stamina consumption which is great for exploration. - C2 is great for increased duration of Burst. | |||
| Kamisato Ayato | DPS | Support | Sustain |
| - | - | ||
| On-Field | Off-Field | - | |
| - | - | ||
| - Ayato can work as a Main or Sub-DPS. - Decent Hydro infliction from buffed Normal Attacks. - Wide AoE of Hydro from Elemental Burst. - Constellations mostly focuses on increasing HP of the team or buffs for Ayato. | |||
| Keqing | DPS | Support | Sustain |
| - | - | ||
| On-Field | Off-Field | - | |
| - | - | ||
| - Amazing character for Electro reactions. - Elemental Burst deals a series of Electro Hits at a wide AoE and is easy to charge. - Elemental Skill is great for travelling since it teleports you to higher locations. - C4 increases ATK when you trigger Electro reactions. | |||
| Lisa | DPS | Support | Sustain |
| - | - | ||
| On-Field | Off-Field | - | |
| - | - | ||
| - Elemental Burst provides DEF Shred and consistent off-field Electro. - Movements charges slowly making Lisa feel clunky to play. - Powerful Charged Attack but takes a lot of time to charge. - C4 allows Burst of Lisa to hit multiple enemies. | |||
| Xinyan | DPS | Support | Sustain |
| - | - | ||
| On-Field | Off-Field | - | |
| - | - | ||
| - Provides shields and off-field Pyro in a small AoE - Needs multiple enemies to maximize shields and split scales from DMG and shield strength. - C2 increases the Crit Rate of Elemental Burst by 100% and gives her a Shield Level 3 enabling a stable shield. | |||
| Yoimiya | DPS | Support | Sustain |
| - | - | ||
| On-Field | Off-Field | - | |
| - | - | ||
| - Powerful Normal Attackt that is buffed by Elemental Skill. - Elemental Burst gives decent ATK buff to teammates surrounding it. - Very single target and sometimes the attack misses. - Constellations are mostly damage increase for Yoimiya. | |||
D (Tier 6)
| Aloy | DPS | Support | Sustain |
|---|---|---|---|
| - | - | ||
| On-Field | Off-Field | - | |
| - | - | ||
| - Great One-Shot Elemental Burst for big damage. - Inconsistent Cryo Infusion since it require the enemy to step on bombs. | |||
| Amber | DPS | Support | Sustain |
| - | - | ||
| On-Field | Off-Field | - | |
| - | - | ||
| - Can Aggro enemies with Elemental Skill. - Decent character for overworld exploration because of Skill, Aim Shots and Gliding Passive. - Elemental Burst is a decent off-field that inflicts multiple hits of Pyro. - C6 gives a much needed ATK buff to the team and movement speed. | |||
| Anemo Traveler | DPS | Support | Sustain |
| - | - | ||
| On-Field | Off-Field | - | |
| - | - | ||
| - A decent Viridescent Venerer holder if you do not have any Anemo Character. - Fairly nice crowd control abilities but is difficult to use since it moves around. | |||
| Chongyun | DPS | Support | Sustain |
| - | |||
| On-Field | Off-Field | - | |
| - | |||
| - Elemental Skill can give Cryo infusion to characters. - Powerful Elemental Burst with low Burst cost. - DMG outside E. Burst and Skill is low. - C2 decreases the cooldown of the Skills casted within the scope of his Elemental Skill. | |||
| Electro Traveler | DPS | Support | Sustain |
| - | - | ||
| On-Field | Off-Field | - | |
| - | - | ||
| - Can provide energy and off-field Electro to the team. - High Cooldown of Elemental Skill makes its Energy production bad. - Needs a high amount of ER to be consistent. | |||
| Freminet | DPS | Support | Sustain |
| - | - | ||
| On-Field | Off-Field | - | |
| - | - | ||
| - Utilizes Shatter to gain buffs and can deal both Physical and Cryo DMG. - Damage is on the lower-side without constellations. - At C6, Freminet gains enough power to compete with 5 star characters. | |||
| Geo Traveler | DPS | Support | Sustain |
| - | - | - | |
| On-Field | Off-Field | - | |
| - | - | ||
| - Decent Geo Sub-DPS that is accessible for all. - Can deal strong damage if given enough investments. - With Constellation 1, Geo Traveler gains more value because of its CRIT Rate support buff. | |||
| Hydro Traveler | DPS | Support | Sustain |
| - | - | ||
| On-Field | Off-Field | - | |
| - | - | ||
| - Rapid Hydro application when holding Skill - Burst is a slow moving ball of water that can be used for additional Hydro application. | |||
| Kaveh | DPS | Support | Sustain |
| - | - | ||
| On-Field | Off-Field | - | |
| - | - | ||
| - Great on-fielder for Bloom Teams. - Requires plenty energy recharge to be consistent. - Amazing characer for Bloom related teams but fairly weak outside it. - C2 Increases Speed for more Dendro infliction. - C6 provides another hit of Dendro enabling him to produce more blooms. | |||
| Ningguang | DPS | Support | Sustain |
| - | - | ||
| On-Field | Off-Field | - | |
| - | - | ||
| - Uses a combo of Normal Attacks and Charged Attack to deal powerful damage. - Decent range and damage that does not rely on reactions. - She can also be used as a Burst DPS. - C6 is recommended since it gives her powerful DMG after using Elemental Burst. | |||
| Shikanoin Heizou | DPS | Support | Sustain |
| - | - | ||
| On-Field | Off-Field | - | |
| - | - | ||
| - Powerful Elemental Skill that deals huge Anemo DMG great for quick swap DPS. - Elemental Burst gives EM Buff for the team. - Weak Normal Attacks but can easily deal swirl damage. - C6 will greatly increase the damage produced by Heizou. | |||
| Yanfei | DPS | Support | Sustain |
| - | - | ||
| On-Field | Off-Field | - | |
| - | - | ||
| - Decent and easy to use DPS that has powerful charged attack. - Amazing at Pyro reaction comps. - C4 allows Yanfei to be a shield support especially when holding a Thrilling Tales of Dragonslayers. | |||
User Tier Polls For Characters
The rankings on this list are based on ratings from all GameWith users.
※ Scores are the calculated average of all user ratings.
※ Press "Rate" to submit your own rating.
Main DPS or Main Attacker
 Diluc
Diluc Razor
Razor Klee
Klee Noelle
 Sucrose
 Xiao
Xiao Ningguang
 Keqing
 Kamisato Ayaka
 Childe
 Wanderer
 Ganyu
Ganyu Hu Tao
 Raiden Shogun
 Cyno
Cyno Lyney
Lyney Sangonomiya Kokomi
 Yoimiya
 Kamisato Ayato
 Varesa
 Kaveh
Kaveh Eula
Eula Yanfei
 Arataki Itto
 Mizuki
 Skirk
Skirk Arlecchino
 Flins
Flins Alhaitham
 Nahida
 Tighnari
 Neuvillette
 Freminet
 Navia
Navia Wriothesley
 Clorinde
 Gaming
 Sethos
 Mualani
 Kinich
 Xilonen
 Chasca
 Mavuika
 Ifa
IfaSub-DPS
 Jean
Jean Lisa
Lisa Kaeya
Kaeya Venti
Venti Fischl
 Mona
Mona Beidou
 Xiangling
 Xingqiu
 Chongyun
 Zhongli
 Xinyan
 Albedo
 Rosaria
 Lynette
 Kaedehara Kazuha
 Thoma
Thoma Furina
 Escoffier
 Yae Miko
 Kujou Sara
 Collei
 Durin
Durin Yelan
Yelan Shikanoin Heizou
 Kuki Shinobu
 Pyro Traveler
 Ineffa
 Lauma
Lauma Aino
Aino Chiori
 Emilie
 Kachina
 Ororon
Offensive Support or DMG Buffers
 Bennett
 Baizhu
 Yun Jin
 Iansan
 Shenhe
 Sayu
Sayu Electro Traveler
 Gorou
Gorou Dendro Traveler
 Nilou
Nilou Dori
Dori Dehya
Dehya Faruzan
 Candace
 Mika
Mika Sigewinne
 Chevreuse
 Dahlia
 Citlali
 Lan Yan
 Qiqi
Qiqi Barbara
 Diona
Diona Yaoyao
 Layla
Layla Kirara
 Charlotte
 Xianyun
Ranking Tools
| Rank Your Favorite Characters! | |
|---|---|
| Best Boy Ranking Tool | |
Character Related Articles
Character Tier Lists
All Characters
| Characters By Rarity | |||||||||||
|---|---|---|---|---|---|---|---|---|---|---|---|
| Characters By Roles | |||||||||||
| DPS List | Support List | Sustain List | |||||||||
| On-Field List | Off-Field List | ||||||||||
| Characters By Element | |||||||||||
| Hydro | Anemo | Electro | |||||||||
| Dendro | |||||||||||
| Characters By Nation | |||||||||||
| Mondstadt | Liyue | ||||||||||
| Fontaine | Natlan | ||||||||||
| Snezhnaya | Nod-Krai | ||||||||||