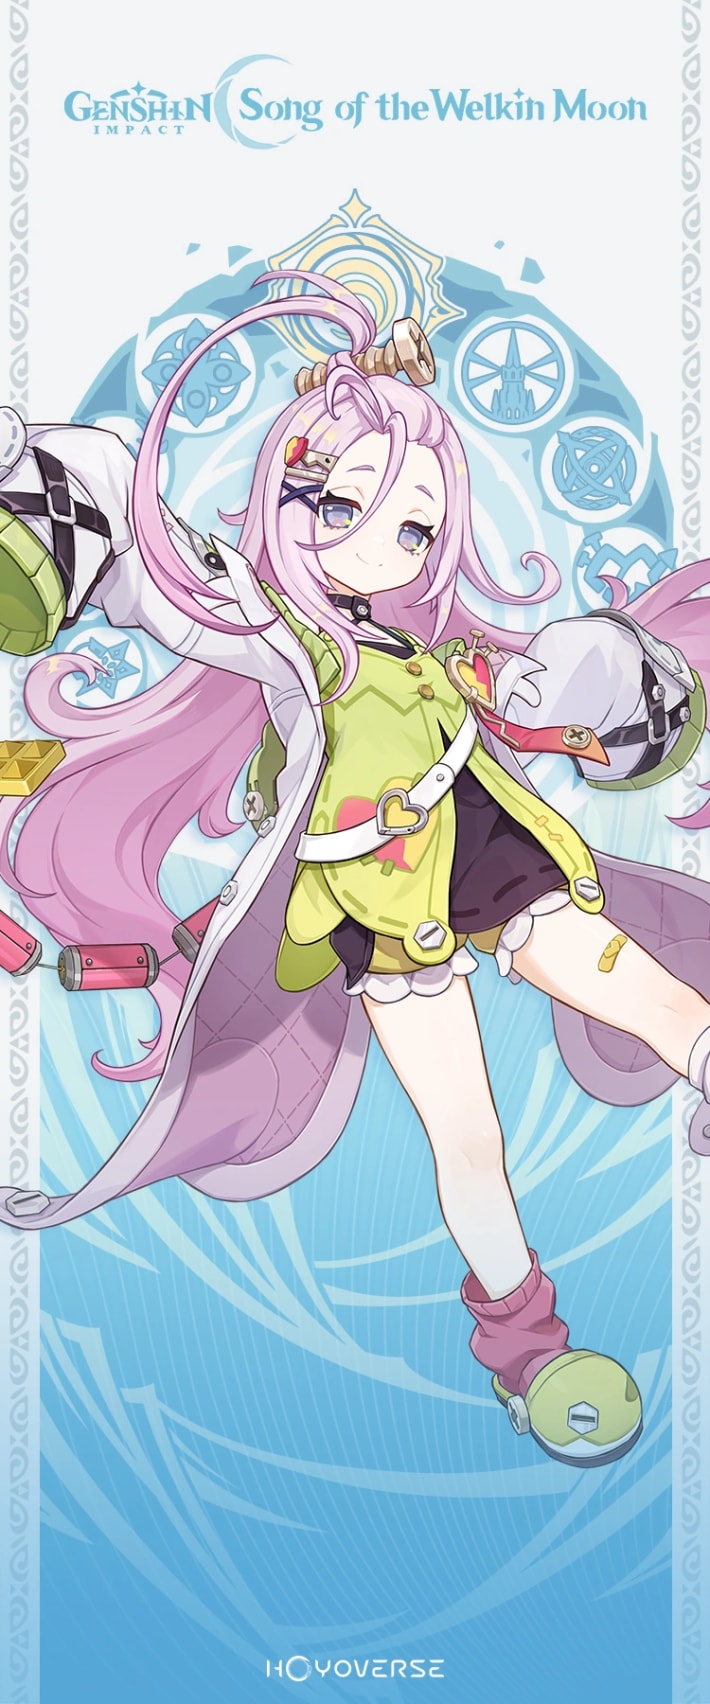
Comprehensive Aino Build Guide for Genshin Impact. Learn Aino's best build, team, kit, and materials for this 4-Star Hydro Sub-DPS Claymore user.
| Aino Related Articles | ||||||||
|---|---|---|---|---|---|---|---|---|
 Best Build Best Build | Best Team | Materials | ||||||
Table of Contents
Aino Character Overview, Base Stats, and Tier
Character Profile
 | Rarity | | |
|---|---|---|---|
| Element | Hydro | ||
| Weapon | Claymore | ||
| Ascend Stat | Elemental Mastery 96 | ||
| Region | Nod-Krai | ||
| Birthday | September 21 | ||
| Roles | | ||
| How To Get | - Available in all Banners at a low drop rate. Currently on rate up in Linnea and Chasca's Banners. - Obtain for free by progressing through Nod-Krai's Archon Quest | ||
Base Stats
| Base HP | Base ATK | Base DEF | |
|---|---|---|---|
| Lvl. 90 | 11,201 | 242 | 607 |
| Lvl. 80 (Ascended) | 10,425 | 225 | 565 |
Aino is a 4-Star Off-Field Hydro Claymore user in Genshin Impact. She applies AoE Hydro with both her Elemental Skill and Burst. She is a character from Nod-Krai that can increase the party's Moonsign Level by 1.
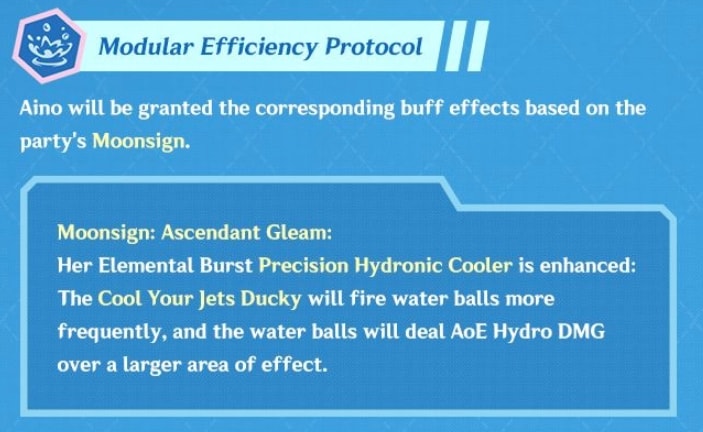
When the party has the Ascendant Gleam Moonsign level, which requires 2 Nod-Krai characters, her Elemental Burst will apply more Hydro and have a larger area of effect.
Aino's Tier & Rating
| Overall Tier | ||||||||||||||
|---|---|---|---|---|---|---|---|---|---|---|---|---|---|---|
| - | ||||||||||||||
| On-Field | Off-Field | DPS | Support | Sustain | ||||||||||
| - | A | - | A | - | ||||||||||
In battle, Aino serves as a Hydro
Rate Aino!
Roles & Playstyle Of Aino and Its Strengths and Weakness
Off-Field Sub-DPS for Nod-Krai Teams
Aino's intended role is to be an Off-Field Sub-DPS or Support for teams with two (2) or more Nod-Krai characters in it. While she can be used as a Hydro Sub-DPS or elemental applier, her Hydro application will be a lot slower compared to other Sub-DPS characters of the same Element.
Pros and Cons of Off-Field Aino
| Pros |
|---|
| - Easy to play. |
| - Easy to build since she doesn't have a lot of priority stats apart from Energy Recharge. |
| Cons |
| - Has slower Elemental Application without a 2nd Nod-Krai character. |
| - Best artifact set and Constellation buffs Lunar Reactions which require a 5-star Nod-Krai character to activate. |
| - Her stationary Burst's AoE can limit the overall attack range available to some teams. |
Best Build for Aino
Aino typically takes a supportive role in her teams and will be built to function as such. See below for recommendations:
| Weapon | Favonius Greatsword |
|---|---|
| Best Artifact | Silken Moon's Serenade x 4 |
| Artifact Main Stats | Sands: Energy Recharge Goblet: Elemental Mastery / Anything with Energy Recharge Circlet: Elemental Mastery or CRIT Rate with Favonius Greatsword) |
| Priority Sub-Stat | Energy Recharge > CRIT Rate (with Favonius Greatsword) > Elemental Mastery |
| Recommended Team | |
Stat Goals For Off-Field Support Aino
| Energy Recharge | 200-250%~ 160-210%~ with her C4 150-200%~ with Favonius Greatsword |
|---|---|
| CRIT Rate | At least 50% (for Favonius Greatsword) |
Energy Recharge (ER) should be Aino's priority stat, like other Burst-oriented supports. Due to her personal damage being underwhelming in a lot of Lunar Reaction teams, she usually doesn't need to be built with a lot of Elemental Mastery unless you use her with Nilou in her specific Bloom teams.
Aino 's Recommended Talent Priority
| Talent | Level Up Priority |
|---|---|
| Bish-Bash-Bosh Repair | ★ ・ ・ ・ ・ |
| Musecatcher (Elemental Skill) | ★★★ ・ ・ |
| Precision Hydronic Cooler (Elemental Burst) | ★★★★★ |
Related Links:
Best Weapon for Aino
Since Aino wants to ensure she has consistent uptime on her Elemental Burst, her weapon choices would include claymores that help her meet her Energy requirements. Weapons that provide buffs for the team should also be usable. See below for the recommendations:
Premium Weapons for Off-Field Support Aino
| Weapon | How to Get Rating | |
|---|---|---|
| Best | Favonius Greatsword | Get from Banners - Energy Recharge secondary stat can help Aino use her Burst every rotation. - Aino needs to be built with some CRIT Rate if you want to reliably trigger the passive. - Best at R5. |
| 2nd | Sacrificial Greatsword | Get from Banners - Also has an Energy Recharge secondary stat, which enables Aino to reach her Energy requirements. - The cooldown reset can help generate more particles for Aino, but whether this has an impact on her Energy needs needs to be tested after her release. |
| 3rd | Skyward Pride | Get from Banners - Another Energy Recharge secondary stat weapon, which can be given to Aino if you happen to have it. - Damage from the passive can be a nice bonus. |
| 4th | Makhaira Aquamarine | Get from Limited Banners - Elemental Mastery secondary stat allows Aino to contribute a little more to the team DPS. - ATK% buff is good for DPSes that care about attack. - No Energy means provided, which may require you to supplement it with higher Energy Recharge stat rolls on her Artifacts. - Only available on weapon banners where it has a specific rate-up. |
Because she is designed for a support-oriented role, her personal damage is naturally non-existent or underwhelming. Aino will usually be better off equipping weapons that increase her supportive utility by providing buffs or Energy (like the Favonius Greatsword).
Free To Play Friendly (F2P Weapons) for Off-Field Support Aino
| Weapon | How to Get Rating | |
|---|---|---|
| Best F2P | Flame-Forged Insight | Reward From Past Event (Sunspray Summer Resort) - Provides Elemental Mastery through the secondary stat, which is something Aino can use. - Restores Energy when triggering Electro-Charged, Lunar-Charged, or Bloom reactions, allowing Aino to charge her Elemental Burst consistently. - Best at R5. - No longer obtainable if you didn't participate in the event. |
| 2nd | Forest Regalia | Sumeru Forgeable (Craftable) Weapon - Energy recharge secondary stat makes charging Aino's Burst more consistent. - Generates a leaf when triggering Dendro reactions, which provides a bit of Elemental Mastery to the character that picked up the leaf. - Best with teams that can trigger Dendro reactions, but still usable for the ER stat regardless. |
| 3rd | Katsuragikiri Nagamasa | Inazuma Forgeable (Craftable) Weapon - Energy Recharge secondary stat can help Aino get her Elemental Burst up consistently. - Elemental Skill damage boost is irrelevant, but the weapon causes the holder to lose 3 Energy then refund 3 Energy back every two seconds. - Passive is good in theory, but is less comfortable in actual play in comparison to other Energy-focused weapons. |
For Free-to-Play options, the event weapon, Flame-Forged Insight, provides a decent amount of Elemental Mastery while also generating Energy for Aino with relative ease. Her best teams should typically trigger the reactions mentioned in it's passive, making it very synergistic with her kit design. Other craftable options with Energy Recharge as the secondary stat should also be usable choices.
All Weapon ListAino Best Artifacts
Aino will be relegated to using supportive Artifact sets as a supportive character in a lot of her teams. See the recommendations below:
| Artifact | Recommendation Details |
|---|---|
| Silken Moon's Serenade | ★★★★★ - Has Energy Recharge% as the 2-piece effect, which helps lower Lauma's needs for high Energy Recharge rolls on her Artifacts. - Increases everyone's Elemental Mastery depending on the Moonsign level of the party. - Also buffs damage made by any Lunar reaction. - Artifact 4-piece cannot stack, so only one character on the team can equip this set. - Best to give Aino this set over other members in the party since she wants to use her Elemental Burst every rotation, which the 2-piece effect can help with. |
| Noblesse Oblige | ★★★★・ - A good alternative to the new Artifact set, allowing Aino to provide another buff to the party. - Use this set if someone else in the party is already using the first Artifact suggestion, since the effect of the Silken Moon set cannot stack. |
| Instructor | ★★★・・ - Powerful set when using Aino in reaction teams. - Provides less artifacts because of less levels being an artifact of 4 rarity. |
Recommended Artifact Stats
| Main: Flat HP Sub: Energy Recharge / Elemental Mastery / CRIT Rate (with Favonius Greatsword) |
|---|---|
| Main: Flat ATK Sub: Energy Recharge / Elemental Mastery / CRIT Rate (with Favonius Greatsword) |
| Main: Elemental Mastery Sub: Energy Recharge / CRIT Rate (with Favonius Greatsword) |
| Main: Elemental Mastery Sub: Energy Recharge / CRIT Rate (with Favonius Greatsword) |
| Main: Elemental Mastery or CRIT Rate (with Favonius Greatsword) Sub: Energy Recharge / CRIT Rate (with Favonius Greatsword) |
Prioritize Her Elemental Burst Uptime
Like most supports, having a decent Energy Recharge stat to use her Elemental Burst consistently. After that, getting to a substantial amount of Elemental Mastery can help elevate the total team DPS since Lunar Reactions will take into account the entire party's stats.
Related Articles
Best Team Comp Aino
Lunar-Charged Team with Aino
| Support | DPS | Support | Support |
|---|---|---|---|
| Flins | Ineffa | Sucrose | |
| Details | |||
| - Aino works well with Lunar-charged and Electro-charge Teams since she applies a decent amount of Hydro for this reaction. - At C6, Aino provides a modest but appreciated Lunar-Charged DMG% buff, which is great for both Flins and Ineffa. - Sucrose provides additional EM and grouping capabilities. - Ineffa contributes her own personal damage and provides a shield for Flins, which is the only source of sustain in the team. | |||
Aino is one of the few viable Off-Field Hydro additions to Flins' team, especially if Ineffa isn't present Without Ineffa, Flins would lose access to several beneficial buffs he gets from having the Ascendant Gleam resonance effect active, making Aino (who is a Nod-Krai character) essential to maintain the Moonsign benefits in some Flins team variations.
Other Team Comps For Aino
Zibai Lunar-Crystallize Team
| Team | Detail | |
|---|---|---|
| Zibai | - Aino can slot into Zibai's team as the Hydro applicator with decent results since the Lunar-Crystallize reaction doesn't require a lot of Hydro to be sustained. | |
| Linnea | Illuga | |
F2P Friendly Team Comp
| Team | Detail | |
|---|---|---|
| Traveler | - A F2P-friendly team comp using free or easily obtainable characters. - This is mostly a Hyperbloom team since Aino doesn't enable any Lunar-Reaction herself. - Dendro Traveler provides more Dendro and can shred Dendro RES with Deepwood Memories. - Shinobu applies Electro to trigger Hyperbloom and acts as the primary sustain character. - Kaveh is the On-Field Driver that can occasionally cause some Blooms to happen, but is there mostly to provide Dendro. | |
| Shinobu | Kaveh | |
Team Rotation of Aino and Combos
Team Rotation of Sub-DPS Aino
| Basic Rotation Of Sub-DPS Aino |
|---|
| 1. Use other characters' Support/Sub-DPS abilities. 2. Switch to Aino and use her Elemental Skill. 3. Immediately use her Elemental Burst before Energy Particles are absorbed. 4. Deploy other support abilities with a shorter duration than Aino's. 5. Switch to your On-Field DPS, deal damage. 6. Repeat from step 1. |
Since Aino will likely be holding Silken Moon set, she needs to go before the On-Field character since the set buff duration is short. But she can trigger the effect again while Off-Field as long as her Burst is active, making it even better if her Burst can last until the start of a new rotation.
Basics of Using Aino (Beginner Guide)
Characters from Nod-Krai have a similar mechanic to the Nightsoul mechanic of Natlan. Each Nod-Krai character increases the Moonsign Level by 1. When the Moonsign Level is 2, Aino's Elemental Burst has increased attack frequency and AoE.
Elemental Skill is a Dash Ability
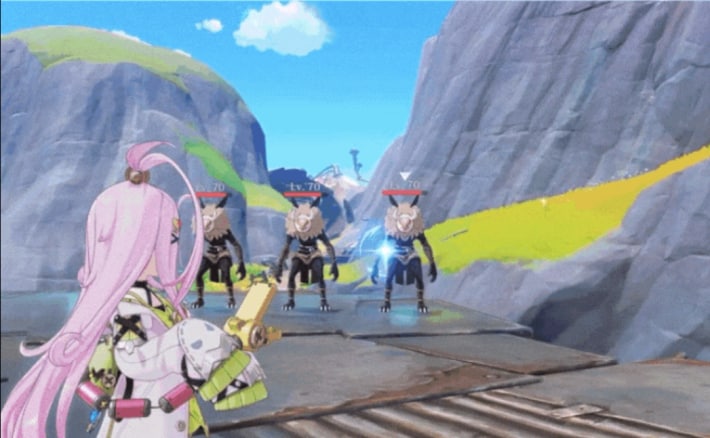
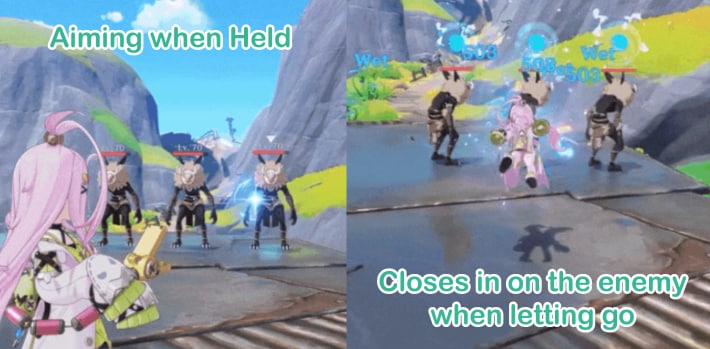
▲ Aino's Elemental Skill Being Aimed at Enemies.
Aino's Elemental Skill works similarly to Chiori, Lan Yan, Alhaitham and Keqing's Elemental Skill. It pulls her over to the target area and deals AoE Hydro Damage. It can be aimed when Held.
Primarily Used for Energy
Aino's Elemental Skill can generate Energy Particles for Aino. Since the best weapon for Aino is a recent Event Claymore, her Elemental Skill can be used for Reactions to give her Energy.
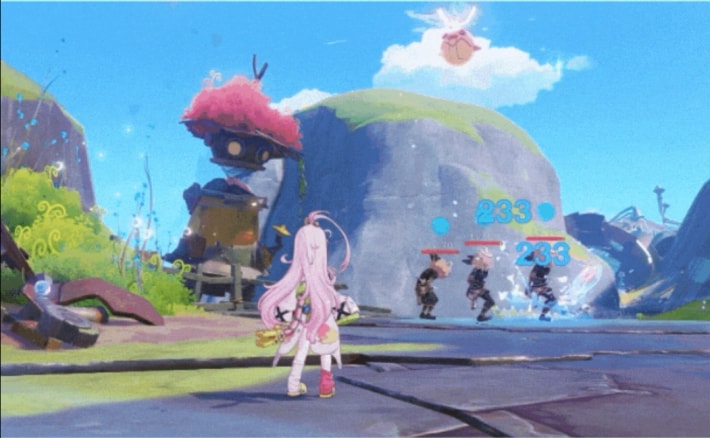
Elemental Burst Applies Hydro in an Area
After triggering her Elemental Burst, Aino applies Hydro to every enemy within a certain radius or area The amount of times this applies Hydro and its area coverage increases when Aino is paired with another Nod-Krai character in the team, making her a decent support for the current selection of Nod-Krai damage characters.
Elemental Skill, Burst and Abilities Guide for Aino
How To Use Aino's Skills & Passives?
Hydro Sub-DPS For Nod-Krai Characters
| Basic Rotation Of Aino |
|---|
| 1.Deploy the abilities of other supports or Sub-DPSes in order of longest ability duration to the shortest. 2. Switch to Aino and use her Elemental Skill. 3. Immediately use her Elemental Burst before Energy Particles are absorbed. 4. Swap to other supports with shorter ability durations if there are any. 5. On-Field your chosen DPS to do their damage combo. 6. Repeat from step 1. |
Aino is a Hydro Sub-DPS meant for supporting Nod-Krai characters. Since it's likely she scales on EM, the new Support Artifact Set is her BiS for supporting Nod-Krai teams.
Elemental Skill Is Used For Energy And Getting Close To Enemies
Aino's Elemental Skill can be Held or Tapped and is used for generating Energy for her so she can use her Elemental Burst immediately. It's also great for repositioning for the optimal placement of her E. Burst.
Elemental Burst Applies Hydro Off-Field
Aino's Elemental Burst applies Hydro to enemies within its range and works Off-Field. The damage dealt is boosted by 50% of Aino's Elemental Mastery.
Best Used With Another Nod-Krai Character
▲ Moonsign: Ascendant Gleam is achieved by having 2 or more Nod-Krai characters in your team.
Aino's Elemental Burst will initially apply Hydro a bit slower than other characters of the same design. But this is remedied by having Ascendant Gleam active (2 Nod-Krai characters in the party), which increases her Burst's AoE and application rate.
Doesn't Convert Reactions To Lunar Reactions
Despite being a Nod-Krai character, Aino does not have the Passive Effect that converts Reactions to Lunar Reactions. This could be the case for 4-star Nod-Krai characters and only 5-star Nod-Kraians are able to have that kind of effect.
Should You Pull for Aino's Constellation Or Best Weapon?
No Need for Weapon So You Can Aim for Constellations
C1 is a Good Stopping Point
Since Aino's best weapon is Flame-Forged Insight from Version 5.8's flagship event, there's no need to pull for a weapon for her. Constellation 1 is her earliest best Constellation level.
C6 Works the Best for Nod-Krai Teams
Aino's C6 allows her to buff Lunar Reactions dealt by her teammates. Since Lunar Reactions are locked to Nod-Krai characters, C6 can be prioritized if you use Aino in a team that has a Nod-Krai character activating Lunar Reactions.
Aino's Constellations & Effects
| Rating | Constellation Effect |
|---|---|
| ★★★★ ・ | C1: The Theory of Ash—Field Equilibrium After Aino uses her Elemental Skill Musecatcher or her Elemental Burst Precision Hydronic Cooler, her Elemental Mastery will be increased by 80. The Elemental Mastery of other nearby active party members will be increased by 80 for 15s. The Elemental Mastery-increasing effects of this Constellation do not stack. |
| ★★★ ・ ・ | C2: The Principle of Transference in Gear Differentials If Aino is off-field while the Focused Hydronic Cooling Zone of her Elemental Burst Precision Hydronic Cooler is active, when your active party member hits a nearby opponent with an attack, the Cool Your Jets Ducky will fire an additional water ball at that opponent, dealing AoE Hydro DMG equal to 25% of Aino's ATK and 100% of her Elemental Mastery. This DMG is considered Elemental Burst DMG. This effect can be triggered once every 5s. |
| ★★ ・ ・ ・ | C3: Cake and the Art of Mechanism Repair Increases the Level of Precision Hydronic Cooler by 3. Maximum upgrade level is 15. |
| ★★★ ・ ・ | C4: Butter and Cats and the Law of Energy Supply When the Elemental Skill Musecatcher hits an opponent, it will restore 10 Elemental Energy for Aino. Energy can be restored to her in this manner once every 10s. |
| ★★ ・ ・ ・ | C5: Perpetual Turbine of Metal and Light Increases the Level of Musecatcher by 3. Maximum upgrade level is 15. |
| ★★★★★ | C6: The Burden of Creative Genius For the next 15s after using the Elemental Burst Precision Hydronic Cooler, DMG from nearby active characters' Electro-Charged, Bloom, Lunar-Charged, and Lunar-Bloom reactions is increased by 15%. Moonsign: Ascendant Gleam: DMG from the aforementioned reactions will be further increased by 20%. |
Aino's Constellation Name is Cistellula Mira
| Cistellula Mira |
|---|
 |
Ascension Materials for Aino Talents & Level
Materials Per Ascension Level
| Lvl 20 | Varunada Lazurite Sliver x1Portable Bearing x3Broken Drive Shaft x3 |
|---|---|
| Lvl 40 | Varunada Lazurite Fragment x3Precision Kuuvahki Stamping Die x2 Portable Bearing x10Broken Drive Shaft x15 |
| Lvl 50 | Varunada Lazurite Fragment x9Precision Kuuvahki Stamping Die x4 Portable Bearing x20Reinforced Drive Shaft x12 |
| Lvl 60 | Varunada Lazurite Chunk x6Precision Kuuvahki Stamping Die x8 Portable Bearing x30Reinforced Drive Shaft x18 |
| Lvl 70 | Varunada Lazurite Chunk x3Precision Kuuvahki Stamping Die x12 Portable Bearing x45Precision Drive Shaft x12 |
| Lvl 80 | Varunada Lazurite Gemstone x6Precision Kuuvahki Stamping Die x20 Portable Bearing x60Precision Drive Shaft x24 |
Materials Per Talent Ascension
| Lvl 1 | Default |
|---|---|
| Lvl 2 | Teachings Of Elysium x3Broken Drive Shaft x6 |
| Lvl 3 | Guide To Elysium x2Reinforced Drive Shaft x3 |
| Lvl 4 | Guide To Elysium x4Reinforced Drive Shaft x4 |
| Lvl 5 | Guide To Elysium x6Reinforced Drive Shaft x6 |
| Lvl 6 | Guide To Elysium x9 Reinforced Drive Shaft x9 |
| Lvl 7 | Philosophies Of Elysium x4Precision Drive Shaft x4Silken Feather x1 |
| Lvl 8 | Philosophies Of Elysium x6Precision Drive Shaft x6Silken Feather x1 |
| Lvl 9 | Philosophies Of Elysium x12Precision Drive Shaft x9Silken Feather x2 |
| Lvl 10 | Philosophies Of Elysium x16Precision Drive Shaft x12Silken Feather x2 |
| Lvl 11 | Unlocked via Constellation Levels |
| Lvl 12 | Unlocked via Constellation Levels |
| Lvl 13 | Unlocked via Constellation Levels |
Related Links
Aino Skills & Talents Details
Bish-Bash-Bosh Repair
Normal Attack
| Effect |
|---|
| Performs up to 3 consecutive strikes. |
| Lv1 | Lv2 | Lv3 | Lv4 | Lv5 | Lv6 | Lv7 | Lv8 | Lv9 | Lv10 | Lv11 | |
|---|---|---|---|---|---|---|---|---|---|---|---|
| 1-Hit DMG | 66.5% | 71.9% | 77.3% | 85.1% | 90.5% | 96.7% | 105.2% | 113.7% | 122.2% | 131.5% | 140.7% |
| 2-Hit DMG | 66.2% | 71.6% | 77% | 84.7% | 90.1% | 96.2% | 104.7% | 113.1% | 121.6% | 130.8% | 140.1% |
| 3-Hit DMG | 49.2%×2 | 53.2%×2 | 57.2%×2 | 63%×2 | 67%×2 | 71.5%×2 | 77.8%×2 | 84.1%×2 | 90.4%×2 | 97.3%×2 | 104.2%×2 |
▲Side-Scroll to check the percentage per level.
Charged Attack
| Effect |
|---|
| Drains Stamina over time to perform continuous spinning attacks against all nearby opponents. At the end of the sequence, performs a more powerful slash. |
| Lv1 | Lv2 | Lv3 | Lv4 | Lv5 | Lv6 | Lv7 | Lv8 | Lv9 | Lv10 | Lv11 | |
|---|---|---|---|---|---|---|---|---|---|---|---|
| Charged Attack Loop DMG | 62.5% | 67.6% | 72.7% | 80% | 85.1% | 90.9% | 98.9% | 106.9% | 114.9% | 123.6% | 132.3% |
| Charged Attack Final DMG | 113.1% | 122.3% | 131.5% | 144.7% | 153.9% | 164.4% | 178.8% | 193.3% | 207.8% | 223.6% | 239.3% |
| Attack Stamina Cost | 40/s | 40/s | 40/s | 40/s | 40/s | 40/s | 40/s | 40/s | 40/s | 40/s | 40/s |
| Max Duration | 5s | 5s | 5s | 5s | 5s | 5s | 5s | 5s | 5s | 5s | 5s |
▲Side-Scroll to check the percentage per level.
Plunged Attack
| Effect |
|---|
| Plunges from mid-air to strike the ground below, damaging opponents along the path and dealing AoE DMG upon impact. |
| Lv1 | Lv2 | Lv3 | Lv4 | Lv5 | Lv6 | Lv7 | Lv8 | Lv9 | Lv10 | Lv11 | |
|---|---|---|---|---|---|---|---|---|---|---|---|
| Plunge DMG | 74.6% | 80.7% | 86.7% | 95.4% | 101.5% | 108.4% | 118% | 127.5% | 137% | 147.4% | 157.8% |
| Low Plunge DMG | 149% | 161% | 173% | 191% | 203% | 217% | 236% | 255% | 274% | 295% | 316% |
| High Plunge DMG | 186% | 201% | 217% | 238% | 253% | 271% | 295% | 318% | 342% | 368% | 394% |
▲Side-Scroll to check the percentage per level.
Musecatcher (Elemental Skill)
| Effect |
|---|
Hold
| Effect |
|---|
| Enter Aiming Mode to adjust the Musecatcher's throwing direction. |
| Lv1 | Lv2 | Lv3 | Lv4 | Lv5 | Lv6 | Lv7 | Lv8 | Lv9 | Lv10 | Lv11 | Lv12 | Lv13 | |
|---|---|---|---|---|---|---|---|---|---|---|---|---|---|
| Stage 1 DMG | 65.6% | 70.5% | 75.4% | 82% | 86.9% | 91.8% | 98.4% | 105% | 111.5% | 118.1% | 124.6% | 131.2% | 139.4% |
| Stage 2 DMG | 188.8% | 203% | 217.1% | 236% | 250.2% | 264.3% | 283.2% | 302.1% | 321% | 339.8% | 358.7% | 377.6% | 401.2% |
| CD | 10s | 10s | 10s | 10s | 10s | 10s | 10s | 10s | 10s | 10s | 10s | 10s | 10s |
▲Side-Scroll to check the percentage per level.
Precision Hydronic Cooler (Elemental Burst)
| Effect |
|---|
| Aino deploys a custom water-spraying device, the Cool Your Jets Ducky to establish a Focused Hydronic Cooling Zone. While active, the Cool Your Jets Ducky will periodically fire water balls at nearby opponents, dealing Hydro DMG. |
| Lv1 | Lv2 | Lv3 | Lv4 | Lv5 | Lv6 | Lv7 | Lv8 | Lv9 | Lv10 | Lv11 | Lv12 | Lv13 | |
|---|---|---|---|---|---|---|---|---|---|---|---|---|---|
| Water Ball DMG | 20.1% | 21.6% | 23.1% | 25.1% | 26.7% | 28.2% | 30.2% | 32.2% | 34.2% | 36.2% | 38.2% | 40.2% | 42.7% |
| Duration | 14s | 14s | 14s | 14s | 14s | 14s | 14s | 14s | 14s | 14s | 14s | 14s | 14s |
| CD | 13.5s | 13.5s | 13.5s | 13.5s | 13.5s | 13.5s | 13.5s | 13.5s | 13.5s | 13.5s | 13.5s | 13.5s | 13.5s |
| Energy Cost | 50 | 50 | 50 | 50 | 50 | 50 | 50 | 50 | 50 | 50 | 50 | 50 | 50 |
▲Side-Scroll to check the percentage per level.
Passive Skills
Modular Efficiency Protocol
| Effect |
|---|
| Aino will be granted the corresponding buff effects based on the party's Moonsign. Moonsign: Ascendant Gleam: Her Elemental Burst Precision Hydronic Cooler is enhanced: The Cool Your Jets Ducky will fire water balls more frequently, and the water balls will deal AoE Hydro DMG over a larger area of effect. |
Structured Power Booster
| Effect |
|---|
| Aino's Elemental Burst DMG is increased by 50% of her Elemental Mastery. |
Moonsign Benediction: Force Limit Analysis
| Effect |
|---|
| When Aino is in the party, the party's Moonsign will increase by 1 level. |
Miniaturized Detection Sensor
| Effect |
|---|
| Displays the location of nearby resources unique to Nod-Krai on the mini-map. Additionally, Aino appears to be able to alter the Cool Your Jets Ducky's appearance in some way... |
Character Related Articles
Character Tier Lists
All Characters
| Characters By Rarity | |||||||||||
|---|---|---|---|---|---|---|---|---|---|---|---|
| Characters By Roles | |||||||||||
| DPS List | Support List | Sustain List | |||||||||
| On-Field List | Off-Field List | ||||||||||
| Characters By Element | |||||||||||
| Hydro | Anemo | Electro | |||||||||
| Dendro | |||||||||||
| Characters By Nation | |||||||||||
| Mondstadt | Liyue | ||||||||||
| Fontaine | Natlan | ||||||||||
| Snezhnaya | Nod-Krai | ||||||||||

