
Comprehensive Sucrose guide for Genshin Impact. Learn Sucrose's best build, best team, and best weapon for this 4-Star Anemo Support Catalyst user.
| Sucrose Related Articles | |||||
|---|---|---|---|---|---|
 Best Build Best Build | Best Team | ||||
| Specialty | Story Quest | ||||
Table of Contents
Sucrose Latest Information & News
Summary of Sucrose's Buff
| Constellation | - C6: Gain additional DMG Buff to Hex Members. |
|---|---|
| Passive | - New Passive adding her as a member of Hexenzirkel Faction. Hex Character Buff: When there are 2 or more Hex Characters: └ When using E. Skill and E. Burst, increase DMG Buff Bonus of the party. |
Sucrose will have a character buff for her Constellation, where she will provide a decent amount of buff and more to Hex Characters.
Sucrose Buffs & Changes GuideSucrose Character Overview, Base Stats, and Tier
Character Profile
 | Rarity | | |
|---|---|---|---|
| Element | Anemo | ||
| Weapon | Catalyst | ||
| Ascend Stat | Anemo DMG Bonus 24.0% | ||
| Region | Mondstadt | ||
| Birthday | November 26 | ||
| Roles | | ||
| How To Get | Available in all Banners at a low drop rate | ||
Base Stats
| Base HP | Base ATK | Base DEF | |
|---|---|---|---|
| Lvl. 90 | 9,244 | 170 | 703 |
| Lvl. 80 (Ascended) | 8,604 | 158 | 654 |
Sucrose is a 4-star Anemo character who wields a Catalyst weapon. She can be played as a support unit that provides the team with Elemental Mastery buffs or as an on-field driver to trigger elemental reactions. Regardless of her role, her playstyle centers around the Elemental Mastery stat. Lore-wise, she is an alchemist residing in Mondstadt and serves as an assistant to Albedo.
Sucrose's Tier & Rating
| Overall Tier | ||||||||||||||
|---|---|---|---|---|---|---|---|---|---|---|---|---|---|---|
| S | ||||||||||||||
| On-Field | Off-Field | DPS | Support | Sustain | ||||||||||
| - | S | - | S | - | ||||||||||
Sucrose is an Anemo Support who is great at buffing
Rate Sucrose!
Roles & Playstyle of Sucrose and Her Strengths and Weakness
Support Sucrose
Sucrose's main role in teams is to be the Anemo Support and/or Reaction Driver. Her ability to hold VV and buff Elemental Mastery makes her a great Support for buffing Reaction Damage.
Pros and Cons of Support Sucrose
| Pros |
|---|
| - Works great as Support even without high Constellations. |
| - Can be used as Support or Reaction Driver for teams. |
| - Easily procs Viridescent Venerer's debuff since her Normal Attacks apply Anemo. |
| - Has a small damage buff for teammates (better in Hexerei teams). |
| Cons |
| - Constellation 1 is somewhat essential for her Driver gameplay but otherwise not necessary as Support. |
Best Build for Sucrose
Sucrose is Best Built as Anemo Support & EM Buffer
| Weapon | Sacrificial Fragments |
|---|---|
| Best Artifact | Viridescent Venerer x4 |
| Artifact Main Stats | Sands: Elemental Mastery Goblet: Elemental Mastery Circlet: Elemental Mastery |
| Priority Sub-Stats | Elemental Mastery > Energy Recharge |
| Recommended Team | |
Stat Goals for Support Sucrose
| Elemental Mastery | 800+ |
|---|---|
| Energy Recharge | 180%~ |
Sucrose only needs two stats to be a good Anemo Support. Focus on getting a lot of Elemental Mastery on her and giving her enough Energy Recharge if you want to use her Elemental Burst each rotation.
Sucrose 's Recommended Talent Priority
| Talent | Level Up Priority |
|---|---|
| Normal Attack: Wind Spirit Creation | ★・・・・ |
| Astable Anemohypostasis Creation - 6308 (Elemental Skill) | ★★★★・ |
| Forbidden Creation - Isomer 75 / Type II (Elemental Burst) | ★★★★★ |
Related Links:
Best Weapon for Sucrose
Sucrose works the best with an Elemental Mastery boosting weapon. For Premium and F2P, she has plenty of choices for them and the ones with added utility are the best for her.
Premium Weapons for Support Sucrose
| Weapon | How to Get Rating | |
|---|---|---|
| Best | Sacrificial Fragments | Get from All Banners - Skill CD refresh works great with Sucrose's Elemental Skill, allowing her to spam her Skill for Swirl and Crowd Control. - Gives a decent amount of Elemental Mastery for Sucrose. |
| 2nd | Sunny Morning Sleep-In | Get from Limited Banner - Mizuki's Signature Weapon that is only available when her Banner is ongoing. └ Since Mizuki is now a standard character but her weapon is not, it's likely to rerun as part of a Chronicled Wish Banner like Tighnari and Dehya's Signature Weapons. - Gives a lot of EM when Swirl is triggered. Best used with Reaction Driver Sucrose. |
| 3rd | A Thousand Floating Dreams | Get from Limited Banner - Nahida's Signature Weapon that is only available when her Banner is ongoing. - Good stat stick for Elemental Mastery that can provide 40 Elemental Mastery to the team as well. |
| 4th | Starcaller's Watch | Get from Limited Banner - Citlali's Signature Weapon that is only available when her Banner is ongoing. - Good stat stick for Elemental Mastery but Sucrose can't activate the damage buff because she is unable to create shields. |
| 5th | Wandering Evenstar | Get from Limited Banners - Obtainable whenever it becomes available on certain Weapon Banners. - Can give an ATK buff periodically to everyone which is beneficial for the team └ Passive can stack with weapons of similar effect |
| 6th | Favonius Codex | Get from All Banners - ER substat is convenient for Burst uptime - Chance to provide more Energy periodically upon CRIT Hits └ Good battery for other characters in the team |
| 7th | Thrilling Tales Of Dragon Slayers | Get from All Banners - Can provide ATK% buff periodically to the next character that takes the field - Easy to refine & upgrade since it is 3* |
Sucrose's best premium weapon is Sacrificial Fragments due to its ability to refresh her Skill CD which works even better if she's Constellation 1. If you don't have it, any EM stat stick or Support weapon can be used on her.
F2P Options for Support Sucrose
| Weapon | How to Get Rating | |
|---|---|---|
| Best F2P | Fruit Of Fulfillment | Sumeru Craftable (Forgeable) Weapon - Great EM stat stick for F2P and can give Energy Recharge for Burst uptime. |
| 2nd (Forge) | Hakushin Ring | Inazuma Craftable (Forgeable) Weapon - Support weapon that's good for boosting Elemental Damage for Electro Reaction teams. - Good for Taser Driver Sucrose. |
| 3rd (Forge) | Mappa Mare | Craftable (Forgeable) Weapon - EM stat stick for Sucrose but the Sumeru Craftable is better since the Weapon Effect of Mappa Mare isn't that great for Sucrose. |
Fruit of Fulfillment is the best weapon for Sucrose as an Elemental Mastery stat stick that can also give Energy Recharge. Hakushin Ring is her 2nd best F2P weapon for its team support abilities if using certain teams.
All Weapon ListSucrose Best Artifacts
Sucrose's best Artifact sets are those that can buff her teammates or sets that can increase her Elemental Mastery so she buffs more EM to the team.
| Artifact | Recommendation Details |
|---|---|
| Viridescent Venerer | ★★★★★ - Best artifact set for Anemo Supports like Sucrose since it allows her to also shred RES for her teammates. |
| Instructor | ★★★★ ・ - Teamwide EM-boosting set that works great with Sucrose's own teamwide EM buff. - Best to use for Lunar-Charged teams since it needs a lot of EM to reach the max damage increase multiplier for the reaction. |
| Noblesse Oblige | ★★★★ ・ - Support set that Sucrose can use if someone is holding Scroll set or using VV. - Use only if the DPS character scales on ATK. |
| Gilded Dreams | ★★★ ・ ・ - Best set for boosting Sucrose's own Elemental Mastery so that her EM buff to the team also increases. |
Recommended Artifact Stats
| Main: Flat HP Sub: Elemental Mastery / Energy Recharge / ATK% / ATK |
|---|---|
| Main: Flat ATK Sub: Elemental Mastery / Energy Recharge / ATK% |
| Main:Elemental Mastery Sub: Energy Recharge / ATK% / ATK |
| Main: Elemental Mastery Sub: Energy Recharge / ATK% / ATK |
| Main: Elemental Mastery Sub: Energy Recharge / ATK% / ATK |
Focus on Elemental Mastery and Energy Recharge for Sub-Stats
Sucrose prefers a lot of Elemental Mastery for her EM buff and her Burst has the more powerful suction ability in her kit. You can use EM mainstats and aim for EM substats on the Flower and Feather piece while focusing on Energy Recharge on her other Artifact pieces.
Related Articles
Best Team Comp Sucrose
Use Sucrose for EM Buff & RES Shred
| Support | DPS | Shielder | Sub-DPS |
|---|---|---|---|
| Sucrose | Flins | Ineffa | |
| Details | |||
| - Sucrose's EM buff and RES shred allows for more powerful Lunar-Charged DMG. - Despite not scaling fully on EM, Flins and Ineffa can benefit from the EM buff while it helps a lot for Aino on her Burst's DMG. - Sucrose's EM scaling can also provide a boost to Lunar-Charged due to the Ascendant Gleam effect.| | |||
Even if Secret Rite effect isn't active, this team is the best for Sucrose since the team greatly benefits from her EM buff, shred and EM scaling. Damage buffs don't affect Lunar-Charged DMG, making it redundant if one of the team members was replaced for a 2nd Hexerei character.
Other Team Comps for Sucrose
Melt Team with Sucrose
| Team | Detail | |
|---|---|---|
| Sucrose | Mavuika | - Mavuika Melt Team with Sucrose as Reaction Damage booster. - Since Citlali can hold Scroll set, Sucrose should hold Instructor set to increase Elemental Mastery for the team. - You can increase the Cryo application by using Sucrose's Burst to undergo Elemental Conversion to Cryo. |
| Iansan | Citlali | |
Klee Vaporize Team with Sucrose
| Team | Detail | |
|---|---|---|
| Sucrose | - Klee Vaporize team with Sucrose, activating the Hexerei Secret Rite effect to buff Klee's attacks and damage with Sucrose's buffs. - Xilonen provides Elemental Damage boosting and healing to offset Furina's HP drain while Furina applies Hydro and provide a damage buff. - Sucrose can help reapply Hydro with her Burst. | |
| Xilonen | Furina | |
Free To Play Team Comp for Sucrose
| Team | Detail | |
|---|---|---|
| Sucrose | Fischl | - F2P Electro-Charged Team with Sucrose as the Driver. Both Party Enhancement effects are active and allow Moonsign/Hexerei characters to use their full kit. - Fischl, Sucrose and Jahoda can buff EM for the team, allowing Aino to deal stronger damage from her Burst. - Jahoda can help reapply Hydro with her Skill and can provide powerful healing as well. |
| Jahoda | ||
Team Rotation of Sucrose and Combos
Basic Team Rotation for Support Sucrose
| Basic Rotation For Sucrose |
|---|
| 1. Apply Element that you want to be Swirled using other characters. 2. Switch to Sucrose and use her Elemental Skill or Burst. |
Sucrose's team rotation doesn't usually change unless she's used for funneling Energy to another Anemo character. Using her Elemental Skill is often better since her Burst can undergo Elemental Conversion and Re-Apply Elements.
Team Rotation for Reaction Driver Sucrose
| Team Rotation For Driver Sucrose |
|---|
| 1. Activate Support and Sub-DPS characters' abilities. 2. Switch to Sucrose and use her Elemental Skill(s) and Burst. 3. Use Normal Attacks to trigger Swirls if her Elemental Skill and Burst is on cooldown. |
Sucrose's rotation as a driver is an extension of how she's used as Support. The only addition is her Normal Attacks to apply Anemo to trigger Swirl and spread the Element affected.
Basics Of Using Sucrose
Anemo Support for Elemental Reaction Boosting
Sucrose is used as an Anemo Support for Pyro, Electro, Cryo and Hydro characters. Her ability to increase the Elemental Mastery of the team makes her even better as Support if it's a Reaction-reliant team. For Constellations, C1 & C6 are her Best Constellations.
Use Elemental Skill or Burst for Crowd Control
▲ Video shows Sucrose's Burst pulling in enemies and her Skill being able to knock enemies into air.
Both of Sucrose's Active Skills can gather enemies. Her Elemental Burst has a more powerful suction ability since it can also pull in farther enemies. While her Skill has a smaller range in terms of enemies pulled, it works great with Sacrificial Fragments.
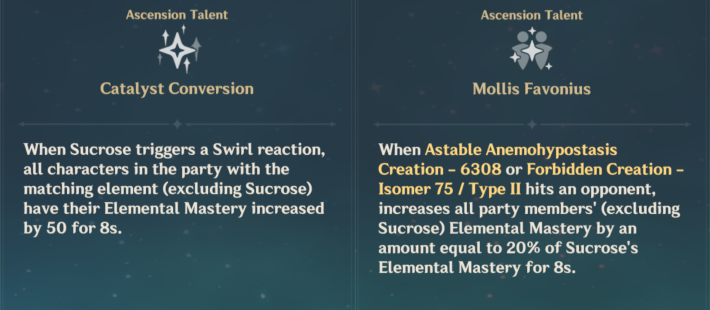
Both Passives Can Increase the Elemental Mastery of the Team
Both of Sucrose's Passives allow her to give an Elemental Mastery buff to her teammates. Her first Passive increases the Swirled Element characters' Elemental Mastery by 50 while her second Passive boosts the team's EM based on 20% of Sucrose's EM so you want to build a lot of EM on her.
| Summary of Sucrose's Passives for Buffing Elemental Mastery | |
|---|---|
| Catalyst Conversion (First Passive) | - When Sucrose triggers a Swirl reaction, the characters whose Element is the same as the reacting Element (Both Anemo and the Swirled Element) will gain a 50 Elemental Mastery increase for 8s. - Sucrose is excluded from this buff. |
| Mollis Favonius (Second Passive) | - When Sucrose lands a hit with her Elemental Skill or Burst, all teammates gain an Elemental Mastery increase based on 20% of Sucrose's Elemental Mastery for 8s. |
Hexerei Buffs Give Her a Teamwide Damage Buff
Sucrose's Active Skills can now give a small damage buff to her teammates. Her Skill gives a ~5.7% damage buff while her Burst gives an additional ~7.1% for Hexerei characters only.. This makes her better to use with Hexerei characters but she's still great for other teams despite the missing 7% damage buff.
Use Viridescent Venerer for Sucrose's Artifact Set
| Artifact Set | Effect |
|---|---|
| Viridescent Venerer | 2-Piece Set Effect: Anemo DMG +15% 4-Piece Set Effect: Increases Swirl DMG +60%. Decreases opponent's Elemental RES to the element infused in the Swirl by 40% for 10s |
Anemo Supports are reliant on this specific artifact set due to it's ability to shred RES for teammates. While Scroll set can sometimes outperform it due to its stronger multipliers and ability to buff Anemo and Geo Elemental Damage, Viridescent Venerer is still the best set for Anemo Supports.
Should You Farm for Viridescent Venerer Set?
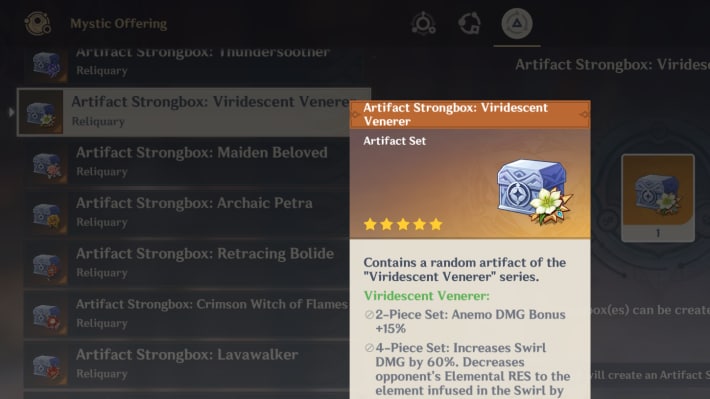
Since the addition of the Mystic Offering system, it's not recommended to farm the domain that drops Viridescent Venerer set. This is because the other set with it is not as good. It's better to recycle useless Artifact pieces from your other domain farming using the Mystic Offering in the Crafting Bench.
Other Artifact Recycling Related Articles
Elemental Skill, Burst and Abilities Guide for Sucrose
How To Use Sucrose?
Anemo Support For Increasing Elemental Mastery For The Team
▲ Sucrose's Elemental Mastery buff shown. Since she only Swirled Hydro in the clip, Furina's EM is increased by 185 while Ororon and Shinobu had a 135 EM increase.
Sucrose is an Anemo Support who can increase the Elemental Mastery of her teammates based on her own Elemental Mastery. The more EM she's built with, the stronger her buff can be. And as an Anemo character, Viridescent Venerer is her Best Artifact set for boosting the team's damage by shredding Resistances for them.
Two Of Her Passives Can Boost The Elemental Mastery Of Her Teammates
Sucrose's first two Passives boost the Elemental Mastery of her teammates. The first boosts based on the Swirled Element and the second boosts whenever her Elemental Skill or Burst hits an opponent.
Both Active Skills Are For Crowd Control
Sucrose's Elemental Skill and Burst are used for grouping up smaller enemies and spreading Elements on them. Her Skill has weaker grouping effect but can have two Charges and be refreshed using Sacrificial Fragments while her Burst can pull enemies farther away. Both Skills are good to use together to ensure all enemies are grouped up.
Should You Pull for Sucrose's Constellation Or Best Weapon?
Any Constellation Level Is Nice to Have
| Constellation Priority |
|---|
| C1 > C4 or C6 |
C1 Is a Good Stopping Point
Sucrose's role in a team has always been very flexible, since she can take both an on-field and off-field position. Her constellations offer something for both roles, so they're worth considering regardless of how you typically use her. Notably, her C1 is a good stopping point since it gives her another Skill proc, thereby increasing her Energy gain, total Swirl number and grouping. Beyond that, her C4 is ideal for an on-field Sucrose since her Skill CD decreases for every 7th attack, while her C6 gives Elemental DMG bonus depending on the element Swirled by her Burst, and although it can be a little inconsistent, still has some value in teams that could use it.
Note that Sucrose's constellations aren't necessary to chase if you want her to perform decently in whatever role you want to play her as. She will be perfectly functional at C0 and anything beyond that can be considered a bonus.
Sucrose's Constellations & Effects
| Rating | Constellation Effect |
|---|---|
| ★★★★★ | C1: Clustered Vacuum Field Astable Anemohypostasis Creation - 6308 gains 1 additional charge. |
| ★★★・・ | C2: Beth: Unbound Farm The duration of Forbidden Creation - Isomer 75 / Type II is increased by 2s. |
| ★・・・・ | C3: Flawless Alchemistress Increases the Level of Astable Anemohypostasis Creation - 6308 by 3. Maximum upgrade level is 15. |
| ★★★・・ | C4: Alchemania Sucrose will reduce the CD of Astable Anemohypostasis Creation - 6308 by 1-7s for every 7 Normal or Charged Attack hits she scores against opponents. One hit may be counted every 0.1s. |
| ★・・・・ | C5: Caution: Standard Flask Increases the Level of Forbidden Creation - Isomer 75 / Type II by 3. Maximum upgrade level is 15. |
| ★★★★・ | C6: Chaotic Entropy If Forbidden Creation - Isomer 75 / Type II triggers an Elemental Absorption, all party members gain a 20% Elemental DMG Bonus for the corresponding absorbed element during the skill's duration, while nearby Hexerei characters in the party gain an additional 8.57142% Elemental DMG Bonus for the corresponding absorbed element. |
Sucrose's Constellation Name is Ampulla
| Ampulla |
|---|
 |
Ascension Materials for Sucrose Talents & Level
Materials Per Ascension Level
| Lvl 20 | Vayuda Turquoise Sliver x1Windwheel Aster x3Whopperflower Nectar x3 |
|---|---|
| Lvl 40 | Vayuda Turquoise Fragment x3Hurricane Seed x2 Windwheel Aster x10Whopperflower Nectar x15 |
| Lvl 50 | Vayuda Turquoise Fragment x9Hurricane Seed x4 Windwheel Aster x20Shimmering Nectar x12 |
| Lvl 60 | Vayuda Turquoise Chunk x6Hurricane Seed x8 Windwheel Aster x30Shimmering Nectar x18 |
| Lvl 70 | Vayuda Turquoise Chunk x3Hurricane Seed x12 Windwheel Aster x45Energy Nectar x12 |
| Lvl 80 | Vayuda Turquoise Gemstone x6Hurricane Seed x20 Windwheel Aster x60Energy Nectar x24 |
| Level 1 | Default |
|---|---|
| Level 2 | Teachings Of Freedom x3 Whopperflower Nectar x6 |
| Level 3 | Guide To Freedom x2 Shimmering Nectar x3 |
| Level 4 | Guide To Freedom x4 Shimmering Nectar x4 |
| Level 5 | Guide To Freedom x6 Shimmering Nectar x6 |
| Level 6 | Guide To Freedom x9 Shimmering Nectar x9 |
| Level 7 | Philosophies Of Freedom x4 Energy Nectar x4 Spirit Locket Of Boreas x1 |
| Level 8 | Philosophies Of Freedom x6 Energy Nectar x6 Spirit Locket Of Boreas x1 |
| Level 9 | Philosophies Of Freedom x12 Energy Nectar x9 Spirit Locket Of Boreas x2 |
| Level 10 | Philosophies Of Freedom x16 Energy Nectar x12 Spirit Locket Of Boreas x2 Crown Of Insight x1 |
| Level 11 | Unlocked via Constellation |
| Level 12 | Unlocked via Constellation |
| Level 13 | Unlocked via Constellation |
Related Links
Sucrose Skills & Talents Details
Normal Attack: Wind Spirit Creation
Normal Attack
| Effect |
|---|
| Performs up to 4 attacks using Wind Spirits, dealing Anemo DMG. |
| Lv1 | Lv2 | Lv3 | Lv4 | Lv5 | Lv6 | Lv7 | Lv8 | Lv9 | Lv10 | Lv11 | |
|---|---|---|---|---|---|---|---|---|---|---|---|
| 1-Hit DMG | 33.5% | 36% | 38.5% | 41.8% | 44.3% | 46.8% | 50.2% | 53.5% | 56.9% | 60.2% | 63.6% |
| 2-Hit DMG | 30.6% | 32.9% | 35.2% | 38.3% | 40.6% | 42.9% | 45.9% | 49% | 52.1% | 55.1% | 58.2% |
| 3-Hit DMG | 38.4% | 41.3% | 44.2% | 48.1% | 50.9% | 53.8% | 57.7% | 61.5% | 65.4% | 69.2% | 73.1% |
| 4-Hit DMG | 47.9% | 51.5% | 55.1% | 59.9% | 63.5% | 67.1% | 71.9% | 76.7% | 81.5% | 86.3% | 91% |
▲Use side-scroll to see percentage per level.
Charged Attack
| Effect |
|---|
| Consumes a certain amount of Stamina and deals AoE Anemo DMG after a short casting time. |
| Lv1 | Lv2 | Lv3 | Lv4 | Lv5 | Lv6 | Lv7 | Lv8 | Lv9 | Lv10 | Lv11 | |
|---|---|---|---|---|---|---|---|---|---|---|---|
| Charged Attack DMG | 120% | 129% | 38% | 150% | 159% | 168% | 180% | 192% | 204% | 216% | 228% |
| Fully-Charged Aimed Shot | 50 | 50 | 50 | 50 | 50 | 50 | 50 | 50 | 50 | 50 | 50 |
▲Use side-scroll to see percentage per level.
Plunging Attack
| Effect |
|---|
| Calling upon the power of her Wind Spirits, Sucrose plunges towards the ground from mid-air, damaging all opponents in her path. Deals AoE Anemo DMG upon impact with the ground. |
| Lv1 | Lv2 | Lv3 | Lv4 | Lv5 | Lv6 | Lv7 | Lv8 | Lv9 | Lv10 | Lv11 | |
|---|---|---|---|---|---|---|---|---|---|---|---|
| Plunge DMG | 56.8% | 61.5% | 66.1% | 72.7% | 77.3% | 82.6% | 89.9% | 97.1% | 104.4% | 112.3% | 120.3% |
| Low Plunge DMG | 114% | 123% | 132% | 145% | 155% | 165% | 180% | 194% | 209% | 225% | 241% |
| High Plunge DMG | 142% | 153% | 165% | 182% | 193% | 206% | 224% | 243% | 261% | 281% | 300% |
▲Use side-scroll to see percentage per level.
Astable Anemohypostasis Creation - 6308 (Elemental Skill)
| Effect |
|---|
| Creates a small Wind Spirit that pulls opponents and objects towards its location, launches opponents within its AoE, and deals Anemo DMG. |
| Lv1 | Lv2 | Lv3 | Lv4 | Lv5 | Lv6 | Lv7 | Lv8 | Lv9 | Lv10 | Lv11 | Lv12 | Lv13 | |
|---|---|---|---|---|---|---|---|---|---|---|---|---|---|
| Skill DMG | 211% | 227% | 243% | 264% | 280% | 296% | 317% | 338% | 359% | 380% | 401% | 422% | 449% |
| CD | 15s | 15s | 15s | 15s | 15s | 15s | 15s | 15s | 15s | 15s | 15s | 15s | 15s |
▲Use side-scroll to see percentage per level.
Forbidden Creation - Isomer 75 / Type II
| Effect |
|---|
| Sucrose hurls an unstable concoction that creates a Large Wind Spirit. While it persists, the Large Wind Spirit will continuously pull in surrounding opponents and objects, launch nearby opponents, and deal Anemo DMG. |
Elemental Absorption
| Effect |
|---|
| If the Wind Spirit comes into contact with Hydro/Pyro/Cryo/Electro energy, it will deal additional Elemental DMG of that type. |
| Lv1 | Lv2 | Lv3 | Lv4 | Lv5 | Lv6 | Lv7 | Lv8 | Lv9 | Lv10 | Lv11 | Lv12 | Lv13 | Lv14 | |
|---|---|---|---|---|---|---|---|---|---|---|---|---|---|---|
| DoT | 148% | 159% | 170% | 185% | 196% | 207% | 222% | 237% | 252% | 266% | 281% | 296% | 315% | 333% |
| Additional Elemental DMG | 44% | 47.3% | 50.6% | 55% | 58.3% | 61.6% | 66% | 70% | 74.8% | 79.2% | 83.6% | 88% | 93.5% | 99% |
| Duration | 6s | 6s | 6s | 6s | 6s | 6s | 6s | 6s | 6s | 6s | 6s | 6s | 6s | 6s |
| CD | 20s | 20s | 20s | 20s | 20s | 20s | 20s | 20s | 20s | 20s | 20s | 20s | 20s | 20s |
| Energy Cost | 80 | 80 | 80 | 80 | 80 | 80 | 80 | 80 | 80 | 80 | 80 | 80 | 80 | 80 |
▲Use side-scroll to see percentage per level.
Catalyst Conversion
| Effect |
|---|
| When Sucrose triggers a Swirl effect, all characters in the party with the matching element (excluding Sucrose) have their Elemental Mastery increased by 50 for 8s. |
Mollis Favonius
| Effect |
|---|
| When Astable Anemohypostasis Creation - 6308 or Forbidden Creation - Isomer 75 / Type II hits an opponent, increases all party members' (excluding Sucrose) Elemental Mastery based on 20% of Sucrose's Elemental Mastery for 8s. |
Astable Invention
| Effect |
|---|
| When Sucrose crafts Character and Weapon Enhancement Materials, she has a 10% chance to obtain double the product. |
Witch's Eve Rite: Sevenfold Transmutation
| Effect |
|---|
| After completing Witch's Homework: Of Wonderland Flowers, Sucrose will become a Hexerei character. When the party includes at least 2 Hexerei characters, you will gain the Hexerei: Secret Rite effect, which enhances Hexerei characters. Hexerei: Secret Rite · After Sucrose creates a Small Wind Spirit, nearby party members' Normal Attack, Charged Attack, Plunging Attack, Elemental Skill, and Elemental Burst DMG are increased by 5.71428% for 15s. · After Sucrose creates a Large Wind Spirit, nearby Hexerei party members' Normal Attack, Charged Attack, Plunging Attack, Elemental Skill, and Elemental Burst DMG are increased by 7.14285% for 20s. |
Who Is Sucrose?
A Bio-Alchemist From Mondstadt

Although young, Sucrose has certainly made a name for herself as a bio-alchemist. She mostly works with plants and her experiments has seen great success to the acknowledgement of Mondstadt's people.
Albedo's Assistant
Sucrose currently works as the assistant to Albedo, the Chief Alchemist of the Knights of Favonius. They have very different takes on Alchemy but they work relatively well together.
Sucrose Voice Actor & Their Notable Roles

English Voice Actor: Valeria Rodriguez & Anonymous
| Notable Roles of Valeria Rodriguez | |
|---|---|
| Akane Tendo | Ranma ½ |
| Seior, Kvasir | Fire Emblem Heroes |
| Strawberry Crepe Cookie | CookieRun: Kingdom |
| Cirrus | Honkai: Star Rail |
Japanese Voice Actor: FUJITA Akane
| Notable Roles | |
|---|---|
| Sistine Fibel | Akashic Records of Bastard Magic Instructor |
| Senran Kagura | Shinovi Master |
| Ren Kunanzuki | Monster Musume |
Character Related Articles
Character Tier Lists
All Characters
| Characters By Rarity | |||||||||||
|---|---|---|---|---|---|---|---|---|---|---|---|
| Characters By Roles | |||||||||||
| DPS List | Support List | Sustain List | |||||||||
| On-Field List | Off-Field List | ||||||||||
| Characters By Element | |||||||||||
| Hydro | Anemo | Electro | |||||||||
| Dendro | |||||||||||
| Characters By Nation | |||||||||||
| Mondstadt | Liyue | ||||||||||
| Fontaine | Natlan | ||||||||||
| Snezhnaya | Nod-Krai | ||||||||||

