
Comprehensive Alhaitham guide for Genshin Impact. Learn Alhaitham's best build, team, kit, and materials for this 5-Star Dendro DPS Sword user.
| Alhaitham Related Articles | ||||||||
|---|---|---|---|---|---|---|---|---|
 Best Build Best Build | Best Team | Gacha Banner | ||||||
| Story Quest | Specialty | Signature Weapon | ||||||
Table of Contents
Alhaitham Character Overview, Base Stats, and Tier
Character Profile
 | Rarity | | |
|---|---|---|---|
| Element | Dendro | ||
| Weapon | Sword | ||
| Ascend Stat | Dendro DMG Bonus 28.8% | ||
| Region | Sumeru | ||
| Birthday | February 11 | ||
| Roles | | ||
| How To Get | Can only be pulled during Alhaitham's Limited-Time Banner (Currently not available) | ||
Base Stats
| Base HP | Base ATK | Base DEF | |
|---|---|---|---|
| Lvl. 90 | 13,348 | 314 | 782 |
| Lvl. 80 (Ascended) | 12,410 | 292 | 727 |
Alhaitham is a 5-star Dendro character that wields a Sword in Genshin Impact. His gameplay focuses on acting as the main, on-field DPS by infusing his attacks with Dendro for super fast elemental application. By using his Elemental Skill, "Universality: An Elaboration on Form", Alhaitham creates stacks of Chisel-Light Mirrors, which enhance his abilities and damage output, before using his Elemental Burst, "Particular Field: Fetters of Phenomena" to extend his combo rotation. Lore-wise, Alhaitham is the current scribe of the Sumeru Akademiya. Both curious, and intelligent, Alhaitham believes it is impossible to save everyone, therefore, it is more important to focus on yourself.
Alhaitham's Tier & Rating
| Overall Tier | ||||||||||||||
|---|---|---|---|---|---|---|---|---|---|---|---|---|---|---|
| S | ||||||||||||||
| On-Field | Off-Field | DPS | Support | Sustain | ||||||||||
| A | - | A | - | - | ||||||||||
What Kind of Character is Alhaitham?
Alhaitham is an On-Field Dendro DPS that uses Chisel-Light Mirrors to trigger Projection Attacks that deal Dendro damage. He is a Sumeru character that synergizes well with Nahida due to her Elemental Mastery buffs, and is good into team comps that's centered around the Spread and/or the Hyperbloom reaction.
Alhaitham is one of the few dedicated Dendro DPSes, and is very reliant on specific Dendro reactions as a result. Because Dendro reactions have fallen out of meta over time, Alhaitham's usage in endgame content has slowly decreased in favor of stronger DPSes. He is still very usable, but no longer considered to be one of the top 5 best damage dealers in the game.
Rate Alhaitham!
Best Build for Alhaitham
Alhaitham prefers to reach to reach his baseline Elemental Mastery stat-goals before prioritizing Crit Rate and DMG. See below for the recommendations on how to do so.
Supply Alhaitham With Elemental Mastery
| Weapon | Light of Foliar Incision |
|---|---|
| Best Artifact | Gilded Dreams x 4 |
| Artifact Main Stats | Sands: Elemental Mastery Goblet: Dendro DMG% Bonus Circlet: CRIT Rate or DMG |
| Priority Sub-Stat | Energy Recharge% > Elemental Mastery > CRIT |
| Recommended Team | |
Stat Goals For On-Field Alhaitham
| Energy Recharge | 120-130%~ with Nahida 175-220%~ as the only Dendro character |
|---|---|
| Elemental Mastery | 300-400~ |
| CRIT Rate & DMG | 70 / 140 |
Generally, Alhaitham can get by having 300-400 Elemental Mastery to account for his ability scalings and for his Ascension 4 Passive: Mysteries Laid Bare. Although the passive has a limit of 1000 EM, you're better off getting more CRIT instead of maxing it to get a full balance of offensive stats, since getting that much Elemental Mastery with an optimal CRIT ratio can be difficult without Constellations.
Alhaitham 's Recommended Talent Priority
| Talent | Level Up Priority |
|---|---|
| Normal Attack: Abductive Reasoning | ★★★・・ |
| Universality: An Elaboration On Form (Elemental Skill) | ★★★★★ |
| Particular Field: Fetters Of Phenomena (Elemental Burst) | ★★★★・ |
Related Links:
Best Weapon for Alhaitham
Alhaitham's top weapon choices are relatively close to each other in terms of possible DPS output, with some being better in certain situations. Choose whichever one you have already.
Premium Weapons for On-Field DPS Alhaitham
| Weapon | How to Get Rating | |
|---|---|---|
| Best | Light of Foliar Incision | Get from Limited Banner - Alhaitham's Signature Weapon that synergizes well with Elemental Mastery and buffs Elemental Skill DMG. - Crit DMG secondary stat makes reaching his Crit stat-goals easier. - Buff is limited to 28 instances of damage from both his Normal Attacks and Projection Attacks, which can be a problem in multi-target scenarios since these instances will be spread out and consumed faster. |
| 2nd | Primordial Jade Cutter | Get from Limited Banner - Crit Rate secondary stat makes reaching his Crit stat-goals easier. - Attack buff can still be beneficial for Alhaitham since his abilities still also take into account his Attack. - Doesn't have the same problem of his Signature Weapon against multi-target content. - One of the best universal sword options due to its unconditional passive. |
| 3rd | Uraku Misugiri | Get from Limited Banner - Crit DMG secondary stat makes reaching his Crit stat-goals easier. - Unconditional Elemental Skill DMG, which Alhaitham appreciates. - Can outperform his Signature Weapon and Jade Cutter if he is in a team with a Geo character. - Otherwise a strong generalist option due to its unconditional passive. |
| 4th | Mistsplitter ReforgedHaran Geppaku Futsu | Get From Banners - Both have CRIT secondary stats so they can let Alhaitham reach his stat-goals easily. - Both result in around similar performances. - Mistsplitter is best if you use his Elemental Burst every rotation to get all 3 stacks. - Either weapon is a generalist sword option, so you can use whichever you have on hand. It's not recommended to get these Swords just for Alhaitham however, but can be a sound decision if you have more characters that can them. |
| 5th | Wolf-Fang | Get From the Battle Pass - CRIT Rate secondary stat lets Alhaitham reach his crit goals easily. - Elemental Skill DMG benefits his Projection Attacks. - Equal in performance to Mistsplitter and Haran at R5. |
Alhaitham's Signature Weapon and Jade Cutter can both result in very similar performances. Light of Foliar Incision is going to be slightly better than Jade Cutter of course, but if you already have Jade Cutter, there's no reason to go for Alhaitham's Signature Weapon. This can also apply to other generalist swords on the list. Use whichever you already have, or consider other sword characters that can use the weapons before pulling.
Free To Play Friendly (F2P Weapons) for On-Field Alhaitham
| Weapon | How to Get Rating | |
|---|---|---|
| Best F2P | Iron Sting | Liyue Forgeable (Craftable) Weapon - Elemental Mastery secondary stat can help Alhaitham reach his stat-goals easier. - Best at R5 - Provides an Elemental DMG buff, which is nice to have. |
| 2nd F2P | Toukabou Shigure | Reward From Past Event (Akitsu Kimodameshi) - Elemental Mastery secondary stat increases her shield strength and personal DPS. - Increases DMG dealt by the equipping character for a limited time. - Best at R5. - Better into single-target, but may struggle in multi-target since the mark or effect only applies to 1 enemy. - No longer obtainable if you didn't complete the event. |
For Free-to-Play options, Iron Sting is the easiest and best option for Alhaitham. It gives Elemental Mastery and Elemental DMG, which are all stats that Alhaitham wants. It'll often be better when fully refined at R5, so it's best to stock up on Billets to do so.
All Weapon ListAlhaitham Best Artifacts
Alhaitham's Artifact choices can depend on his teammates, but there are clear options that outrank the others. See the recommendations below:
| Artifact | Recommendation Details |
|---|---|
| Gilded Dreams | ★★★★★ - Alhaitham's best set for general use that works with most team combos. - Provides Elemental Mastery, which Alhaitham appreciates. |
| Marechaussee Hunter | ★★★★・ - If you like using Alhaitham with Furina, this set is the strongest option with her. - Allows Alhaitham to reach high CRIT Rate just by having Furina (and a healer) on his team. - Passive won't work without Furina and a healer, so if you use Furina elsewhere, you won't be able to use Alhaitham that has this set equipped. |
| 2-pc. Elemental Mastery2-pc. Elemental Mastery | ★★★・・ - Any 2 piece combination of stats that Alhaitham likes such as Elemental Mastery can be better than Gilded Dreams if the sub-stats are better. - You can use the set combination indicated here or alongside any of 2-piece of the following: - Deepwood Memories - Gladiator's Finale - Golden Troupe |
Recommended Artifact Stats
| Main: Flat HP Sub: CRIT Rate or DMG / Energy Recharge / Elemental Mastery |
|---|---|
| Main: Flat ATK Sub:CRIT Rate or DMG / Energy Recharge / Elemental Mastery |
| Main: Elemental Mastery Sub: CRIT Rate or DMG / Energy Recharge |
| Main:Dendro DMG Bonus Sub:CRIT Rate or DMG / Energy Recharge / Elemental Mastery |
| Main: CRIT Rate or DMG Sub: CRIT Rate or DMG / Energy Recharge / Elemental Mastery |
Hit His Energy Requirements First
Ideally, for ease of play, you want to Alhaitham to reach his Energy Recharge stat goal to be able to use his Elemental Burst reliably every rotation before focusing on his Elemental Mastery and CRIT. This makes it easier to maintain 3 Chisel-Light Mirrors consistently, It's possible to still get 3 Mirrors without using his Burst every rotation, but it requires getting the hang of a specific combo rotation. Regardless, ensuring he meets his Energy requirements will make his gameplay feel smoother while still also contributing to the total DPS.
Related Articles
Best Team Comp Alhaitham
Premium Hyperbloom Team
| DPS | Support | Support | Support |
|---|---|---|---|
| Alhaitham | Nahida | Furina | Shinobu |
| Details | |||
| - Alhaitham is the On-Field DPS that benefits from the Spread reaction while also ensuring the Quicken aura is maintained to allow for Hyperblooms to happen. - Nahida provides Elemental Mastery with her Burst, Off-Field Dendro application with her Skill and Energy particles. - Furina applies Hydro and a hefty DMG% buff to the entire team with her Burst. - Shinobu applies the Electro, provides healing and is the main Hyperbloom trigger. | |||
Alhaitham's strongest team in terms of total DPS includes Furina as the main Hydro applicator. She can be replaced by other Hydro units, however her slow application makes it so that Alhaitham gets to trigger the Spread reaction more often since the Hydro won't overpower the Quicken aura too rapidly. Nahida is his strongest teammate by far and he benefits greatly from the EM buff she provides to the active character inside her Elemental Burst field.
Other Team Comps For Alhaitham
Alhaitham Spread Team
| Team | Detail | |
|---|---|---|
| Alhaitham | Nahida | - Alhaitham focuses more on his Spread damage in this team. - Miko is the best Off-Field Electro applicator because Fischl's A4 passive doesn't proc with Spread. - Zhongli provides Elemental RES Shred and a durable shield that helps Alhaitham remain uninterrupted. |
| Miko | Zhongli | |
F2P Friendly Team Comp
| Team | Detail | |
|---|---|---|
| Alhaitham | Yaoyao | - A F2P-friendly team comp using free or easily obtainable characters. - Because Xingqiu's Hydro application is fast and significant, Alhaitham can't reliably trigger Spread as often, which lowers his personal damage. - Hyperbloom teams have a relatively decent baseline damage, so it should still be usable, just not as strong. |
| Shinobu | Xingqiu | |
Team Rotation of Alhaitham and Combos
Basic Team Rotation for On-Field DPS Alhaitham
| Basic Rotation For On-Field DPS Alhaitham |
|---|
| 1. Start with supports with longer ability durations. 2. Swap to Alhaitham, then do one of the combos based on preference and support ability durations. 3. Swap back into your supports to refresh abilities if the combo allows you to. 4 Finish Alhaitham's DPS combo. 5. Return to Step 1. |
Alhaitham's rotations can vary depending on his teammates, his Energy Recharge stat, and your personal preference. The main focus of his combos is to keep refreshing his Mirror attacks by alternating between abilities that can generate mirrors. This is to ensure you are reliably triggering the 3-mirror Projection Attack for most of his field-time.
Optimal Alhaitham Combos
Long Rotation
| Long Rotation - 6 Projection Attacks |
|---|
| 1. Use Elemental Burst, wait 2 seconds (since there's a delay in Mirror generation after using his Burst). └ You can try to swap into a support to refresh their skill, but this requires a lot of skill and good ping, so its best to simply attack or dodge instead. 2. Use Normal Attack for around 4 seconds (or 2 Projection Attacks). You can dash at the third Normal attack since the 4th Normal Attack animation is long. 3. Use either Skill or Charged attack to refresh 1 Mirror. 4. Use Normal Attack for around (or 2 Projection Attacks). 5. Use either Skill or Charged attack to refresh 1 Mirror 5. Keep attacking if you see the need to. 6. Swap to your supports and then repeat from Step 1. |
▲ You can count the amount of Projection Attacks that trigger as a visual guide for when to do the next action (which is generally going to be after 2 projections).
Alhaitham's long combo theoretically deals the most damage since it fully maximizes the uptime for his 3-mirror projections, but his field time also increases as a result. Support abilities with short durations may run out mid-combo.
This is best suited for teammates with longer durations such as Xingqiu, Baizhu, Furina and Raiden Shogun (Skill only).
Short Rotation
| Short Rotation - 4 Projection Attacks |
|---|
| 1. Use Elemental Burst. 2. Use Elemental Skill. 3. Use Normal Attack for around 5 seconds (2 Projection Attacks + 1 second). 4. Use a Charged Attack to refresh 1 Mirror. 5. Use Normal Attack for 4 seconds (2 Projection Attacks). 6. Swap to your supports and then repeat from Step 1. |
▲ You can count the amount of Projection Attacks that trigger as a visual guide for when to do the next action (which is generally going to be after 2 projections).
Alhaitham's short combo may result in less damage, but the shorter field-time makes it easier to refresh his support's abilities, making it slightly easier to execute. This rotation can be played with most supports provided you refresh the ones that expire earlier, such as Shinobu's or Yae Miko's Elemental Skill.
Split Rotation
| Split Rotation - 2 + 4 Projection Attacks |
|---|
| 1. Hold Elemental Skill slightly above the enemy, ensure that you will still hit them. 2. After blinking to the location, immediately Plunge. This should generate 3 Mirrors. 3. Use Normal Attacks for around 4 to 11 Seconds (2 Projection Attacks, let the mirrors level down to 2 mirrors). 4. Swap into your supports to use or refresh key abilities. 5. Swap back into Alhaitham (this is essentially another rotation), use his Elemental Burst. 6. Wait for the 2 second delay to finish. Attack or dodge if necessary. 7. Use Normal Attacks for 4 seconds (2 Projection Attacks). Use a Charged Attack after to create 2 more Projection Attacks. 8. Swap to your supports and then repeat from Step 1. |
▲ You can count the amount of Projection Attacks that trigger as a visual guide for when to do the next action (which is generally going to be after 2 projections).
This rotation is a bit unique in where you essentially split the usage of Alhaitham's Skill and Burst between two rotations or halves, instead of using both all in one go. This makes it possible to maintain 100% uptime on your support abilities while also having decent 3-mirror projection uptime. It also allows Alhaitham to have lesser Energy Recharge since his Burst can be used in the next half.
Basics Of Using Alhaitham
Alhaitham is an On-Field Dendro DPS that uses Chisel-Light Mirrors to create Dendro Projection Attacks that fire off at a set interval. These Mirrors are generated through his Elemental Skill, Burst and Passive Talents. He can only have up to 3 Chisel-Light Mirrors at a time, with each level corresponding to a different Projection type.
Maintaining 3 Mirrors Is Essential
Alhaitham wants to stay at 3 Chisel-Light Mirrors consistently since this level provides the highest damage. Achieving this involves managing his Mirror generating abilities carefully and following a specific rotation, making Alhaitham at a base level a little more complicated to get the most out of in comparison to other DPSes.
Best Played in a Hyperbloom or Spread Team
Alhaitham's abilities scale heavily with his Elemental Mastery. They still account for his Attack, but focusing on his Elemental Mastery more is highly recommended. Because of this, Alhaitham is naturally suited for teams that can are based off of the Quicken reaction, which is created by combining Dendro and Electro. Quicken is like an aura that stays on an enemy, and it will persist so long as you keep applying Electro or Dendro to the enemy.
Hyperbloom and Spread Can Coexist
If you apply Hydro to an enemy with Quicken, it triggers Hyperbloom. If you apply more Dendro to them while Quicken is active, it triggers Spread, which increases Dendro damage. Both of these reactions can be triggered at the same time since applying Dendro on a quick enemy to trigger Spread keeps the Quicken aura alive, so that the Hydro attack doesn't completely remove the aura. Alhaitham thrives off of both these reactions, making his most popular and strongest teams usually seeing a combination of both.
Elemental Skill, Burst and Abilities Guide for Alhaitham
How To Use Alhaitham Skills & Passives
- ▼Strong Dendro DPS with a unique mechanic.
- ▼Elemental Skill requires 3 Chisel-Light Mirrors to activate his Projection Attacks.
- ▼Elemental Burst makes and consumes mirrors.
- ▼Passive also generates 1 mirror.
- ▼Maintaining 3 mirrors is essential for his DPS.
- ▼Different optimal combos.
- ▼Alhaitham appreciates Elemental Mastery.
- ▼Skill can be used for exploration.
Strong Dendro DPS With a Unique Mechanic
| Basic Rotation Of Alhaitham |
|---|
| 1. Start with the supports with shorter ability durations and use their Elemental Skills or Bursts. 2. Swap to Alhaitham to execute one of his damage combos depending on team (or preference). 3 .Swap to a support whose ability you want to refresh. 4. Switch to Alhaitham again to finish his damage combo. 5. Repeat from Step 1. |
Alhaitham's unique gameplay mechanic involves managing a stacking resource called Chisel-Light Mirrors. These mirrors can be generated through his Skill, his Burst and through his Passive that allows his Charged or Plunge Attacks to create 1 Mirror if it hits an enemy. Alhaitham has several different combos that you can use to match your preference or team cooldowns.
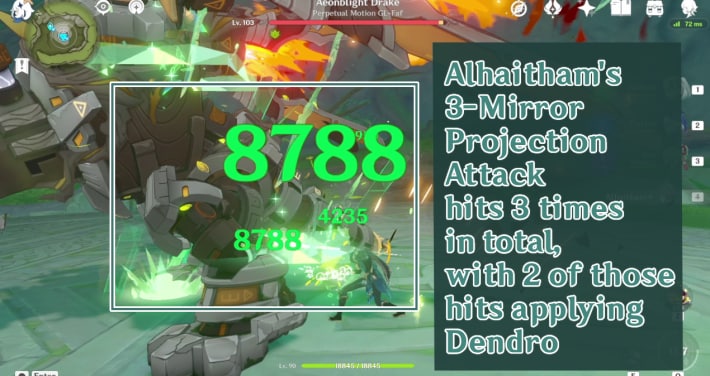
Elemental Skill Requires 3 Chisel-Light Mirrors to Activate His Projection Attacks
Alhaitham's Elemental Skill infuses his Normal Attacks with Dendro and also causes Projection Attacks to occur at set intervals every time he uses his Normal Attack. The Projection Attacks make up the bulk of his personal damage and appear as light-green beams of light.
These projections require you to have a Chisel-Light Mirror active before they can be triggered, and the total number of active Mirrors determines the level of the Projection Attacks. Ideally you always want to stay at 3 Chisel-Light Mirrors since the projections at this mirror number have the highest DPS.

▲ Chisel-Light Mirrors don't persist after swapping or when Alhaitham is not on the field.
Alhaitham can gain Mirrors from the following actions:
| Action | Mirrors Generated |
|---|---|
| Use Elemental Skill | 1 Mirror. 2 Mirrors if there are no current Mirrors active. |
| Four-Causal Correction Passive | 1 Mirror after a Plunge Attack OR Charged Attack. └This effect can be triggered only once every 12 seconds. If you've already used a Plunge Attack before, doing a Charged Attack immediately after will not make a Mirror. |
| Use Elemental Burst | Can consume active Mirrors to increase attack instances. Refunds 3/2/1/0 Mirrors if there were 0/1/2/3 Mirrors already active. └ ex. If used with 0 Mirrors active, the Burst will generate 3 Mirrors. |
Elemental Burst Makes and Consumes Mirrors
With no mirrors active, Alhaitham’s Elemental Burst generates 3 Mirrors. This lets you start a combo with his Burst or use it after swapping in. If used with any number mirrors active, each mirror extends the Burst’s duration and increases the total attack instances of the Particular Binding Field. The Burst refunds a number of Mirrors based on the total consumed.
Unless you build him as a Burst DPS or have C6, it is generally better to use his Burst for mirror generation. Consuming mirrors with his Burst often leaves his Skill on cooldown afterward, making it harder to regain 3 Chisel-Light Mirrors quickly.
Passive Also Generates 1 Mirror
| Passive | Description |
|---|---|
| (Ascension 1) Four-Causal Correction | When Alhaitham's Charged or Plunging Attacks hit opponents, they will generate 1 Chisel-Light Mirror. This effect can be triggered once every 12s. |
Alhaitham unlocks Four-Causal Correction after ascending to Level 20, allowing his Charged and Plunging Attacks to generate a mirror stack. In practice, he still needs to use Normal Attacks with mirrors active to spawn projections, so weaving in a Charged Attack during this is intuitive. His Elemental Skill can also be held to enter Aiming Mode, and casting from certain heights can trigger a Plunge Attack.
Keep this in mind for later combos, as they often require a Charged or Plunge Attack at specific times. These attacks must hit an enemy to create a mirror.
Maintaining 3 Mirrors Is Essential for His DPS
Alhaitham’s main damage comes from Projection Attacks via his Elemental Skill, which are triggered by Normal Attacking when a Chisel-Light Mirror stack is active. Since 3-mirror Projections far outdamage the 1-mirror or 2-mirror attacks, maintaining three mirrors is key for maximum DPS.
Each Mirror lasts around 4 seconds. Creating a new one at max mirrors replaces the one closest to expiring. This is why Alhaitham's optimal combos constantly refresh mirrors to sustain 3-mirror Projection Attacks.
Different Optimal Combos
Alhaitham has a few different combos that maximize the uptime of the 3-mirror Projection Attack. Whichever you use depends mostly on preference, but more importantly on the durations of your support abilities. For a detailed demo of these combos, you can click here to jump to them.
Alhaitham Appreciates Elemental Mastery
| Passive | Description |
|---|---|
| (Ascension 4) Mysteries Laid Bare | Each point of Alhaitham's Elemental Mastery will increase the DMG dealt by Projection Attacks and Particular Field: Fetters of Phenomena by 0.1%. The DMG of both aforementioned abilities can be increased by a maximum of 100% this way. |
Alhaitham’s kit has strong Elemental Mastery scaling across most talents, including his Elemental Skill activation damage, all levels of Projection Attacks, his Elemental Burst damage, and his Ascension 4 Passive, Mysteries Laid Bare. He needs about 1000 EM to max this Passive, but it is generally better to aim for 300–400 EM from Artifacts and Weapon, then focus on CRIT Rate or DMG for better stat balance.
He still benefits greatly from external EM sources, such as the Gilded Dreams set, Dendro Resonance, and Nahida’s Elemental Burst.
Skill Can Be Used for Exploration
Alhaitham's Elemental Skill allows him to blink or teleport to a location indicated by the special cursor or marker that pops up when you hold his Skill. This can be helpful when you want to reach higher areas when exploring. Because the cooldown can be a bit long, usage of his Skill in this way is limited, unlike the Natlan Characters that have dedicated exploration abilities.
Should You Pull for Alhaitham's Constellation Or Best Weapon?
Getting His Signature Weapon is Recommended
| Signature VS Constellations |
|---|
| Light of Foliar Incision > C2+ > C1 |
Light of Foliar Incision is Better than the 4-Star Options
Alhaitham is a very capable Dendro carry at C0, and because his constellations don't provide a significant upgrade over his C0 performance (at least until C6), it's generally recommended to get Light of Foliar Incision instead if you had to choose between his constellations or the weapon. His Signature Weapon is a notable improvement over his 4-star options, and while it may not be as universal as other 5-star Crit swords like Mistsplitter Reforged, it'll be usable as a stat-stick and can be good for specific characters that benefit from the Elemental Mastery in it's passive.
| Recommendation if You Have Primordial Jade Cutter or Uraku Misugiri |
|---|
| C6 > C2 > C1 > Light of Foliar Incision |
C2 is a Good Stopping Point
Primordial Jade Cutter can be competitive with his signature weapon, while Uraku Misugiri edges out by a small margin over both of Primordial Jade Cutter and his Signature Weapon if Alhaitham has a Geo teammate. If you happen to have either, and if you want to get Alhaitham's constellations instead without fully committing to C6, C2 can be a viable stopping point. It won't necessarily boost his damage output, but C1 can be useful for exploration thanks to the extra skill instance, while C2 provides a bit more Elemental Mastery when he has a Chisel-Light Mirror, which is nice to have.
If you would like to, and if you have the funds to do so, you can also consider getting Nahida's C2 for the DEF shred it provides on targets affected by Quicken, which should elevate Alhaitham's damage in a way that his pre-C6 constellations cannot.
Alhaitham's Constellations & Effects
| Rating | Constellation Effect |
|---|---|
| ★★・・・ | C1: Intuition When a Projection Attack hits an opponent, Universality: An Elaboration On Form's CD is decreased by 1.2s. This effect can be triggered once every 1s. |
| ★★★★・ | C2: Debate When Alhaitham generates a Chisel-Light Mirror, his Elemental Mastery will be increased by 50 for 8 seconds, max 4 stacks. Each stack's duration is counted independently. This effect can be triggered even when the maximum number of Chisel-Light Mirrors has been reached. |
| ★★★・・ | C3: Negation Increases the Level of Universality: An Elaboration On Form by 3. Maximum upgrade level is 15. |
| ★★★・・ | C4: Elucidation When Particular Field: Fetters Of Phenomena is unleashed, the following effects will become active based on the number of Chisel-Light Mirrors consumed and created this time around: - Each Mirror consumed will increase the Elemental Mastery of all other nearby party members by 30 for 15s - Each Mirror generated will grant Alhaitham a 10% Dendro DMG Bonus for 15s The pre-existing duration of the aforementioned effects will be cleared if you use Particular Field: Fetter of Phenomena again while they are in effect. |
| ★★★・・ | C5: Sagacity Increases the Level of Particular Field: Fetters Of Phenomena by 3. Maximum upgrade level is 15. |
| ★★★★★ | C6: Structuration Alhaitham gains the following effects: - 2 seconds after Particular Field: Fetters Of Phenomena is unleashed, he will generate 3 Chisel-Light Mirrors regardless of the number of mirrors consumed. - If Alhaitham generates Chisel-Light Mirrors when their numbers have already maxed out, his CRIT Rate and CRIT DMG will increased by 10% and 70% respectively for 6s. If this effect is triggered again during its initial duration, the duration remaining will be increased by 6s. |
Alhaitham's Constellation Name is Vultur Volans
| Vultur Volans |
|---|
 |
Ascension Materials for Alhaitham Talents & Level
Materials Per Level Ascension Level
| Materials Needed To Get To Lvl. 80 |
|---|
| Nagadus Emerald Sliver x 1Nagadus Emerald Fragment x 9Nagadus Emerald Chunk x 9Faded Red Satin x 18Trimmed Red Silk x 30Rich Red Brocade x 12Sand Grease Pupa x 108Pseudo-Stamens x 26 |
| Materials Needed To Get To Lvl. 90 |
| Nagadus Emerald Sliver x 1 Nagadus Emerald Fragment x 9Nagadus Emerald Chunk x 9Nagadus Emerald Gemstone x 6Faded Red Satin x 18Trimmed Red Silk x 30Rich Red Brocade x 36Sand Grease Pupa x 168Pseudo-Stamens x 46 |
| Level 1 | Default |
|---|---|
| Level 2 | Teachings Of Ingenuity x3Faded Red Satin x6 |
| Level 3 | Guide To Ingenuity x2 Trimmed Red Silk x3 |
| Level 4 | Guide To Ingenuity x4Trimmed Red Silk x4 |
| Level 5 | Guide To Ingenuity x6 Trimmed Red Silk x6 |
| Level 6 | Guide To Ingenuity x9 Trimmed Red Silk x9 |
| Level 7 | Philosophies Of Ingenuity x4 Rich Red Brocade x4 Mirror Of Mushin x1 |
| Level 8 | Philosophies Of Ingenuity x6 Rich Red Brocade x6 Mirror Of Mushin x1 |
| Level 9 | Philosophies Of Ingenuity x12 Rich Red Brocade x9 Mirror Of Mushin x2 |
| Level 10 | Philosophies Of Ingenuity x16 Rich Red Brocade x12 Mirror Of Mushin x2 Crown of Insight x1 |
| Level 11 | Unlocked via Constellation |
| Level 12 | Unlocked via Constellation |
| Level 13 | Unlocked via Constellation |
Related Links
Alhaitham Skills & Talents Details
Normal Attack: Abductive Reasoning
Normal Attack
| Effect |
|---|
| Performs up to 5 rapid strikes. |
| Lv1 | Lv2 | Lv3 | Lv4 | Lv5 | Lv6 | Lv7 | Lv8 | Lv9 | Lv10 | Lv11 | |
|---|---|---|---|---|---|---|---|---|---|---|---|
| 1-Hit DMG | 49.5% | 53.4% | 57.6% | 63.4% | 67.4% | 72% | 78.3% | 84.7% | 91% | 97.9% | 104.8% |
| 2-Hit DMG | 50.8% | 54.9% | 59% | 64.9% | 69% | 73.8% | 80.3% | 86.8% | 93.2% | 100.3% | 107.4% |
| 3-Hit DMG | 34.2%+34.2% | 37%+37% | 39.7%+39.7% | 43.7%+43.7% | 46.5%+46.5% | 49.7%+49.7% | 54.1%+54.1% | 58.4%+58.4% | 62.8%+62.8% | 67.6%+67.6% | 72.3%+72.3% |
| 4-Hit DMG | 66.8% | 72.2% | 77.6% | 85.4% | 90.8% | 97.1% | 105.6% | 114.1% | 122.7% | 132% | 141.3% |
| 5-Hit DMG | 83.9% | 90.7% | 97.5% | 107.3% | 114.1% | 121.9% | 132.6% | 143.3% | 154.1% | 165.8% | 177.5% |
Charged Attack
| Effect |
|---|
| Consumes a certain amount of Stamina to unleash 2 rapid sword strikes. |
| Lv1 | Lv2 | Lv3 | Lv4 | Lv5 | Lv6 | Lv7 | Lv8 | Lv9 | Lv10 | Lv11 | |
|---|---|---|---|---|---|---|---|---|---|---|---|
| Charged Attack DMG | 55.3%+55.3% | 59.8%+59.8% | 64.3%+64.3% | 70.7%+70.7% | 75.2%+75.2% | 80.3%+80.3% | 87.4%+87.4% | 94.5%+94.5% | 101.5%+101.5% | 109.2%+109.2% | 116.9%+116.9% |
| Charged Attack Stamina Cost | 20 | 20 | 20 | 20 | 20 | 20 | 20 | 20 | 20 | 20 | 20 |
▲Use side-scroll to see percentage per level.
Plunging Attack
| Effect |
|---|
| Plunges from mid-air to strike the ground below, damaging opponents along the path and dealing AoE DMG upon impact. |
| Lv1 | Lv2 | Lv3 | Lv4 | Lv5 | Lv6 | Lv7 | Lv8 | Lv9 | Lv10 | Lv11 | |
|---|---|---|---|---|---|---|---|---|---|---|---|
| Plunge DMG | 63.9% | 69.1% | 74.3% | 81.8% | 87.0% | 92.9% | 101.1% | 109.3% | 117.5% | 126.4% | 135.3% |
| Low Plunge DMG | 128% | 138% | 149% | 164% | 174% | 186% | 202% | 219% | 235% | 253% | 271% |
| High Plunge DMG | 160% | 173% | 186% | 204% | 217% | 232% | 253% | 273% | 293% | 316% | 338% |
▲Use side-scroll to see percentage per level.
Universality: An Elaboration On Form (Elemental Skill)
| Effect |
|---|
| Rushes forward, dealing Dendro DMG to nearby opponents when the rush ends, causing a Chisel-Light Mirror to form. Holding this skill will cause it to behave differently. |
Hold
| Effect |
|---|
| Enters Aiming Mode to adjust the direction of Alhaitham's rush attack. |
Chisel-Light Mirror
| Effect |
|---|
| When this skill is unleashed, Alhaitham will generate 1 Chisel-Light Mirror. If there are no Mirrors at this time, he will generate 1 additional Mirror. Chisel-Light Mirrors will have the following properties: ・When he possesses Chisel-Light Mirrors, Alhaitham's Normal, Charged, and Plunging Attacks will be converted to Dendro DMG. This cannot be overridden. ・When attacks of the aforementioned kinds hit opponents, the Chisel-Light Mirrors will unleash a Projection Attack that deals AoE Dendro DMG based on the number of Mirrors on the field. ・A total of 3 Chisel-Light Mirrors can exist at once. ・The Chisel-Light Mirrors will disappear one after the other over time, and will all disappear when Alhaitham leaves the field. |
| Lv1 | Lv2 | Lv3 | Lv4 | Lv5 | Lv6 | Lv7 | Lv8 | Lv9 | Lv10 | Lv11 | lv12 | Lv13 | |
|---|---|---|---|---|---|---|---|---|---|---|---|---|---|
| Rush Attack DMG | 193.6% ATK +154.9% Elemental Mastery | 208.1% ATK +166.5% Elemental Mastery | 222.6% ATK +178.1% Elemental Mastery | 242.0% ATK +193.6% Elemental Mastery | 256.5% ATK +205.2% Elemental Mastery | 271.0% ATK +216.8% Elemental Mastery | 290.4% ATK +232.3% Elemental Mastery | 309.8% ATK +247.8% Elemental Mastery | 329.1% ATK +263.3% Elemental Mastery | 348.5% ATK +278.8% Elemental Mastery | 367.8% ATK +294.3% Elemental Mastery | 387.2% ATK +309.8% Elemental Mastery | 411.4% ATK +329.1% Elemental Mastery |
| Projection Attack Interval1.6s | 1.6s | 1.6s | 1.6s | 1.6s | 1.6s | 1.6s | 1.6s | 1.6s | 1.6s | 1.6s | 1.6s | 1.6s | |
| 1-Mirror Projection Attack DMG | 67.2%ATK +134.4% Elemental Mastery | 72.2%ATK +144.5% Elemental Mastery | 77.3%ATK +154.6% Elemental Mastery | 84.0%ATK +168.0% Elemental Mastery | 89.0%ATK +178.1% Elemental Mastery | 94.1%ATK +188.2% Elemental Mastery | 100.8%ATK +201.6% Elemental Mastery | 107.5%ATK +215.0% Elemental Mastery | 114.2%ATK +228.5% Elemental Mastery | 121.0%ATK +241.9% Elemental Mastery | 127.7%ATK +255.4% Elemental Mastery | 134.4%ATK +268.8% Elemental Mastery | 142.8%ATK +285.6% Elemental Mastery |
| 2-Mirror Projection Attack DMG | (67.2% ATK +134.4% Elemental Mastery)×2 | (72.2% ATK +144.5% Elemental Mastery)×2 | (77.3% ATK +154.6% Elemental Mastery)×2 | (84.0% ATK +168.0% Elemental Mastery)×2 | (89.0% ATK +178.1% Elemental Mastery)×2 | (94.1% ATK +188.2% Elemental Mastery)×2 | (100.8% ATK +201.6% Elemental Mastery)×2 | (107.5% ATK +215.0% Elemental Mastery)×2 | (114.2% ATK +228.5% Elemental Mastery)×2 | (121.0% ATK +241.9% Elemental Mastery)×2 | (127.7% ATK +255.4% Elemental Mastery)×2 | (134.4% ATK +268.8% Elemental Mastery)×2 | (142.8% ATK +285.6% Elemental Mastery)×2 |
| 3-Mirror Projection Attack DMG | (67.2% ATK +134.4% Elemental Mastery)×2 | (72.2% ATK +144.5% Elemental Mastery)×2 | (77.3% ATK +154.6% Elemental Mastery)×2 | (84.0% ATK +168.0% Elemental Mastery)×2 | (89.0% ATK +178.1% Elemental Mastery)×2 | (94.1% ATK +188.2% Elemental Mastery)×2 | (100.8% ATK +201.6% Elemental Mastery)×2 | (107.5% ATK +215.0% Elemental Mastery)×2 | (114.2% ATK +228.5% Elemental Mastery)×2 | (121.0% ATK +241.9% Elemental Mastery)×2 | (127.7% ATK +255.4% Elemental Mastery)×2 | (134.4% ATK +268.8% Elemental Mastery)×2 | (142.8% ATK +285.6% Elemental Mastery)×2 |
| Chisel-Light Mirror Removal Interval | 4s | 4s | 4s | 4s | 4s | 4s | 4s | 4s | 4s | 4s | 4s | 4s | 4s |
| CD | 18s | 18s | 18s | 18s | 18s | 18s | 18s | 18s | 18s | 18s | 18s | 18s | 18s |
▲Use side-scroll to see percentage per level.
Particular Field: Fetters Of Phenomena
| Effect |
|---|
| Creates a Particular Binding Field and deals multiple instances of AoE Dendro DMG. If Chisel-Light Mirrors exist when this ability is unleashed, all such Mirrors will be consumed and increase the number of DMG instances dealt. 2s after this ability is unleashed, if 0/1/2/3 Mirrors were consumed, Alhaitham will generate 3/2/1/0 new Mirrors in turn. |
| Lv1 | Lv2 | Lv3 | Lv4 | Lv5 | Lv6 | Lv7 | Lv8 | Lv9 | Lv10 | Lv11 | Lv12 | Lv13 | |
|---|---|---|---|---|---|---|---|---|---|---|---|---|---|
| Single-Instance DMG | 121.6% ATK +97.3% Elemental Mastery | 130.7% ATK +104.6% Elemental Mastery | 139.8% ATK +111.9% Elemental Mastery | 152.0% ATK +121.6% Elemental Mastery | 161.1% ATK +128.9% Elemental Mastery | 170.2% ATK +136.2% Elemental Mastery | 182.4% ATK +145.9% Elemental Mastery | 194.6% ATK +155.6% Elemental Mastery | 206.7% ATK +165.4% Elemental Mastery | 218.9% ATK +175.1% Elemental Mastery | 231.0% ATK +184.8% Elemental Mastery | 243.2% ATK +194.6% Elemental Mastery | 258.4% ATK +206.7% Elemental Mastery |
| Basic Attack Instances | 4 | 4 | 4 | 4 | 4 | 4 | 4 | 4 | 4 | 4 | 4 | 4 | 4 |
| 1-Mirror Attack Instances | 6 | 6 | 6 | 6 | 6 | 6 | 6 | 6 | 6 | 6 | 6 | 6 | 6 |
| 2-Mirror Attack Instances | 8 | 8 | 8 | 8 | 8 | 8 | 8 | 8 | 8 | 8 | 8 | 8 | 8 |
| 3-Mirror Attack Instances | 10 | 10 | 10 | 10 | 10 | 10 | 10 | 10 | 10 | 10 | 10 | 10 | 10 |
| CD | 18s | 18s | 18s | 18s | 18s | 18s | 18s | 18s | 18s | 18s | 18s | 18s | 18s |
| Energy Cost | 70 | 70 | 70 | 70 | 70 | 70 | 70 | 70 | 70 | 70 | 70 | 70 | 70 |
▲Use side-scroll to see percentage per level.
Four-Causal Correction
| Effect |
|---|
| When Alhaitham's Charged or Plunging Attacks hit opponents, they will generate 1 Chisel-Light Mirror. This effect can be triggered once every 12s. |
Mysteries Laid Bare
| Effect |
|---|
| Each point of Alhaitham's Elemental Mastery will increase the DMG dealt by Projection Attacks and Particular Field: Fetters of Phenomena by 0.1%. The maximum DMG increase this way for both these abilities is 100% |
Law Of Reductive Overdetermination
| Thoth's Revelation |
|---|
| When Alhaitham crafts Weapon Ascension Materials, he has a 10% chance to receive double the product. |
Character Related Articles
Character Tier Lists
All Characters
| Characters By Rarity | |||||||||||
|---|---|---|---|---|---|---|---|---|---|---|---|
| Characters By Roles | |||||||||||
| DPS List | Support List | Sustain List | |||||||||
| On-Field List | Off-Field List | ||||||||||
| Characters By Element | |||||||||||
| Hydro | Anemo | Electro | |||||||||
| Dendro | |||||||||||
| Characters By Nation | |||||||||||
| Mondstadt | Liyue | ||||||||||
| Fontaine | Natlan | ||||||||||
| Snezhnaya | Nod-Krai | ||||||||||

