Spiral Abyss Floor 10 Best Characters, Teams & Strategy For 6.0 (Luna I) in Genshin Impact. See how to 9 stars, tips, enemies, elements, guide & more for Spiral Abyss Floor 10.
All Spiral Abyss Floor Guides
Check Out The Spiral Abyss GuideSpiral Abyss Floor 10 - Guide Overview
| If you've previously cleared Floor 12 with full stars on the previous rotation, the next reset should have Floor 10 automatically 9-starred for you. |
| Ley Line Disorder |
|---|
| - Characters' Lunar reaction DMG increased by 50%. |
| Enemy Levels |
| - 80 ~ 85 |
| Challenge Goal |
| [ Chamber 1 ] - Defeat all enemies, Remaining challenge longer than time 60 seconds (★ 1) / 180 seconds (★ 2) / 300 seconds (★ 3) |
| [ Chamber 2 ] Defeat all enemies, Remaining challenge longer than time 60 seconds (★ 1) / 180 seconds (★ 2) / 300 seconds (★ 3) |
| [ Chamber 3 ] Defeat all enemies, Remaining challenge longer than time 180 seconds (★ 1) / 300 seconds (★ 2) / 420 seconds (★ 3) |
| Blessing of the Abyssal Moon |
| When a character triggers Hydro-related reactions, a shockwave will be released at the opponent's position, dealing True DMG. This effect can be triggered once every 2s. |
Spiral Abyss Floor 10 - Recommended Characters & Party
Recommended Team Comp
| Ley Line Disorder |
|---|
| - Characters' Lunar reaction DMG increased by 50%. |
First Half Team
| Lauma Lunar-Bloom Team | |||
|---|---|---|---|
 Lauma Lauma | Nilou | Nahida | Kokomi |
| Neuvillette Lunar-Charged Team | |||
| Neuvillette | Ineffa | Xilonen | Furina |
| Mavuika Melt Team | |||
| Mavuika | Citlali | Bennett | Furina |
| F2P Team | |||
| Ororon | Xingqiu | Beidou | |
Use Lunar Reactions or AoE Teams
As of the Version 6.0 (Luna I), there is currently only three characters that can enable the conversion of Electro-Charged to Lunar-Charged and Bloom to Lunar-Bloom when they're added to party. It's expected that there will be more as the game progresses. You can use any of the above characters, or any team whose abilities and reactions triggered can hit multiple targets, such as an Electro-charged team.
If you have any decently-invested AoE (area-of-effect) team, you can make quick work of this floor even if you don't follow any of the enemy mechanics just by brute-forcing.
Crowd Control Can Be Good In The First Half
The first half of the floor will have a few light enemies that can be lifted by Anemo abilities that can group enemies, which is referred to as Crowd Control. You can use these characters in your clears to attack these enemies at the same time.
Second Team
| Ley Line Disorder |
|---|
| - Characters' Lunar reaction DMG increased by 50%. |
| Lauma Lunar-Bloom Team | |||
|---|---|---|---|
| Lauma | Nilou | Nahida | Kokomi |
| Neuvillette Hyperbloom Team | |||
| Neuvillette | Ineffa | Lauma | Furina |
| Clorinde Aggravate Team | |||
| Clorinde | Nahida | Xilonen | Fischl |
| F2P Team | |||
| Barbara | Kuki Shinobu | Collei | Dendro T. |
Dendro Teams Have an Advantage
Most of the enemies on the 2nd half have weaknesses that are present in Dendro teams. The Wayob simply requires you to deal with its shield by applying an element that reacts to Dendro to it, such as Electro or Hydro, and the Frostnight Scions wants to be attacked with the same element (which is Dendro). The Radiant Bladehorn has a mechanic that requires you to be healed to full, which can be supplied by a healer or anyone with self-healing.
Some of the more meta single-target teams can brute-force this half and get full stars with decent investment.
Sample Team Composition - Free / Low Rarity
| First Team | |||
|---|---|---|---|
| On-Field | Sub DPS | Support | Sub-DPS |
| Ororon | Xingqiu | Beidou | |
| Second Team | |||
| On-Field | Sub DPS | Sub DPS | Support |
| Barbara | Kuki Shinobu | Collei | Dendro T. |
Spiral Abyss Floor 10 - Enemies & Tips
Floor 10 Chamber 1
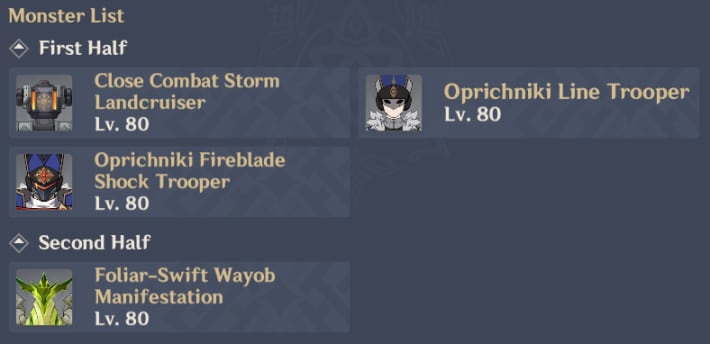
| First Half Tips |
|---|
| - You can use teams that have AoE abilities or can trigger multi-target reactions like Electro-charged. - Since there are enemies that aren't immune to grouping, you can bring an Anemo character like Venti to be able to hit them all at once. |
| Second Half Tips |
| - Use Hydro or Electro to deplete the Wayob Manifestation's shield. |
Floor 10 Chamber 2
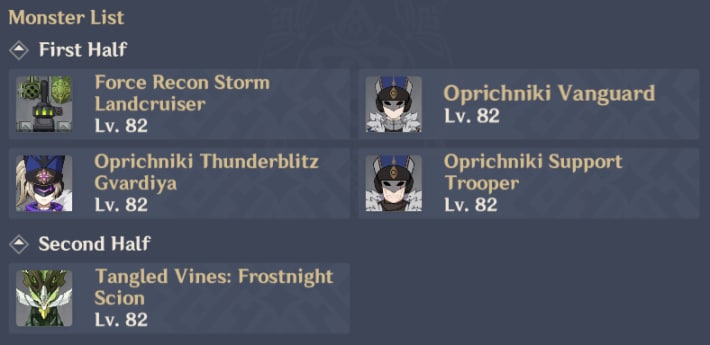
| First Half Tips |
|---|
| - You can use teams that have AoE abilities or can trigger multi-target reactions like Electro-charged. - Since there are enemies that aren't immune to grouping, you can bring an Anemo character like Venti to be able to hit them all at once. |
| Second Half Tips |
| - Attack the Frostnight Scion with Dendro to stop its special state. |
Floor 10 Chamber 3
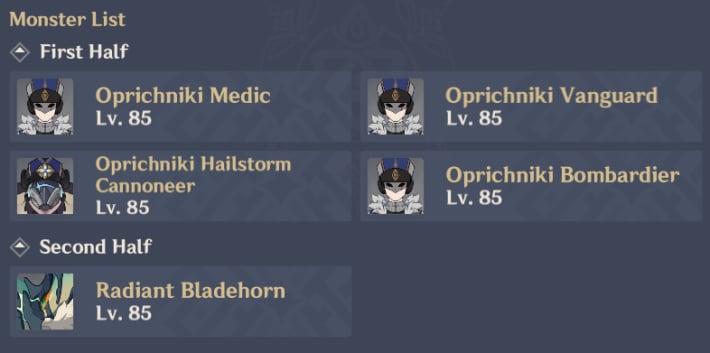
| First Half Tips |
|---|
| - You can use teams that have AoE abilities or can trigger multi-target reactions like Electro-charged. - Since there are enemies that aren't immune to grouping, you can bring an Anemo character like Venti to be able to hit them all at once. |
| Second Half Tips |
| - To escape the Radiant Cocoon, use a healer or a character with strong self-healing to be able to heal to max HP. |
Spiral Abyss Floor 10 - Rewards & Primogems
Chamber Rewards
| Chamber 1 | Adventurer's Experience x 3 Mystic Enhancement Ore x 6 Domain Reliquary - Tier II x 1 |
|---|---|
| Chamber 2 | Adventurer's Experience x 3 Mystic Enhancement Ore x 6 Domain Reliquary - Tier II x 1 |
| Chamber 3 | Adventurer's Experience x 3 Mystic Enhancement Ore x 6 Domain Reliquary - Tier II x 1 |
Stars (Primogems) Rewards
| ★ 3 | Primogem x 50 |
|---|---|
| ★ 6 | Primogemx 50 |
| ★ 9 | Primogem x 100 |
Genshin Impact Related Articles
| Related Guides | |||||
|---|---|---|---|---|---|
| 6.7 Update (Luna 8) | |||||
| New & Rerun Characters | |||||
| Sandrone | Citlali | ||||
| Columbina | Raiden Shogun | ||||
| Heavenlit Prophecy Rate-Up Characters | |||||
| Yae Miko | Wriothesley | ||||
| Mizuki | |||||
| Useful Tools | |||||
| Best Girl Ranking Tool | Best Boy Ranking Tool | ||||
| Item Locations & Databases | |||||
| Interactive Map Guide Of All Items & Chests | |||||
| Anemoculus | Geoculus | ||||
| Electroculus | Dendroculus | ||||
| Hydroculus | Pyroculus | ||||
| Crimson Agate | Key Sigil | ||||
| Lunoculus | - | ||||
| Other Popular Guides | |||||
| Best Character Tier List | Reroll Tier List | ||||
| Best Team Comp | - | ||||
| Other Guides | |||||
| Artifact List + Set Bonuses | Artifacts Guide | ||||
| How To Reroll Fast | All Characters List | ||||
| All Weapons List | How To Download Genshin? | ||||

