Iktomi Spirit seeking Scrolls is an event for Genshin Impact. See release date, how to unlock, gameplay, tips, strategy, and rewards for Iktomi Spirit seeking Scrolls.
Table of Contents
Iktomi Spiritseeking Scrolls Guide


| Event Duration | 2024/11/28 10:00 - 2024/12/16 3:59 |
|---|---|
| Unlock Condition | - Adventure Rank 20 or above - Complete the Prologue Act 3: Song Of The Dragon And Freedom |
| Reward | ▼ All Rewards |
Iktomi Spiritseeking Scrolls Is An Event That Features 3 Mini-Games
Iktomi Spirintseeking Scrolls is an event wherein you help Ororon and Citlali to help a character who got his spirit removed. This event features 3 mini-events that will unlock upon finishing the first part of the story.
Mini-Games
| Mini Games | Description |
|---|---|
| ▼ Search for Lost Spirits | - A Coop-game wherein you play with randoms or your friends to move spirits to bases. - Point based and the better you play the more you get per round. |
| ▼ Evil Banisher | - A Combat mini-game that requires you to do specific actions to get buff. |
| ▼ Restoring Fragmented Records | - A Picture-based puzzle that requires you to put pieces together |
Search for Lost Spirits Strategy Guide
Chase The Balls Towards The Goal

The goal of the Search for Lost Spirits is to send the spirit balls to the goals. You will join the team of other players but it is not competitive but rather cooperative.
After Sending Spirits, You Will Get A Gathering Buff

Sending spirits will max out the bar on the top of the screen. Upon maxing out the bar, your team will get a buff that gathers spirits near you allowing an easier transfer.
Goals that are glowing in gold will also give more points so if there is a glowing one, make sure to use that goal.
Use Items On Field For Buffs

While playing Search for List Spirits, you can get buffs from orbs that appears on-field. The yellow orbs recovers your stamina while the one with shoe mark increases your movement speed.
Evil Banisher Tips
Make Use Of The Buff By Choosing An Appropriate Team

▲For the first day using a Natlan character + Anemo is recommended.
For Evil Banisher of Iktomi Spirit Seeking Scrolls, you can receive a buff called "Banishing Aura". You can only activate this buff by accomplishing the contents of "Banishing Rite". Choosing a team that accomplishes this condition will make the play easily so make sure to think and form a team that can activate the buff.
Look At The Gauge To See The Buff Status

The Buff's, Banishing Aura, can be seen by checking the bar on the top of the screen. Once it is maxed out, the conditions on the left side of the screen will disappear and a special effect will happen on the screen. Focus on doing the conditions for buffs to deal more damage.
Restoring Fragmented Records
How To Solve?
Menilek

The shadowed upper scarf and hair will be the first layer

The face fragment will be the second layer.

Both of the second part of the headgear and scarf will be the third layer.

The yellow headgear adornment is the finishing touch to this puzzle.
Sundjatta

The first layer for this puzzle will be the triangle mark fragment and the face fragment. Any of them can be placed on top of the other.

Next layer is adding the fragment of a face silhouette with his neck.

Third layer will be placing the upper outfit fragment and hair fragment

The final layer will be adding the accessories. The necklace and the shoulder accessory fragments are to be added.
Wanjiru

Start with adding the shorter rectangle fragment. This will be the forehead marking later

Add the face and neck fragment for the second layer.

Third layer will be adding the right sleeve fragment and the face silhouette with eyepatch fragment

Fourth layer will be the upper outfit fragment and the hair fragment

The final layer will be the left sleeve with scarf fragment
Tupac

Add the shadowed neck fragment for the first layer

The second layer will contain the left sleeve with scarf fragment and the smaller blue fragment for his beard and facial mark.

The third layer will be the face fragment and the amulet fragment.

The finishing layer is the right shoulder fragment and the hair fragment to complete the puzzle
Burkina

First layer will be adding the fragment of the shadowed part of his jacket's hood.

Next layer is adding the other fragment of the jacket's hood.

Third layer consists of the neck fragment and the upper outfit torso fragment.

Fourth layer will be adding the face and headgear fragment along with the sleeve fragment

Afterwards, add the hood design with outfit patchwork fragment.
Clairvoyant Shard: Ororon

Place the muffler part of Ororon at the placement shown above. Take care of the layers when placing this.


Clairvoyant Shard: Citlali

Citlali's puzzle is fairly easy. You will mostly be struggling with Layers so follow the placement in this chart for an easier time.


Iktomi Spiritseeking Scrolls Rewards
Rewards List
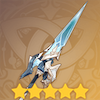
| Known Rewards | Calamity of Eshu (Sword) Shuttle of Odara Mora Primogems Crown of Insight Character EXP Materials Artifact EXP Materials Talent Materials |
|---|
New 4-star Event-Exclusive Weapon

Travelers can obtain the new event limited sword, "Calamity of Eshu," and its Refinement Material, "Shuttle of Odara," by completing the event!
Event Related Articles

Current Wish (Gacha) Banners
| Banner | Boosted Character / Weapon |
|---|---|
| Frostedge Nocturne 6/9/2026 - 6/30/2026 [ Gatcha Simulator ] | |
| Ancient Flame Ablaze 6/9/2026 - 6/30/2026 [ Gatcha Simulator ] | |
6/9/2026 - 6/30/2026 | |
| Beginners' Wish Permanent | |
| Wanderlust Invocation Permanent | - |