
Tulin of Rito Village guide for the Legend of Zelda: Tears of the Kingdom (TotK). See how to go to Rito Village, Wind Temple, walkthrough chart, quest tips, & procedures.
Table of Contents
How To Get To Rito Village
Directional Map

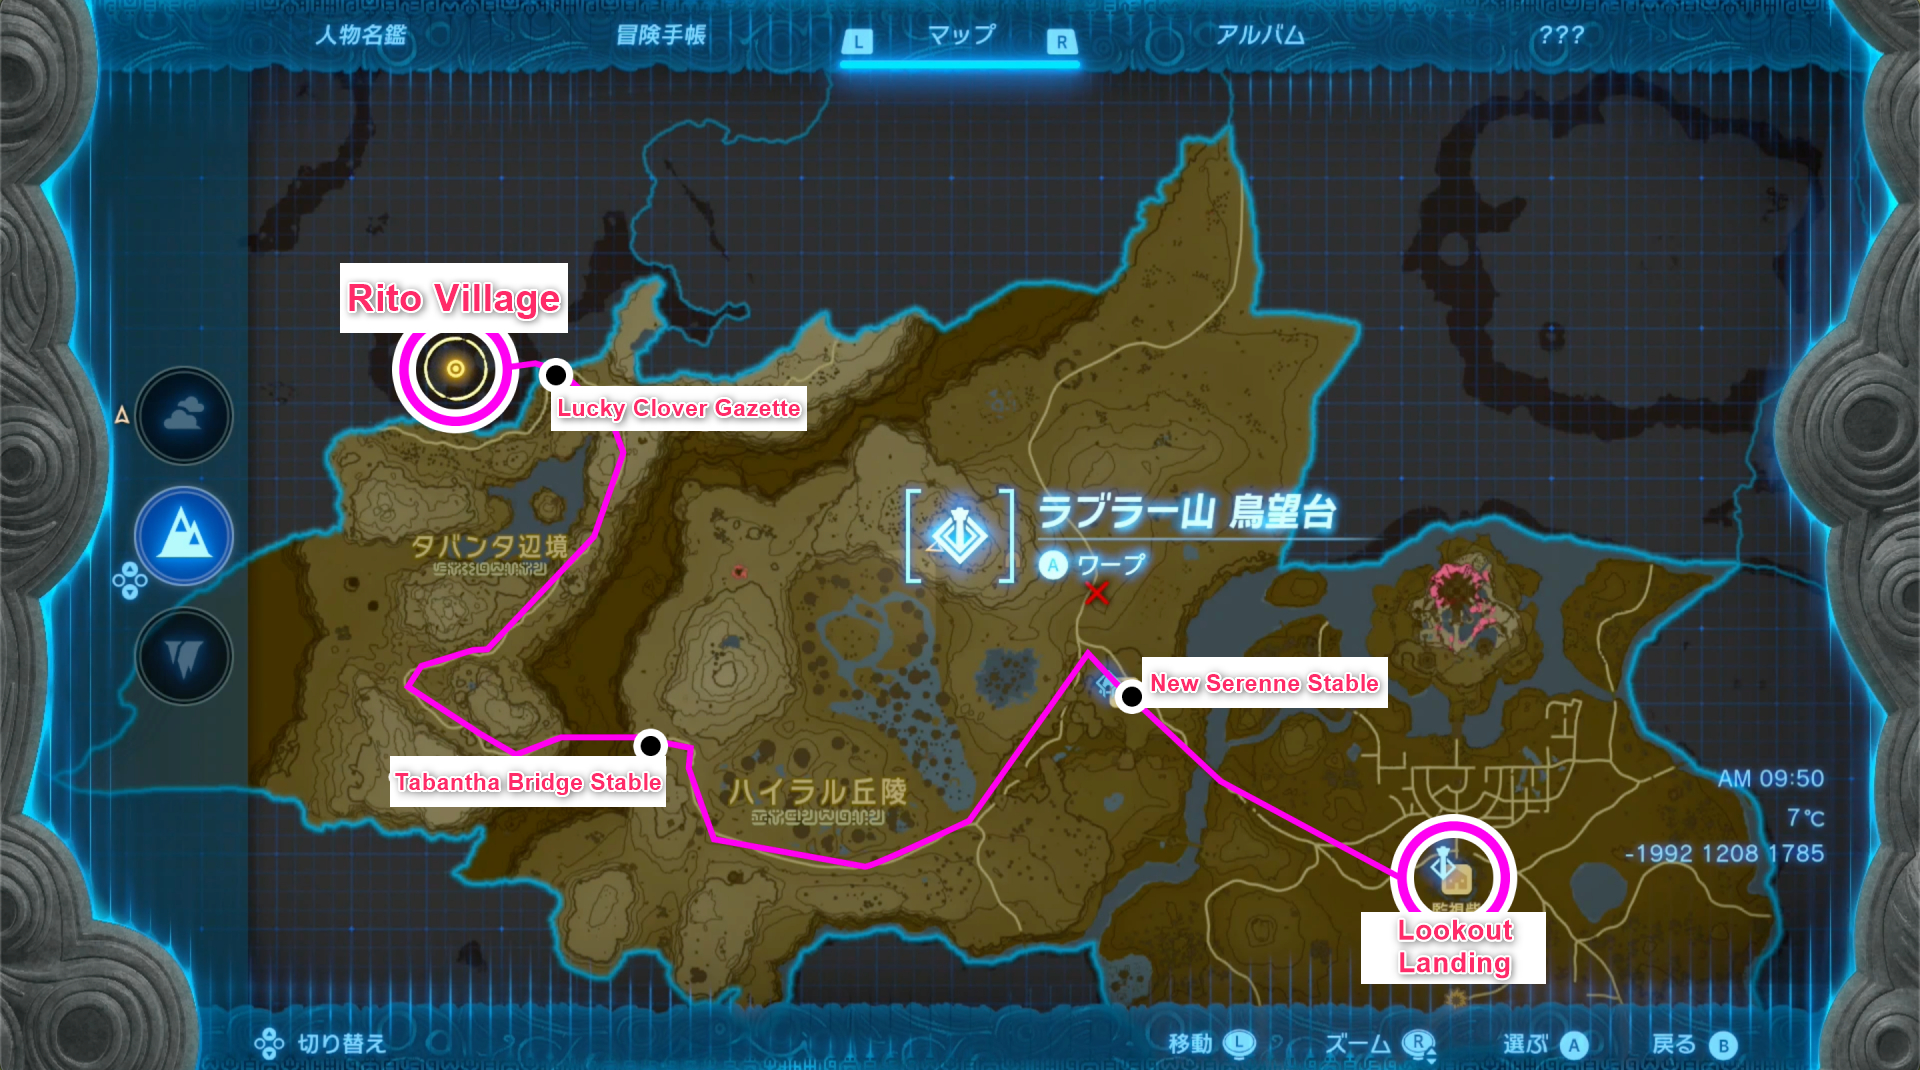
Steps Of Getting Rito Village
| Steps | How To Get To Rito Village |
|---|---|
| From Lookout Landing, head northwest along the road. Riding horse is recommended ▶Horse Guide | |
 New Serenne Stable is the first check point New Serenne Stable is the first check point | |
| Head to nearby Lindor's Brow Skyview Tower to unlock the map of the nearby area. ▶Lindor's Brow Skyview Tower | |
 Proceed along the road to reach Tabantha Bridge Stable Proceed along the road to reach Tabantha Bridge StableCross the bridge to move forward | |
 cross the narrow bridge located on top of the slope cross the narrow bridge located on top of the slope | |
| Proceed along the road to reach Lucky Clover Gazette | |
| The bridge connecting to the next cliff is broken. Pick up Hylian Pine Cone and place it on the bonfire and create updraft Use Paraglider to reach Rito Village on the other side. |
Tulin Of Rito Village Walkthrough Guide
Steps Complete Tulin Of Rito Village
From Arrival To Starting The Quest

| Steps | From Arrival To Starting The Quest |
|---|---|
| Once you arrive at Rito Village, activate Gatakis Shrine first for Travel Point | |
| Purchase Snowquill Tunic(500 Rupees) at Armor Shop (You need 2 Cold Resistance armor to reach Wind Temple) ▼How To Obtain Cold Resistance Armor | |
 Climb up further to talk to Tulin at the platform Climb up further to talk to Tulin at the platform | |
| The quest Tulin of Rito Village starts here. |
How To Obtain Major Cold Resistance Armor
| Armor | How To Obtain |
|---|---|
| Archaic Warm Greaves | 【Location】 ・Great Sky Island 【Price】 ・Non |
| Snowquill Tunic | 【Location】 ・Armor Shop at Rito Village 【Price】 ・500 Rupees |
| Vah Medoh Divine Helm | 【Location】 ・North Biron Snowshelf Cave 【Price】 ・Non |
Level 2 Cold Resistance armor is required to complete "Tulin of Rito". Archaic Warm Greaves can be obtained at Sky Island and Snowquill Tunic can be bought at Rito Village. Another option is to obtain Vah Medoh Divine Helm at North Biron Snowshelf for no cost.
Vah Medoh Divine Helm Is Objective For Sub Quest
Vah Medoh Divine Helm is an objective for a sub-quest "Treasure of the Secret Spring". However, the quest is only available after completing Wind Temple. So if you obtained Vah Medo Divine Helm before make sure to talk to Tulin after you complete Wind Temple.
Talk To Tulin Again And Recover The Bow

| Order | Start From The Platform You Talked With Tulin |
|---|---|
 Look north from the platform to check bonfire. Look north from the platform to check bonfire. Fly towards bonfire using Paraglider | |
 Talk to Harth at Hebra Trailhead Lodge Talk to Harth at Hebra Trailhead LodgeClimb up the ladder and walk along the road to find a cave Activating the Rospro Pass Skyview Tower will make exploring much easier | |
 Enter Hebra South Summit Cave Enter Hebra South Summit CaveBurn the thorns to enter the route on the right | |
| Fly up using updraft with Paraglider Enter hole located on the side to move forward | |
 Once arrive at Campfire remains, put fire on Campfire Once arrive at Campfire remains, put fire on CampfireUse Hylian Pine Cone to create updraft, then use Paraglider to fly up | |
 Talk to Gesane and move forward Talk to Gesane and move forward | |
 Leave the cave then head to cedar tree located on the north Leave the cave then head to cedar tree located on the northClimb and Ascend to head to cedar tree | |
| Talk to Tulin once arrive at the cedar tree You will need to stay with Tulin from here to the Wind Temple You will not be able to progress if you're separated from Tulin. ▼What To Do If You're Separated From Tulin | |
| Use Tulin's skill to cross to opposite cliff Press A to prepare Tulin's skill→Press A again to activate | |
 Defeat flying enemy to recover the bow Defeat flying enemy to recover the bow(Fuse Keese Eyeball to hit the enemy with 100% accuracy) | |
| Enemy reinforcement will arrive after recovering Bow Collect Falcon Bow which drops when defeating enemies with bows (It will be very useful for completing Wind Temple) |
Until Arriving Wind Temple
Video Of The Route To Wind Temple
Skills Utilised Often On The Way
| Skill Utilised Often | |
|---|---|
| Ascend | ・Use Ascend on the roof ・If the roof is too high, use the block to create a scaffold then use acend |
| Tulin's Skill | ・Skill used for the Paraglider movement ・There is a skill cooldown, so make sure to rest before flying again |
| Ship Trampoline | ・Able to jump higher ・Jump up high to look around, then choose a direction to move towards using Paraglider (Can be used multiple times) |
Steps Until Arriving Wind Temple
| Order | Heading From Hebra Mountain To Temple |
|---|---|
 Go to the top of Hebra Moutain Go to the top of Hebra Moutain | |
 Use Ascend on buildings Use Ascend on buildings | |
 Arrive at Hebra Mountain(Location of Heck) Arrive at Hebra Mountain(Location of Heck)Go up towards floating buildings ・Ascend on roof ・Use Paraglider + Tulin's Skills to move to next platform | |
 Arrive at the next location which ship and Mayaumekis Shrine can be seen Arrive at the next location which ship and Mayaumekis Shrine can be seenUse trampoline at the ship to move up Activate the Shrine to be able to travel to and back from the village (Get back to this location if you're separated from Tulin) | |
 Find location that is blocked by icicles. Find location that is blocked by icicles. Break the icicles using bow and use Ascend | |
 Destroy the rock on top of the ship using weapon or Bomb Flower, than move on using Ship Tranmpoline Destroy the rock on top of the ship using weapon or Bomb Flower, than move on using Ship Tranmpoline | |
 There will be many enemies around location which looks like a big gate There will be many enemies around location which looks like a big gateRun across the pathway as it will collapse after short time | |
 Combine Hot-Air Balloon+Board+Flame Emitter and fly up Combine Hot-Air Balloon+Board+Flame Emitter and fly upAscend aim for higher location | |
| Move along using the trampoline to reach Kahatanaum Shrine Use the ship trampoline to move further ahead You will need Cold Resistance Level 2 from this point onwards | |
 The wind is blowing counterclockwise around the giant tornado The wind is blowing counterclockwise around the giant tornadoUse the ship and proceed so that there is a tornado on the left side | |
| Once you reached the top, enter the eye of the tornado to enter Wind Temple |
What To Do If You Got Separated From Tulin

You will not be able to advance Wind Temple if you lost Tulin. If you can't find Tulin, go back to Mayaumekis Shrine, Tulin will be back near the first Ship Trampoline.
 Return To Top
 Great Sky Island Guide
 Main Quest Walkthrough List
 Find Princess Zelda
 The Closed Door
 To the Kingdom of Hyrule
 Crisis at Hyrule Castle (1st Time)
 Regional Phenomena
 Impa and the Geoglyphs
 Camera Work In The Depths
 A Mystery In The Depths
 Tulin of Rito Village
 Yunobo of Goron City
 Sidon of the Zora
 Riju of Gerudo Town
 Dragon's Tears
 Crisis at Hyrule Castle (2nd Time)
 Find the Fifth Sage
 Guidance From Ages Past
 Trail of the Master Sword
 Destroy Ganondorf
 Wind Temple
 Water Temple
 Fire Temple
 Lightning Temple
 Spirit Temple
 Colgera
 Marbled Gohma
 Mucktorok
 Queen Gibdo
 Seized Construct
 How To Unlock True Ending
 Post Game Guide & What To Do After Game?
