



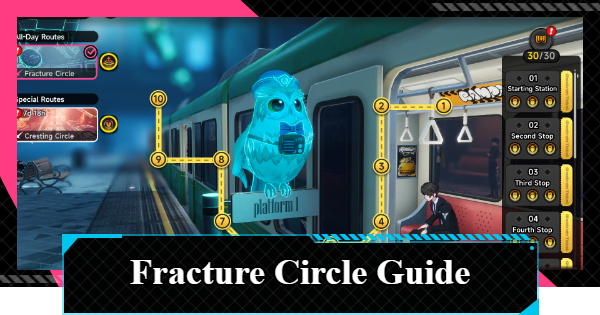
Fracture Circle guide for Neverness to Everness (NTE). See stage mechanics, best team comps for Stages 1 to 10, Ninth and Terminal Station strategies, and all rewards.
Table of Contents
What Is Fracture Circle?
Permanent High-Difficulty Combat Mode


Fracture Circle is permanent high-difficulty combat content under the Beyond the Rails in NTE. Players challenge progressively harder stages under a strict timer, requiring well-built teams and smart rotations to clear all objectives.
Beyond the Rails Tips & Best TeamsBeyond the Rails Location

Located in the northern district of Miguel, the Fracture Circle is marked by the green railway icon on the world map. Once unlocked, you can teleport directly to the entrance at any time.
Objective Rewards

Each stage awards up to 3 Seals based on your remaining clear time. Accumulating Seals across all 10 stages unlocks milestone rewards, including Annuliths and Train Logs.
▼Fracture Circle Rewards ListTips for Fracture Circle
Take Advantage of Otherworld Resonance Buffs

Each rotation features an Otherworld Resonance, a stage buff gimmick. Tailor your party composition around these mechanics to optimize your rotations and significantly cut clear times.
Prepare Two Distinct Teams for Latter Stages

Starting at the 6th Stop, stages are split into two halves: Inbound and Outbound. Units deployed in your Inbound squad cannot be reused on the Outbound side for that stage.
Best Team Builds and CompositionsOutbound is a Boss Fight

Outbound stages in Fracture Circle primarily feature single-target boss fights. Focus on building teams centered around high break gauge efficiency, concentrated burst damage, and targeted ATK buffs to maximize DPS during vulnerability windows.
Utilize Otherworld Supply Items

Before starting a stage, spend Shadowquills to equip an Otherworld Supply for each team. Select items that directly complement your squad's strategy.
| Note! | You can equip 1 supply item per team per stage. Purchased supplies are tied strictly to that stage and do not transfer over. |
|---|
Exploit Enemy Weaknesses

In Beyond the Rails, enemy weaknesses are displayed, so build a team with characters that can exploit those weaknesses. Being mindful of Esper Cycles will also allow you to deal damage more efficiently.
Esper Cycle GuideRe-challenge Later for 3-Seal Clears

Fracture Circle is permanent content, so there is no need to rush a perfect run. If your roster isn't quite strong enough for a 3-Seal clear yet, complete the stage at 1 or 2 Seals to secure early rewards, then return once your team is further leveled and geared.
Best Teams for Fracture Circle 1 - 8
*Click below to jump to a section!
| Starting Station | Second Stop | Third Stop | Fourth Stop |
| Fifth Stop | Sixth Stop | Seventh Stop | Eighth Stop |
Best Team for Starting Station
| Recommended Formation | |||
 Esper Zero Esper Zero |  Edgar Edgar |  Nanally Nanally |  Adler Adler |
| Enemy Lv/Weakness | Rec. Lv | Recommended Gift | |
Lv43 Cosmos Cosmos  Incant. Incant. | Lv30+ | Esper Resonance - DMG+ | |
This team is built around Cosmos and Incantation characters to exploit the enemy's weaknesses. Including an Anima character also lets you trigger the Blossom and Hexed Esper Cycles.
Best Team for Second Stop
| Recommended Formation | |||
| Esper Zero | Edgar |  Hathor Hathor |  Skia Skia |
| Enemy Lv/Weakness | Rec. Lv | Recommended Gift | |
Lv46 Cosmos  Lakshana Lakshana | Lv30+ | Esper Resonance - DMG+ | |
This team is built around Cosmos and Lakshana characters, letting you trigger the "Remora" Esper Cycle. We also recommend including Anima characters to trigger "Charge."
Best Team for Third Stop
| Recommended Formation | |||
| Esper Zero |  Sakiri Sakiri | Nanally | Adler |
| Enemy Lv/Weakness | Rec. Lv | Recommended Gift | |
Lv49 Cosmos Incant.  Psyche Psyche | Lv40+ | Esper Resonance - DMG+ | |
This team is built around Cosmos and Incantation characters. By including Anima characters, you can also trigger Esper Cycles: Blossom and Hexed.
Best Team for Fourth Stop
| Recommended Formation | |||
 Baicang Baicang | Sakiri |  Daffodill Daffodill | Adler |
| Enemy Lv/Weakness | Rec. Lv | Recommended Gift | |
| Lv52 Incant. | Lv40+ | Off-Rail Resonance - Incantation | |
This team is centered around Incantation Espers that can exploit the enemy's weaknesses. You can proc "Scorch" with Daffodill, and we also recommend including Anima characters to trigger Hexed.
Best Team for Fifth Stop
| Recommended Formation | |||
| Esper Zero | Edgar | Nanally |  Chiz Chiz |
| Enemy Lv/Weakness | Rec. Lv | Recommended Gift | |
| Lv55 Cosmos | Lv50+ | Off-Rail Resonance - Cosmos | |
This team composition is centered around Cosmos characters. Aim to trigger "Blossom" with Anima characters like Nanally, and consider including Lakshana characters for "Remora."
Best Team for Sixth Stop
| Recommended Inbound Formation | |||
| Esper Zero | Sakiri |  Jiuyuan Jiuyuan |  Mint Mint |
| Enemy Lv/Weakness | Rec. Lv | Recommended Gift | |
Lv58 Cosmos  Anima Anima | Lv50+ | Esper Resonance - Cycle Intensity | |
| Recommended Outbound Formation | |||
| Nanally | Hathor | Chiz |  Haniel Haniel |
| Enemy Lv/Weakness | Rec. Lv | Recommended Gift | |
| Lv58 Anima Lakshana | Lv50+ | Esper Resonance - DMG+ | |
Inbound Strategy
Favor using Esper Zero and Jiuyuan, whose attacks affect a wide range and can exploit weaknesses. Mint's Blossom is also ideal for defeating multiple enemies. Including Sakiri allows you to apply buffs and restrain mobs.
Outbound Strategy
Fight with Nanally and Hathor as your main units. Use Chiz for Charge procs, and rack up damage with Hathor's Cyclone Strike during damage windows.
Best Team for Seventh Stop
| Recommended Inbound Formation | |||
| Jiuyuan | Nanally | Hathor | Esper Zero |
| Enemy Lv/Weakness | Rec. Lv | Recommended Gift | |
| Lv60 Anima Lakshana | Lv55+ | Omnidirectional Vortex | |
| Recommended Outbound Formation | |||
| Daffodill | Sakiri | Baicang |  Fadia Fadia |
| Enemy Lv/Weakness | Rec. Lv | Recommended Gift | |
Lv60 Cosmos  Chaos Chaos | Lv55+ | Esper Resonance - DMG+ | |
Inbound Strategy
Fight with Jiuyuan as the main DPS as she can exploit weaknesses. Hathor acts as a secondary attacker since her range is narrow outside of her Ultimate and Cyclone Strike, so tag her in when her Ultimate Energy is full.
Outbound Strategy
There are numerous weaknesses present in the Outbound, so we recommend building your team around either Cosmos or Chaos. Since Cosmos was used previously, a Chaos formation may be easier to build for the Outbound. Center your team around Daffodill, and if you can, try to activate Discord as well.
Best Team for Eighth Stop
| Recommended Inbound Formation | |||
| Sakiri | Baicang |  Aurelia Aurelia | Daffodill |
| Enemy Lv/Weakness | Rec. Lv | Recommended Gift | |
| Lv62 Incant. Psyche | Lv55+ | Omnidirectional Vortex | |
| Recommended Outbound Formation | |||
| Esper Zero | Nanally | Jiuyuan | Hathor |
| Enemy Lv/Weakness | Rec. Lv | Recommended Gift | |
| Lv62 Cosmos Anima | Lv55+ | Esper Resonance - DMG+ | |
Inbound Strategy
Baicang will act as the main DPS since he can land wide-range attacks and exploit weaknesses. Try to apply Scorch to multiple enemies simultaneously to make defeating them much easier.
Outbound Strategy
Prioritize keeping Nanally active and aim to proc Charge. You can rack up damage by increasing the frequency of Ultimate Skills.
Fracture Circle Ninth Stop Guide
Recommended Preparation

| Enemy Level | Lv. 63 |
|---|---|
| Recommended Party Level | Lv. 58–60+ |
| Enemy Weakness | ChaosPsyche |
Stage 9 enemies hit extremely hard and come with severe level-gap penalties. If your party is underleveled relative to Lv. 63, your overall damage takes a direct hit from the game's level scaling penalty. Make sure to push your primary DPS units to at least Lv. 58 before attempting this stage.
Stage 9 Best Teams and Tips
| Recommended Inbound Team | |||
|---|---|---|---|
 Lacrimosa Lacrimosa | Haniel | Sakiri | Daffodill |
| Otherworld Supply | Omnidirectional Vortex |
|---|
Inbound Strategy & Wave-Clearing Tips
Group Enemies First
Use grouping abilities the moment enemies spawn to pull scattered ranged and melee mobs together. Clustering them early prevents wasted time chasing down individual targets across the arena.
Layer Support Buffs Before Bursting
Cycle through your support and sub-DPS skills first to stack ATK boosts and Energy Recharge before swapping to your main DPS to maximize overall damage output.
Manage Wave Timings
Save your main Ultimate bursts for the tankier second wave of elites rather than blowing all your heavy cooldowns on the weaker initial spawns.
| Recommended Outbound Team | |||
|---|---|---|---|
| Nanally | Esper Zero | Jiuyuan | Hotori |
| Otherworld Supply | Esper Resonance - Cycle Intensity |
|---|
Outbound Boss Strategy
Dodge Serenetti's Wide AoE Attacks
Serenetti uses multiple wide-range AoE attacks that can interrupt your combos and knock back your characters. Learn its attack telegraphs and prioritize dodging early to maintain continuous DPS uptime.
Deplete the Break Gauge Before Bursting
Use your sub-DPS and support skills to break Serenetti's gauge as quickly as possible. Line up your full skill rotation right as her Break Gauge is about to shatter to maximize your overall damage output.
Time Buffs with Break Vulnerability Windows
Once Serenetti enters the Break state, quickly stack your support ATK buffs and unload your main DPS Ultimate rotation to deal massive damage while her resistances are down.
Fracture Circle Terminal Station Guide
Recommended Preparation

| Enemy Level | Lv. 70 |
|---|---|
| Recommended Party Level | Lv. 65+ |
| Enemy Weakness | CosmosAnima |
Terminal Station is the final challenge in Fracture Circle, and clearing it unlocks the rotational endgame mode, Special Routes, in Beyond the Rails. Due to massive enemy HP pools, optimize your Energy Recharge and tighten up your skill rotations to clear the stage within the 3-Seal timer.
Terminal Station Best Teams and Tips
| Recommended Inbound Team | |||
|---|---|---|---|
| Nanally | Esper Zero |  Iroi Iroi |  Hotori Hotori |
| Otherworld Supply | Esper Resonance - DMG+ |
|---|
Inbound Strategy & Wave-Clearing Tips
Combine CC for Instant Wave Control
Use grouping skills at the start of each wave to group scattered mobs into a single spot, ensuring your main DPS skills hit every enemy simultaneously.
Maintain Energy Flow for High Wave Uptime
Cycle through your support buffs quickly to keep your team's energy topped up. Maintaining a continuous skill loop is crucial in Stage 10 to clear the massive total HP pool of elite wave spawns.
Manage Wave Timings
Reserve your main Ultimate bursts for the more durable second wave of elites, instead of using all your heavy cooldowns on the weaker first wave.
| Recommended Outbound Team | |||
|---|---|---|---|
 Shinku Shinku | Hathor | Chiz | Jiuyuan |
| Otherworld Supply | Esper Resonance - CRIT DMG |
|---|
Outbound Boss Strategy
Keep a Proper Distance
If you move too far from Morphix, it will trigger powerful long-range attacks that are difficult to dodge. Unless you need to create distance for a specific mechanic, stay close to the boss.
Watch Out for the Discs
Morphix fires disc attacks that inflict heavy damage on hit. You can deflect these discs back at the boss by timing your melee attacks, which helps deplete its Break Gauge quickly. Be sure to dodge or parry them!
Align Burst Rotation During Break Windows
Once you trigger the boss's Break status, immediately pop your support's damage buffs before dumping your DPS's full burst rotation to maximize damage during the vulnerability window.
Fracture Circle Rewards List
Claim Haniel by Completing Stage 10

The BigOwl Express event grants milestone rewards simply by clearing designated stages. Reaching and completing Fracture Circle Stage 10 rewards you with Annulith, Fons, and the A-rank character Haniel.
Seal Objective Rewards
| Total Seals | Milestone Rewards |
|---|---|
3 Seals | - Annulith x160 - Train Log x60 |
6 Seals | - Annulith x160 - Train Log x60 |
9 Seals | - Annulith x160 - Train Log x60 |
12 Seals | - Annulith x160 - Train Log x60 |
15 Seals | - Annulith x160 - Train Log x60 |
18 Seals | - Annulith x160 - Train Log x80 |
21 Seals | - Annulith x160 - Train Log x80 |
24 Seals | - Annulith x160 - Train Log x80 |
27 Seals | - Annulith x160 - Train Log x80 |
30 Seals | - Annulith x160 - Train Log x80 |
NTE Related Articles
Return to HomeRecommended Articles
Recommended Guide Articles
 Early Game Guide
 Mid-Game Guide
 Daily Things to Do
 Team Building Tips
 Hunter Level
 Appraisal Level
 Anomaly Commission List
 Beyond the Rails
 Get Chiz for Free
 Get Free S-Rank Arcs
 Mall Guide
 Oracle Stone
 Interactive Map
 Best In-Game Purchases
 How to Min-Max Consoles
 Hunter Exchange
 Latest Updates
Database
 All Items List All Items List |  All Furniture List All Furniture List |  Fish List Fish List |
 Vehicles List Vehicles List |  Hidden Achievements Hidden Achievements |  Voice Actor Cast Voice Actor Cast |
 Outfits and Skins Outfits and Skins |  Arcs Weapon List Arcs Weapon List |  All Cartridges List All Cartridges List |
 Gacha Machine Locations Gacha Machine Locations |  Achievements List Achievements List |  Common Enemy List Common Enemy List |











