


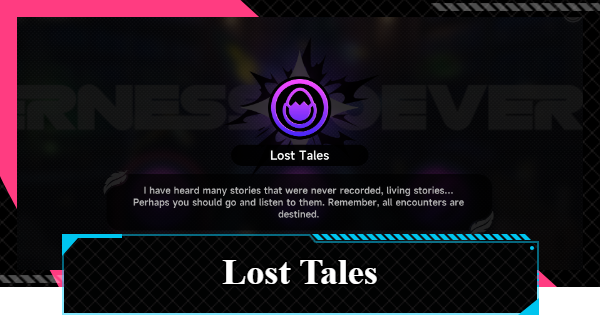
This is a Lost Tales guide for NTE (Neverness to Everness). Read on to learn how to check Lost Tales, as well as a List of Lost Tales Guides to help you complete all the quests!
| Related Articles | |
| Oracle Stones | The Witch's House |
| Lost Tales | |
This page lists Lost Tales confirmed by our team.
More Lost Tales will be added as we confirm them.
Important Notes for Lost Tales
Game-Breaking Bugs May Occur
We have confirmed that bugs in Lost Tales may prevent quest progression. In particular, skipping dialogue can lead to bugs such as being unable to proceed to the next objective, so we highly recommend avoiding the skip function.
 Tip! Tip! | If a bug occurs during your playthrough, you may have to wait for a major update before it is resolved. |
|---|
Confirmed Possible Bugs
| Vehicle Destroyer |
|---|
| If you skip the conversation with the first man, or change the in-game time after speaking with him before delivering the package, the package will disappear. - We have confirmed that the package can be obtained again from the first man after the Monday reset or once The Witch's House reveals the Lost Tale location again. |
| Photo Op with Anomalies |
| If you accidentally defeat a photo target, they may not reappear. If they do reappear, it may take a whole day. |
Things to Keep in Mind
- Don't Skip Dialogue
- Complete Lost Tales Immediately
- Avoid Combat with Anomalies
- Only Change Time to Summon NPCs
- Meet the Conditions for NPCs to Appear
- Location Remains Visible After Achievement
Avoid using the skip function during conversations, and try to complete quests on the same day they are accepted. Additionally, some quests may require interaction with a specific Anomaly, so it is recommended to avoid engaging in combat near the quest destination.
Quest NPCs Appear When Conditions Are Met
In some cases, a quest NPC will not appear at the destination until the required quest conditions have been met. The NPC's location may still be revealed through Divination at The Witch's House, even if the quest cannot currently be progressed. If the NPC does not appear after adjusting the in-game time, there is no need to continue searching for them. Simply progress other content and return later.
How to Check Lost Tales
Daily Check at the Witch's House


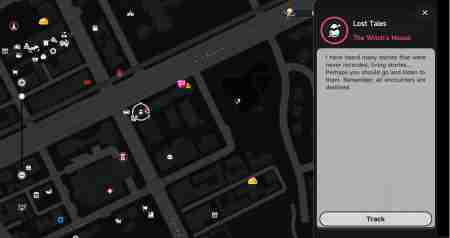
You can check one Lost Tale (Hidden Quest) per day by getting a Divination at the Witch's House. As long as you know where the quest occurs, you can progress it without doing the Divination.
The Witch's House Location
| Exterior | Map | ||
|---|---|---|---|
 |  |
Talk to the Client NPC On Site

After the Witch reveals the location of the Lost Tale shown on the map, head to the area and look for a Client NPC with a speech bubble above their head. Since Lost Tales don't appear in the quest list, make sure to read through the conversation to learn what the NPC is asking for.
If Missing: Change Time or Relog
If you can't find the Client NPC at the destination, try changing the time or logging in again to resolve the issue.
| Note! |
|---|
| Some NPCs don't appear during Rainy Weather, so if any of the Lost Tales NPCs are missing, make sure it isn't raining after advancing the time. |
Questlines Revealed Over Several Days
Many Lost Tales storylines involve multiple locations, and a single divination won't reveal every location. You'll eventually learn of every location one by one through daily divinations, but if you already know where to go, you can progress the quest in a single day.
List of Lost Tales Guides
The rewards listed represent the total rewards obtained from completing all steps.
- ▼Vehicle Killer
- ▼Anomaly and, Say Cheese
- ▼Danzaburou Never Gives Up!
- ▼Multi-Location Check-in Expert
- ▼Pet's Secret Cafeteria
- ▼A Pack of Spicy Sticks Promise
- ▼Fake Car Owner Chronicles
- ▼Next Time For Sure!
- ▼Omnic Crisis...?
- ▼Devoured Melody
- ▼Honest Body, Lying Lips
- ▼Witness Journal
- ▼Broken Machine's Generosity
- ▼The Dart's Fantastic Journey
- ▼Non-Intrusive Documentation
- ▼Hmm! Hmm! Observation Log
- ▼Sprightly Grandfather
- ▼Devil's Shadow
- ▼Talkative Old Man
- ▼World Changer [Requires Day Off Arc]
- ▼Anomaly Tracker (Self-Proclaimed) [Requires Skia]
- ▼Gangster Dreams [Requires Nanally]
- ▼The Other Side of the Legend [Requires Nanally]
Vehicle Killer
 |  |
| Time | Location |
|---|---|
| 14:00 | Hethereau - Illusion Town |
The Vehicle Destroyer Lost Tale is accepted by speaking to the man near his overturned car at 14:00, located just next to Beat King, in Hethereau - Illusion Town.
| Reward | Achievement "Vehicle Destroyer" Fons ×20,000 |
|---|
- Speak to the Man
- Head to 2-Four Convenience Store
- Relocate the
Vehicle Destroyer
- Locate the
Vehicle Destroyer
Again - Go to the Nearby Park
- Read the Message

Talk to the Anxious Passerby near the overturned car and select Need help?
. He will then ask you to deliver a document to his younger brother at the entrance of the Origami Market Convenience Store
before handing you a Thick Document Envelope.

In some cases, the overturned car may not render, so use the Anxious Passerby as your landmark. Remember that he's on the road in front of Beat King's location.

Talk to the blond man in front of the 2-Four Convenience Store. After handing over the Thick Document Envelope, you'll receive 20,000 Fons as a reward.

Vehicle Destroyer

The Vehicle Destroyer
you spoke with in Step 1 is now at the plaza, under a large Sakura tree, near the Phone Booth in Illusion Town. Simply find and speak to him as there's no new commission—just a conversation.

If you try to continue immediately after clearing Step 2, the man may not appear. In that case, advance the in-game time by 1 day to make him appear.
Vehicle DestroyerAgain

Head back in the direction of the 2-Four Convenience Store in Illusion Town and continue down the opposite sidewalk. You'll eventually spot the Man with his bicycle stuck in a nearby tree. Again, this is just a conversation with no new commission.

If the man doesn't appear, advancing in-game time or re-logging in will make him appear.

Head to the park in Illusion Town, where the man is sitting on a bench next to his younger brother. Approach and interact with them to continue.

If the man doesn't appear, advancing in-game time or re-logging in will make him appear.

After the conversation ends, an email from the Security Office will arrive—check it. After reading the contents, speak to the man for a final time to complete the Lost Tale and unlock the achievement "Vehicle Destroyer."
Photo Op with Anomalies Guide
 |  |
| Time | Location |
|---|---|
| 13:00 | Hethereau - Miguel District |
The Photo Op with Anomalies Lost Tale is accepted by speaking to the Photographer under the tree at 13:00, located near some sitting kids, in "Hethereau - Miguel District."
| Reward | Achievement "Photo Op with Anomalies" Fons ×4000 Annulith ×10 |
|---|
- Talk to the Strange Photographer
- Take a Photo of the Anomaly
- Report to the Photographer
- Relocate the Strange Photographer
- Photograph the Vending Machine
- Move to the Final Location
- Photograph the Carp Flag
- Return to the Photographer

Talk to the Strange Photographer hiding under the shade of a tree. He will ask you to take a photo of the Anomaly ontop of the nearby tree.
The Kite Anomaly that appears nearby is the photo target, and accidentally killing it will block quest progress.

The Anomaly is on top of the tree in the direction the Photographer is facing—move a little closer and take a photo with the Camera. You can take the pic even if the Anomaly is already aggressive towards you.

You can launch the Camera app from the Camera icon on the Menu screen.

When "Photography Target Completed!" appears during the shot, return to the Photographer and report. You'll obtain Fons ×2000 as a reward.

The Strange Photographer reappear on top of the stairs near the Phone Booth in Illusion Town. Talk to him and he'll ask for another photo.

The Photographer may not appear if you're continuing here immediately after clearing Step 3. In such cases, advance in-game time by 1 day and he will appear.

The Anomaly in question is the Vending Machine in the direction the Photographer is facing. Move a little closer and snap a photo with the Camera. After the photo, report to the Photographer to obtain Fons ×2000 as a reward.

The Photographer will appear at his final location under an umbrella in between the Wertheimer Tower and Phone Booth in Unheard Shores. Talk to him and he'll ask for a final photo.

The Photographer may not appear if you're continuing here immediately after clearing Step 5. In such cases, advance in-game time by 1 day and he will appear.

The Carp Flag Anomaly is under the Sakura tree. Approach the Anomaly and take a photo before reporting to the Photographer.

After taking the photo, report to the Photographer to complete the quest. Note that he has transferred from his original position, and moved closer to the Sakura tree. You'll obtain Annulith ×10 as a reward and unlock the achievement "Photo Op with Anomalies."
Danzaburou Will Never Be Enslaved! Guide
| Danzaburou Locations | Map Locations |
|---|---|
 |  |
 |  |
 |  |
 |  |
| Time | Location |
| 12:00 | Hethereau - Unheard Shores |
Danzaburou Will Never Be Enslaved! can be accepted at "Hethereau - Unheard Shores," and there are 3 other locations where Danzaburou can be found. Completing all challenges awards the Danzaburou Will Never Be Enslaved! achievement.
| Reward | Achievement "Danzaburou Will Never Be Enslaved!" Fons ×8000 U-00NE ×20 Unsolved Numeral ×4 Rising Hunter Guide ×3 The Great Thief ×4 TeaRealm T-Fusion ×1 Cool-lala Spicy Snack ×1 Nestling's Longing ×2 |
|---|
- Speak to Danzaburou
- Follow Danzaburou
- Identify Danzaburou
- Defeat Danzaburou

Approach the bonfire and speak to Danzaburou, who resembles a small tanuki. Speaking to initiates a Challenge—accept it.

Keep up with Danzaburou as he begins to move.

After following Danzaburou, he will stop and transform into multiple objects. The fallen tree with the red scarf is the real Danzaburou, so approach it and remove the scarf. Speak to Danzaburou again to progress.

Danzaburou will transform into a Living Armor
Anomaly. Since he is alone, the fight itself is fairly easy. After defeating Danzaburo, speak to him again to complete the Challenge #1 and receive Fons, Arc, and other rewards.
- Talk to the girl on the bridge in Unheard Shores
- Follow the Girl
- Defeat Danzaburou Again
- Chase Danzaburou
- Speak to Danzaburou
Talk to the Distressed Tourist
on the bridge in the center of Unheard Shores.

After speaking to the Distressed Tourist
, she will ask you to follow her. She will move somewhat erratically, but she will eventually stop at a nearby camspite.

Danzaburou will transform into another Anomaly after arriving at the campsite. Just like last time, he's alone, so he's easy to defeat.

Once defeated, Danzaburou reverts into his original form. He will try to run away and escape, so chase after him until he creates more clones. Chase the middle clone and ignore the other two.

Danzaburou will eventually collapse from exhaustion. Talk to him to complete Challenge #2 and receive Fons, Arc, and other rewards.
- Approach the Vending Machines
- Chase After Danzaburou
- Ignore the Clone
- Identify Danzaburou
Challenge #3 starts near the vending machines outside of the Moby-Dick Bookstore situated near the Wertheimer Tower in Bridge Crossings. Approach the Strange Boy
rummaging through the vending machine and speak to him.

Pointing out the Strange Boy's
scarf will cause Danzaburou to flee, so be prepared to chase him. Danzaburou will create clones after climbing the stairs, so chase after the one that runs left.

Danzaburou will eventually create another clone. Ignore the one that climbs up the stairs and continue chasing after the one that continues fleeing down the same path.

Just passed the point where Danzaburou creates the clone, he will turn the corner and create multiple objects. The real Danzaburou is the graffiti painted on the wall, so approach and interact with it to complete Challenge #3 and receive rewards.
- Go to Races in Rampage Players
- Chase After Danzaburou
- Identify Danzaburou
Head towards the Races and Rampage Players in Bridge Crossings
to locate the Alerted Man
standing near a neon green Jeep.

Just like before, Danzaburou will attempt to flee, so be prepared to chase him. After he creates a clone, chase after the one that says I'm the fake one!
.

Danzaburou will eventually try his usual trick and create multiple objects. The standing umbrella with the red scarf is the real Danzaburou, so approach and interact. Identifying Danzaburou and talking to him completes Challenge #4 and you'll receive rewards and unlock the Danzaburou Will Never Be Enslaved!
achievement.
Multi-Location Check-in Expert
| Starting Location | |||
|---|---|---|---|
| Bridge Crossings | |||
| Quest NPC | Map | ||
 |  | ||
Multi-Location Check-in Expert can be started in "Bridge Crossings," near the Security Office, Tikal Bridge Branch.
| Rewards | Achievement "Multi-Location Check-in Expert" |
|---|
- Talk to Hazekura
- Talk at the Candy Shop
- Talk in Front of the Hot pot Restaurant
- Talk in Front of Budoriya
- After Visiting the 3 Places, Recommend Eibon
- Talk in Front of Eibon

Talk to the crouching man named "Hazekura" along the roadside in Bridge Crossings. He will ask you to recommend a tourist spot, requiring you to choose from three different options. You will visit all locations in the order they are selected, so you may choose any option freely.

Your next conversation with Hazekura will take place at the location you selected, so make sure to head to the correct area. Hazekura will appear there after advancing the in-game time to the next day.

After selecting the candy shop, advance the in-game time to the next day to make Hazekura appear at the candy shop, "Puka Candy." Speak with him to continue the conversation, and he will ask you to recommend the next location from the remaining options. Choose any option to proceed.

After selecting the Hot Pot Restaurant, advance the in-game time to the next day to make Hazekura appear in front of the restaurant. Speak with him to continue the conversation, and he will ask you to recommend the next location from the remaining options. Choose any option to proceed.

After selecting Budoriya, advance the in-game time to the next day to make Hazekura appear in front of Budoriya. Speak with him to continue the conversation.

After visiting all the chosen locations, he will ask you to recommend a place to buy a souvenir. Recommend "Eibon Antique Shop".

After selecting Eibon, advance the in-game time to the next day to make Hazekura appear in front of Eibon. Speak with him to trigger the final conversation and complete the quest.

Pet's Secret Cafeteria Guide
 |  |
| Time | Location |
|---|---|
| 09:00 | Hethereau - Illusion Town |
The Pet's Secret Cafeteria Lost Tale can be accepted from behind the Jingle Wrangle Pet Store, just north of Nacupeda's Pool, in Illusion Town
.
| Reward | Achievement "Pet's Secret Cafeteria" |
|---|
- Feed the Cat & Dog
- Advance Time to the Next Day
- Advance 2 More Days

Look for the Kitten and Puppy behind the Jingle Wrangle Pet Store. Approach their empty food bools and select Add Food.
to progress the Lost Tale.

After feeding the animals, advance the time forward to 09:00 the next day. If there are more animals behind the pet store, you'll know the Lost Tale is progressing as intended.

After seeing the animals, advance the time forward another 2 days. After waiting for the time to advance, you will automatically receive the Pet's Secret Cafeteria
achievement.
A Pack of Spicy Sticks Promise
| Starting Location | |||
|---|---|---|---|
| Bridge Crossings | |||
| Quest NPC | Map | ||
 |  | ||
A Pack of Spicy Sticks Promise can be started in "Bridge Crossings".
| Reward | Achievement "A Pack of Spicy Sticks Promise" Brand New Marble |
|---|
- Talk to the Boy Near the Vending Machine
- Buy the Snack From the Vending Machine
- Talk to the Boy While Holding the Snack

Talk to the "Hungry Child" near the vending machine. Since he does not know how to use the vending machine, he will ask you to buy a snack for him. If you accept the request, you will receive 300 Fons as a reward.
The Hungry Child appears on sunny days between 9:00 AM and 3:00 PM.

Use the Fons you received to purchase a "Cool-lala Spicy Snack" from the vending machine. If you already own a "Cool-lala Spicy Snack," you can skip this step.

With the "Cool-lala Spicy Snack" in your possession, talk to the boy to give him the snack and clear the quest. You'll get the Achievement and a "Brand New Marble".
Fake Car Owner Chronicles
| Starting Location | |||
|---|---|---|---|
| Bridge Crossings | |||
| Quest NPC | Map | ||
 |  | ||
Fake Car Owner Chronicles can be started in "Bridge Crossings".
| Reward | Achievement "Fake Car Owner Chronicles" |
|---|
- Talk to the Man at the Racing Area
- Place a Vehicle Near the Man and Talk to Him

In the Garage with the Racing area, talk to the "Troubled Car Designer" standing outside the shop.

Summon a vehicle on the road, enter it, and drive it near the man before getting out and speaking to him again to complete the quest. Note that motorcycles do not count for this objective, so you must use a car-type vehicle.

The Achievement may not unlock after showing him only one vehicle. If this happens, bring a second vehicle and repeat the process. Borrowed vehicles can also be used for this objective, so if you do not own another car, you can take one from the road nearby.
How to Steal CarsNext Time For Sure!
| Starting Location | |||
|---|---|---|---|
| Bridge Crossings | |||
| Quest NPC | Map | ||
 |  | ||
Next Time For Sure! can be started in "Bridge Crossings".
| Reward | Achievement "Next Time For Sure!" |
|---|
- Talk to the Man Knocking on the Door
- Confirm the Editor Has Left and Enter the House
- Talk to the Woman Hiding in the Back of the Room

Talk to the Manga Editor standing outside and knocking on the house door. To continue the quest, you must meet the Manga Artist, so select the dialogue option, "Get the Editor Away."
The Manga Editor appears on sunny days between 7 AM and 8 PM.

After selecting the option to make the editor leave, the man will slowly walk away. Once enough time has passed, you will be able to enter the house, so wait briefly before entering the room he was knocking on.

Once the house becomes accessible, head to the back of the room and speak with the Cake Sweeper Manga Artist hiding in the rear room. Talking to her will complete the quest.
Omnic Crisis...? Guide
 |  |
| Time | Location |
|---|---|
| 17:00 | Hethereau - Bureau of Anomaly Control |
The Omnic Crisis...? Lost Tale is started by speaking to the Working Robot
inside the Bureau of Anomaly Control.
| Reward | Achievement "Omnic Crisis...?" |
|---|
- Interact with the Working Robot
- Escort and Observe the Robots
- Check if the Robot Returned
- Interact with the Working Robot

Initiate the Omnic Crisis...? Lost Tale by interacting with the Working Robot and selecting the Let it be.
option.

Escort the Working Robot until it bumps into other robots. There's nothing to do at this point other than to advance the time to the following day.

The goal
is to wait for the Working Robot to return to its original position, next to the service counter. If advancing time doesn't work, try to relogin or try to advance the time to the next day until the Working Robot moves back. Some reports say that you might have to do this multiple times.

Once the Working Robot has returned to its original position, interact with it and select Let's see why.
to complete the Lost Tale and receive the achievement.
Devoured Melody
| Starting Location | |||
|---|---|---|---|
| Unheard Shores | |||
| Quest NPC | Map | ||
 |  | ||
The Devoured Melody can be started in "Unheard Shores" at the Bluegaze Campground near the Headless Rider.
| Rewards | Achievement "Devoured Melody" Fons x20,000 |
|---|
- Talk to the Man at the Campground
- Talk to Kiroumaru on the 2nd Floor of Eibon
- Pick Up the Guitar After the Conversation
- Return to the Campground and Deliver the Guitar

Talk to the Campground Manager at the campsite. He is looking for a Customer's lost guitar and you can hear a report of Kiroumaru being spotted.
The Campground Manager appears on a Sunny weather from 8:00 AM to 8:00 PM.

Kiroumaru is located on the 2nd floor of Eibon. Head upstairs and speak with him on the opposite side of the floor.


Kiroumaru has the guitar you are looking for. After the conversation, he will place it on the ground at his feet, so pick it up.

Once you have the guitar, return to the campsite and deliver it to the manager to complete the quest.
Honest Body, Lying Lips
| Starting Location | |||
|---|---|---|---|
| Illusion Town | |||
| Quest NPC | Map | ||
 |  | ||
Honest Body, Lying Lips can be started in "Illusion Town," north west of Fiscus Avenue .
| Rewards | Achievement "Honest Body, Lying Lips" |
|---|
- Activate the Radio on the Bench
- Talk to the Man at Fiscus Avenue Intersection

On a Sunny day between 6:00 AM and 11:00 PM, go to the bench along Fiscus Avenue in Wertheimer Tower, Illusion Town, and interact with the radio beside the seated man.

After activating the radio, switch the channel about two times. Make sure the man standing speaks before heading to the next location.

Head south from Wertheimer Tower toward Fiscus Avenue to find the "Stubborn Citizen" from Location 1 and speak with him. If he does not appear immediately after completing Step 1, advance the in-game time by one day and re-log before checking again.

The Stubborn Citizen normally appears in line on Sunny days, but he can also be found at night even when other NPCs are absent. If he still does not appear after adjusting the time or re-logging, you may not have changed the radio correctly in Step 1. Return to the radio and switch the channel again to confirm.
Witness Journal
| Quest Location | |||
|---|---|---|---|
| Bridge Crossings | |||
| Quest NPC 1 | Map | ||
 |  | ||
| Quest NPC 2 | Map | ||
 |  | ||
Witness Journal can be accepted at two locations in Bridge Crossings. You can start with either walkthrough, and completing them all will unlock the Achievement.
| Reward | Achievement "Witness Journal" |
|---|
- Talk to the Couple in the Plaza
- Take a Picture
- Talk to the Couple

Talk to the "Couple Wanting a Photo Together" located in the plaza behind the "Vehicle Dealership" or near "The Cafe by Origen" in Bridge Crossings. They will ask you to take a photo, so accept their request.

Use the camera function to take a photo of the couple. You may use a drone, and the player character can also appear in the photo; however, the picture must be taken from directly in front of the NPCs for it to count.

The camera function can be accessed by selecting the camera icon from the Menu screen.

After taking the photo, speak with the couple again to complete the request.
- Talk to the Man on the Coast
- Take a Picture
- Talk to the Man

Talk to the male "Traveler Looking to Capture Memories" on the road along the eastern coast of Bridge Crossings. He will ask you to take a photo, accept the request.

Use the camera function to take a picture of the Traveler. It's okay if you use a drone or if the player is in the photo, but you must take the picture from the front of the NPC.
The camera function can be accessed by selecting the camera icon from the Menu screen.

Once the photo is taken, talk to the Traveler to complete the request.
Broken Machine's Generosity
| Quest Location | |||
|---|---|---|---|
| Bridge Crossings | |||
| Quest NPC | Map | ||
 |  | ||
The Broken Machine's Generosity can be started in Bridge Crossings, in Hankaku Street, next to the 7-Oceans Store.
| Reward | - Achievement "Broken Machine's Generosity" - 1,000 Fons |
|---|
- Tap the Vending Machine 3 Times
- Skip 1 Day for the Achievement

Examine the vending machine next to the 7-Oceans Seafood Store in Bridge Crossings. When prompted, select "Tap it gently" three consecutive times instead of "Leave" to receive 1,000 Fons.

You can unlock the "Broken Machine's Generosity" Achievement by using the time adjustment feature to advance one day.
How to Change Time and WeatherIf adjusting the time doesn't unlock it, try relogging. As long as one day has passed since completing step 1, the Achievement will be unlocked.
The Dart's Fantastic Journey
Although the guide team has not yet officially verified this Lost Tale's appearance at The Witch's House, these steps are being published early because completing them unlocks a Hidden Achievement.
| Quest Location | |||
|---|---|---|---|
| Illusion Town | |||
| Quest NPC | Map | ||
 |  | ||
The "The Dart's Fantastic Journey" can be started at the live music club "StarSign" in Illusion Town, between Fiscus Avenue and Davidia Avenue.
| Reward | Achievement "The Dart's Fantastic Journey" |
|---|
- Talk to the Girl by the Dartboard
- Get the Dart on Top of the Trash Can
- Talk to the Girl Again

Go near the dartboard at the live music club "Starlight" in Illusion Town and talk to the Careless Fellow. Select "Looking for something?" and she will ask you to look for her missing dart.

The Careless Fellow appears between 4:00 PM and 8:00 PM. Because the entrance to the "Starlight" livehouse is located in the basement, navigate to the map marker and head down the stairs to enter the venue.

Pick up the lost dart on top of a nearby trash can.

After picking up the dart, talk to the Careless Fellow again. Speaking to her will complete the request.
Non-Intrusive Documentation
Although the guide team has not yet officially verified this Lost Tale's appearance at The Witch's House, these steps are being published early because completing them unlocks a Hidden Achievement.
| Quest Location | |||
|---|---|---|---|
| Unheard Shores | |||
| Quest NPC | Map | ||
 |  | ||
Non-Intrusive Documentation can be started in Hethereau-Unheard Shores.
| Reward | Achievement "Non-Intrusive Documentation" |
|---|
- Get Oracle Stone to Talk to the Girl
- Talk to the Girl at Campsite in Unheard Shores
- Talk to the Girl at Nacupeda's Pool in Illusion Town

Speak with the Focused Bird Enthusiast at the Unheard Shores Train Station. She becomes available to interact with only after you have collected the Oracle Stone located directly in front of her.

If you have already obtained the Oracle Stone but still cannot interact with the Focused Bird Enthusiast, you can force the conversation to trigger by attacking and destroying the flowerbed directly in front of her.

Next, head to the campsite in Unheard Shores, where the Focused Bird Enthusiast will appear in the parking lot at the entrance. While you cannot interact with her initially, executing an attack or a dash nearby will prompt her to warn you to "Keep it down," which opens up the dialogue option.

If you attempt to proceed immediately after completing step 1, the Focused Bird Enthusiast may not appear. If this occurs, wait one full in-game day for her to spawn at the location.

Next, head to Nacupeda's Pool in Illusion Town, where the Focused Bird Enthusiast will appear. You will not be able to interact with her initially, but performing an attack or a dash nearby will prompt her to warn, "Wait, stop! You'll startle the birds..." This triggers the dialogue option, and speaking with her will complete the quest.

If you attempt to proceed immediately after completing step 2, the Focused Bird Enthusiast may not appear. If this occurs, wait one full in-game day for her to spawn at the location.
Hmm! Hmm! Observation Log
| Starting Location | |||
|---|---|---|---|
| Illusion Town | |||
| Quest NPC | Map | ||
 |  | ||
"Hmm! Hmm! Observation Log" can be started in "Illusion Town" by the Nacupeda's Pool.
| Rewards | Achievement "Hmm! Hmm! Observation Log" |
|---|
Talk to Edgar or Sakiri at Nacupeda's Pool

Go to "Nacupeda's Pool" in Hethereau's Illusion Town on a Sunny day to find Edgar or Sakiri. Speak with either of them to unlock the Achievement. Since only a conversation is required, it is recommended to complete this while doing your daily routine. If neither NPC appears, try exiting and re-entering the game.
Nacupeda's Pool LocationSprightly Grandfather
| Starting Location | |||
|---|---|---|---|
| Miguel District | |||
| Quest NPC | Map | ||
 |  | ||
Sprightly Grandfather can be started in "Miguel District" by the Caltrop Lake.
| Rewards | None |
|---|
- Talk to the Old Gentleman and Accept Challenge
- Race Against the Old Gentleman
- Talk to Old Gentleman After the Race

Talk to the Sprightly Grandfather exercising near the Caltrop Lake, and he will challenge you to a competition. Accept it.

The race starts with the old gentleman's call. Follow the direction he goes.
Winning or losing the race against the old gentleman does not affect Step 3. However, make sure not to lose sight of him during the race.

Talk to the Sprightly Grandfather after the race is over.
Sprightly Grandfather GuideDevil's Shadow
| Starting Location | |||
|---|---|---|---|
| Illusion Town | |||
| Quest NPC | Map | ||
 |  | ||
Excited Student can be started in "Illusion Town," inside the Clement Academy.
| Rewards | Gigafluff - The Strong x1 |
|---|
- Infiltrate Clement Academy
- Enter School Building From North Entrance
- Talk to the Excited Students
- Head to the Rooftop of North Building of the Academy
- Investigate the Light Near the Devil's Shadow
- Investigate the Devil's Shadow to Clear

The target students are located inside Clement Academy, so you will need to infiltrate the campus. Attempting to enter through the front entrance will result in you being removed from the campus, so instead, climb over the fence north of the main gate, or across the security office to enter the academy.

Once you're on the academy grounds, enter the main building from the north entrance.

Proceed further down the school hallway past the central area, and you will find three students standing together. Speak with them to hear rumors about the "Devil's Shadow." After talking to them a second time, they will reveal the location and the time it appears.
The students appear between 8:00 AM and 6:00 PM, so adjust the time to match their appearance time.

Follow the information from the students and head to the rooftop of the building north of the academy.


When you head to the rooftop, the "Devil's Shadow" will appear nearby. Approach the light source, and the "Close" interaction option will appear. Select it to turn off the light.
The Devil's Shadow appears between Midnight and 5:00 AM, so adjust the time to match its appearance time. Also, it will not appear if you haven't spoken to the students in step 3, so be sure to proceed in order.

After turning off the light, you can investigate the Devil's Shadow (Gigafluff). Investigate it to obtain the furniture item "Gigafluff - The Strong" and complete the quest.
Talkative Old Man
| Starting Location | |||
|---|---|---|---|
| New Herland District | |||
| Quest NPC | Map | ||
 |  | ||
The Talkative Old Man quest can be accepted in "New Herland District," near Flamingo Avenue.
| Rewards | Fons x2,000 |
|---|
- Talk to the Talkative Old Man
- Clean Up the Flyers on the Wall
- Talk to the Old Man Again to Complete

Talk to the Talkative Old Man in the alley behind Flamingo Avenue in New Herland District.

On behalf of the Old Man who lacks the strength, approach the flyers plastered all over the wall he was looking at and start peeling them off.

There are flyers posted in elevated locations, so be sure to check to avoid overlooking them.

After removing all of the flyers, speak with the Old Man, who has moved to the railing on the opposite side. Doing so will complete the quest and reward you with Fons.
Talkative Old Man GuideWorld Changer [Requires Day Off Arc]
| Starting Location | |||
|---|---|---|---|
| Unheard Shores | |||
| Quest NPC | Map | ||
 |  | ||
World Changer can be started in "Unheard Shores," near Orichalcos Imaginist Wertheimer Tower. To clear the quest, you need to obtain the S-Rank Arc "Day Off".
How to Get Day Off Arc| Rewards | Achievement "World Changer" |
|---|
- Talk to the Curious Kid
- Use the Arc "Day Off" to Show an Eclipse
- Talk to the Curious Kid Again to Clear

At the Orichalcos Imaginist near the Wertheimer Tower in Hethereau's Unheard Shores, talk to the "Curious Kid" who appears on Sunny weather.

Activate "Eclipse" near the boy by equipping the Arc "Day Off." , and the "Eclipse" skill button will not appear unless it is equipped. If the skill is not displayed, switch to the protagonist and check the skill button again.

After creating the eclipse, talk to the Curious Kid again to clear the quest and unlock the "World Changer" Achievement.
Anomaly Tracker (Self-Proclaimed) [Requires Skia]
| Starting Location | |||
|---|---|---|---|
| Unheard Shores | |||
| Quest NPC | Map | ||
 |  | ||
Anomaly Tracker (Self-Proclaimed) can be started in "Unheard Shores," near the Headless Rider. The quest can be completed with the skill of the permanent A-rank character "Skia".
| Rewards | None |
|---|
- Talk to the NPC Overlooking the Coast
- Head to the Unheard Shores Train Station
- Wait on Top of the Train Until It Departs
- Use Skia's Skill Near of Step 1 Location

Talk to the girl at the location overlooking the coast in Hethereau's Unheard Shores. You'll hear her say she wants to see the strange sight of a black shadow moving when the train passes by again.

Head to the Unheard Shores Train Station, which is very close to the Step 1 location.


A train will arrive and stop at the station. Board the stopped train and remain on top of it until it departs.

Once the train departs, it will travel toward the coastline visible from the Step 1 location. When the train reaches a position within the girl's line of sight from the bridge, use Skia's skill while standing on top of the train. Afterward, speak with the girl from Step 1 again to hear her mention that she saw the black shadow once more.
Gangster Dreams
| Starting Location | |||
|---|---|---|---|
| Bridge Crossings | |||
| Quest NPC | Map | ||
 |  | ||
Gangster Dreams can be started in "Bridge Crossings," in front of Q³. The Client NPC will appear if you own the Nanally.
| Rewards | Achievement "Gangster Dreams" Fons x50,000 |
|---|
- Talk to the Shopkeeper by the Q³ Store
- Switch Controlled Character to Nanally and Talk to Her

Talk to the shopkeeper at the intersection in front of the clothing store "Q³". She will say that she wants to meet Nanally.

Talk to her while your controlled character is Nanally. Just having a conversation will clear the quest, and you will receive 50,000 Fons as a reward.
Simply obtaining Nanally is only enough to make the Lost Tale appear. Additional conditions must be met, as the quest cannot be completed by speaking to the NPC alone.
The Other Side of the Legend
| Starting Location | |||
|---|---|---|---|
| Bureau of Anomaly Control | |||
| Quest NPC | Map | ||
 |  | ||
The Other Side of the Legend can be started in the "Bureau of Anomaly Control". You will need the Nanally to clear it.
| Rewards | Achievement "The Other Side of the Legend" |
|---|
- Talk to the Anxious Resident
- Switch Controlled Character to Nanally and Talk to Him

Talk to the Anxious Resident waiting in line at the Bureau of Anomaly Control's service window. He will say that he "Saw a new Anomaly."

Talk to him again while your controlled character is Nanally. Just having a conversation will clear the quest, and you will receive an Achievement as a reward.
If you don't own Nanally, the Lost Tale will appear but you won't be able to clear it just by talking to the NPC.
NTE Related Articles
Return to HomeRecommended Articles
Recommended Guide Articles
 Early Game Guide
 Mid-Game Guide
 Daily Things to Do
 Team Building Tips
 Hunter Level
 Appraisal Level
 Anomaly Commission List
 Beyond the Rails
 Get Chiz for Free
 Get Free S-Rank Arcs
 Mall Guide
 Oracle Stone
 Interactive Map
 Best In-Game Purchases
 How to Min-Max Consoles
 Hunter Exchange
 Latest Updates
Database
 All Items List All Items List |  All Furniture List All Furniture List |  Fish List Fish List |
 Vehicles List Vehicles List |  Hidden Achievements Hidden Achievements |  Voice Actor Cast Voice Actor Cast |
 Outfits and Skins Outfits and Skins |  Arcs Weapon List Arcs Weapon List |  All Cartridges List All Cartridges List |
 Gacha Machine Locations Gacha Machine Locations |  Achievements List Achievements List |