











Whose Leak Is This? anomaly commission guide for NTE: Neverness to Everness. Covers Whose Leak Is This? unlock conditions and rewards. Use this guide for quest walkthroughs in NTE.
Table of Contents
Whose Leak Is This? - Rewards and Unlock Conditions
Anomaly Commission Details and Rewards
| Location | Miguel District |
|---|---|
| Anomaly Name | Level Proliferation |
| Category | Common Commission |
| Anomaly Class | III |
| Anomaly Type | Object |
| Reward | Hunter Level EXP×200 Annulith×30 Fons×10,000 U-00NE×20 Beetle Coin×5,000 Anomaly Material Selection Box I×4 |
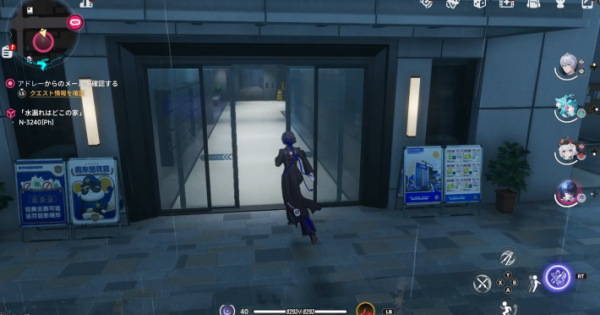
The Whose Leak Is This? in NTE is an Anomaly Commission that can be progressed in a building near Saint Torres Avenue. Rewards include Fons.
Anomaly Commission Start Location
| Surrounding Scenery | Map |
|---|---|
  |  |
Whose Leak Is This? Walkthrough Chart
- Enter the destination building
- Ride the elevator in the back
- Once the elevator opens, proceed down the hallway
- Examine the switch at the far right of the hallway
- Return to the elevator and select the next floor
- Force Start the panel to open the door
- Proceed down the hallway again
- Examine the ringing phone at the back
- Return to the elevator
- Select a floor and Force Start
- Force Start again since the door won't open
- A black shadow appears along with the sound of water
- The door opens and you're told to collect the buttons
- Once you've collected the buttons, return to the elevator
- Select the next floor and Force Start
- You can move on immediately on the next floor
- Dodge the Anomaly's attacks by moving left and right
- The Anomaly disappears and you arrive at the final floor
- Close the faucet
There's a building you can enter at the destination, so head inside. The building is located on Saint Torres Avenue, just southwest of the nearby ReroRero Phone Booth.
Once inside the building, get in the elevator at the back. Use the control panel to select a floor to proceed. Note that either floor choice leads to the same destination.
When the elevator doors open, you'll see a hallway. Proceed straight to the back.
Examine the repair switch located at the far right of the hallway. Along the way, flickering lights and the sound of a door repeatedly trying to open will occur — a bit unsettling, but it has no direct effect on the player.
Once you've examined the switch, return to the elevator and move to another floor. A shadow will appear on your way back, but it has no particular effect on the player. As before, you can choose either floor.
When the elevator arrives at the target floor, the doors will open but only halfway, blocking your path. Approach the control panel to bring up the "Force Start" option, then select it to open the doors.
Once the doors open, proceed down the hallway again. As on the previous floor, you'll hear the sound of a door trying to open, but it has no particular effect on this floor either.
As you proceed to the back of the hallway, the phone there will start ringing. Examine it.
After examining the phone, return to the elevator. On your way back, a shadow will emerge from the phone and reduce visibility, so move away from the shadow as you go.
Once back in the elevator, select the next floor. A warning alarm will sound along with red lighting, but after waiting a moment, "Force Start" will become available — select it to activate.
If the elevator doesn't respond after selecting "Force Start," wait a moment and select it again. The doors will close and the elevator will start moving.
While the elevator is moving, you'll hear what sounds like knocking on the doors. After a while, you'll arrive at the target floor, but the doors won't open, so select "Force Start" from the control panel.
Even after selecting "Force Start," the doors won't open right away, and you'll hear the sound of water. After a moment, a black shadow will appear behind you — wait for it to disappear. It won't attack or cause any harm.
Once the black shadow disappears, the doors will open and you'll be able to examine the control panel. Doing so will instruct you to collect 3 missing buttons, so search the hallway to gather them.
The first button is located just in front of you as you exit the elevator.
The second button is on top of a shelf to the right, a short distance ahead after picking up the first button.
The third button is found further ahead, at the very back of the hallway.
Once you've collected all three buttons, a large number of black shadows will appear in the hallway. Passing near them will deal damage, so avoid the shadows as you make your way back through the hallway to the elevator.
Once back in the elevator, select the next floor. Any floor choice is fine, but an error will occur after selecting, so choose "Force Start." After that, black water will surge in from the hallway and deal damage, and the elevator will start moving.
When you arrive at the next floor, you'll find your path blocked by a black shadow. You can activate the control panel right away, so start the elevator without exploring the surroundings.
Once you activate the elevator, an Anomaly will emerge on the doors and attack. Getting hit will deal damage, so watch for the spike's telegraph before dodging left or right. The telegraph appears on one side just before the attack, so the key is to stay calm, read it, and dodge accordingly.
Keep dodging the attacks, and the Anomaly will eventually disappear, causing the elevator to start moving again. After a while, the doors will open with an ominous sound, and you'll arrive at the final floor.
Close the faucet at the sink in the back to clear the Anomaly Commission. Although the BGM is unsettling, no horror event occurs here. After clearing it, use the elevator to return to the 1st floor.
NTE Related Articles
Return to HomeRecommended Articles
Recommended Guide Articles
 Early Game Guide
 Mid-Game Guide
 Daily Things to Do
 Team Building Tips
 Hunter Level
 Appraisal Level
 Anomaly Commission List
 Beyond the Rails
 Get Chiz for Free
 Get Free S-Rank Arcs
 Mall Guide
 Oracle Stone
 Interactive Map
 Best In-Game Purchases
 How to Min-Max Consoles
 Hunter Exchange
 Latest Updates
Database
 All Items List All Items List |  All Furniture List All Furniture List |  Fish List Fish List |
 Vehicles List Vehicles List |  Hidden Achievements Hidden Achievements |  Voice Actor Cast Voice Actor Cast |
 Outfits and Skins Outfits and Skins |  Arcs Weapon List Arcs Weapon List |  All Cartridges List All Cartridges List |
 Gacha Machine Locations Gacha Machine Locations |  Achievements List Achievements List |  Common Enemy List Common Enemy List |











