






Full Walkthrough and Best Teams for Prime Circle, the Beyond the Rails in NTE (Neverness to Everness). Covers Miss Levi Seal, station weaknesses, and the best team for the route.
Table of Contents
| Related Articles | |
| Fracture Circle Guide | Prime Circle Walkthrough |
What is Prime Circle?
Beyond the Rails Endgame
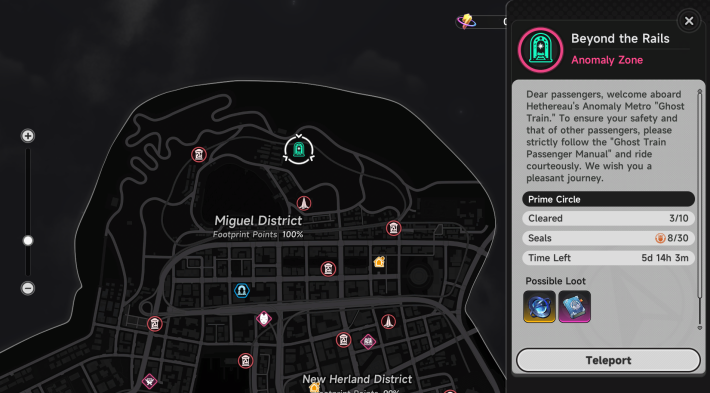
Prime Circle is high-difficulty endgame content in NTE, located within the Beyond the Rails area of the Miguel District. With enemy levels reaching close to 70, you should thoroughly optimize your character builds before attempting this challenge.
Recurring Limited-Time Event
Prime Circle refreshes every 14 days, resetting all Platform Seals and swapping each station's Anomalies. Since the rewards also refresh with each cycle, you should clear as many stages as possible before the reset.
| Current Period | Until August 13 (UTC+8) |
Unlock: Clear Fracture Circle
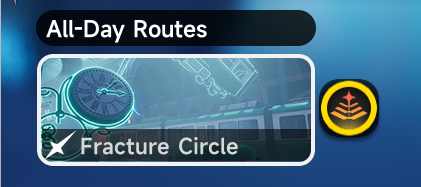
Prime Circle unlocks only after clearing Fracture Circle. Because this mode features a significant jump in difficulty, you must successfully complete Fracture Circle before you can attempt this challenge.
Rewards by Seal Count Milestone
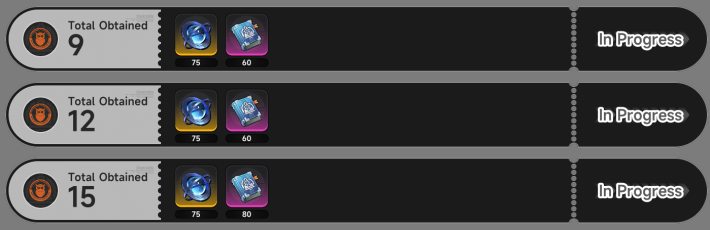
Each station has three Targets (e.g., "Target: 180s Time Remaining"). Successfully completing a Target awards Platform Seals. With 10 Stages in total, you can earn up to 30 Seals, and every 3 Seals collected grants Annulith and a Train Log as rewards.
Trade Train Logs for Items
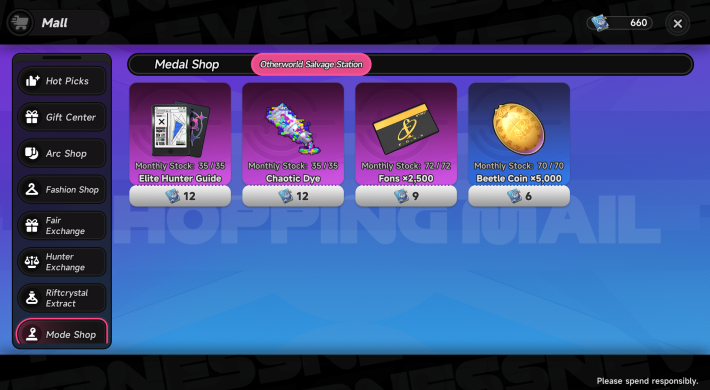
Train Logs can be exchanged at the Mall's Otherworld Salvage Station for items like Elite Hunter Guides (which power up characters) or Chaotic Dye (which upgrades Arcs).
Earn Seals to Fast Travel


Some stations in the special route will be auto‑progressed based on the number of Seals you earned before the reset. Stations cleared this way do not need to be played again, and you can claim their rewards immediately.
▼ List of Skippable Stations| Last Number of Seals | Skipped Stations |
| 18-20 Seals | Auto-completes Station 1, jumps to Station 2 |
| 21-23 Seals | Auto-completes Stations 1-2, jumps to Station 3 |
| 24-26 Seals | Auto-completes Stations 1-3, jumps to Station 4 |
| 27-29 Seals | Auto-completes Stations 1-4, jumps to Station 5 |
| -30-32 Seals | Auto-completes Stations 1-5, jumps to Station 6 |
| 33-35 Seals | Auto-completes Stations 1-6, jumps to Station 7 |
| 36 Seals | Auto-completes Stations 1-7, jumps to Station 8 |
Prime Circle Strategy Tips
Build Around Mob Weaknesses
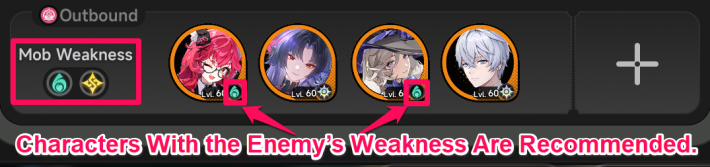
In Beyond the Rails, enemy weaknesses are clearly displayed, making it essential to field characters who can exploit them. Matching your active characters to trigger an Esper Cycle on top of those weaknesses will boost your team's DPS even further.
Two Separate Teams Are Required
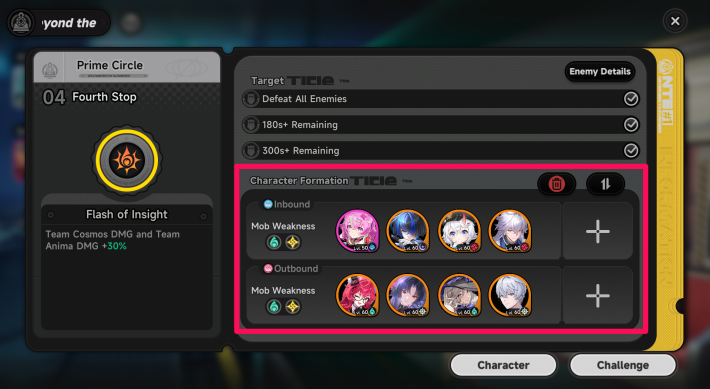
Prime Circle features both an "Inbound" and an "Outbound" line, requiring you to field two distinct teams with no overlapping characters. Because high-level character development is resource-intensive, your best strategy is to lock in your two strongest squads and focus all your investment directly into them.
Mind the Resonance Effect
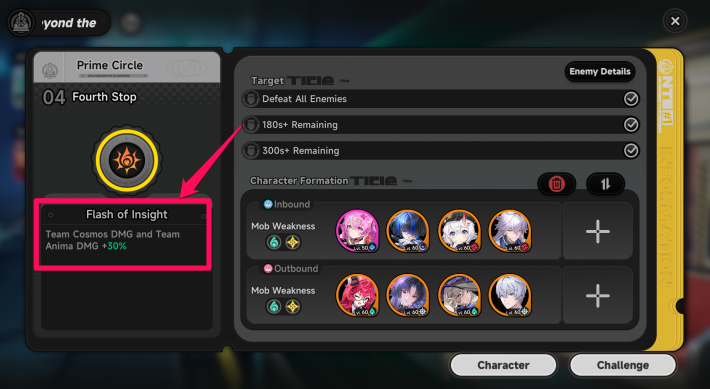
Each line has a global gimmick called "Otherworld Resonance." It applies the Resonance Effect, such as a damage boost for a specific Esper Ability, so build around those effects.
Build Around Esper Cycle
Slotting in characters of the required types together triggers an Esper Cycle, activating powerful combos that tilt the battle in your favor. When team-building, aim to simultaneously exploit the enemy's elemental weakness and line up an Esper Cycle synergy.
Esper Cycle Combos and Effects
Use Supply Stop on Tough Floors
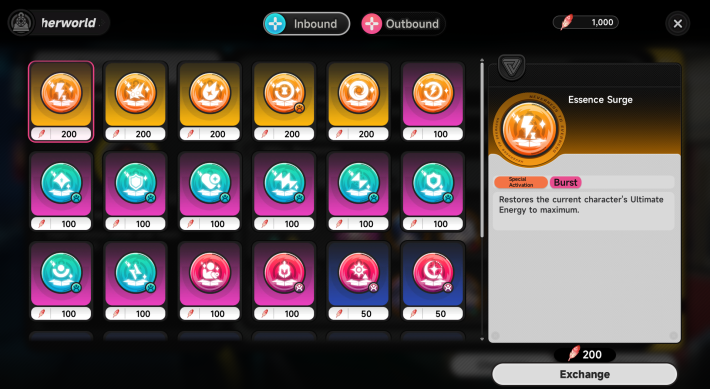
At the Otherworld Supply Stop, you can spend Shadowquills to activate various Skills. Note that each Miss Levi Seal you exchange for is strictly locked to that specific station and will not carry over to the next. To maximize their value, save your Shadowquills and exchange them at the late-game stops where the battles drag out the longest.
Re-Clear to Reuse Seals
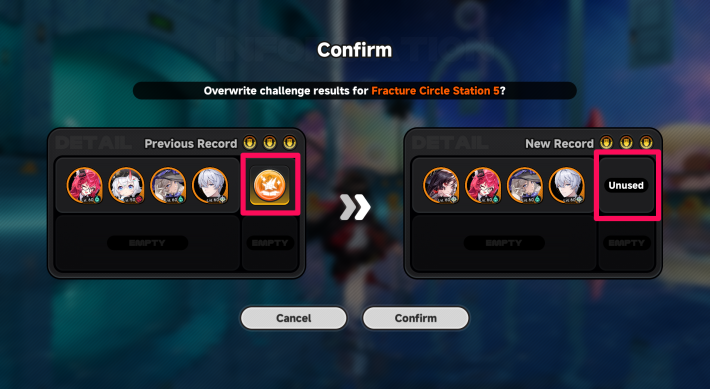
A Miss Levi Seal you used on clear can't be ported to another station, and the Shadowquills are still spent. To repurpose a Seal elsewhere, re-clear the same station without using one to overwrite the previous record.
Best Teams for Prime Circle
Blossom Team
| DPS | Blossom Enhancement | Buff / Blossom | Esper Cycle |
 Nanally Nanally |  Jiuyuan Jiuyuan |  Iroi Iroi |  Esper Zero Esper Zero |
| Substitutes | |||
 Mint Mint |  Hotori Hotori |  Shinku Shinku |  Chiz Chiz |
Nanally, Jiuyuan, and Iroi all carry passives that strengthen Blossom, letting the team stack up damage fast. Lead with Nanally as your main DPS and use Esper Zero's Redirect Skill to keep triggering Esper Cycles so you never run out of Vita Pistils.
Charge Team
| DPS | Esper Cycle | Anima | Lakshana |
| Shinku | Esper Zero | Iroi |  Hathor Hathor |
| Substitutes | |||
| None | Hotori | NanallyJiuyuan |  Skia Skia Chaos Chaos |
This team is built around Shinku to trigger Charge. Shinku gains an ATK boost and deals area damage once Charge activates, so make a point of switching to her the moment it goes off.
Remora Team
| DPS | Esper Cycle | Buff | Remora Enhancement |
| Chaos | Esper Zero |  Haniel Haniel | Hathor |
| Substitutes | |||
| None | Hotori |  Fadia Fadia Sakiri Sakiri | Skia |
This team leans on the Remora Enhancement that Chaos and Hathor both provide. Trigger Remora with Esper Zero while Haniel's buffs and Stain push Chaos's damage higher.
Discord Team
| DPS | Buff / Esper Cycle | Support | |
 Lacrimosa Lacrimosa | Sakiri | Fadia |  Daffodill Daffodill |
| Substitutes | |||
 Baicang Baicang Aurelia Aurelia |  Adler Adler | Haniel | Hotori |
This team uses the Discord Esper Cycle, triggered by Chaos, Incantation, and Psyche to Break enemies and land heavy damage. If you don't need the healing, swapping Fadia for Haniel raises your damage output.
Should You Pull Lacrimosa?Chiz Team
| DPS | Esper Cycle | Esper Cycle | Support |
| Chiz | Mint | Hathor | Sakiri |
| Substitutes | |||
| None | Jiuyuan | Skia | Haniel |
Chiz handles everything as a high-damage solo carry, and when a Charge Esper Cycle is on the table, Mint or Hathor steps in to trigger it. For the support slot, Sakiri is the top pick because she can both gather mobs and buff the team.
Chiz Solo Build Also Works
Using the Miss Levi Seal "Lone Hero" boosts the solo character's DMG by 50% each. It can only be applied at one station, but if you're stuck on a single stop, a Chiz solo run can be a solid plan.
Best Teams per Station
| ▼Starting Station | ▼2nd Stop | ▼3rd Stop | ▼4th Stop | ▼5th Stop |
| ▼6th Stop | ▼7th Stop | ▼8th Stop | ▼9th Stop | ▼10th Stop |
| ▼11th Stop | ▼Terminal Station | |||
Best Team: Starting Station
| Recommended Team: Inbound | |||
|---|---|---|---|
| Nanally | Jiuyuan | Iroi | Esper Zero |
| Enemy Lv / Weakness | Battle Format | Other Recommended Team | |
Lv 65 Cosmos Cosmos Incantation Incantation | Group Battle | | |
| Recommended Team: Outbound | |||
| Lacrimosa | Sakiri | Fadia | Daffodill |
| Enemy Lv / Weakness | Battle Format | Other Recommended Team | |
Lv 65 Chaos Chaos Lakshana Lakshana | Group Battle | | |
Best Team: Second Stop
| Recommended Team: Inbound | |||
|---|---|---|---|
| Nanally | Jiuyuan | Iroi | Esper Zero |
| Enemy Lv / Weakness | Battle Format | Other Recommended Team | |
Lv 67Chaos Psyche Psyche | Group Battle | | |
| Recommended Team: Outbound | |||
| Lacrimosa | Sakiri | Fadia | Daffodill |
| Enemy Lv / Weakness | Battle Format | Other Recommended Team | |
| Lv 67IncantationChaos | Group Battle | | |
Best Team: Third Stop
| Recommended Team: Inbound | |||
|---|---|---|---|
| Nanally | Jiuyuan | Iroi | Esper Zero |
| Enemy Lv / Weakness | Battle Format | Other Recommended Team | |
| Lv 69CosmosIncantation | Group Battle | | |
| Recommended Team: Outbound | |||
| Lacrimosa | Sakiri | Fadia | Daffodill |
| Enemy Lv / Weakness | Battle Format | Other Recommended Team | |
| Lv 69ChaosLakshana | Group Battle | | |
Best Team: Fourth Stop
| Recommended Team: Inbound | |||
|---|---|---|---|
| Shinku | Esper Zero | Iroi | Hathor |
| Enemy Lv / Weakness | Battle Format | Other Recommended Team | |
| Lv 71CosmosLakshana | Group Battle | | |
| Recommended Team: Outbound | |||
| Lacrimosa | Sakiri | Fadia | Daffodill |
| Enemy Lv / Weakness | Battle Format | Other Recommended Team | |
| Lv 71ChaosIncantation | Group Battle | | |
Best Team: Fifth Stop
| Recommended Team: Inbound | |||
|---|---|---|---|
| Lacrimosa | Sakiri | Fadia | Daffodill |
| Enemy Lv / Weakness | Battle Format | Other Recommended Team | |
| Lv 73ChaosIncantation | Group Battle | | |
| Recommended Team: Outbound | |||
| Chaos | Esper Zero | Haniel | Hathor |
| Enemy Lv / Weakness | Battle Format | Other Recommended Team | |
| Lv 73PsycheLakshana | Group Battle | | |
Best Team: Sixth Stop
| Recommended Team: Inbound | |||
|---|---|---|---|
| Lacrimosa | Sakiri | Fadia | Daffodill |
| Enemy Lv / Weakness | Battle Format | Other Recommended Team | |
| Lv 75IncantationPsyche | Group Battle | | |
| Recommended Team: Outbound | |||
| Nanally | Jiuyuan | Iroi | Esper Zero |
| Enemy Lv / Weakness | Battle Format | Other Recommended Team | |
Lv 75Cosmos Anima Anima | Group Battle | | |
Best Team: Seventh Stop
| Recommended Team: Inbound | |||
|---|---|---|---|
| Lacrimosa | Sakiri | Fadia | Daffodill |
| Enemy Lv / Weakness | Battle Format | Other Recommended Team | |
| Lv 77ChaosLakshana | Group Battle | | |
| Recommended Team: Outbound | |||
| Nanally | Jiuyuan | Iroi | Esper Zero |
| Enemy Lv / Weakness | Battle Format | Other Recommended Team | |
| Lv 77CosmosAnima | Group Battle | | |
Best Team: Eighth Stop
| Recommended Team: Inbound | |||
|---|---|---|---|
| Chaos | Esper Zero | Haniel | Hathor |
| Enemy Lv / Weakness | Enemy | Other Recommended Team | |
| Lv 79CosmosLakshana | Arachne Estate | | |
| Recommended Team: Outbound | |||
| Lacrimosa | Sakiri | Fadia | Daffodill |
| Enemy Lv / Weakness | Enemy | Other Recommended Team | |
| Lv 79AnimaIncantation | Trailer Sheath | | |
Best Team: Ninth Stop
| Recommended Team: Inbound | |||
|---|---|---|---|
| Lacrimosa | Sakiri | Fadia | Daffodill |
| Enemy Lv / Weakness | Battle Format | Other Recommended Team | |
| Lv 80ChaosLakshana | Group Battle | | |
| Recommended Team: Outbound | |||
| Nanally | Jiuyuan | Iroi | Esper Zero |
| Enemy Lv / Weakness | Battle Format | Other Recommended Team | |
| Lv 80CosmosAnima | Group Battle | | |
Best Team: Tenth Stop
| Recommended Team: Inbound | |||
|---|---|---|---|
| Nanally | Jiuyuan | Iroi | Esper Zero |
| Enemy Lv / Weakness | Battle Format | Other Recommended Team | |
| Lv 82CosmosLakshana | Group Battle | | |
| Recommended Team: Outbound | |||
| Lacrimosa | Sakiri | Fadia | Daffodill |
| Enemy Lv / Weakness | Enemy | Other Recommended Team | |
| Lv 82CosmosChaos | Beat King | | |
Best Team: Eleventh Stop
| Recommended Team: Inbound | |||
|---|---|---|---|
| Nanally | Jiuyuan | Iroi | Esper Zero |
| Enemy Lv / Weakness | Battle Format | Other Recommended Team | |
| Lv 85CosmosLakshana | Group Battle | | |
| Recommended Team: Outbound | |||
| Lacrimosa | Sakiri | Fadia | Daffodill |
| Enemy Lv / Weakness | Enemy | Other Recommended Team | |
| Lv 85IncantationChaos | Mammon | | |
Best Team: Terminal Station
| Recommended Team: Inbound | |||
|---|---|---|---|
| Nanally | Jiuyuan | Iroi | Esper Zero |
| Enemy Lv / Weakness | Enemy | Other Recommended Team | |
| Lv 90CosmosIncantation | Debt Collector | | |
| Recommended Team: Outbound | |||
| Chaos | Hotori | Haniel | Hathor |
| Enemy Lv / Weakness | Enemy | Other Recommended Team | |
| Lv 90CosmosLakshana | Black Tome | | |
Terminal Station Clear Video
We have included a walkthrough video for the final station of the special route. This actual gameplay features the Blossom Team and Remora Team in action so, please watch this clip!
Miss Levi Seal List
| Gift | Cost | Effect |
|---|---|---|
| Essence Surge | 200 | Restores the current character's Ultimate Energy to maximum. |
| Core Lock | 200 | Inflicts a Fury mark on the in-range enemy with the highest Max HP, lasting 30s. Reduces their damage by 30%, and increases damage dealt by all allies to them by 30%. |
| Instant Judgement | 200 | Deals damage equal to 10% of Max HP to all enemies in the scene upon activation. |
| Sync Restart | 200 | Resets all allies' Skill cooldowns upon activation. |
| Omnidirectional Vortex | 200 | Summons a Black Hole that lasts for 30s, continuously pulling in nearby enemies and dealing 5,000 fixed Chaos DMG to all enemies within range every 3s. |
| Zero Hour Restart | 100 | Resets the current character's Redirect Skill cooldown. |
| Esper Resonance - ATK | 100 | Increases Team ATK by 20% for 60s. |
| Esper Resonance - DEF | 100 | Increases Team DEF by 20% for 60s. |
| Esper Resonance - HP | 100 | Increases Team HP by 20% for 60s. |
| Esper Resonance - CRIT RATE | 100 | Increases Team Crit Chance by 16% for 60s. |
| Esper Resonance - CRIT DMG | 100 | Increases Team Crit DMG by 32% for 60s. |
| Esper Resonance - DMG+ | 100 | Increases Team DMG by 20% for 60s. |
| Esper Resonance - Break Intensity | 100 | Increases Team Break Intensity by 100 for 60s. |
| Esper Resonance - Cycle Intensity | 100 | Increases Team Cycle Intensity by 100 for 60s. |
| Esper Resonance - Strike the Weak | 100 | Deals 25% bonus damage to Broken enemies. |
| Esper Resonance - Lone Hero | 100 | Increases a character's DMG by 50% and Max HP by 50% when they are the only one deployed. |
| Off-Rail Resonance - Cosmos | 50 | Team Cosmos DMG +8%. |
| Off-Rail Resonance - Chaos | 50 | Team Chaos DMG +8%. |
| Off-Rail Resonance - Anima | 50 | Team Anima DMG +8%. |
| Off-Rail Resonance - Incantation | 50 | Team Incantation DMG +8%. |
| Off-Rail Resonance - Psyche | 50 | Team Psyche DMG +8%. |
| Off-Rail Resonance - Lakshana | 50 | Team Lakshana DMG +8%. |
| Off-Rail Resonance - CRIT RATE | 50 | Team Crit Chance +6%. |
| Off-Rail Resonance - ATK | 50 | Team ATK +8%. |
| Off-Rail Resonance - DEF | 50 | Team DEF +15%. |
| Off-Rail Resonance - HP | 50 | Team HP +8%. |
| Off-Rail Resonance - Break Intensity | 50 | Team Break Intensity +40. |
| Off-Rail Resonance - Cycle Intensity | 50 | Team Cycle Intensity +48. |
| Off-Rail Resonance - CRIT DMG | 50 | Increases Team CRIT DMG by 16%. |
NTE Related Articles
Return to HomeRecommended Articles
Recommended Guide Articles
 Early Game Guide
 Mid-Game Guide
 Daily Things to Do
 Team Building Tips
 Hunter Level
 Appraisal Level
 Anomaly Commission List
 Beyond the Rails
 Get Chiz for Free
 Get Free S-Rank Arcs
 Mall Guide
 Oracle Stone
 Interactive Map
 Best In-Game Purchases
 How to Min-Max Consoles
 Hunter Exchange
 Latest Updates
Database
 All Items List All Items List |  All Furniture List All Furniture List |  Fish List Fish List |
 Vehicles List Vehicles List |  Hidden Achievements Hidden Achievements |  Voice Actor Cast Voice Actor Cast |
 Outfits and Skins Outfits and Skins |  Arcs Weapon List Arcs Weapon List |  All Cartridges List All Cartridges List |
 Gacha Machine Locations Gacha Machine Locations |  Achievements List Achievements List |  Common Enemy List Common Enemy List |











