Area Defense Jingyu Valley Level 3 Guide for the Early Warning Terminal in Arknights: Endfield. See strategies for Auto Defense, Operator Intervention, and facilities to use.
Table of Contents
| Previous/Next Base Defense Articles | |
| Level 2 | - |
Jingyu Valley Defense Level 3 Guide
AF1 Armor Fragger, Deluge Tower, and Marsh Gas


You can reliably clear this Auto-Defense using a combination of the AF1 Armor Fragger, Deluge Tower, and Marsh Gas Mk I. These facilities unlock as you progress through the Wuling AIC Plan, so make sure to explore Wuling and gather Protocol Dataloggers first.
| Tip! | To craft the AF1 Armor Fragger and Deluge Tower, you need Cuprium Parts. Be sure to upgrade the Wuling AIC Plan to Level II. |
|---|
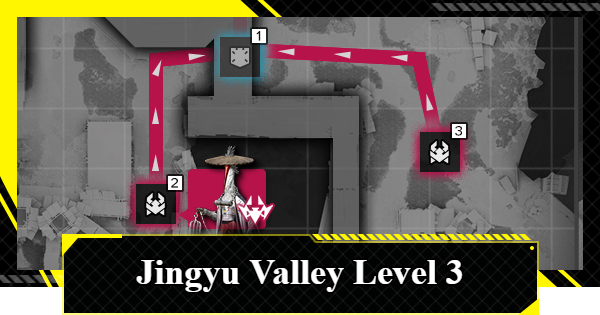
Placement Details for Each Route
| North Side | Southwest Side | Southeast Side |
 |  |  |
Setting up an AF1 Armor Fragger, Deluge Tower, and Marsh Gas Mk-I directly on the enemy's path will consistently wipe them out before they break through.
If you have extra facility slots, drop an Omnidirectional Sonic Tower on the north and southwest sides where the Cloud Stalker boss spawns. This buys you valuable time by stalling incoming enemies, making your clear much safer.
Jingyu Valley Level 3 Auto-Defense Guide
AF1 Armor Fragger and Deluge Tower
 |  |
Enemies in Jingyu Valley Level 3 spawn in huge, tightly packed groups, meaning strong AoE attacks are incredibly effective here.
The AF1 Armor Fragger and Deluge Tower combo unleashes massive damage and heavy knockback, hitting targets within range multiple times. It is perfect for clearing out dense enemy clusters.
Place Towers on the Enemy's Path

Because the AF1 Armor Fragger and Deluge Tower have a fairly narrow effect radius, make sure to place them directly along the enemy's main path.
As a highly effective tactic, try placing a Deluge Tower directly behind an AF1 Armor Fragger. The Deluge Tower's knockback will repeatedly shove enemies right back into the Fragger's blast zone.
Stall With Marsh Gas and Sonic Tower
The Marsh Gas Mk-I and Omnidirectional Sonic Tower are incredibly effective for stalling enemies right inside the blast zones of your AF1 Armor Fraggers and Deluge Towers. Prioritize setting down at least one Marsh Gas. If you have the facility capacity to spare, drop an Omnidirectional Sonic Tower as well.
Boss Buffs Nearby Enemy Defense

When the Cloud Stalker boss takes damage, it releases a smokescreen that boosts the Defense of nearby enemies. Because this stage throws a massive number of enemies at you, taking them down one by one isn't practical. Instead, your best strategy is to stall the horde and wipe them out with heavy AoE attacks.
Jingyu Valley Level 3 Manual Intervention Guide
AF1 Armor Fragger, Deluge Tower, and Marsh Gas
You can reliably clear Manual Intervention using a combination of the AF1 Armor Fragger, Deluge Tower, and Marsh Gas Mk-I. In fact, you can use the exact same layout as your Auto-Defense setup.
Once you clear Jingyu Valley Level 2 Manual Intervention, your placement limit increases, allowing you to build up to 11 Combat Facilities.
Stall Enemies With Solidification
You can lock down normal, non-boss enemies for much longer by using character skills to apply Solidification. Since Jingyu Valley Level 3 relies heavily on stalling enemies inside the AF1 Armor Fragger's blast zone, try running a Freeze Team to maximize your crowd control.


