
This is a walkthrough for Super Mario RPG Remake up to the 6th Star Piece. It also introduces boss strategies and key points up to the 6th Star Piece, so please refer to it.
Table of Contents
Walkthrough up to the 6th Star Piece
| 1. | Land's End | Path to Belome Temple |
|---|---|---|
| 2. |  Belome Temple | Defeat Belome (2nd time) |
| 3. | Bean Valley | Defeat Megasmilax |
| 4. | Nimbus Land | Defeat Birdo Defeat Defeat Valentina |
| 5. | Barrel Volcano | Defeat Czar Dragon Defeat Axem Rangers |
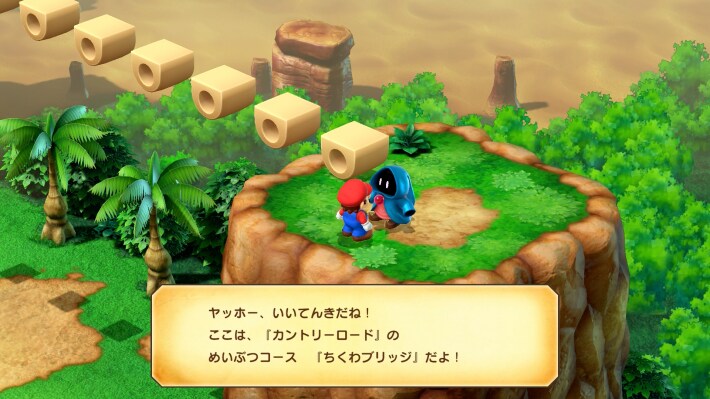
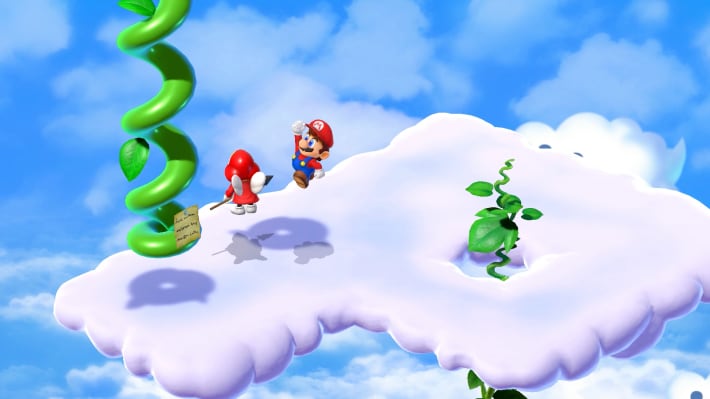
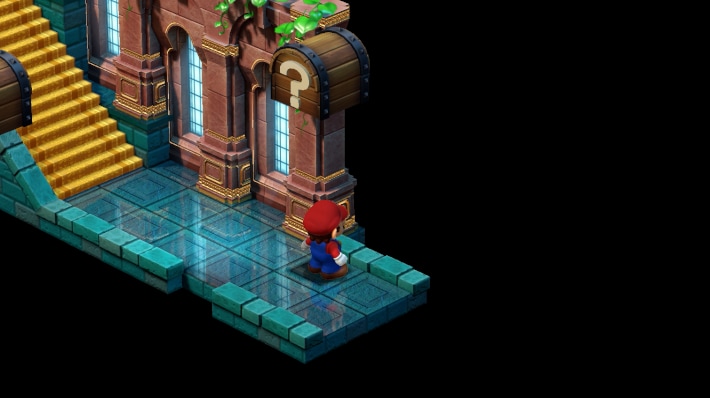
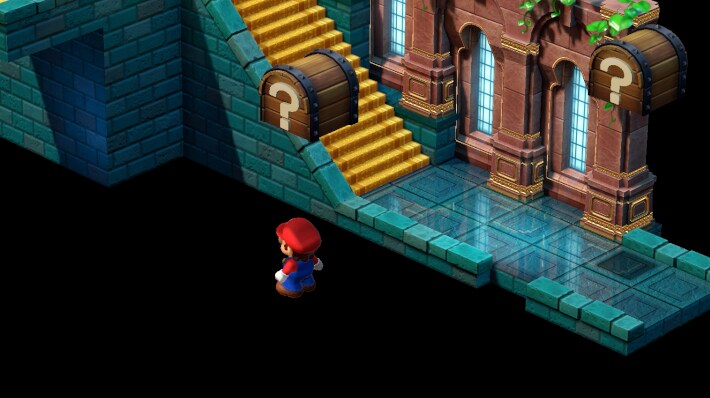
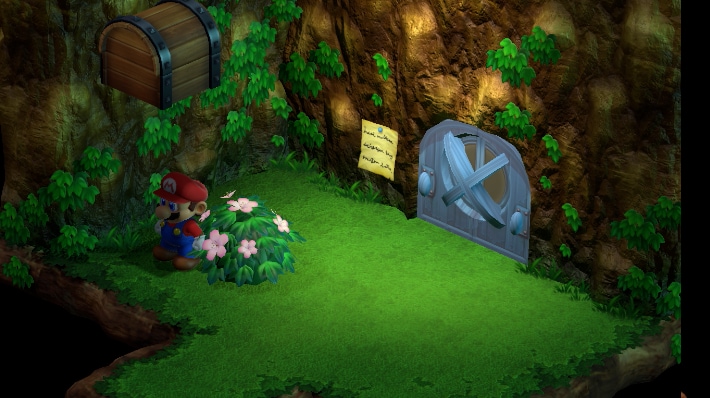
Up to Clearing Land's End
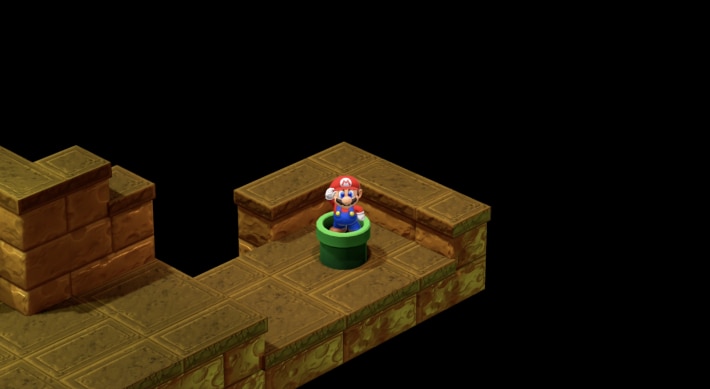
Enter the cannon and get on the upper rock platform
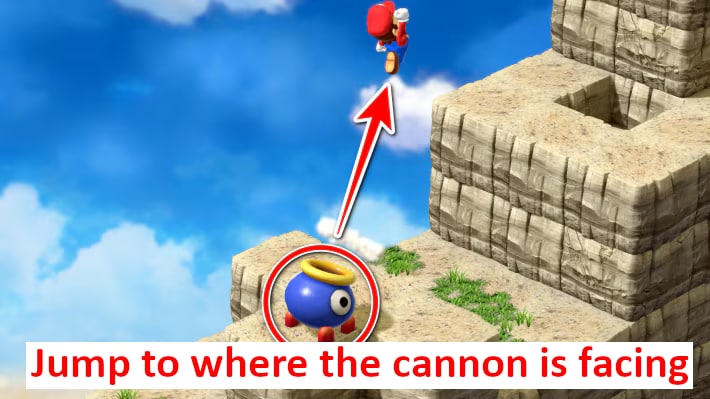
When you enter Land's End, get into the cannon and onto the rock platform above. Pay attention to the direction and press the button.
Hidden treasure chest in Area 1

Ride the yellow platform, and if you face the area exit, jump towards the upper left to make a hidden treasure chest appear.
Area 2: Jump into the hole
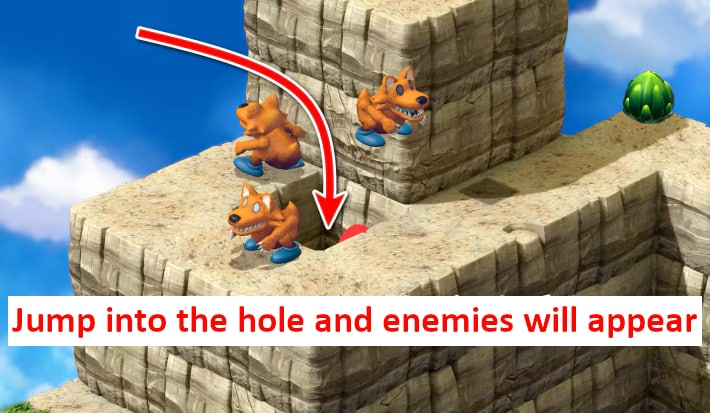
In Area 2, you also move by riding a cannon. If you jump into the hole in the rock platform, three Chows will jump out. You will have to fight them when you go out, so defeat them and proceed.
How to get the treasure chest
| 1. | 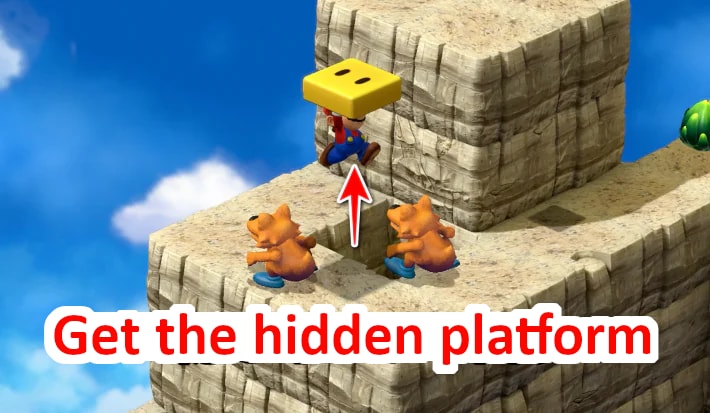 |
|---|---|
| 2. | 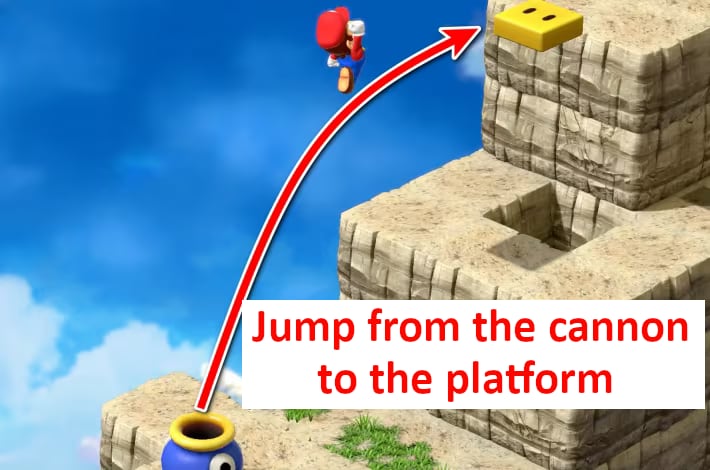 |
| 3. | 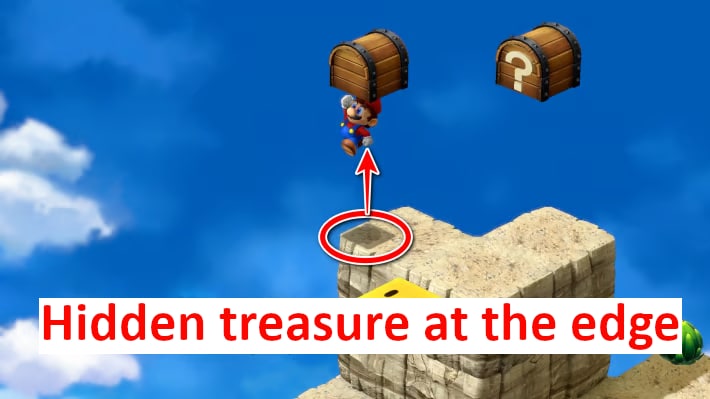 |
| 4. | 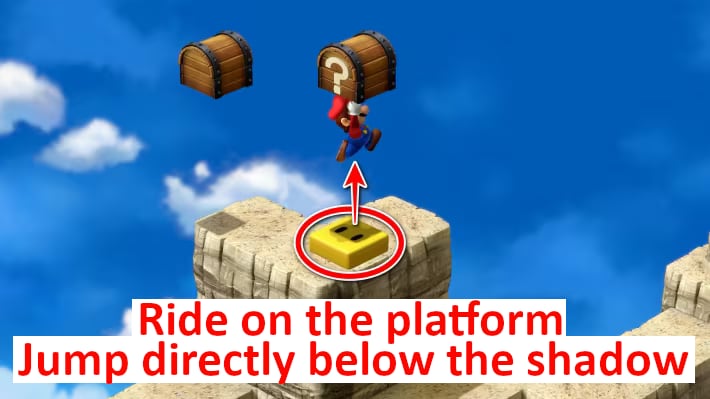 |
Cross the rock platforms to proceed
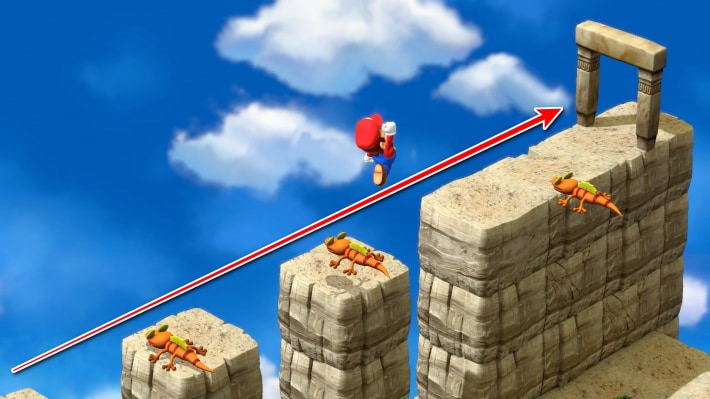
You can proceed to the next area by crossing the rock platforms. The platforms are narrow and enemy monsters are fired from cannons, so fight your way across.
If you fall down, use the cannon
If you fall down, you can get back on the rock platform by entering the cannon at the very front. There are also enemy monsters, so be careful not to touch them.
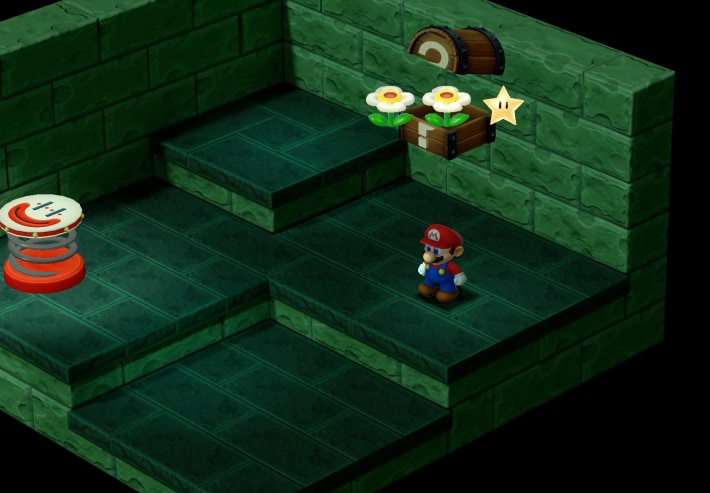
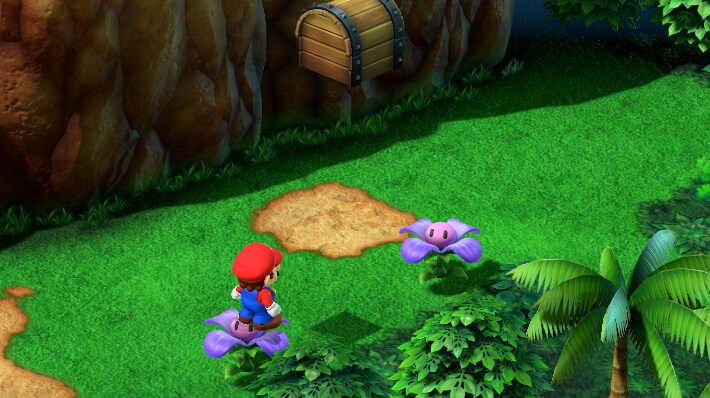
Ride the flowers to aim for the top
Ride the rotating flowers to aim for the top. If the direction of the rotating flower is wrong, you will go to a different place, so jump when it faces the direction of the rock platform.
There is a hidden treasure chest
There is a hidden treasure chest where three blue flowers are lined up. Jump between the middle and right ones.
Cross the Donut Bridge
Cross the Donut Bridge to reach the next area. You can try a mini-game, so you might want to give it a shot.
Go down and find a Flower Tab
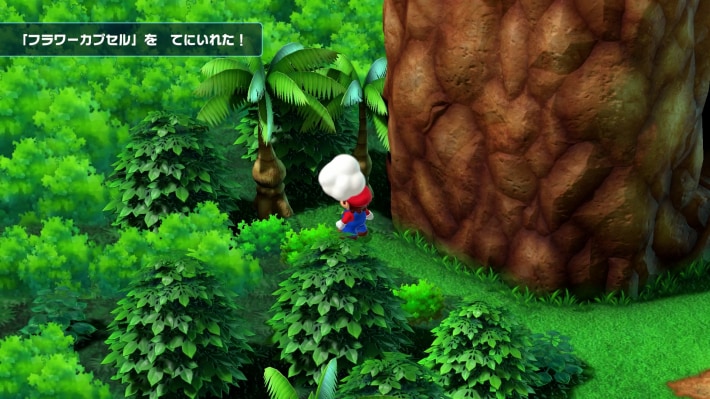
Go down from the donut blocks and there is a passage in the shadow of the tree. There is a Flower Tab, so be sure to collect it.
Enter the whirlpool with ants
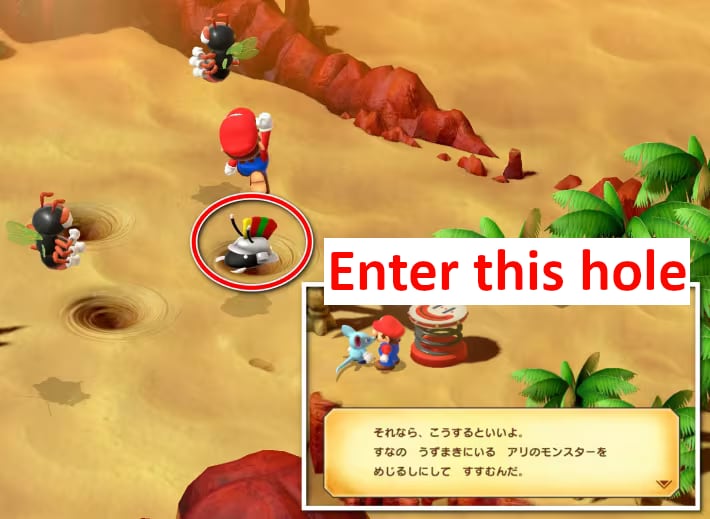
When you arrive in the desert area, enter the whirlpool with ants. You will need to fight, so be well prepared. Enter the whirlpool with ants 4 times to go to the next area.
Cannot enter by running away
You cannot enter the whirlpool even if you run away from the battle with the ants. Make sure to defeat them and proceed.
Return to the previous floor
If you enter a whirlpool without ants, you will return to the previous area. Enter the whirlpool with ants again.
Get the Star and defeat enemies as you proceed
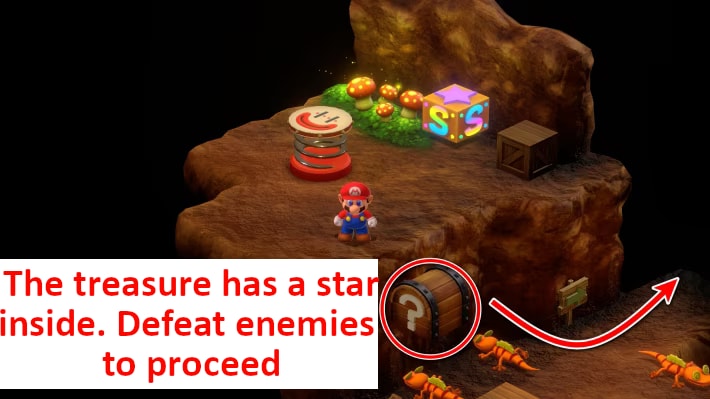
In the next area, you can get a Star from the treasure chest right after entering. There are many enemies around, so defeat them as you proceed.
You can buy a Star in the area where you fell
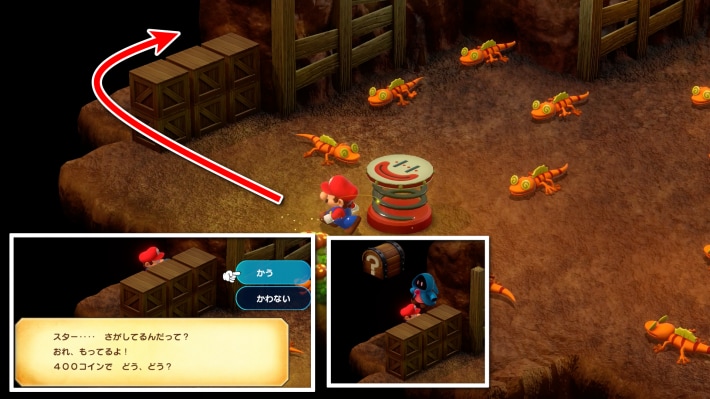
In the area where you fell, a character who will sell you a Star for 400 coins is hidden in the shadow of a wooden box. There are many enemy monsters in this area as well, so if you have enough coins, buy it. Proceeding to the next area will take you to Belome Temple.
Can be purchased twice
If you talk to the character again after buying a Star, they will go look for another Star. When you visit again, they will sell it to you for 800 coins, but it's expensive, so you don't have to buy it if you don't want to.
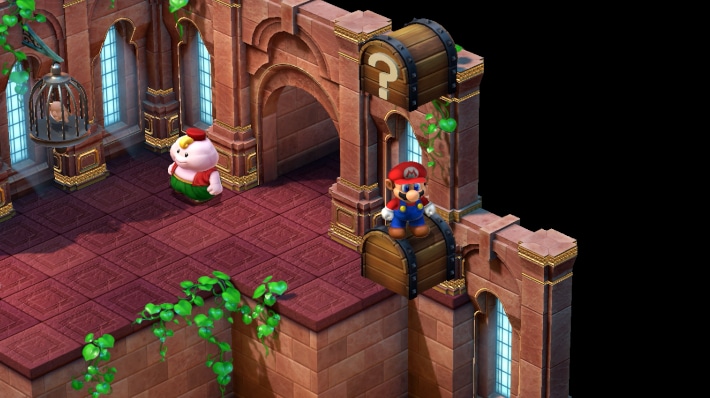
Up to Clearing Belome Temple
Go down the stairs and proceed
After entering Belome Temple, go down the stairs and proceed. You will fight Belome again, so prepare your equipment and items.
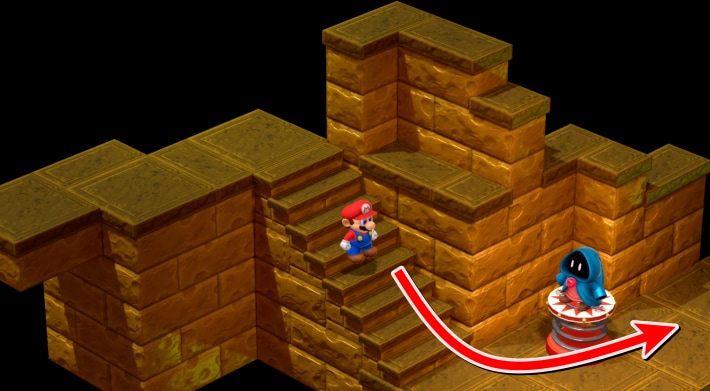
There is a jump platform
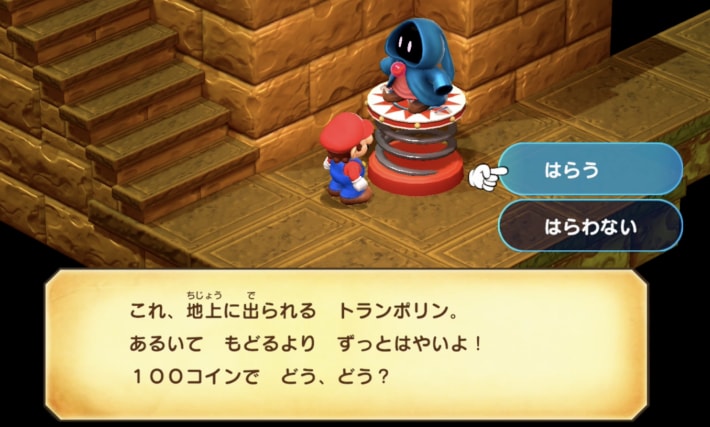
In the first area, there is a jump platform that allows you to return to the surface by paying 100 coins. Once you pay, you can use it for free afterwards.
Draw a Belome fortune
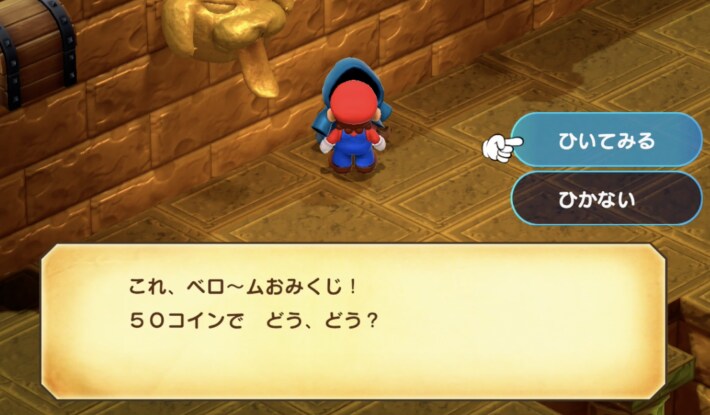
You can proceed by drawing a Belome fortune. It costs 50 coins each time, so make sure you have enough coins.
Belome fortune contents
| Order to Press | Content |
|---|---|
| Right → Middle → Left | 100 Coins |
| Right → Left → Middle | 100 Coins |
| Left → Middle → Right | Mushroom |
| Left → Right → Middle | Yoshi Cookie |
| Middle → Right → Left | Enemy Monster |
| Middle → Left → Right | Enemy Monster |
Can be challenged many times
After drawing a Belome fortune, you can go back and pay 50 coins to try again as many times as you want. You can collect coins and Yoshi Cookies.
Enter the pipe and proceed
After drawing the fortune, enter the pipe and proceed. If the fortune result is an enemy monster, fight and defeat it to proceed.
Go down the stairs and proceed
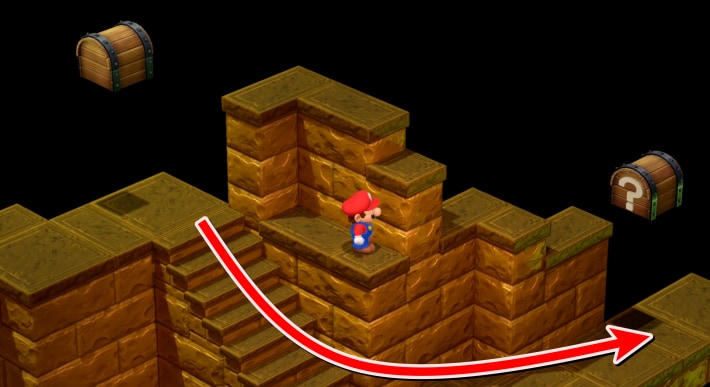
After proceeding beyond the closed shutter, go down the stairs. There are two hidden treasure chests in this area.
First hidden treasure chest
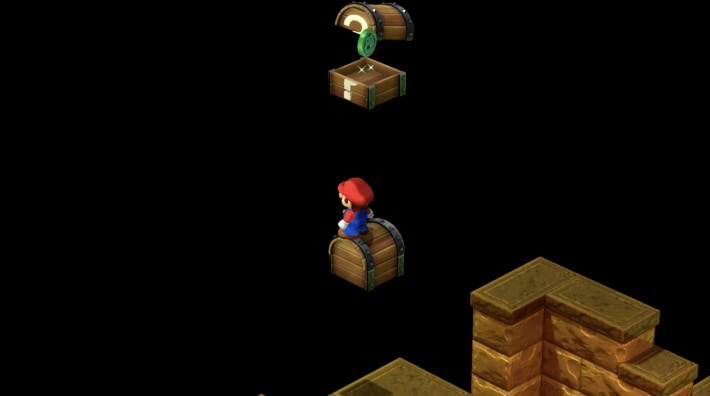
Jump on top of the first treasure chest to make a hidden treasure chest appear.
Second hidden treasure chest
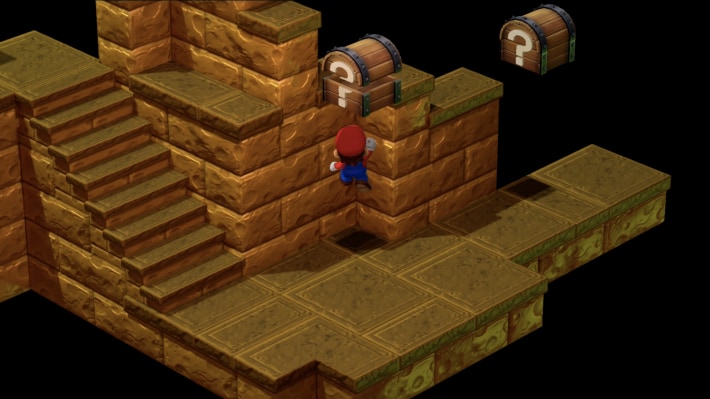
There is a hidden treasure chest right after going down the stairs.
Draw the second Belome fortune
Proceed further and you can draw the second Belome fortune. If you get "Hmm. I'm hungry~", ride the yellow block and go down.
Enter the pipe to fight Belome again
- Prepare for sleep status beforehand
- Be careful of character copying
- Inflict fear status with Bowser
- It is recommended to defeat Belome first
Entering the pipe will lead to a rematch with Belome. Fear is effective, so you'll want to have Bowser in your party. After defeating him, proceed further to reach Monstro Town.
From Monstro Town to Bean Valley
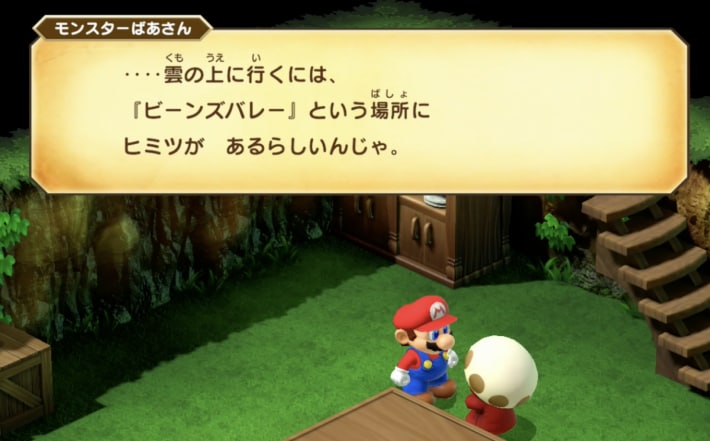
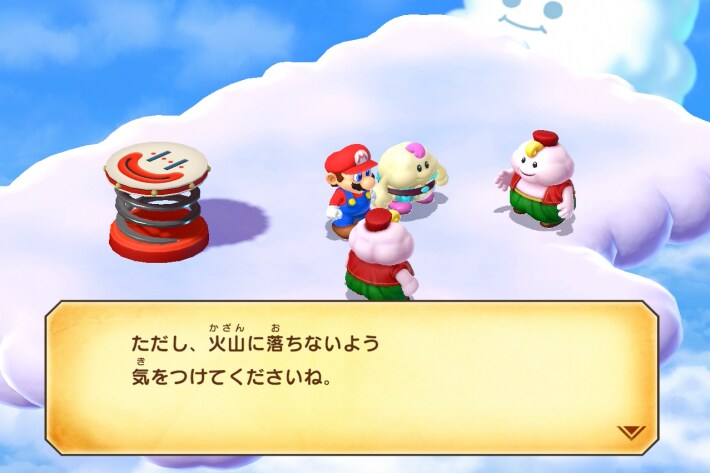
Talk to the monster granny in the leftmost house in Monstro Town, and she will tell you how to get to Bean Valley. Ride the Sky Troopas to aim for the top of the cliff.
How to get to the Sky Troopas' location
| Order | Image |
|---|---|
| 1. | 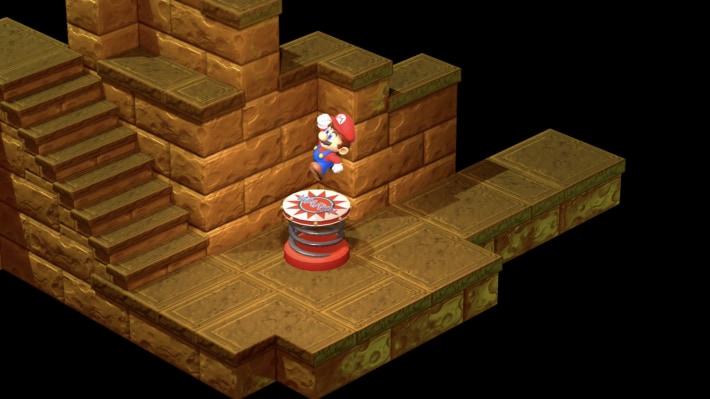 Return to Belome Temple and use the jump platform to return to the surface Return to Belome Temple and use the jump platform to return to the surface |
| 2. | 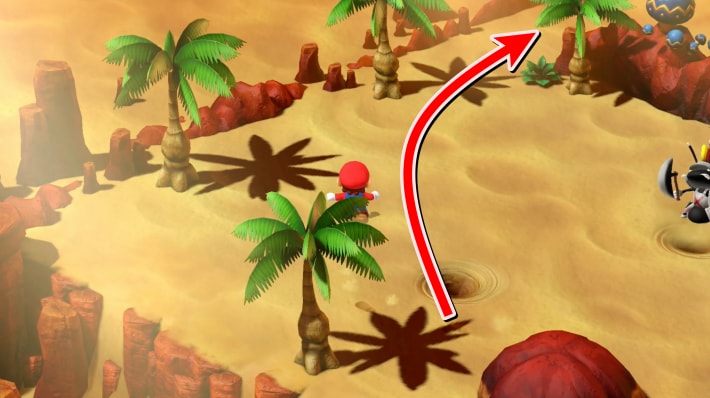 Go upwards without entering the whirlpool Go upwards without entering the whirlpool |
| 3. | 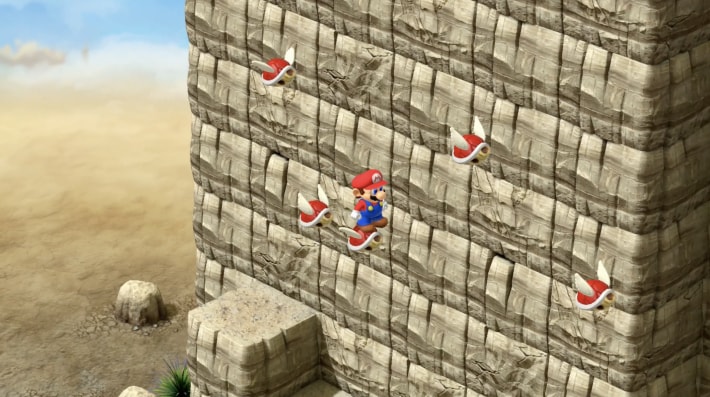 Ride the Sky Troopas to aim for the top Ride the Sky Troopas to aim for the top |
Monstro Town has many sub-events
In the story walkthrough, you only ask how to get to Bean Valley, but there are many other sub-events. Some of them can get you powerful accessories, so it's recommended to take a little detour here.
Up to Clearing Bean Valley
Area 1: Enter the right pipe
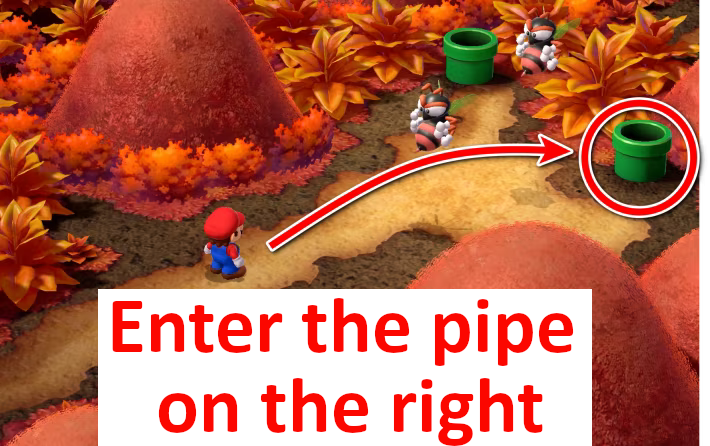
After entering Bean Valley, first enter the pipe on the right. There is nothing in the left pipe, so there is no need to enter it.
Area 2: Enter the pipe in the back

When you go to the next area, enter the pipe in the back.
Hidden treasure chest location No.1
In the second area, there is a hidden treasure chest near the bottom of the pipe.
Area 3: Proceed to the path in the back left
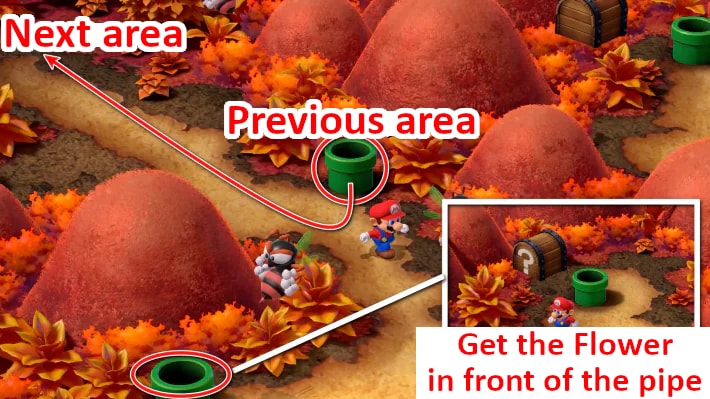
Proceed to the left to go to the next area. Also, if you enter the pipe below, you can get a Flower.
Area 4: There are 5 pipes
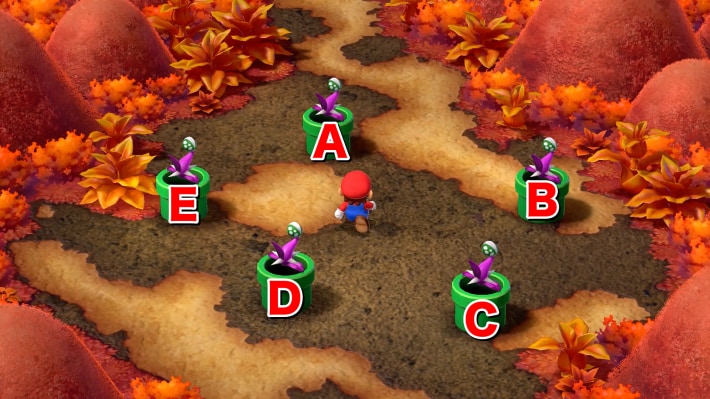
Piranha Plants appear in the 5 pipes. If you defeat them, you can enter the pipes and open treasure chests. However, there are also enemy monsters, so be careful.
Inside the pipes by position
| Pipe | Inside the Pipe |
|---|---|
| A | Treasure Chest Roulette (If you miss, you fight Pandorite) You can go to Grate Guy's Casino |
| B | Frog Coin Pandorite (Enemy) |
| C | Treasure Chest Roulette (If you miss, you fight Pandorite) |
| D | Treasure Chest Roulette (If you miss, you fight Pandorite) |
| E | Enemy Monster |
Pipe A: To Grate Guy's Casino
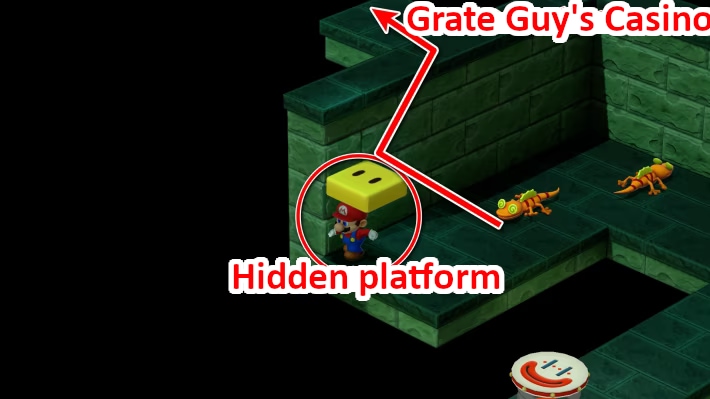
Entering pipe A leads to a dead end. However, there is a hidden block, and you can jump to the exit above the wall. The exit is connected to the world map, and a new path to Grate Guy's Casino has been added. You need a Bright Card to use Grate Guy's Casino.
Pipe B: Frog Coin
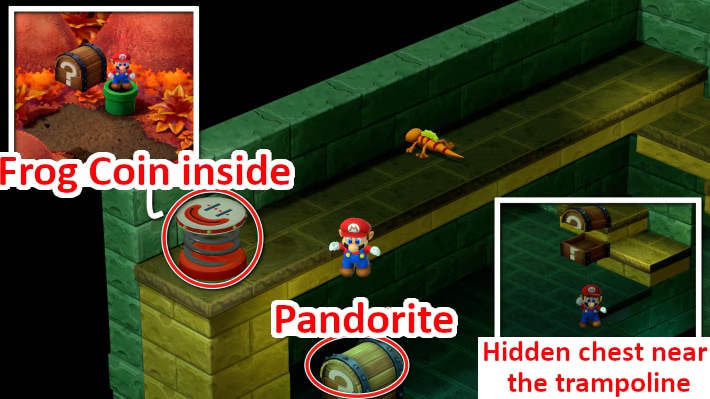
Entering pipe B, you'll find a treasure chest, stairs, and a trampoline. Near the trampoline to return, there's a hidden treasure chest. The treasure chest in the room triggers a battle. Go up the stairs and jump on the trampoline to open a treasure chest containing a Frog Coin.
Pipe C: Hidden Treasure Chest
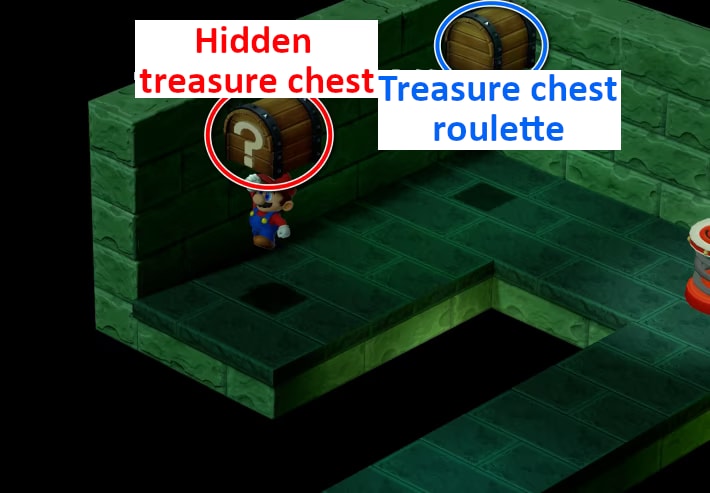
When you enter pipe C, the treasure chest that appears is a roulette. There is a hidden treasure chest near the dead end just ahead.
Pipes E/D: Treasure Chest Roulette
In the room you descend to from pipes D and E, there is only a treasure chest roulette. If you miss, you will have to start a battle.
Fight Megasmilax
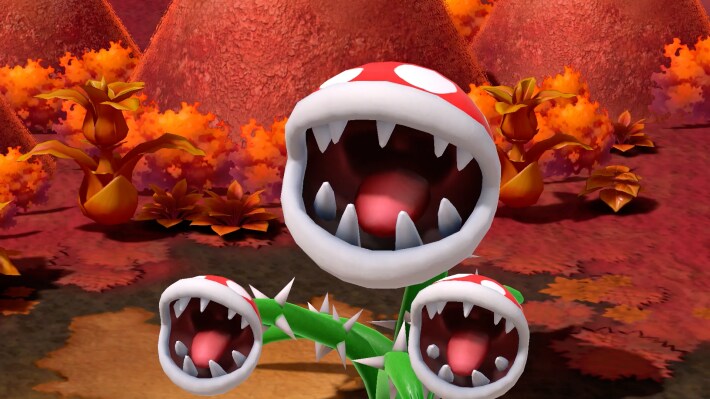
- Defeating the buds will make the main body appear
- Countermeasures for multiple status ailments are necessary
- Weak to Ice attribute: "Snowy" is effective
Touching the Piranha Plant in the back will trigger a battle. Defeating the buds will make Megasmilax appear. It's weak to the Ice attribute, so Mallow's Snowy is effective.
Get the Well-grown Seed
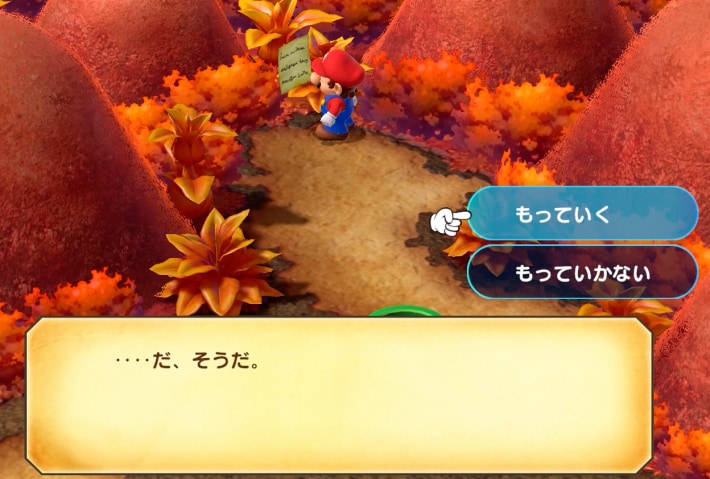
Defeating Megasmilax will reward you with a Well-grown Seed. It's necessary to obtain the Lazy Shell, so don't forget to get it.
Hit the Rock Block
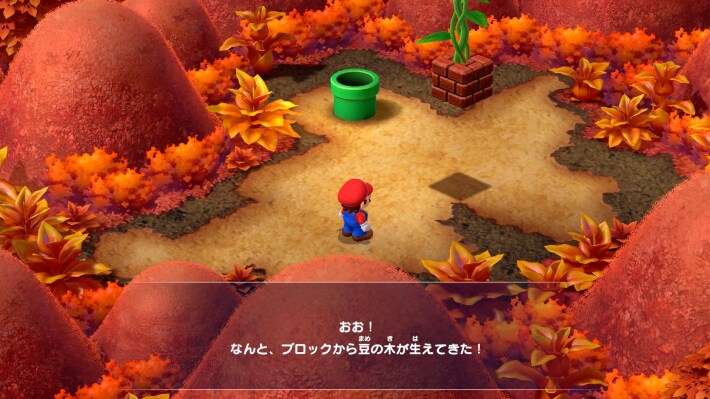
After entering the pipe, hitting the rock block will cause a beanstalk to grow, allowing you to go above the clouds. To climb it, hit the block again.
Cloud Area 1: Climb the Green → Yellow → Blue Vines
Once you're above the clouds, you'll find vines of different colors. You can move around the vines with the stick and jump to other vines with the B button to climb.
Collect Coins Around the Vines

There are coins around the vines, which you can collect by moving around the vines with the stick while climbing.
Area 2: Fork in the Road
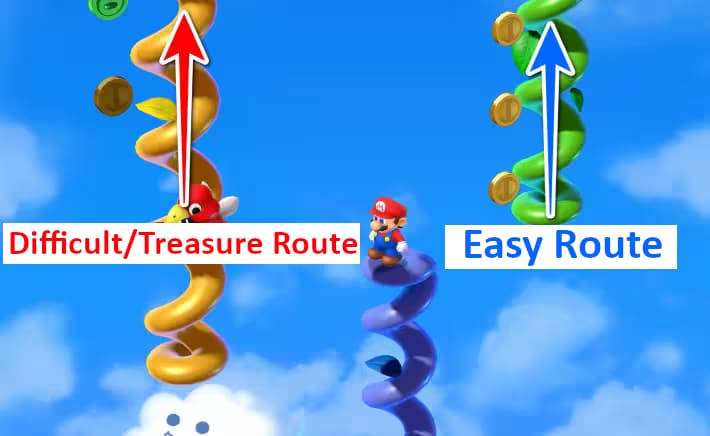
Climbing Area 2 leads to a fork with yellow and green vines. The difficulty of climbing each differs, but the yellow vine also has a treasure chest, so try your hand at jumping between them.
Yellow Route: Utilize Hidden Blocks
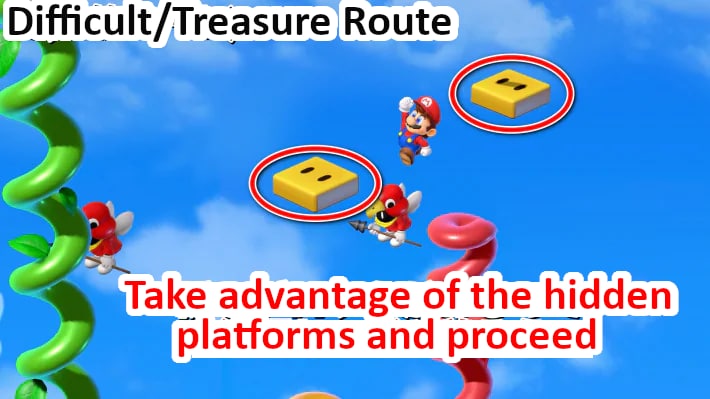
On the yellow vine route with the treasure chest, you can climb by jumping from vine to vine. However, there are also hidden blocks above the vines, which can make jumping easier.
To Nimbus Land

Jumping on the trampoline will take you to Nimbus Land above the clouds. There will be an event in front of the palace, but once it's over, you can save at the inn.
Until Clearing Nimbus Land
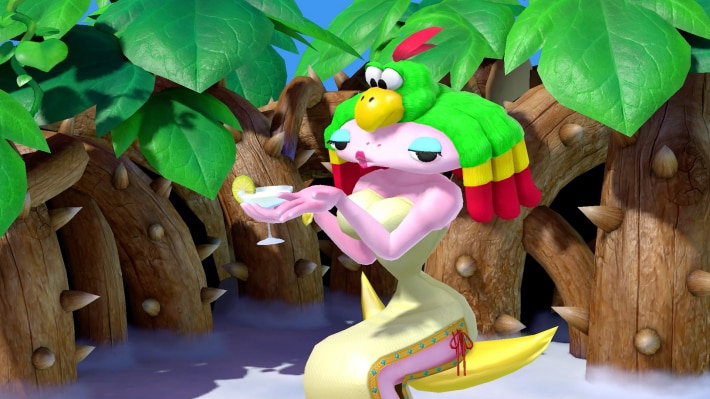
A Fake Mallow Prince Appears Upon Arriving in the Kingdom

When you climb the vine from Bean Valley and arrive at Nimbus Land, an event will occur. Valentina and the fake Mallow Prince are giving a speech to the citizens.
Start with Shopping First
After the event, you can purchase weapons and armor at the item shop near the kingdom entrance. If you proceed with the event at Garro the sculptor's house next, you won't be able to visit the shop for a while, so buy everything you need at this time.
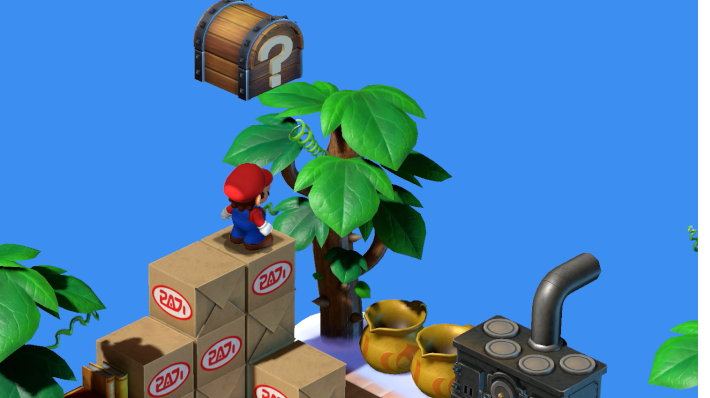
Open the Hidden Treasure Chest
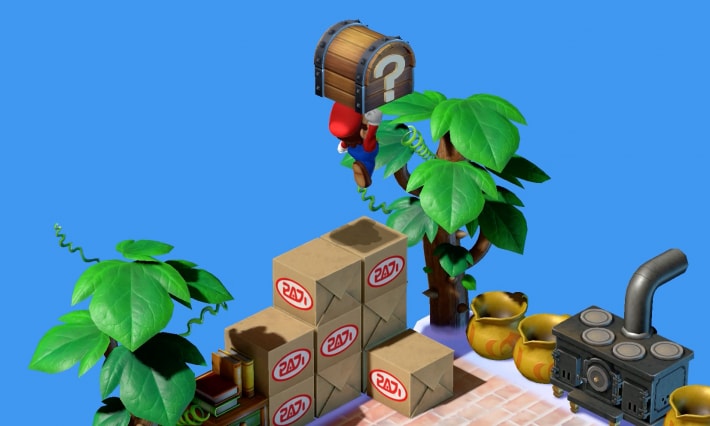
Boxes are stacked up in the back of the item shop. There's a hidden treasure chest on the very top, so be sure to open it.
Examine the Statue in Garro the Sculptor's House
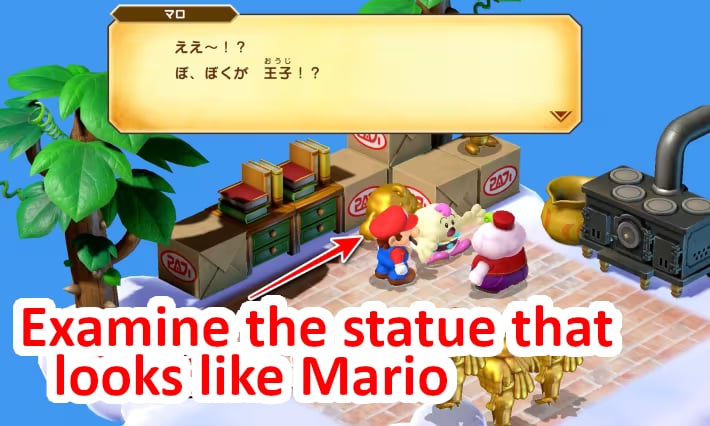
The building to the left of the palace is Garro the sculptor's house. Inside, there's a statue of Mallow's father that looks just like him. Examine it to talk to Garro and find out that Mallow is the prince. If you choose "Yes," you can infiltrate the palace by pretending to be a statue.
Save in the Palace Passageway
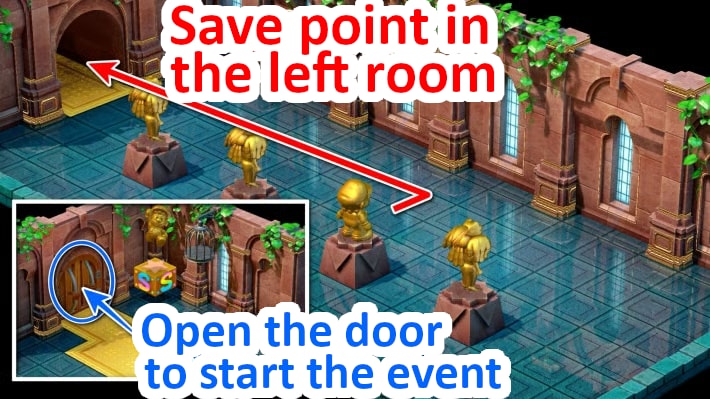
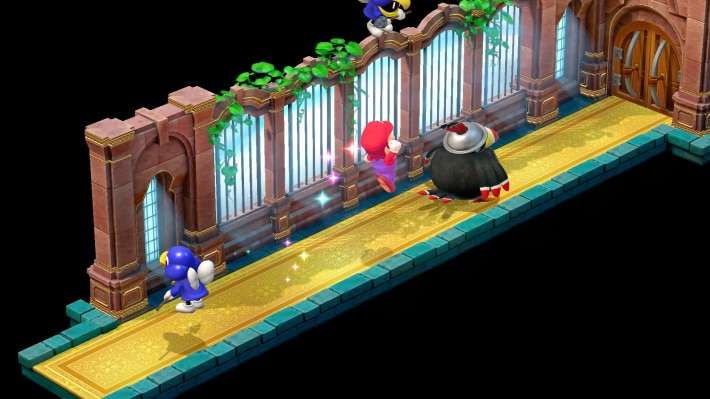
You can save by going left from the room where the Mario statue was placed. If you try to proceed through the room, you'll hear Valentina and Dodo talking... Return to your original spot and pretend to be a statue so Dodo doesn't notice you!
Dodge Dodo's Pecks by Jumping
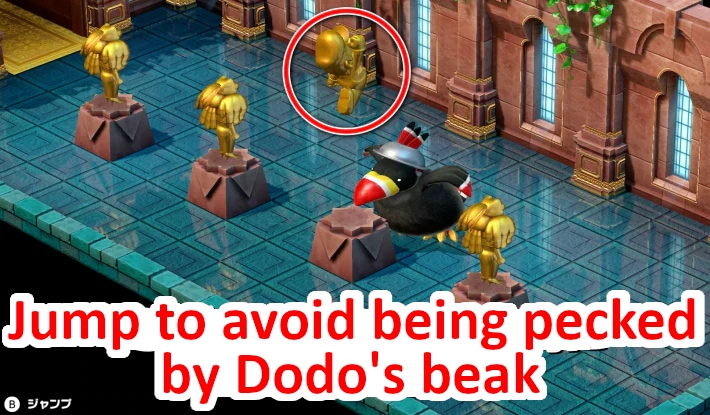
Dodo was ordered to polish the statue. Since he's in a bad mood, a game begins where you have to dodge his beak pecks by jumping. Jump when he walks in front of Mario.
- You will be pecked a total of 4 times
- For the last one, he will circle the room and quickly come in front of you
- If you fail, you start over from the beginning
- If you fail twice, you will enter a battle
Succeed to Get "Dodo's Feather"
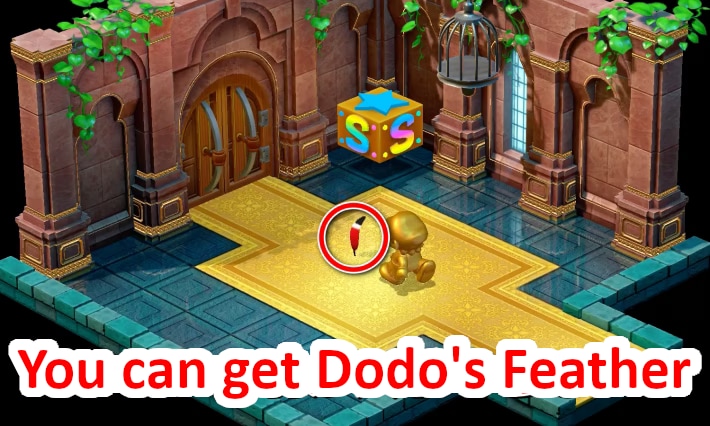
If you dodge all the pecks, "Dodo's Feather" will be on the floor in the next room. It's a valuable accessory that increases speed by +20.
Failing the Minigame Results in a Battle
If you fail twice, you will battle Dodo. Dodo's normal attacks are powerful and inflict Silence, so prepare with accessories.
- Strategy for when minigame fails or contact is made
- Prepare for Silence
- Fear status is effective
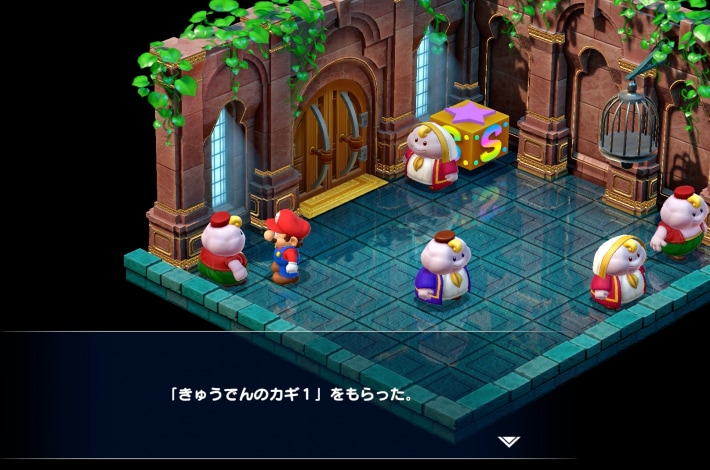
Get "Castle Key 1" from a Resident
Head for the save room where the people of Nimbus Land are. There are hidden treasure chests and other things along the way, so collect them. Talk to the person in the room and select "Yes" to get "Castle Key 1".
| Order | Path Description |
|---|---|
| 1. | 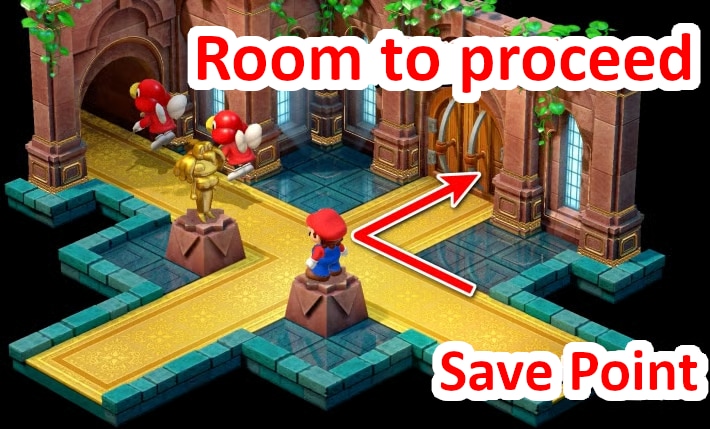 Proceed to the right room Proceed to the right room |
| 2. | 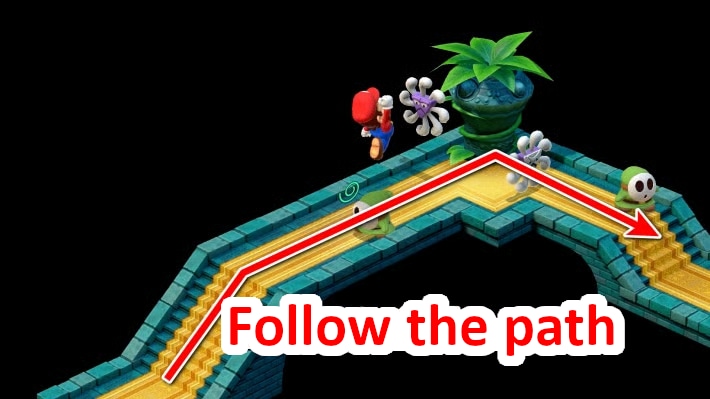 Proceed along the path Proceed along the path |
| 3. | 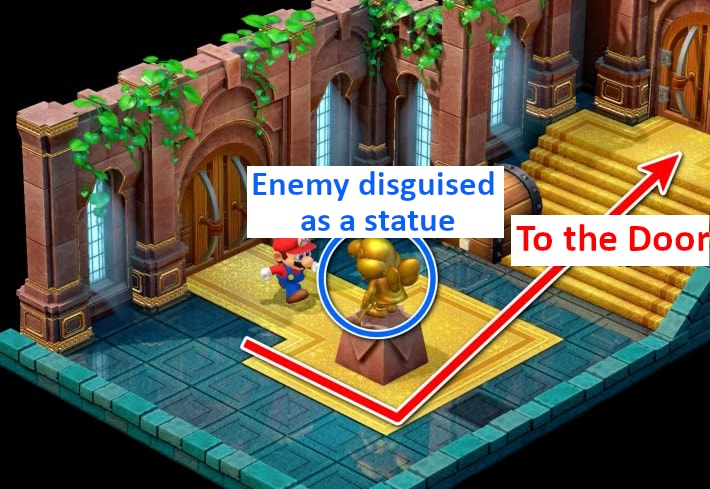 Be careful of enemies disguised as statues Be careful of enemies disguised as statues |
| 4. | 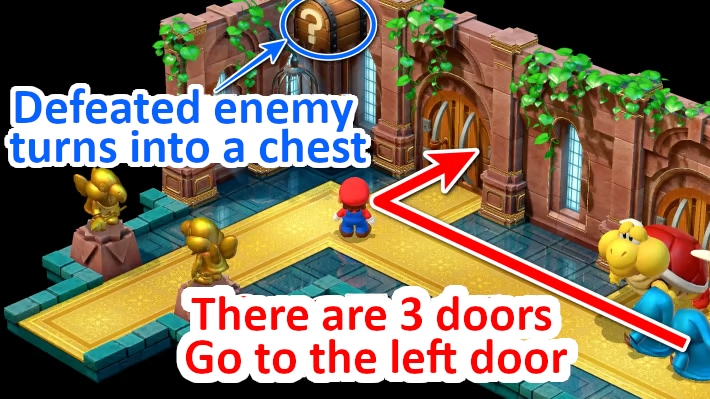 Enter the left door in the passage with the Heavy Troopa. Get the treasure chest near the door. Enter the left door in the passage with the Heavy Troopa. Get the treasure chest near the door. |
| 5. | 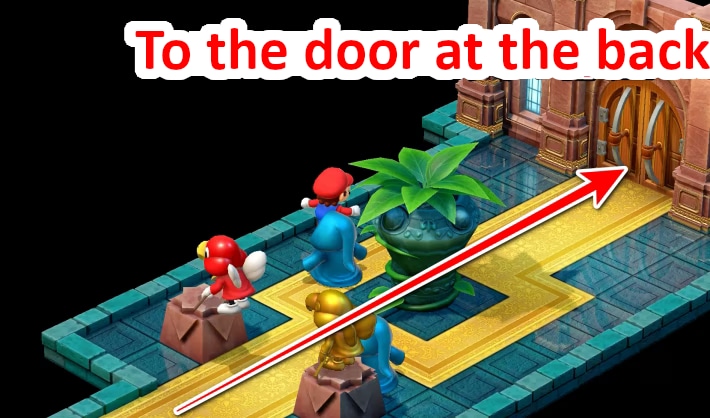 Enemies in the passage will approach, so be careful. Enemies in the passage will approach, so be careful. |
| 6. | 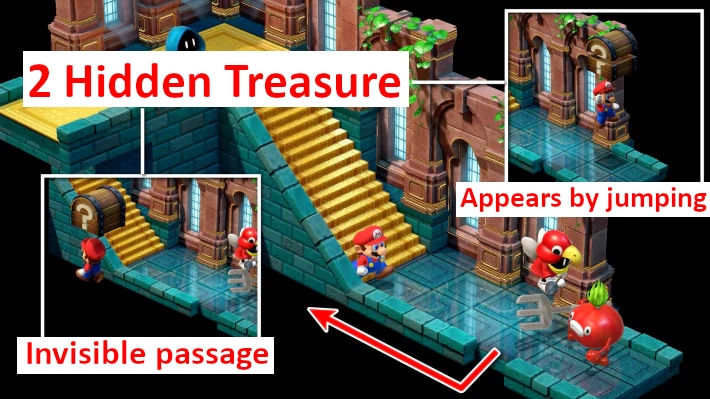 There are 2 hidden treasure chests. Proceed through the passage to There are 2 hidden treasure chests. Proceed through the passage to |
| 7. | 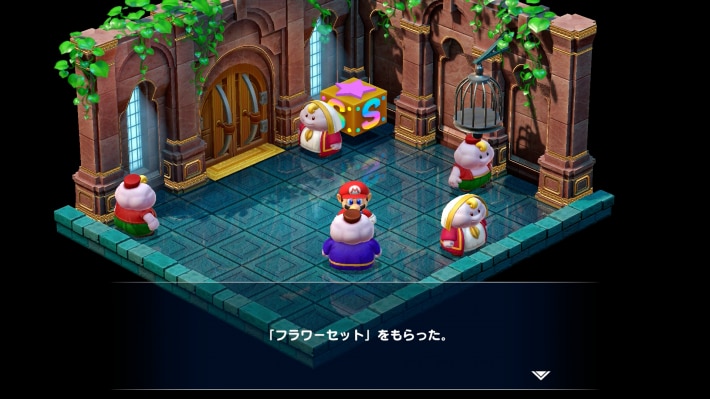 The save room with the palace servants. You can get a Flower Set and Castle Key 1. The save room with the palace servants. You can get a Flower Set and Castle Key 1. |
Defeat the Big Troopa Guarding the Door
As you proceed through the palace, you'll find a Big Troopa guarding a door, so defeat it. Jump attacks are effective. After defeating it, use the "Castle Key 1" you just received to open the door.
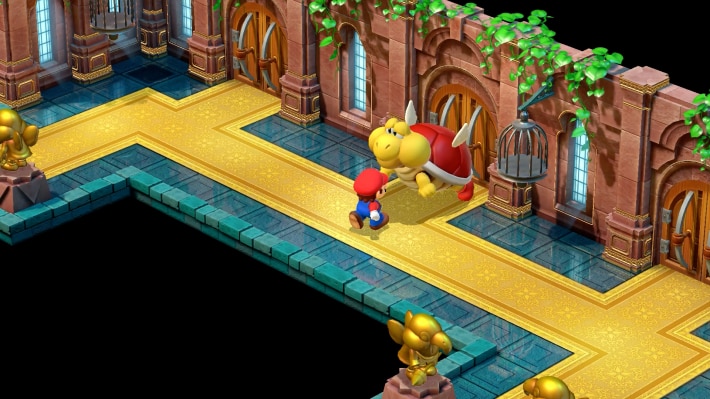
Get "Castle Key 2" from Birdo
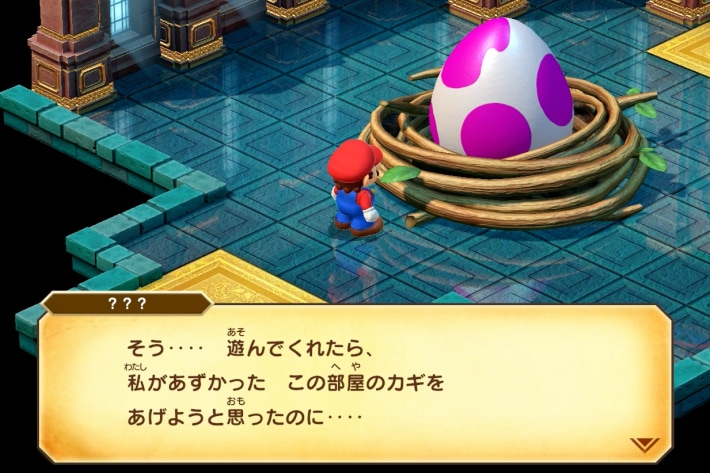
Talk to the egg placed in the room and select "Play with it" to start a battle. Normal attacks don't do much damage, but use the eggs Birdo spits out to deal damage. Win to get "Castle Key 2".
- Reflect eggs with "Defend"
- Attack Birdo's eggs for explosion damage
Get Spotted by Valentina in the Back Room
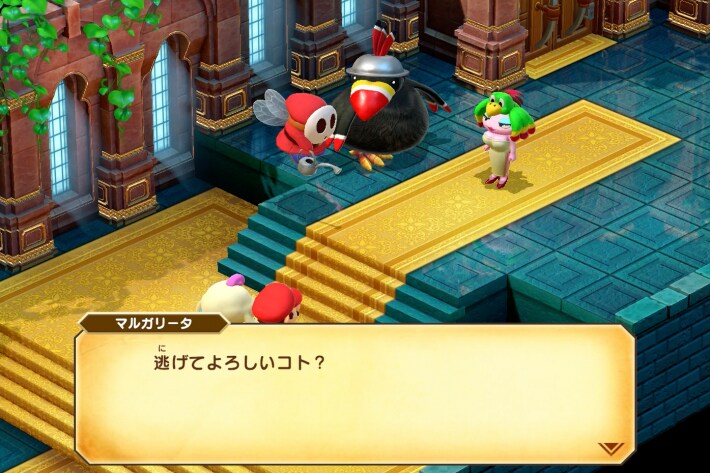
Open the door and Valentina will spot you. She'll flee to the back room, so chase after her.
Chase Her and Fight Dodo
You can catch up to the slow Dodo. Whether you defeat him in this room or not, you'll fight him along with Valentina once you leave the palace.
Become Invincible
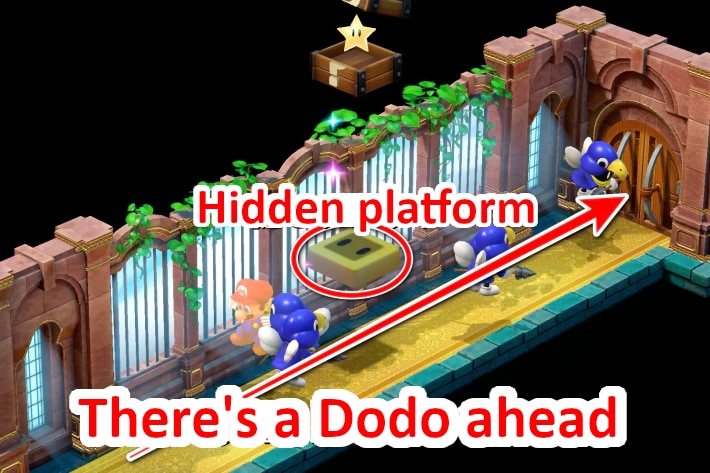
There's no downside as you can earn experience points, so aim to get the Star and then hit Dodo. Jump from directly below to reveal a hidden block. Open the treasure chest to become invincible and head to the next room.
Exit to the World Map to Recover HP
You'll fall from the palace to the clouds below, and if you return to Nimbus Land again, an event will occur and you'll immediately be in a boss battle. Use the trampoline to go to the world map, visit Ripple Town or Monstro Town to recover HP and save, then enter Nimbus Land again.
Change Your Party Formation
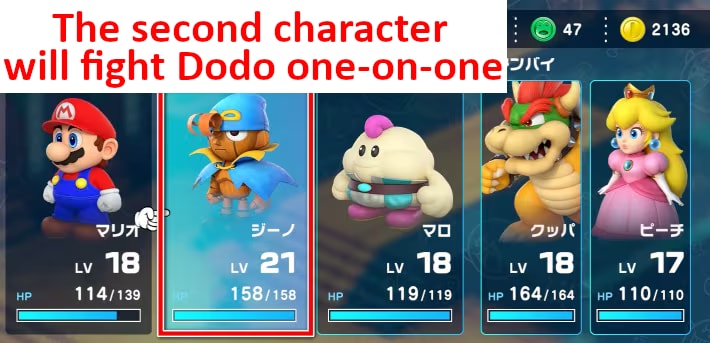
In the next battle against Valentina & Dodo, the character in the middle of your party will fight Dodo 1-on-1 in a separate location. Dodo's normal attacks are powerful, so it's recommended to place fast Geno, who can strike first, or Bowser, who has high defense, in the middle.
Fight Valentina & Dodo in Front of the Palace
First, Dodo, summoned by Valentina, will fight the character in the middle of your party in a separate location. Then it will be Valentina vs. the remaining 2 characters, and then Dodo's group will join, making it 3 vs. 2.
- The second character in the party will fight Dodo 1-on-1
- Prepare for status ailments
- Equip Peach with a Safety Ring
Exit the Palace and Head to the Hot Spring
You can now use the hot spring that only royalty can use. Talk to the hot spring guard to pass, then head to Barrel Volcano.
Until Clearing Barrel Volcano
Descend from Nimbus Land
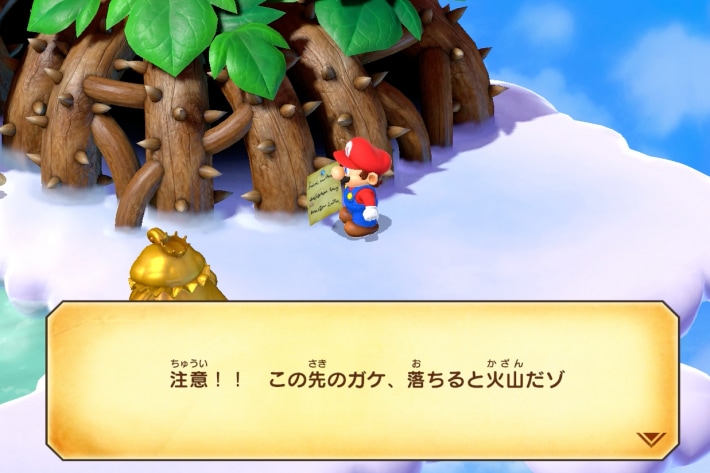
Head to the hot spring from the entrance of Nimbus Land. Talk to the guard, and Mallow will be proven to be royalty, allowing you to enter the hot spring. There's a sign posted, and falling through the gap in the clouds will let you enter Barrel Volcano.
Features of Barrel Volcano's Interior
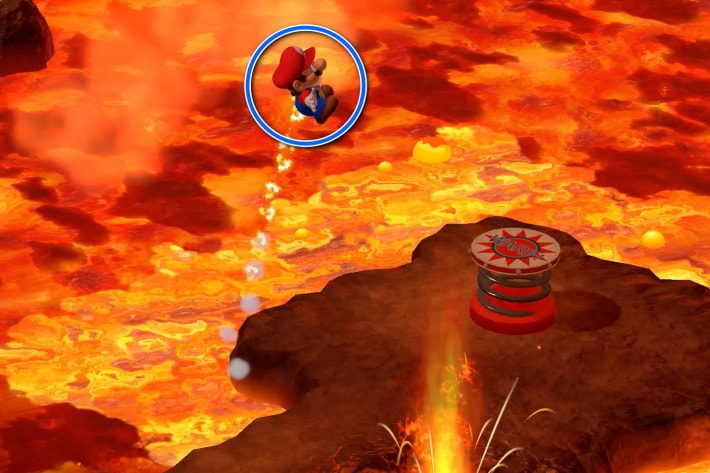
Falling into Lava Makes You Bounce
Inside Barrel Volcano, if you fall anywhere other than walkable areas, Mario will get burned and jump high. Be careful when proceeding as you'll return to a designated spot.
A Single Path, No Getting Lost
There are no forks in the road inside Barrel Volcano; it's a single path. There are also two save points and an item/inn inside.
Many Enemies are Weak to Ice
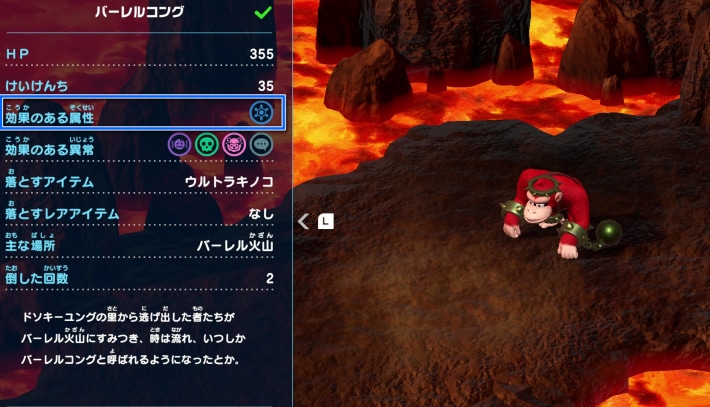
All enemies that appear in Barrel Volcano, except for the final bosses Axem Rangers and Zombone, are weak to the Ice attribute. Mallow's special move "Snowy" is very effective. Since there are many tough enemies, don't hesitate to use it. Recover FP with Maple Syrup.
The Third Treasure Chest from the Entrance is a Star
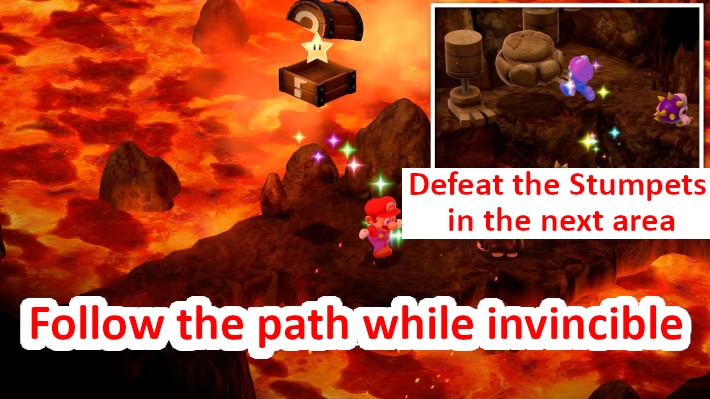
The third treasure chest counting from the entrance contains a Star. Once you become invincible, quickly proceed to the next area where multiple "Stumpets" will appear. Hit them while invincible to level up quickly.
Defeat Magma on the Ledge
"Magma" is a troublesome enemy in normal battles. Mallow's "Snowy" makes it easier to defeat, but if you want to conserve FP, defeat it while you have a Star.
How to Get Frog Coins
There are several Frog Coins inside Barrel Volcano, but you'll need a little trick to get them.
Frog Coin in the Lava
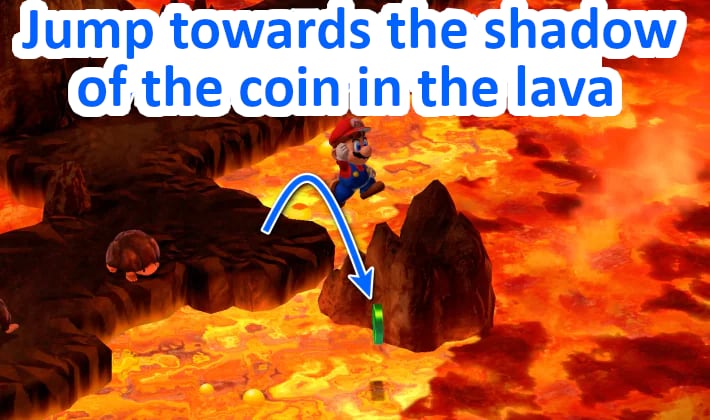
There's a Frog Coin in the lava where there's no footing. To get it, jump from the side to grab the coin. You won't take damage from stepping on the lava, so you can try as many times as you need.
Frog Coin Above the Exit

There's an area where Bob-ombs jump out of the lava, and you have to cross by jumping on platforms. There's a Frog Coin above the exit, but no platform. To get it, fall into the lava near the exit, and you'll jump up onto the area above the exit.
Frog Coin in the Area with Dry Bones
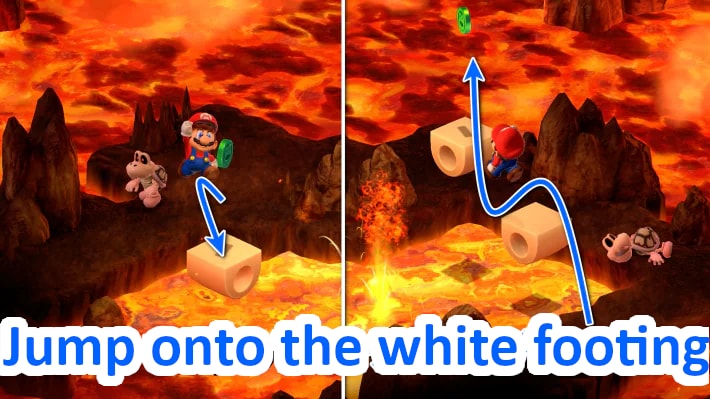
The Frog Coin in the area where Dry Bones roam can be obtained by jumping onto the white platform that collapses over time.
Mallow is Effective Against Funga and Jidanda
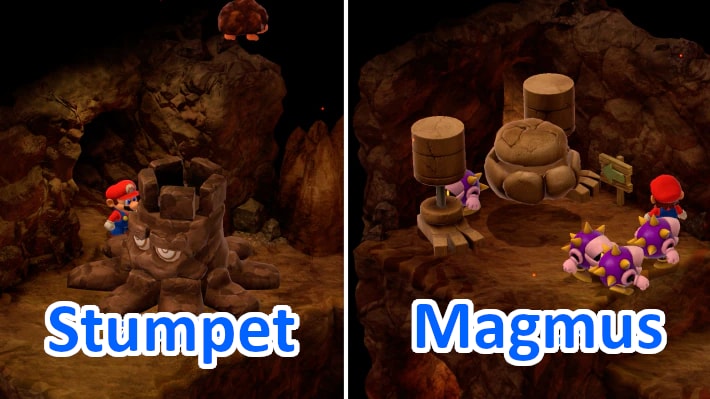
You must fight "Stumpet" and "Magmus" who are blocking the passage. The special move "Snowy," which can hit their weaknesses, is effective, so include Mallow in your party.
Rest at Cinder Toad's Inn
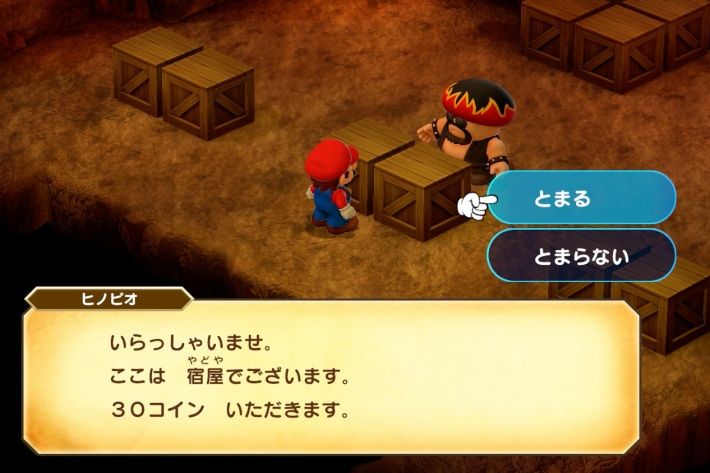
There's a Cinder Toad who runs Cinder Mart where you can shop. You can use items, equipment, and the inn. There's also a save point in the next area, so strengthen your equipment with things like the Fire Shirt.
Cross the Lava by Jumping on Donut Blocks
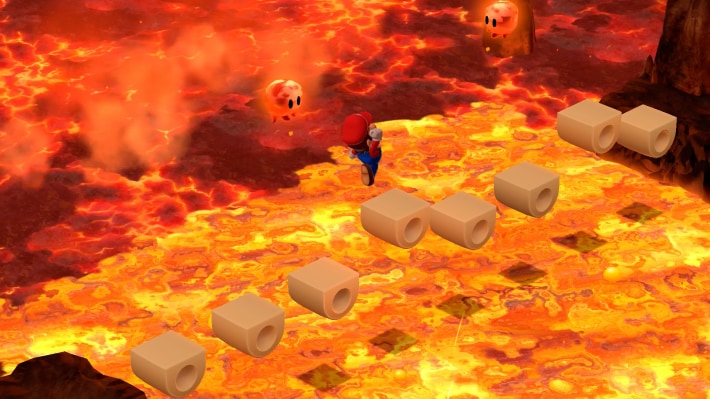
The floating donut blocks will fall after a certain amount of time if you stand on them. If one falls, return to the previous area and come back, and it will be restored.
Fight Czar Dragon
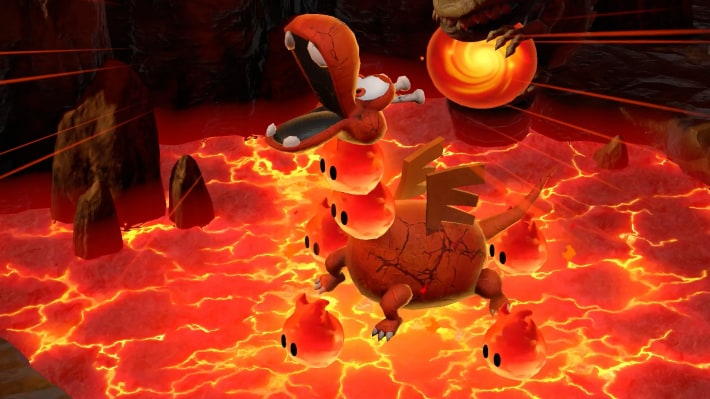
Entering the area after crossing the donut blocks will automatically trigger a boss battle. After defeating Czar Dragon, you will immediately fight Zombone. Be aware that their weaknesses are different.
- Back-to-back battles with Czar Dragon and Zombone
- Prepare for Fear status
- Peach with group heal is recommended
- Snowy is effective against Czar Dragon
- Chip away at Zombone with normal attacks
Return to Cinder Toad's Shop
After defeating Czar Dragon and going to the next area, you will have consecutive battles with the Axem Rangers. Before that, it's recommended to return to Cinder Toad's shop to save and purchase any needed items.
Get the Star Piece... or So You Thought
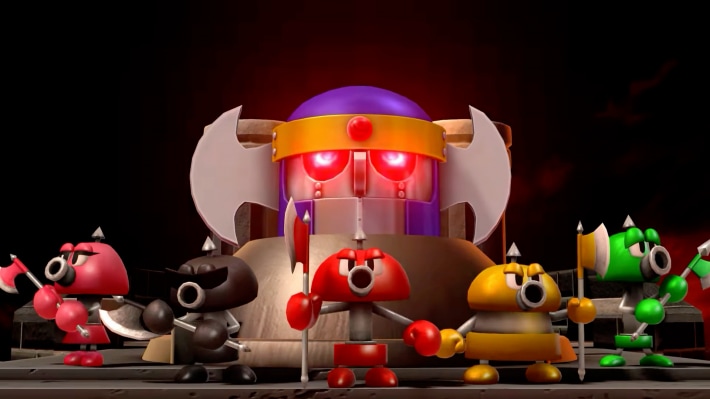
Just when you think you've finally obtained the 6th Star Piece, the "Axem Rangers" snatch it away. Chase them up the volcano, and you'll have consecutive battles with the Axem Rangers and the giant battleship, Axem Blade, at the crater.
- Back-to-back battles with Axem Rangers and Axem Blade
- Prepare for status ailments beforehand
- Thoroughly heal everyone with Peach
- Prioritize defeating Green and Pink
- Beware of Black's special move counter
- Heal everyone before defeating the fifth member
- Defeat Axem Blade with jumps and normal attacks
Nimbus Land's Royal Bus is Restored
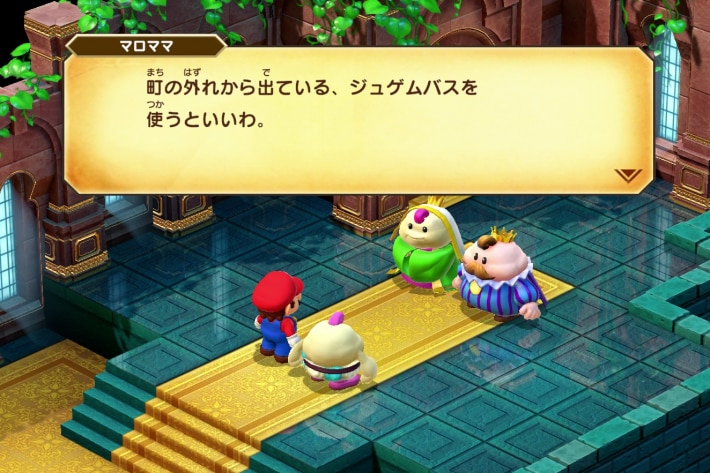
After reporting the battle in Barrel Volcano and the remaining Star Pieces, you will be able to use the Royal Bus. Exit the palace, go left, and talk to the Royal Bus manager. This will allow you to go to Bowser's Keep at any time.
Hidden Treasure Chests Up to the 6th Star Piece
Land's End Hidden Treasure Chests
First Area
| Treasure Chest Contents | Red Essence |
|---|---|
| How to Get/Location | Land's End: First area. Jump diagonally to the upper left from the yellow block. |
Get on the yellow block and jump towards the rock face when you reach the top.
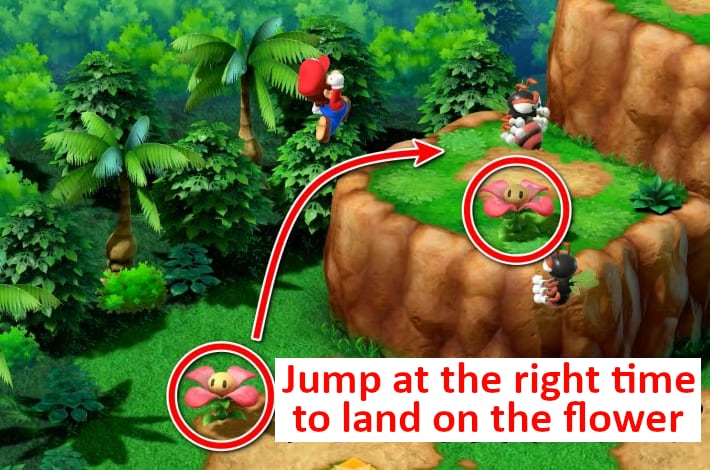
Area with Three Blue Flowers Lined Up
| Treasure Chest Contents | Frog Coin |
|---|---|
| How to Get/Location | Land's End: Area with three blue flowers lined up |
In the place with three blue flowers lined up, jump from on top of a flower between the middle and right ones.
Near the Stairs in the Hidden Area

| Treasure Chest Contents | Frog Coin |
|---|---|
| How to Get/Location | Land's End: Near the stairs in the hidden area |
Second Area
| Treasure Chest Contents | KeroKeroCola |
|---|---|
| How to Get/Location | Land's End: Second area. At the bottom left edge of the high place you land on with the cannon, from where three Chows appear. |
Jump to the left before the hole where the Chows appear to make a yellow block appear. It's at the bottom left edge of the place you land on with the cannon.
Belome Temple Hidden Treasure Chests
Area After the Shutter
| Treasure Chest Contents | Frog Coin |
|---|---|
| How to Get/Location | Belome Temple: Jump on top of the left treasure chest in the area after the shutter. |
Get on top of the first treasure chest and jump.
Area After the Shutter
| Treasure Chest Contents | Frog Coin |
|---|---|
| How to Get/Location | Belome Temple: At the corner after going down the stairs in the area after the shutter. |
At the corner after going down the stairs.
Nimbus Land Hidden Treasure Chests
On Top of the Cardboard Boxes in the Item Shop
| Treasure Chest Contents | Frog Coin |
|---|---|
| How to Get/Location | Nimbus Land: On top of the cardboard boxes in the item shop |
Entrance to the Room Where Citizens are Trapped
| Treasure Chest Contents | Frog Coin |
|---|---|
| How to Get/Location | Nimbus Land: Entrance to the room inside the palace where citizens are trapped |
End of the Hidden Passage
| Treasure Chest Contents | Frog Coin |
|---|---|
| How to Get/Location | Nimbus Land: End of the hidden passage next to the entrance of the room inside the palace where citizens are trapped |
Inside the Area with Three Lined-Up Doors
| Treasure Chest Contents | Frog Coin |
|---|---|
| How to Get/Location | Nimbus Land: At the top left corner inside the area with three lined-up doors |
Area After Birdo
| Treasure Chest Contents | Frog Coin |
|---|---|
| How to Get/Location | Nimbus Land: Jump on top of the treasure chest in the area after where Birdo appears. |
Monstro Town Hidden Treasure Chests
Monstro Town Entrance
| Treasure Chest Contents | Frog Coin |
|---|---|
| How to Get/Location | Monstro Town: Monstro Town entrance |
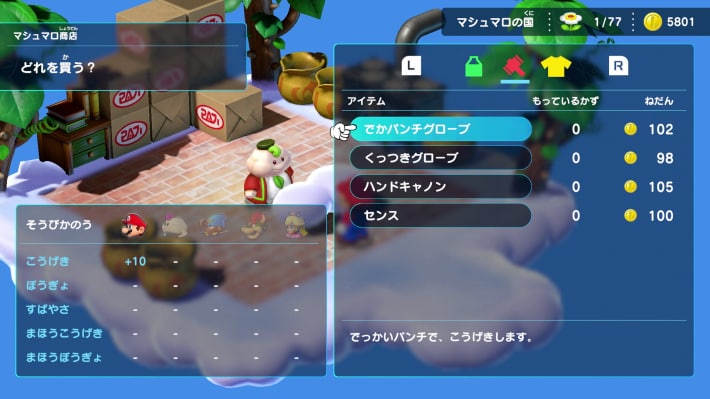
Equipment Update Summary Up to the 6th Star Piece
Equipment Update in Nimbus Land
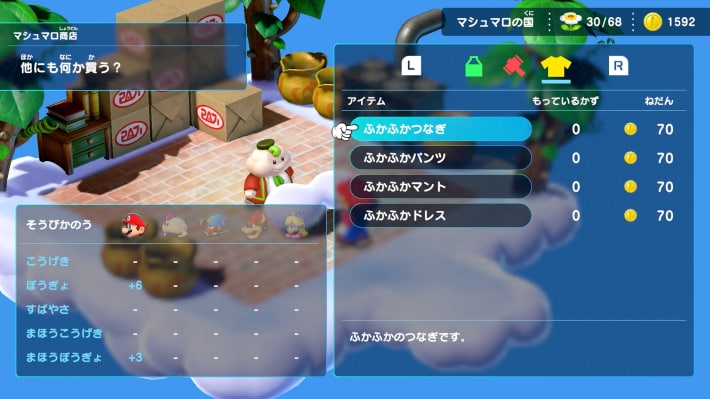
You can purchase weapons and armor as soon as you enter Nimbus Land. Armor will be updated in Barrel Volcano, which you will go to immediately after, so only purchase for the characters you need.
Recommended Equipment to Purchase
| Weapon | Brief Description/Required Coins |
|---|---|
| Sticky Glove | Strongest Mallow-exclusive weapon at this point 98 Coins |
| Hand Cannon | Strongest Geno-exclusive weapon at this point 105 Coins |
| War Fan | Strongest Peach-exclusive weapon at this point 100 Coins |
| Armor | Brief Description/Required Coins |
| Fluffy Shirt | Strongest Mario-exclusive armor at this point 70 Coins |
| Fluffy Cape | Strongest Geno-exclusive armor at this point 70 Coins |
| Fluffy Dress | Strongest Peach-exclusive armor at this point 70 Coins |
※For armor, it's fine to only update for the characters you'll use in the immediately following boss battle.
Armor Update in Barrel Volcano
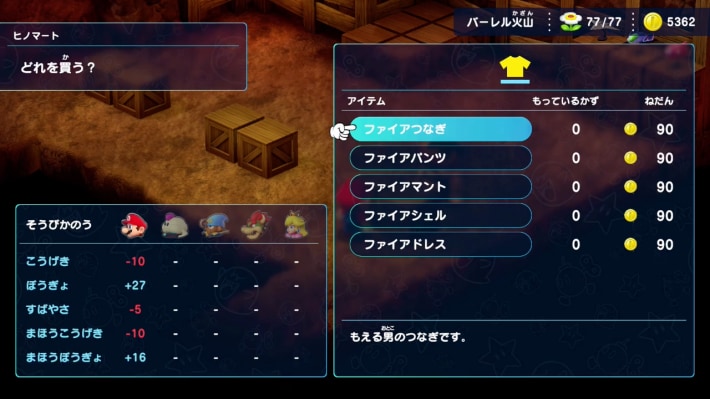
You can purchase armor in Barrel Volcano. Although the armor names include 'Fire,' they do not have fire resistance, so be careful.
Recommended Equipment to Purchase
| Armor | Brief Description/Required Coins |
|---|---|
| Fire Shirt | Strongest Mario-exclusive armor at this point 90 Coins |
| Fire Pants | Strongest Mallow-exclusive armor at this point 90 Coins |
| Fire Cape | Strongest Geno-exclusive armor at this point 90 Coins |
| Fire Shell | Strongest Bowser-exclusive armor at this point 90 Coins |
| Fire Dress | Strongest Peach-exclusive armor at this point 90 Coins |
※Characters who bought armor in Nimbus Land don't necessarily need to update, but updating for all characters is safer.
Get Mario's Strongest Weapon After Valentina
After defeating Valentina in Nimbus Land, you can obtain Mario's strongest weapon, the "Lazy Shell." Get it early to prepare for what's to come.
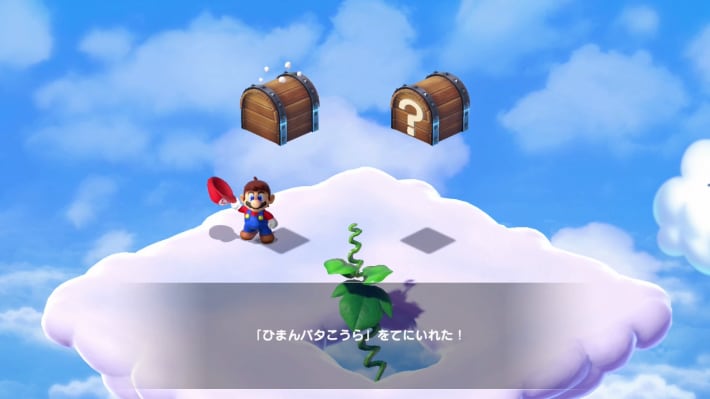
Brief Explanation of How to Get It
After talking to the mouse on the 2nd floor of the Monstro Town house, give the "Seed" and "Fertilizer" to the planter in Rose Town, and get it from the treasure chest at the end of the beanstalk that appears.
| How to Get the Seed | |
|---|---|
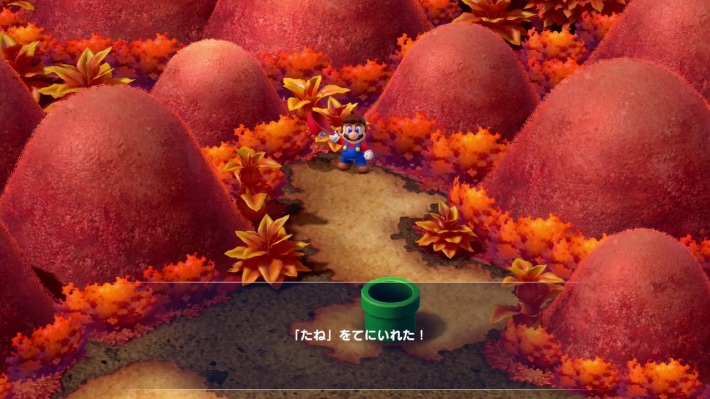 | The Seed can be obtained along with a memo dropped by a Sky Troopa after defeating Megasmilax. |
| How to Get the Fertilizer | |
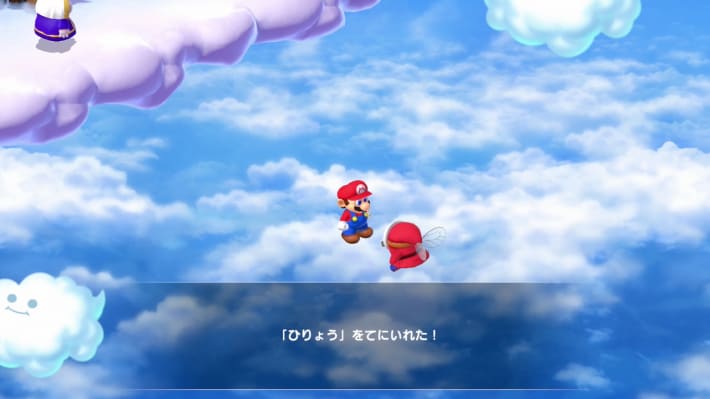 | It can be obtained from the Sky Troopa at the end of the invisible path on the right side of Nimbus Land. |
Get Peach's Strongest Weapon After Barrel Volcano
After clearing Barrel Volcano, you can obtain Peach's strongest weapon, the "Frying Pan." Peach's damage output will increase significantly, so be sure to get it.
Brief Explanation of How to Get It
Purchase from the Moleville item shop (the one run by the moles) for 300 coins.