

This is a full walkthrough for Ganon's Castle in The Legend of Zelda: Ocarina of Time, including Gold Skulltula locations, strategies, and tips for defeating Ganondorf and Ganon.
| ◀ Previous | Next ▶ |
|---|---|
| Spirit Temple | - |
Ganon's Castle Location
Head from Hyrule Castle Town


Ganon's Castle can be reached from Hyrule Castle Town in the adult era. The area where Hyrule Castle stood during the child era becomes Ganon's Castle in the adult era.
You Need All 6 Sage Medallions to Enter

If you have all 6 Medallions, a bridge of light will appear at the entrance to Ganon's Castle, allowing you to enter. If it does not appear, continue progressing through the story.
Ganon's Castle Walkthrough
Ganon's Castle Great Hall
Enter Ganon's Castle then Through the 1st Door
Cross the Bridge of Light to enter Ganon's Castle. Once inside, continue straight through the first door without stopping to avoid the two Beamos.
Dispel the 6 Barriers in the Great Hall

| Forest | Fire | Water |
|---|---|---|
 |  |  |
| Spirit | Shadow | Light |
 |  |  |
Dispel the six barriers: Forest, Fire, Water, Spirit, Shadow, and Light to unlock the boss room.
It's Recommended to Start with the Shadow Barrier

| Benefits of Dispelling the Shadow Barrier First |
|---|
| - Obtain the Golden Gauntlets. - You can enhance your defense at the Great Fairy's Fountain east of Ganon's Castle. - The Golden Gauntlets are required to dispel the Fire and Light Barriers. |
Defeat the Final Boss Ganondorf

Once you destroy all 6 Barriers, you can unlock the Boss Room and face the final boss, Ganondorf. Since the battle has two phases, stock up on Arrows and Green Potion beforehand.
Dispel the Shadow Barrier

Enter the Northeast Room of the Great Hall
Enter the door with the purple mark in the northeast of the Great Hall.
Light the Braizer to Cross and Reach the Switch
Light the brazier on the right with a Fire Arrow to reveal a timed platform. Cross it quickly, then press the switch to make a treasure chest appear.
Another Brazier Ahead Also Creates a Platform

If you ran out of time, there's another brazier further in the room, and lighting it will also make a platform appear.
You Can Return with the Longshot

After pressing the switch, use the Longshot on the treasure chest that appeared to return to the platform in one go. Open the chest to get the Golden Gauntlets.
Use the Lens of Truth to Reach and Hammer the Switch
Face the locked door and use the Lens of Truth to reveal a hidden path on the left. Cross it, hit the second switch with the Megaton Hammer, then return and take the revealed path on the right to reach the unlocked door.
Dispel the Barrier with a Light Arrow
Inside the next room, shoot the orb with a Light Arrow to dispel the Shadow Barrier. Dispelling the barrier will return you to the Great Hall.
Go to the East Great Fairy's Fountain
Not required to progress the story

▲Lift the pillar to enter
After getting the Golden Gauntlets, it's recommended to go outside the castle and head to the Great Fairy's Fountain to the east. Here, the Great Fairy can enhance your defense, reducing the damage you take by half. This is a significant upgrade that will make clearing Ganon's Castle much easier.
Collect the Gold Skulltula on the Way

You can collect a Gold Skulltula Token on the way to the Great Fairy's Fountain.
Dispel the Fire Barrier

Enter the Room Wearing the Goron Tunic

Move to the northwest of the Great Hall and enter the door marked in red. Equip the Goron Tunic to withstand the lava-filled room, then collect all 5 Silver Rupees.
Get the First Rupee on the Right Side

First, collect the Silver Rupee to the right of the entrance. Some platforms sink into the lava when stepped on, so quickly jump to the next one before they fully submerge.
The Central Platform Won't Sink with Hover Boots
Equip the Hover Boots before stepping onto the central platform. If worn beforehand, it won't sink into the lava.
Falling into the Lava Will Restart the Puzzle

Falling into the lava will damage you and reset all collected Silver Rupees. Watch for sinking platforms and proceed carefully.
Get the Second Rupee on the Left

Next, collect the Silver Rupee on the left side of the entrance. Flames are erupting, so avoid them while collecting it.
Lift the Pillar to Get the Third Rupee

Use the Golden Gauntlets to lift and throw the giant pillar at the back of the room. A Silver Rupee is hidden beneath it, and removing the pillar also opens the path to the remaining Rupees.
Collect the Remaining 2 Silver Rupees

Collect the remaining 2 Silver Rupees to open the iron bars blocking the door. If you're wearing the Hover Boots, you won't be able to climb back up after collecting the farthest Rupee, so switch back to the Kokiri Boots before continuing.
Move to the Door Ahead with the Longshot

Once the door opens, use the Longshot on the target next to the door to move to the far door in one go.
Dispel the Barrier with a Light Arrow
Shoot the orb at the back of the room with a Light Arrow to dispel the Fire Barrier. This also returns you to the Great Hall.
Dispel the Light Barrier

- Move the Pillar West of the Great Hall and Enter
- Defeat all Invisible Enemies
- Take the First Small Key and Proceed
- Play Zelda's Lullaby on the Royal Crest
- Take the Second Small Key and Proceed
- Collect 5 Silver Rupees Within 1 Minute
- Use the Lens of Truth to Pass Through the Wall
- Dispel the Barrier with a Light Arrow
Move the Pillar West of the Great Hall and Enter

The giant pillar to the west of the Great Hall can be lifted with the Golden Gauntlets. Enter the door behind it.
Defeat All Invisible Enemies

This room contains invisible enemies. Use the Lens of Truth to see and defeat them all.
Take the First Small Key and Proceed

Defeating all the enemies reveals a treasure chest containing a Small Key. Use the key to open the door and move on to the next room.
Contents of the Surrounding Treasure Chests


From the other treasure chests in the room, you can get items like arrows and Recovery Hearts. Collect them as needed before moving on.
Play Zelda's Lullaby on the Royal Crest

| Zelda's Lullaby |
|---|
 |
The floor of the next room has the Royal Crest on it. Stand on the crest and play Zelda's Lullaby.
Take the Second Small Key and Proceed

Playing the song will make a treasure chest with a Small Key appear. Use the key to open the door and move on to the next room.
Collect 5 Silver Rupees Within 1 Minute
| 1 | 2 | ||||
|---|---|---|---|---|---|
 |  | ||||
| 3 | 4 | 5 | |||
 |  |  | |||
As soon as you enter, a 1-minute timer begins. Collect all 5 Silver Rupees before time runs out while avoiding the rolling boulders.
Use the Longshot to Get the Central Rupee

Use the Longshot on the ceiling target to reach the Silver Rupee high above the center of the room.
Use the Lens of Truth to Pass Through the Wall

The next room appears to be a dead end, but use the Lens of Truth to reveal a fake wall at the far end. Pass through the wall to continue.
Watch Out for the Floormaster and Don't Stop
A Floormaster will drop from the ceiling. If it catches you, you'll be sent back to the Great Hall, so run straight through without stopping.
Dispel the Barrier with a Light Arrow
Shoot the orb at the back of the room with a Light Arrow to dispel the Light Barrier. This returns you to the Great Hall.
Dispel the Spirit Barrier

Enter the Room Southwest of the Great Hall

Enter the door with the orange mark in the southwest of the Great Hall.
Collect 5 Silver Rupees

Collect all 5 Silver Rupees while avoiding the blades moving left and right. All Rupees are in plain sight, and collecting them will open the door ahead.
Defeat the Beamos in the Center First
A Beamos is in the center of the room, so destroy it with a bomb first to safely collect the Silver Rupees.
Move a Statue to Block the Blade's Movement
The statues in the room can be moved. Place them in the blades' path to stop their movement, then safely collect the Rupees.
Use the Longshot to Get the Rupee

Use the Longshot on the ceiling target to reach the Silver Rupee high above the center of the room.
Send a Bombchu through the Iron Bars
The next room has iron bars with a switch behind them. Send a Bombchu through the gap above the bars to hit the switch and open the door.
Press the Switch to Make a Bombchu Chest Appear

Use a Spin Attack on the switch in front of the iron bars to make a treasure chest containing Bombchus appear. If you run out of Bombchus, restock here.
Use a Fire Arrow to Burn the Ceiling Cobwebs

Burn the cobweb on the ceiling of the dead-end passage with a Fire Arrow to let sunlight into the room.
Shine Light on the Sun on the Right Side

Use the Mirror Shield to reflect sunlight onto the sun mural on the right side of the passage, opening the door.
Lighting Other Suns Spawns Enemies
There are multiple sun murals on the wall, but shining light on the wrong one will summon enemies. Avoid illuminating the incorrect sun.
Dispel the Barrier with a Light Arrow
Shoot the orb at the back of the room with a Light Arrow to dispel the Spirit Barrier. This returns you to the Great Hall.
Dispel the Forest Barrier

Enter the Southeast Room of the Great Hall

Enter the door with the green mark in the southeast of the Great Hall.
Defeat the Wolfos in the First Room

A Wolfos will appear when you enter the first room. Bait its attack, then strike when it's open.
Defeating It Reveals a Chest with 5 Rupees

Defeating the Wolfos will make a treasure chest containing 5 Rupees appear in the center of the room.
Light the 5 Braziers

Light all 5 braziers to open the door ahead. Use Din's Fire to light the four braziers in the center of the room, then use a Fire Arrow for the brazier above the door.
Get 5 Silver Rupees While Avoiding Wind

In the next room, collect all 5 Silver Rupees. The fans periodically create strong winds, so wait for the wind to stop before moving.
Use the Song of Time to Get the First Silver Rupee

| Song of Time |
|---|
 |
Play the "Song of Time" to create a Time Block beneath the high Silver Rupee, then climb onto it to collect the Rupee.
Move Around with the Hover Boots
For places with wide gaps between platforms, equip the Hover Boots and glide across.
Press the Switch to Make a Longshot Target Appear
Press the floor switch to make a pillar with a Longshot target appear beneath the Silver Rupee. Use the Longshot to reach the pillar and collect the Rupee on top.
Continue After Collecting 5 Silver Rupees

After collecting all 5 Silver Rupees, the door ahead will open. Head through it.
Dispel the Barrier with a Light Arrow
Shoot the orb at the back of the room with a Light Arrow to dispel the Forest Barrier. This returns you to the Great Hall.
Dispel the Water Barrier

- Enter the Room East of the Great Hall
- Defeat the 2 Freezards
- Put Blue Fire in an Empty Bottle
- Melt the Red Ice with Blue Fire
- Put Blue Fire in an Empty Bottle Again
- Move the Ice Blocks to Create a Platform
- Melt the Red Ice with Blue Fire
- Hit the Switch with the Megaton Hammer
- Dispel the Barrier with a Light Arrow
Enter the Room East of the Great Hall

Enter the door with the blue mark in the east of the Great Hall.
Defeat the 2 Freezards

Defeat the 2 Freezards in the first room to open the door ahead. Avoid their freezing breath and defeat them quickly before they regenerate.
Put Blue Fire in an Empty Bottle

Put the Blue Fire in the room into an Empty Bottle. The icicles around the Blue Fire can be broken with your sword.
Melt the Red Ice with Blue Fire

The door ahead is blocked by Red Ice. Pour the Blue Fire from the bottle on it to melt it.
Put Blue Fire in an Empty Bottle Again

You will need one more Blue Fire ahead. Before leaving the room, put Blue Fire in an Empty Bottle again and then proceed.
The Treasure Chest Contains a Recovery Heart

The treasure chest in the room contains a Recovery Heart. The other chest is a trap that damages you, so open it with caution.
Move the Ice Blocks to Create a Platform

Upon entering the room, a timer starts, and you must solve the puzzle and exit within 2 minutes. Move the ice blocks to create a platform and proceed.
Push the Block at the Back into the Hole First
First, push the ice block at the back and drop it into the hole.
Place the Remaining Block in Front of the Red Ice
Move the remaining ice block and place it in front of the Red Ice.
Melt the Red Ice with Blue Fire

Melt the Red Ice with the Blue Fire you put in the Empty Bottle.
Hit the Switch with the Megaton Hammer

Use the ice block as a platform to reach the rusted switch, then hit it with the Megaton Hammer. The switch opens the door ahead, so exit before the timer runs out.
Dispel the Barrier with a Light Arrow
Shoot the orb at the back of the room with a Light Arrow to dispel the Water Barrier. This returns you to the Great Hall.
Enter the Boss Room

Enter the Tower in the Center of the Great Hall

After dispelling all six barriers, the barrier around the tower in the center of the Great Hall will disappear. Cross the bridge and enter the tower.
Climb the Stairs and Enter the Next Room

Once inside the tower, climb the stairs to the next room. Many Fire Keese will appear, but you can run past them.
Defeat the 2 Dinolfos
| Key Strategy |
|---|
| - Watch for their jump attack that puts them behind Link. |
Upon entering the room, you'll face 2 Dinolfos. Block their attacks with your shield and strike during the opening. Defeating both will open the door ahead.
Defeat the 2 Stalfos
| Key Strategy |
|---|
| - Their jump attack leaves them open to attack. |
After climbing the stairs, defeat the 2 Stalfos by baiting their attacks and striking during the opening.
Get the Boss Key from the Treasure Chest

After defeating both Stalfos, the flames surrounding the treasure chest will disappear. Get the Boss Key from the treasure chest and move on.
Defeat the 2 Iron Knuckles
| Key Strategy |
|---|
| - After taking some damage, their armor will break. - They flinch after their armor breaks. |
The next room has 2 Iron Knuckles. Hit only one to fight them one-on-one, wait for an opening after its axe attack, then strike. Defeat both to open the door.
Defeat Ganondorf

Use the Boss Key to open the door. You will enter the boss room, but the actual boss fight is a little further on.
Enter the Right Door and Go Upstairs

After entering the boss room, open the door on the right and proceed. Opening the door reveals a long staircase.
Save the Pots for Later

The pots in this room contain hearts, arrows, and magic, but it's best to save them for the boss fight. If you need supplies now, leave Ganon's Castle and restock outside.
Open the Door to Start the Boss Fight
Opening the door at the top of the stairs starts the boss fight. Make sure you're prepared before entering. If you need to restock, use a warp song to leave Ganon's Castle.
Be Sure to Save
Ocarina of Time has no post-game save. After the credits, the game reloads your last save point, so save before the final boss to avoid losing progress.
To the Ending

Defeat Ganondorf
| Key Strategy |
|---|
| - Deflect Ganondorf's orb of light with your sword. - Hit it back and forth a few times to damage Ganondorf. - When he is hit, shoot him with a Light Arrow. - He will go down, so follow up with a sword attack. - Use a Light Arrow to hit him when he charges. - Break the pots below if your hearts or magic are low. |
Reflect Ganondorf's light orb with your sword to stun him, then hit him with a Light Arrow to knock him down. Attack with your sword while he is down.
Escape the Collapsing Tower Within 3 Minutes

After defeating Ganondorf, escape the collapsing tower with Princess Zelda within 3 minutes. Follow Zelda to avoid getting lost and dodge falling debris to prevent damage.
Princess Zelda Will Open the Iron Bars

Princess Zelda will open the iron-barred doors along the way. Stay with her so you don't get separated.
You Need to Defeat 2 Stalfos on the Way

Along the way, Zelda will be surrounded by fire, starting a battle with 2 Stalfos. Defeat them quickly to avoid running out of time.
Proceed to the Center of the Map

After escaping the tower and speaking with Zelda, approach the rubble in the center of the area to trigger the final boss battle against Ganon.
Defeat the Final Boss (Ganon)
| Key Strategy |
|---|
| - Get behind Ganon and attack his weak point, the tail. - Stun him with a Light Arrow and get behind him. - You can also go between Ganon's legs. - In the first half, you fight without the Master Sword. - Use Biggoron's Sword or Megaton Hammer for damage. - Use the Master Sword during the second half. |
Dodge his attacks and hit his weak point, the tail. During the first half, use the Biggoron's Sword or Megaton Hammer since the Master Sword is unavailable. Hit Ganon's face with a Light Arrow to stun him and get behind him safely.
Retrieve the Master Sword in the Second Half

After dealing enough damage, Ganon will collapse and the flames will disappear. Retrieve the Master Sword near Princess Zelda and continue the fight. The Master Sword deals the most damage, so use it for the rest of the battle.
Finish Him with the Master Sword
Once you've dealt enough damage, Ganon will collapse. Finish him off with the Master Sword to complete the fight. The ending sequence will then begin.
| ◀ Previous | Next ▶ |
|---|---|
| Spirit Temple | - |
Gold Skulltula Locations
- Ganon's Castle Skulltula Behind the broken gate to the east


Ganondorf Boss Guide

Boss Movements
| Movement | Effect |
|---|---|
| Ball of Light | Fires a ball of light that brings down the floor when it hits |
| Multi Ball of Light | Fires 5 balls of light simultaneously. Will also cause the floor to collapse when hit |
How to Defeat and Tips
- Double your magic and defense in advance
- Stock up on potions to restore magic before the fight
- Reflect energy balls back with sword attacks
- Follow up with Light Arrows once an energy ball connects
└You can use the Longshot on the red walls - Knock Ganondorf down with Light Arrows during the energy ball barrage windup
└If you can't make it in time, reflect with a Spin Attack - Head down below when things get dangerous
In the Ocarina of Time Ganondorf boss fight, reflect his energy balls back with your sword to stagger him, then follow up with Light Arrows to knock him down. Once he's down, close the gap with the Longshot and deal damage with your sword — that's the core loop. Magic is essential and incoming damage hits hard, so make sure to prepare before taking him on.
Double Your Magic and Defense
| Stat | Where to Double It |
|---|---|
| Magic Gauge | Death Mountain Crater |
| Defense | Ganon's Castle |
The Ganondorf fight deals heavy damage and magic is absolutely required to get through it. Taking a detour to double both your magic and defense beforehand will make the fight significantly easier, so it's highly recommended to power up your stats first.
Great Fairy Fountain LocationsStock Up on Magic Recovery Items
| Potion Type | Effect / Notes |
|---|---|
| Blue Potion | Fully restores health and magic Unlocked via a side event / requires an Empty Bottle |
| Green Potion | Fully restores magic Requires an Empty Bottle |
When the Ganondorf fight begins, your health is fully restored, but your magic is not. Since magic is essential to winning, make sure you have potions on hand so you can restore magic if you run out mid-fight.
Empty Bottle LocationsReflect Energy Balls Back with Sword Attacks
The majority of Ganondorf's attacks are energy ball projectiles. You can reflect them by hitting them with a sword attack at the right moment, and landing the rally a few times will send the ball into Ganondorf and stagger him. It's recommended to fight while standing on the corner platforms, which can't be destroyed during battle.
A Vertical Slash While Z-Targeting Is the Easiest Way to Reflect
The recommended way to reflect Ganondorf's energy balls is with a vertical slash. You can't use Z-targeting during the Ganondorf fight except when he's staggered or knocked down, but pressing the ZL button will change your attack motion to a vertical slash.
Follow Up with Light Arrows Once an Energy Ball Connects
When an energy ball hits Ganondorf and staggers him, it's your chance to knock him down. Fire a Light Arrow to knock him down, then close in with the Longshot and attack with your sword to deal damage. Once Ganondorf gets back up, return to the wall side and wait for the next energy ball.
The Longshot Works on the Red Walls
The recommended way to move around is by firing the Longshot at the red walls on the corners. During the Ganondorf fight, energy balls and recovery from knockdown will destroy floor tiles, reducing your footing, but using the Longshot lets you reduce the risk of taking fall damage.
Knock Ganondorf Down with Light Arrows During the Energy Ball Barrage Windup
During the energy ball barrage, you can knock Ganondorf down by hitting him with a Light Arrow during the windup animation. The windup is an easy-to-read motion where he raises both hands accompanied by a burst of intense light, and it lasts a fairly long time. This is easier to land than the rallying method, so go for it aggressively whenever you see it.
If You Can't Make It in Time, Reflect with a Spin Attack
You can also knock Ganondorf down by reflecting the energy ball barrage with a Spin Attack. If you can't get a Light Arrow off in time, aim for a knockdown by reflecting with a Spin Attack instead.
Head Below When Things Get Dangerous
During the fight, if your health or magic runs low, heading down below is always an option. Ganondorf won't attack until you return to the upper area, so you can recover safely. The area below is the same one you passed through before the fight, and the pots contain health and arrows. Just note that if you already collected everything before the battle, the pots will be empty.
Ganon Boss Guide

Boss Movements
| Movement | Effect |
|---|---|
| Mowing Strike | Mows down an area to its front with the sword |
How to Defeat and Tips
In Ocarina of Time, Ganon can be defeated by circling behind him and attacking his weak point — his tail. During the first half you cannot use the Master Sword, so make full use of equipment like Biggoron's Sword and the Megaton Hammer.
First half: fight without the Master Sword

During the opening cutscene of the battle, Ganon knocks the Master Sword out of your hands, so you must fight the entire first half without it. In addition to Biggoron's Sword and the Megaton Hammer, you can deal damage to the tail using arrows, Bombs, and Deku Nuts. Keep attacking the tail repeatedly to end the first phase.
Circle behind Ganon and attack his weak point: the tail
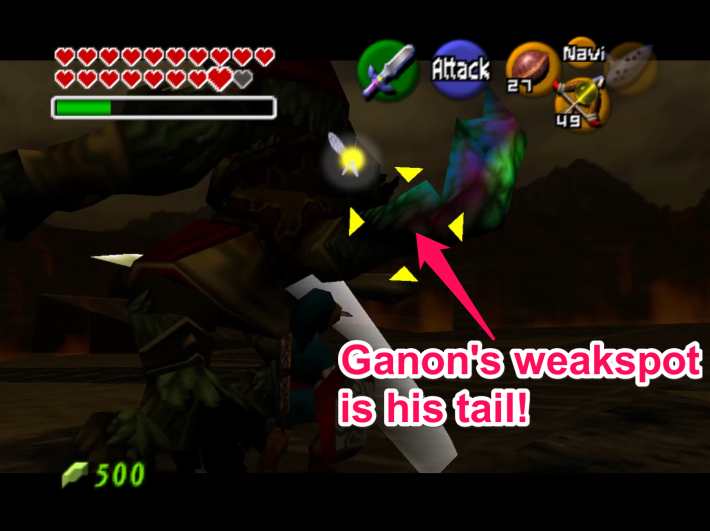
Ganon's weak point is his tail — attacking him from the front deals no damage. The basic strategy is to dodge his attacks, circle around to his back, and strike the tail.
Hit his face with a Light Arrow to stop him in his tracks
Hitting Ganon's face with a Light Arrow will stop his movement for a period of time. Use that opening to get behind him and safely attack the tail. Regular arrows, the Longshot, and Deku Nuts can also stun him briefly if you don't have Light Arrows to spare.
You can also roll between Ganon's legs
If you time it during a break in Ganon's attacks, you can run straight at him, pass between his legs, and get behind him. Use this technique when you want to conserve magic power or arrows.
Second half: attack with the Master Sword

After the first phase ends, Ganon collapses and the flames surrounding the arena disappear. Pick up the Master Sword that has fallen near Princess Zelda. In the second half Ganon's attacks become more intense, so the safest approach is to shoot his face with a Light Arrow to stop him, then get behind him and attack the tail with the Master Sword.
The Master Sword deals the most damage
In the Ganon fight, the Master Sword is the highest-damage weapon available. Make it your go-to weapon throughout the battle.
Break rubble to restock and recover
Smashing the rubble scattered around the arena can drop Fairies, Magic Jars, arrows, and Bombs. Rubble can be blown up with a Bomb, or you can bait Ganon's attacks into the rubble to destroy it. Use this whenever you run low on magic power or arrows for firing Light Arrows.
Finish him off with the Master Sword
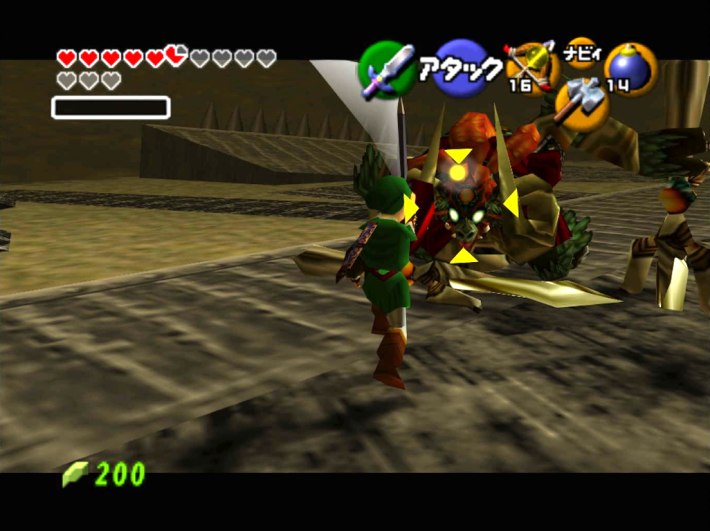
Keep attacking the tail and Ganon will eventually collapse. Deliver the final blow with the Master Sword to complete the battle.
Ocarina of Time Related Articles
 Story Walkthrough - All Chapters
 1. Opening
 2. Great Deku Tree
 3. Hyrule Castle
 4. Dodongo's Cavern
 5. Lord Jabu-Jabu
 6. Forest Temple
 7. Fire Temple
 8. Ice Cavern
 9. Water Temple
 10. Bottom of the Well
 11. Shadow Temple
 12. Gerudo Fortress
 13. Spirit Temple
 14. Ganon's Castle











