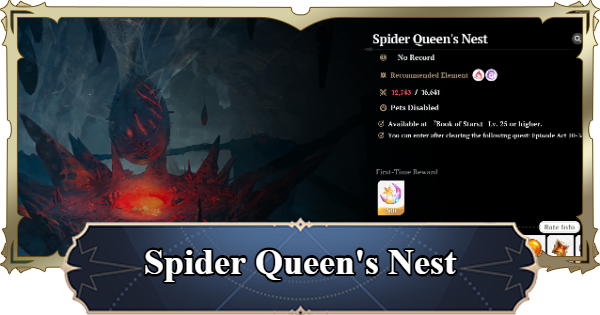
This is a guide for the Spider Queen's Nest in Seven Deadly Sins: Origin (7DSO). It covers the boss's location, recommended teams, attack patterns, battle rewards, and tips to defeat the boss efficiently.
Table of Contents
Where to Find the Spider Queen's Nest
Can be Challenged in Dungeons


The Spider Queen's Nest can be challenged from the Dungeons in the menu. To unlock Dungeons, you need to clear Main Story Act 10.
There Are Multiple Bosses
The Spider Queen's Nest has multiple bosses, and each requires a Cube Key to obtain rewards. Using a key is optional, so it's a valid strategy to defeat only the bosses you want rewards from and then leave.
Benefits of Farming the Spider Queen's Nest
Obtain Materials for Engraved Equipment

You have a chance to obtain the Revived Nightmare Top and Combat Boots, which are necessary for Crafting Engraved Equipment. The remaining pieces, the Bottoms and Belt, can be obtained as clear rewards from the Boss Challenge "Corrupted Ancient Dragon," so farm that as well.
| How to Make Engraved Equipment | Engraved Equipment List |
Obtain Large Amounts of Gold Accessories

By clearing Nightmare difficulty or higher, you have a chance to obtain a large amount of Gold Accessories that are difficult to get in other stages.
Also Great for Gold and Ingot Farming

From the Gemstone Golem along the way, you have a chance to get Ingots and their Materials. You can obtain valuable Platinum Ingots and Gold Ingots just by consuming 5 keys, so it is an effective method to farm them quickly while also earning Gold.
Sample Formations and Recommended Characters
Fire & Darkness Element Party
| Attacker | Burst Efficiency Boost | Tank | Healer |
 Meliodas MeliodasLongsword |  Tristan TristanDual Swords |  Guila GuilaSword and Shield |  Tioreh TiorehWand |
The enemies in this Dungeon are weak to Darkness and Fire Elements, so a Party combining free characters with Meliodas is recommended. If you don't have Meliodas, you can still clear it with a Fire Element formation using Lance Guila as the main Attacker.
Recommended Characters
| Recommended Character | Reason |
| Meliodas | - A Darkness Element Burst Attacker - His Axe is powerful and can be expected to deal high damage. |
| Tioreh Wand | - She is useful as a Healer and for disarming Fire Element gimmicks along the way. - The Burn her Ultimate Move can inflict is effective against the Spider Queen. |
As a Darkness Element attacker, Meliodas can deal high damage to enemies who are weak to it. The path through this dungeon is long, so we recommend using Tioreh's healing to maintain your HP while disarming Fire Element gimmicks.
Plenty Of Fire Gimmicks

In the Deep Spider Nest Dungeon, there are multiple gimmicks that cannot be passed without a Fire Element attack. Therefore, be sure to include a Fire Element character in your formation for the path to the boss. When playing multiplayer, things will go smoothly if one person on the team includes one and goes ahead.
Deep Spider Nest Strategy
Memorize the Route to the Boss

| Route Video |
| |
- Light the lighthouse with a Fire attack
- Pass through the beam gimmick with a Jump Dash
- Avoid the Spider in the center of the room and proceed
- Stick to the right wall to advance and avoid the rolling rocks
- Go out to the stairs and watch out for the rolling rock from the top left
- Defeat the Female Spider
- You don't have to defeat the Gemstone Golem (optional)
- Defeat the Soldier Spider
- Defeat the Arrogant Spider Queen Shakeera
The Deep Spider Nest Dungeon's map is more intricate than other stages, and it has many gimmicks, so be careful on your first attempt. Memorizing the map beforehand will help you proceed without getting lost.
You Can Proceed Without Defeating the Golem
You can proceed without defeating the Gemstone Golem, so it's okay to ignore it. If you're aiming for Gold or Ingots, defeat it to get the rewards.
Arrogant Spider Queen Shakeera Guide
Basic Attacks are Claw Scratch and Venom Spit
The Spider Queen's basic attacks are a claw scratch and a venom spit that deals area-of-effect (AoE) damage.
Watch the Claw's Movement for the Scratch Attack
The scratch attack can be easily dodged by observing the claw's movement. Move away from the claw that it raises.
Escape the Area of Effect for Venom's DoT
The venom spit creates a damage area that persists for a certain time where it lands. The venom always flies to the front of the Spider Queen, so it's safe to move to its side or get in close when you see the preliminary motion.
Wipe Out the Baby Spiders

Defeating the baby spiders summoned by the Spider Queen lowers the Spider Queen's Defense. This effect can stack up to 30 times, so defeating them in groups periodically allows you to deal damage efficiently. Additionally, it becomes easier to fight as there are fewer targets to distract you.
As a characteristic of the Spider Queen, the baby spiders it summons while under the Burn effect will have their Defense significantly lowered, making them easier to wipe out. Including a character that can inflict Burn will lower the difficulty of the battle.
Escape Movement Speed Reduction with Jump & Dodge
The attack that shoots red thread creates a movement-speed-reduction area in front of the Spider Queen. This itself deals no damage, but it makes subsequent attacks harder to dodge, so use Jump & Dodge to quickly escape the area.
Beware of the Rush Attack When It Creates Distance
A long attack prediction range appearing from the Spider Queen is the sign of a rush attack. If you get hit, you'll be knocked back far and take heavy damage, so be sure to dodge it. Be careful, as the rush attack may be performed consecutively.
Aim for a Counter Switch if Possible
If a counter switch is possible during the rush attack, be proactive and aim for it. It creates a chance to counterattack.
Break 3 Cocoons During its Special Move to Induce a Groggy State
When the Spider Queen clings to the ceiling in the center of the field, it's a sign of its special move. Destroy the 3 surrounding cocoons within a certain time to prevent instant-death level damage. It's recommended to destroy them using an Elemental Burst while avoiding the attacks of the exploding spiders.
If you get caught in the exploding spider's attack, you will be knocked back far, and your actions will be hindered.
Use an Ultimate Move to Survive
The time limit is strict, so if you're playing solo, you might not be able to destroy the 3 cocoons in time. In that case, using the invincibility frames of an Ultimate Move to get through it is also effective. You can avoid it by activating your Ultimate Move at the moment the stun gauge at the top of the screen disappears.
Preparing for the Deep Spider Nest
Enhance Your Characters Based on the Recommended CP

When challenging high-difficulty Dungeons or Boss Challenges, make sure to check the recommended Combat Power for that stage before attempting it. In stages with a time limit, it becomes difficult to defeat the boss in time if your Combat Power is insufficient.
Development Priority and Efficient Progression
Try Using Multiplayer
If you find it difficult to clear solo, using multiplayer is a good option. Cooperate with other players to face strong enemies and get rewards.
How to Play Multiplayer and Its Benefits
Register Potions to the Quick Slot

When challenging strong enemies like bosses, it's recommended to register healing potions to your Quick Slot beforehand. By registering them to the Quick Slot, you can instantly recover HP.
HP Recovery Effects and Healer Character List
7DS: Origin Related Guides


 Act 1
Act 1 Act 2
Act 2 Act 3
Act 3 Act 4
Act 4 Act 5
Act 5 Act 6
Act 6 Act 7
Act 7 Act 8
Act 8 Act 9
Act 9 Act 10
 Act 11
 Act 12
 Albion Guide
 Banakro Guide
 Draco King Drake Guide
 Red Demon Guide
 Corrupted Guardian Golem
 Gray Demon Guide
 Twigo Boss Guide
 Molbog Guide
 Corrupted Warden Orgot Guide
 Guila Boss Guide
 Corrupted Ancient Dragon
