Permanent Fierce Battle Area London Stage 12 guide for Kaiju No. 8 The Game. See the best teams, stage tips, clear strategies, and stage info for London Stage 12 in K8 The Game.
Table of Contents
Permanent London Stage 12 Best Teams
Best Team for the First Half
| Attacker | Support | Attacker | Support |
  Soshiro Hoshina Soshiro Hoshina |  Soshiro Hoshina Soshiro Hoshina |  Kikoru Shinomiya Kikoru Shinomiya |  Ryo Ikaruga Ryo Ikaruga |
The enemies in the first half have Slash and Blunt Plates. Stage 12 does not feature a boss, and because multiple enemies appear, you should include characters with Blast Attacks.
Alternative Characters
| Character | Reason |
 Gen Narumi Gen Narumi | - An Attacker who can reduce Slash Plates with Blast Attacks - Deals increased damage to Core Exposed Kaiju - Grants himself a DMG dealt or SPD buff based on his Ultimate Gauge |
 Kikoru Shinomiya Kikoru Shinomiya | - An Attacker who can reduce Slash Plates with Blast Attacks - Gains stacking ATK and CRIT DMG buffs (up to 3 stacks) - Provides a DEF debuff to enemies with her Ultimate |
 Soshiro Hoshina Soshiro Hoshina | - Can reduce Slash Plates with his AoE Attack - Has strong Critical Hit buffs - Increased DMG against miniature Kaiju |
 Isao Shinomiya Isao Shinomiya | - An Attacker who can reduce Blunt Plates with AoE Attacks - Deals additional Blunt damage at max Valor stacks - Can increase his own damage |
 Kaiju No. 8 Kaiju No. 8 | - An Attacker who can reduce Blunt Plates - Has strong self-buffs - Can execute small Kaiju at 50% HP or lower - His Normal Attack applies Taunt; use with caution |
 Sagan Shinomiya Sagan Shinomiya | - A Defender who can reduce Blunt Plates - Protects allies with Taunt and increased durability - Can counterattack via her Passive - Her Ultimate grants an ATK buff to allies |
 Isao Shinomiya Isao Shinomiya | - A Defender who can reduce Blunt Plates - Protects allies with a Shield - Provides a teamwide DMG dealt buff |
| Ryo Ikaruga | - Passively increases ally ATK by being on the team - Grants a DMG dealt and SPD buff |
 Kafka Hibino Kafka Hibino | - Can use a Blunt AoE Attack in Kaiju form - Gains greatly enhanced stats in Kaiju form - Anyone can raise him to A6 |
Best Team for the Second Half
| Attacker | Attacker | Attacker | Support |
| Gen Narumi |  Gen Narumi Gen Narumi |  Hikari Shinomiya Hikari Shinomiya |  Chester Lochburn Chester Lochburn |
The enemies in the second half have Slash, Shot, and Elemental Plates. Enemies appear in groups of three, and the midsized enemies have more Plates, so it is recommended to include characters with multi-target attacks or those who can easily reduce Plates.
| Character | Reason |
 Reno Ichikawa Reno Ichikawa | - Has 2 attributes: Shot and Ice. - Strong additional damage from ice crystals - Has SP recovery - Freezes enemy actions |
| Soshiro Hoshina | - Skills and Passive effects change based on his Resonance state. - In Resonance state, his damage is increased, and he deals high damage to single enemies. - In the state where Resonance is released, he performs a Blast Attack, improves Action Order, and increases the Ultimate Gauge. |
| Soshiro Hoshina | - An Attacker who can reduce Slash Plates with his AoE Attack. - Can fight effectively by granting himself damage buffs. |
| Kikoru Shinomiya | - An Attacker who can reduce Slash Plates with Blast Attacks. - Increases damage with ATK and CRIT DMG buffs that stack up to three times. - Contributes to ally damage with the Defense debuff from her Ultimate. |
 Mina Ashiro Mina Ashiro | - A Shot Attribute Attacker with self-buffs that increase her damage. - Increases CRIT Rate and gains a Shield during Bakko's turn. - Performs an Extra Attack when Bakko acts while under the Combined Forces effect. |
| Sagan Shinomiya | - A Defender who can reduce Elemental Plates. - Protects allies by Taunting and increasing her own durability. - Can counterattack with her Passive Skill. - Can also grant an ATK buff to allies with her Ultimate. |
| Soshiro Hoshina | - Provides excellent Critical Hit buffs. - A Support specializing in buffing his Battle Buddy. |
 Mina Ashiro Mina Ashiro | - A Support who can greatly increase ally damage. - Can also deal damage with her Ultimate. |
| Ryo Ikaruga | - Increases ally ATK just by being in the team. - Grants a DMG dealt and speed buff. |
 Iharu Furuhashi Iharu Furuhashi | - Can reduce Shot and Elemental Plates. - Can inflict Shock. - Contributes to damage with a Defense debuff. |
 Tae Nakanoshima Tae Nakanoshima | - An Attacker who can reduce Shot and Elemental Plates. - Her Ultimate has a fast rotation. - Can inflict Burn and deals increased damage after using her Normal Attack & Ultimate on a burning enemy. |
First Half Stage 12 Strategy Tips
First Half Strategy
- Use Slash & Blunt Multi-Target Attackers
- Beware of Shock in Wave 1
- Prioritize Defeating the Camponotus Yoju
Use Slash & Blunt Multi-Target Attackers
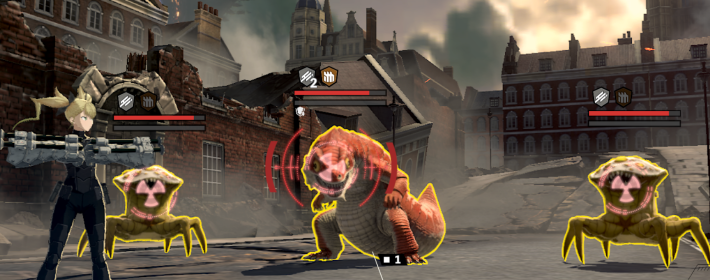
The enemies in Stage 12 have Slash and Blunt Plates in the first half. Since multiple miniature and midsized enemies will appear, use multi-target attacks like Blast to expose multiple cores simultaneously.
Element Effects and Plate Mechanics
Beware of Shock in Wave 1
The miniature "Phaneroplasmodium: Electric Subspecies" in Wave 1 inflicts Shock, a Damage-over-Time (DoT) effect. In addition to slowing its actions by inflicting Core Exposed, consider adding Akari Minase as a healer if survivability is an issue.
Prioritize Defeating the Camponotus Yoju
The miniature Camponotus Yoju in Wave 2 summons other enemies. Prioritize attacking it to inflict Core Exposed, which will slow its actions, and defeat it quickly.
Second Half Stage 12 Strategy Tips
Second Half Strategy

- Use Slash, Shot, and Elemental Characters
- Focus Skills on the Midsized Enemy
- Target the Camponotus Yoju First in Wave 2
Use Slash, Shot, and Elemental Characters
Enemies in the second half of Stage 12 have Slash, Shot, and Elemental Plates. They appear in groups of three, so it is effective to use multi-target attacks to reduce all their Plates simultaneously.
Focus Skills on the Midsized Enemy
A midsized enemy appears in the center during the second half. It has more HP and a higher Plate count than the smaller enemies. Efficiently break its Plates, then prioritize using high-damage skills to defeat it.
Target the Camponotus Yoju First in Wave 2
The small Camponotus Yoju also appears in Wave 2 of the second half. Because it summons reinforcements, prioritize inflicting Core Exposed and defeating it quickly.
Permanent London Stage 12 Strategy Tips
Efficiently Reduce Enemy Plates
In Fierce Battle Area 12, enemies have Slash and Blunt Plates in the first half, and Slash, Shot, and Elemental Plates in the second half. Efficiently break these Plates to inflict Core Exposed. This effect slows enemies and increases the damage they take, creating an ideal opening to use your Ultimates.
Level Characters to 100
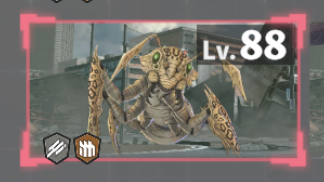
During battle, if your level is lower than the enemy's, the damage you receive will increase, making it difficult to achieve the "Win with 0 incapacitated units" objective. The enemies in Fierce Battle 12 are Level 88, so it is recommended to use characters at Level 90 or higher.
Basic Stage Information
Enemy Information
First Half Enemies

Second Half Enemies

Objectives
| Objectives |
| - Win with 0 incapacitated units - Win within a total of 12 rounds - Win within a total of 20 rounds |
Kaiju 8 The Game Related Guides


Recommended Guides
| Popular Articles | ||
|---|---|---|
| Reroll Tier List | Best Characters | Best Squads |
| Early Game Guide | Daily to Do | Paid Packs |
| Character List | Weapon List | Uniparts List |
Other Articles
 How to Reroll
 Best Free 5 Star
 Best 4-Stars
 Best Banner
 Gacha Animation
 Pulls Until Guaranteed?
 Enhance Priority
 Squad Setup
 Web Store
 Redeem Codes
 Latest Updates
 Controller Support
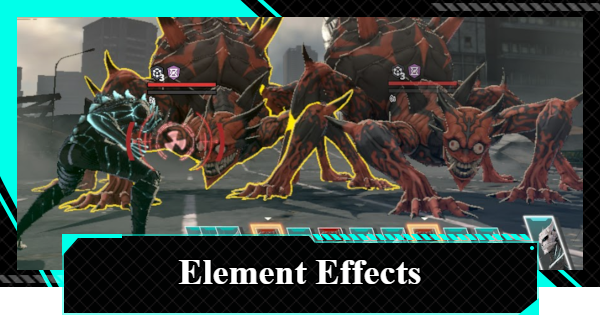 Element Effects and Plate Mechanics
 Best Store Purchases
 Action Order
 How to Disassemble Weapons
 Weapon Exchange Shop
 Uniparts Farming Guide
 Weapon Ascension
 Emblem of Defense
 Identified Kaiju Neutralization
 Kaiju Core Material
Must Reads Before Playing
| Useful Info | ||
|---|---|---|
| Pre-Registration | Required Specs | Steam Release |
| Link Data | Data Transfer | Best Settings |
| How to Fix Lagging | PS5 ver? | Voice Actors |

