 Acambe
 Afra
Afra Agata
Agata Alexei
 Auguste
 Ayishah
 Beryl
Beryl Camelot
 Caris
Caris Ciri
Ciri Clara
Clara Cocoa
Cocoa Col
Col Credenza
 Dantalion
 Edda
Edda Estra
Estra Falin
Falin Faycal
 Flavia
 Garcia
 Geralt
 Gloria
 Guzman
 Hasna
Hasna Heshan
 Homa
Homa Iggy
Iggy Inanna
 Kianshir
 Kiya
Kiya Kvare
Kvare Layla
Layla Leonide
 LilyWill
 Lukamar
 Lutfi
Lutfi Luvata
 Magnus
 Maitha
 Marcille
 Miguel
 Momo
Momo Nergal
 NonoWill
 Nungal
 Nydia
Nydia Pamina
 Parsifal
 Pooch Runrun
 Rawiyah
 Rico
Rico Safiyyah
 Samantha
 SchackLulu
 Selina
 Senshi
 Shahnaz
 Shams
Shams Simona
 SP Faycal
 SP Inanna
 SP Maitha
 SP Nungal
 SP Rawiyah
 SP Safiyyah
 SP Samantha
 Taair
Taair Teadon
 Team Meteor
 Triss
Triss Tristan
 Xavier
 Yeganeh
 Yennefer
 Yserinde
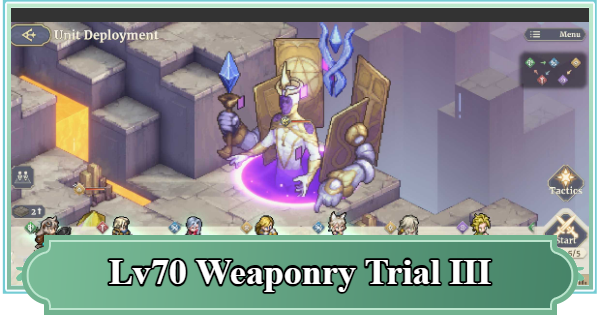
This is a guide for Weaponry Trial III (Lv.70) in Sword of Convallaria (SoC). Below are strategy points, as well as recommended characters and gear for Stage 11 Weaponry Trial III.
| Weaponry Trial Related Articles | ||
|---|---|---|
| I | II | III |
| Lv.65 | Lv.65 | Lv.65 |
| Lv.70 | Lv.70 | Lv. 70 |
Table of Contents
*This guide is based on the content of Stage 11 (Lv. 70).
Boss Overview
Calamity I "Magician"
| Calamity I "Magician" | ||
|---|---|---|
  | HP 186,168 | SPD 205 |
| P.ATK 5,133 | P.DEF 2,543 | |
| M.ATK 7,433 | M.DEF 2,543 | |
The enemy that appears in Weaponry Trial III is Calamity I "Magician". Unlike other Weaponry Trials, neither melee nor Ranged attacks are strictly prohibited, but it has the Trait of summoning enemy units. Additionally, note that Misfortune Cohesion now alternates between Magic Shields and Physical Shields.
Passive Skills of Calamity I "Magician"
- At the end of its turn, summons "Calamity Spawn
Floating Rock
(hereafter referred to as Floating Rocks)" - Gains a DMG Dealt UP buff each time a Floating Rock is defeated
- Nullifies percentage-based damage and Disruption
- Reduces DMG Taken based on the number of Floating Rocks
Calamity I "Magician" Skill Rotations
| Turn | Skills and Details |
| Note | - You need to defeat the summoned enemy "Floating Rocks" every turn. - Dispel the buff applied each time a Floating Rocks is defeated. |
| 1st Turn | [Ashes to Ashes] - Used only on the first turn. - Single-target attack. - The effects of its passive skills are nullified for 2 turns. |
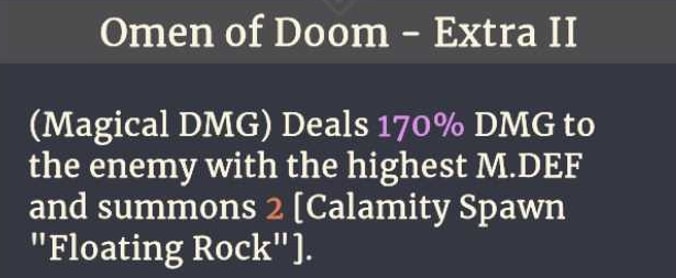
| 2nd Turn | [Omen of Doom] - Deals heavy damage to the character with the highest M.DEF. - Summons 2 Floating Rocks. - Decide in advance which character will take the hit. |
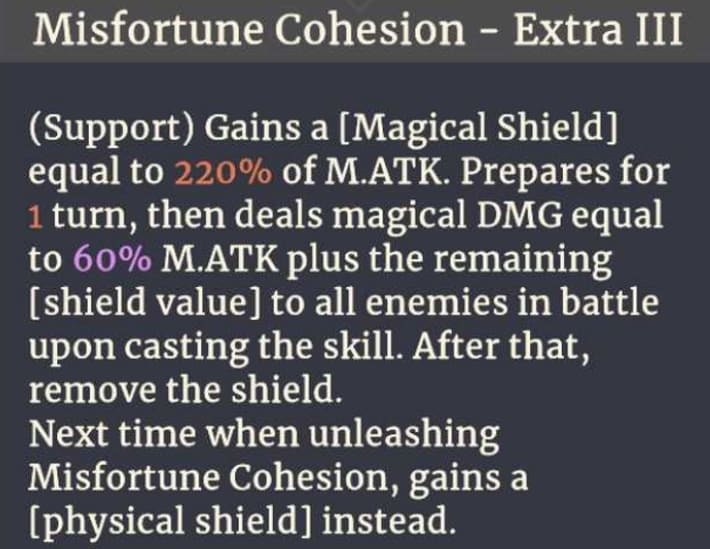
| 3rd Turn | [Misfortune Cohesion] - Gains a Magical Shield and prepares for 1 turn - After 1 turn, deals damage based on the remaining Magical Shield amount - Use M.ATK to deplete the Shield as much as possible - The second time, it changes to a Physical Shield - From the 3rd time onwards, it alternates between Magical and Physical |
| 4th Turn | [Detonates Misfortune Cohesion] - If the Physical Shield has been reduced, the damage will be low. |
| 5th Turn | [Apocalypse] - Deals heavy damage in a 3-tile target range. - Damage increases further based on the number of Floating Rocks. - Use buffs/debuffs to mitigate the damage. |
| 6th Turn+ | Repeats turns 2-5 |
Weaponry Trial III (Lv.70) Strategy Points
- Defeat Floating Rocks every turn
- Prepare a way to dispel buffs
- Include characters with high M.DEF
- Destroy the Misfortune Cohesion Shield
- Survive [Apocalypse] using buffs/debuffs
- Include a healer
Defeat Floating Rocks Every Turn

![]()
In Weaponry Trial III, you need to defeat the summoned "Floating Rock" enemies that appear at the end of the boss's turn or when it uses [Omen of Doom]. The Floating Rocks not only perform Ranged attacks but also have effects like reducing the boss's DMG Taken and increasing the damage of certain attacks, so leaving them alone will often lead to defeat.
High-Maneuver Seekers are Recommended
Use high movement Seekers like Col to quickly dispatch Floating Rocks. If you can't reach them all, we recommend using Tactical Skills like "Maneuver Command" or "Pursuit Order".
Prepare a Way to Dispel Buffs

Each time a Floating Rock is defeated, the buff "Sacrifice Ritual," which increases the boss's M.ATK by 4%, will stack. If not dispelled, the damage you take will continuously increase, so prepare a way to dispel buffs using character skills or Gear.
Include Characters with High M.DEF
To counter [Omen of Doom], which deals high damage to the character with the highest M.DEF, include "characters with high M.DEF" or "characters who can protect allies from M.ATK". It's also important to reduce the damage taken with Gear and buffs/debuffs.
Destroy the Misfortune Cohesion Shield
[Misfortune Cohesion] grants a Magical Shield the first time, and a Physical Shield the second time, then deals AoE damage after preparing for 1 turn. This damage increases the more Shield remains, so include characters who can deal high damage with the corresponding attack type to reduce the damage taken.
Decide on a Strategy for the Shield
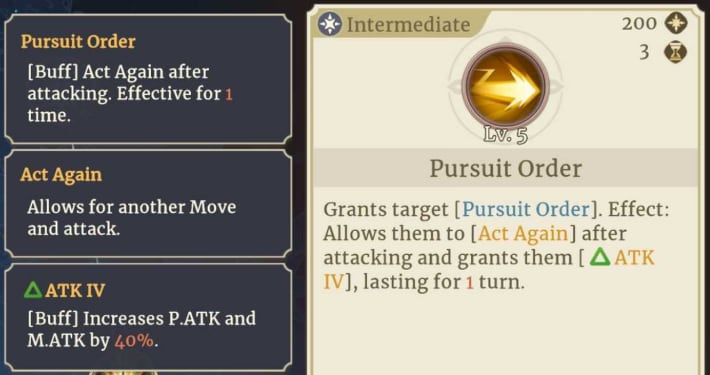
Either form a balanced team with characters focused on P.ATK and M.ATK, or aim to break the Shield with one powerful attacker using buffs/debuffs. It's also possible to use Tactical Skills like "Pursuit Order", so it's important to decide in advance how you will handle it.
Survive [Apocalypse] Using Buffs/Debuffs
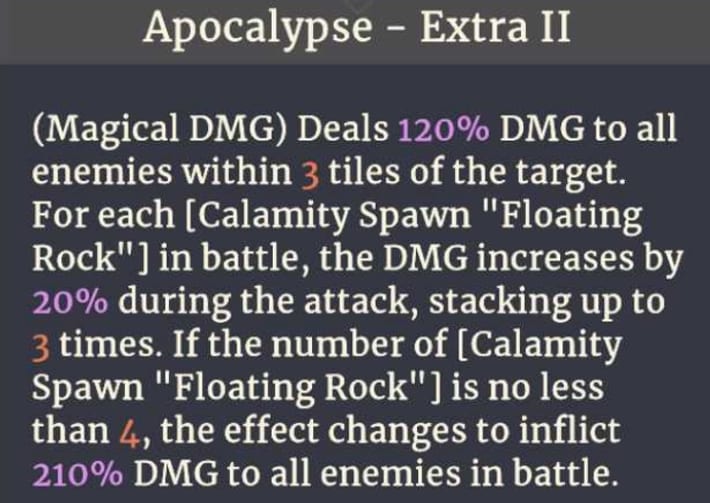
Surviving [Apocalypse], which deals high damage in a wide 3-tile target area, is of utmost importance. Dispatching all Floating Rocks is not enough; you must also make full use of buffs/debuffs to endure the attack.
Include a Healer
Unless you're aiming for a quick battle, including a character with healing skills is essential. It's important to include characters who can not only heal but also take on other roles, such as applying buffs/debuffs.
Weaponry Trial III (Lv.70) Sample Parties
Our Clear Party
 Col ColFloating Rock counter |  Gloria GloriaAttacker/Buffer |  Edda EddaAttacker/Support |
 Beryl BerylAttacker |  Cocoa CocoaHealer/Support | ー |
Although "Beryl" is the only one who can perform M.ATK, thanks to powerful buffs/debuffs from "Edda" and the Tactical Skill "Pursuit Order", she can destroy the Magical Shield by herself. For countering Floating Rocks, we use "Col" who has very high Maneuver, and for the healer, we've included "Cocoa" who has powerful buffs and a Vulnerable debuff.
Recommended Characters and Gear
Recommended Characters
Attackers
| Character | Details |
|---|---|
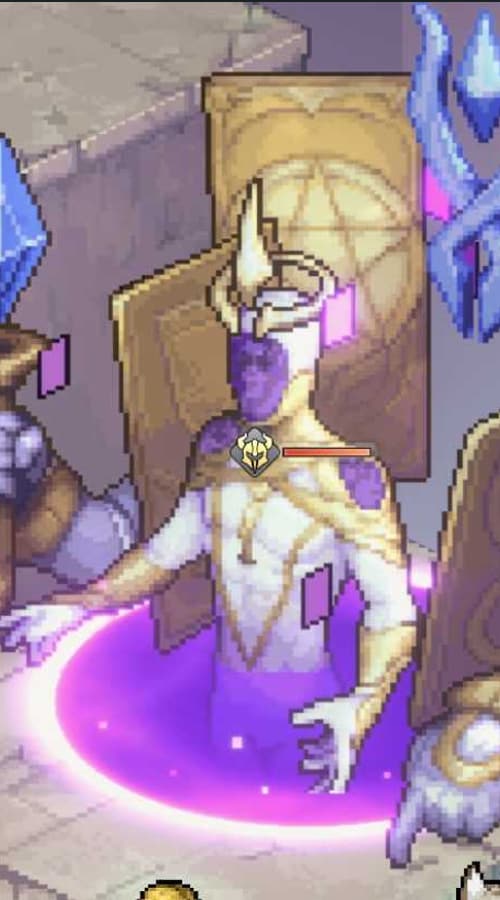
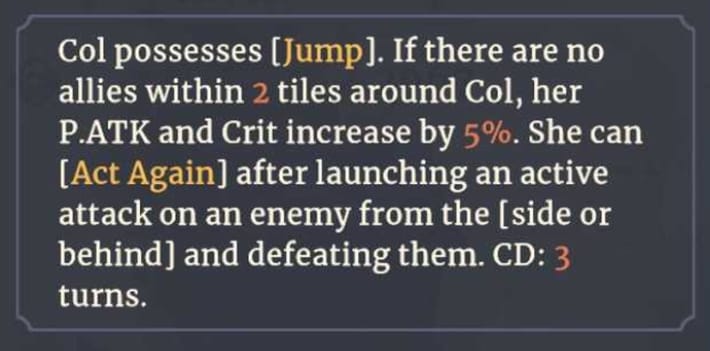
| Col | [Attacker/Floating Rock Counter] - High Maneuver and damage - Powerful Act Again on side/back kills - Can act alone due to self-healing |
 Garcia Garcia | [Attacker/Debuffer] - Increases firepower as turns pass/Floating Rocks are defeated - P.DEF DOWN debuff is also powerful - Low Maneuver among Seekers |
 Rawiyah Rawiyah | [Attacker] - High single-target damage - Strengthens "Sword of Convallaria" with Leader's Aura - High survivability with self-healing |
 Guzman Guzman | [Attacker/Debuffer/Omen of Doom Counter] - Powerful self-buffs for ATK UP/Regen - Inflicts DMG Dealt↓/DMG Taken↑ debuffs on enemies - Can protect allies from Omen of Doom |
| Beryl | [Attacker/Omen of Doom Counter] - Stable NRG + DEF-ignoring magic is powerful - DMG Taken reduction + high M.DEF to counter Omen of Doom - Be careful as she cannot break Physical Shields |
 Momo Momo | [Attacker/Floating Rock Counter] - Damage from Alert is powerful - Requires the Trinket "Hunter's Intuition" - Also has AoE reduction and Shield Break |
 Acambe Acambe | [Attacker/Buffer] - Attacks with abundant NRG - High-damage, DEF-ignoring Skill - AoE buffs are also excellent |
 Nungal Nungal | [Attacker] - Top-class single-target damage - Be careful as he has no support or healing |
 Dantalion Dantalion | [Attacker] - Recovers HP & NRG on defeating Floating Rocks - Debuff removal and Iria Faction's Leader's Aura are also powerful |
 Crimson Falcon Crimson Falcon | [Attacker/Floating Rock Counter] - High Maneuver and damage - High side/back damage to Floating Rocks - Can also inflict P.DEF DOWN |
 Divine Grace Divine Grace | [Attacker] - Self-buffs when having 3 or more buffs - Especially powerful ATK for an Epic or lower character |
 Blade Blade | [Attacker/Floating Rock Counter] - Self-buffs when having 3 or more buffs - Can dispel buffs with Trait - Maneuver is also high |
 K.A. Pikeman K.A. Pikeman | [Attacker/Debuffer] - Stats UP when many allies are nearby - Can also dispel buffs - DEF DOWN/DMG Taken UP debuffs are excellent |
 Iggy Iggy | [Attacker/Floating Rock Counter] - Many ways to increase Move - Also has an Instant movement Skill - DMG Dealt is lower when movement Skill is equipped |
 Faycal Faycal | [Attacker/Debuffer] - High damage with [Gale - Billow Volley] - Powerful debuff application via Trait - Support like NRG Recovery and cost reduction is essential |
 Safiyyah Safiyyah | [Attacker/Debuffer] - High damage with Pursuit and summons - Inflicts P.DEF/M.DEF DOWN - Be careful not to let the Summoned Unit be defeated |
 Auguste Auguste | [Attacker/Debuffer] - Top-class single-target damage - Can inflict P.DEF DOWN - Recommended even for quick battle strategies |
 Hasna Hasna | [Attacker/Debuffer] - Attacker with powerful critical hits - Inflicts ATK/DEF DOWN + Crit Rate Taken UP - Excellent NRG Recovery allows using skills every turn |
 Agata Agata | [Attacker/Debuffer] - High single-target damage - DMG Taken UP + SPD DOWN debuff - High Maneuver allows for handling Floating Rocks |
 SP Rawiyah SP Rawiyah | [Attacker/Debuffer] - High single-target damage via Act Again - Inflicts multiple debuffs simultaneously with attacks - Handles Floating Rocks with Act Again |
Buffers/Debuffers
| Character | Details |
|---|---|
| Gloria | [Attacker/Buff] - Strengthens allies with multiple buffs - High attack performance in Sword mode |
 Inanna Inanna | [Healer/Buff] - Powerful Act Again for main attacker - Can also heal |
| Edda | [Attacker/Buff] - Powerful high-effect DMG Dealt/MDEF UP - Also active as an attacker - Liquor panel change is very powerful |
 Magnus Magnus | [Attacker/Debuff] - Reduces enemy ATK & DEF with Trait - Applies debuffs to enemies and buffs to allies with passive |
 NonoWill NonoWill | [Debuff] - Powerful DMG Taken +30% debuff - Excellent 99% reduction of AoE attacks - Attack performance is modest |
 Homa Homa | [Buff/Debuff/Healer] - Has 2 types of healing Skills - Powerful PDEF DOWN debuff - High damage dealt with Pursuit |
 Caris Caris | [Buff/Debuff] - Can apply Magical Shield - Randomly applies 3 Lv2 debuffs - MDEF -60% debuff is also powerful |
 Abyss Abyss | [Debuff/Omen of Doom Countermeasure] - Very rich in ways to apply debuffs - High MDEF, can also counter Omen of Doom |
 Night Raven Night Raven | [Debuff/Omen of Doom Countermeasure] - Very rich in ways to apply debuffs - High MDEF, can also counter Omen of Doom - Contributes to Shield destruction with high damage |
Healers
| Character | Details |
|---|---|
| Cocoa | [Buff/Healer] - Powerful Crit support and CD/Cost reduction - Abundant healing Skills - Can also apply DMG Taken UP debuff |
 Samantha Samantha | [Healer/Buff] - Stable NRG supply with NRG Restoration - Heals without consuming a turn due to passive - Also has AoE healing & buffs |
 Angel Angel | [Healer/Buff] - Can apply buffs while healing - Has a 0 CD AoE heal - Additional NRG Recovery by taking damage |
 Butterfly Butterfly | [Healer/Buff] - Has a 0 CD AoE heal - Powerful DMG Dealt UP & Life Steal |
 Flare Flare | [Healer] - Can attack and heal at the same time - Also has a buff removal Skill |
Recommended Gear and Tarot
| Gear | Details |
|---|---|
 Redemption of The Judgment Redemption of The Judgment | - A Tarot that dispels buffs from nearby enemies. - Equipping it on one person gives an advantage. |
 Temptation of The Devil Temptation of The Devil | - ATK/DEF UP each time a Floating Rocks is defeated. |
 Hierophant's Laws Hierophant's Laws | - Reduces AoE damage. - Increases performance of single-target attacks/heals. |
 Disaster Bottle Disaster Bottle | - Can apply debuffs multiple times. - Effective when held by multiple people. |
 Tuning Hammer Tuning Hammer Antimagic Axe Antimagic Axe | - Dispels buffs on attack. - Attack performance is modest. |
 Fancy Hat Fancy Hat | - Increases M.DEF when Healthy. - Recommended if you want to increase durability. |
 Coexist Armor Coexist Armor | - Reduces DMG Taken when Healthy. - Recommended if you want to increase durability. |
 Rejection Mask Rejection Mask | - Reduces magical DMG taken. - Recommended if you want to increase durability. - Be aware of the CD. |
Recommended Tactical Skills
| Tactical Skills | Details |
|---|---|
 | - Strengthens surrounding allies - Additional NRG recovery and CD-1 are especially powerful - Allows for stable battles |
 | - Greatly increases damage taken by enemies - Essential when aiming for a quick battle |
 | - Move +2 for 2 turns - Useful for dealing with Floating Rocks |
 | - Act Again + ATK UP - Used for Floating Rock countermeasures or on attackers |
 | - Warps a character to any position - Useful for Floating Rock countermeasures or sudden retreats - Also has an HP recovery effect |
Basic Stage Information
Obtain Gear as Rewards
In Weaponry Trial 3, you can obtain Gear such as Weapons and Trinkets as rewards. The rarity of the Gear increases in proportion to the stage difficulty, so aim to clear higher difficulty stages.
Tarot Cannot Be Obtained
Tarot will not appear as rewards from Weaponry Trial 3. If you want to collect Tarot, challenge "Tarot Residual".
Epic or Higher Rewards
Reward Weapons
 Double-Sided Halberd
 Doomsday Scythe
 Hollow Axe
 Starry Sky Heritage
 Skeleton Staff
 Ever-Burning Blade
 Nameless Staff
 Longbow of Martyrs
 Resentment Broom
 The Silent Guard
 Diffusing Prism
 Armor-piercing Spear
 Formidable Axe
 Hunting Bow
 Ink Totem
Reward Trinkets
 Evergreen Pendent Evergreen Pendent |  Spring Tonic Spring Tonic |  Mist Necklace Mist Necklace |
| Disaster Bottle | - | - |
Weaponry Trial 3 Basic Information
| Victory Condition | Defeat Calamity I "Magician" |
| Mission Objective 1 | Clear the stage |
| Mission Objective 2 | Clear within 15 turns |
| Mission Objective 3 | 2 or fewer incapacitated allies |
Sword of Convallaria (SoC) Related Articles

Spiral of Destinies
| Eternal Awakening | Night Crimson Guide | Sand-made Scales Guide |
| Hero's Quest Chronicles | - | - |
Weaponry Trials
| I | II | III |
|---|---|---|
| Lv.65 | Lv.65 | Lv.65 |
| Lv.70 | Lv.70 | Lv.70 |

