 Acambe
 Afra
Afra Agata
Agata Alexei
 Auguste
 Ayishah
 Beryl
Beryl Camelot
 Caris
Caris Ciri
Ciri Clara
Clara Cocoa
Cocoa Col
Col Credenza
 Dantalion
 Edda
Edda Estra
Estra Falin
Falin Faycal
 Flavia
 Garcia
 Geralt
 Gloria
 Guzman
 Hasna
Hasna Heshan
 Homa
Homa Iggy
Iggy Inanna
 Kianshir
 Kiya
Kiya Kvare
Kvare Layla
Layla Leonide
 LilyWill
 Lukamar
 Lutfi
Lutfi Luvata
 Magnus
 Maitha
 Marcille
 Miguel
 Momo
Momo Nergal
 NonoWill
 Nungal
 Nydia
Nydia Pamina
 Parsifal
 Pooch Runrun
 Rawiyah
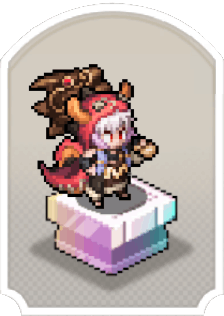 Rico
Rico Safiyyah
 Samantha
 SchackLulu
 Selina
 Senshi
 Shahnaz
 Shams
Shams Simona
 SP Faycal
 SP Inanna
 SP Nungal
 SP Rawiyah
 SP Safiyyah
 SP Samantha
 Taair
Taair Teadon
 Team Meteor
 Triss
Triss Tristan
 Xavier
 Yeganeh
 Yennefer
 Yserinde
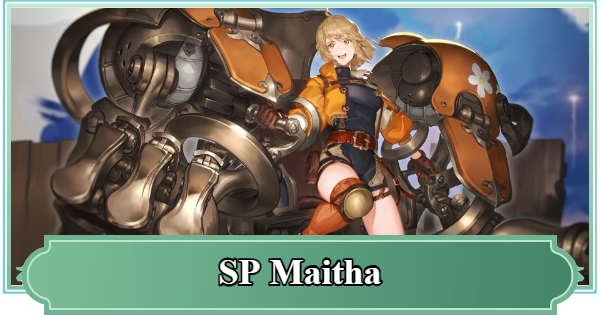
Build and skill tree guide for SP Maitha in Sword of Convallaria (SoC). See the best gear (weapon/trinket/tarot), skin, tier, and review here!
Table of Contents
| Maitha Variants | |
|---|---|
 Maitha (Original) Maitha (Original) | SP Maitha |
SP Maitha's Tier & Basic Info
 | |
| Rarity |  Legendary Legendary |
|---|---|
| Role |  Watcher Watcher |
| Faction |  Sword of Convallaria Sword of Convallaria Iria Iria Fortitude Fortitude |
Movement Stats
| Move | Stand | High Jump | Low Jump |
|---|---|---|---|
| 3 | Normal | 2 | 2 |
SP Maitha's Tier
| Overall Rating | Reroll Rating | ||||
|---|---|---|---|---|---|
▶ Character Tier List | ▶ Reroll Tier List | ||||
| Single-Target Rating | Multi-Target Rating | ||||
User Score
Review & How to Get
| Review | - Excels at Piercing AoE DMG - Activates Rally Responses with Rally Command - Takes a portion of DMG to Allies - Greatly boosts SoC Faction |
|---|---|
| How to Get | - Obtain from Gacha (Summon) |
SP Maitha Pros and Strength
SP Maitha's Character Overview
- AoE Piercing DMG Specialist
- Rally Command Triggers Extra Effects
- Greatly Empowers SoC Faction Units
- Viable Support and Damage Sharing
- Conditional DMG and Low Mobility
AoE Piercing DMG Specialist
SP Maitha excels at using AoE attacks that deal Piercing DMG, allowing her to deal consistent amounts of damage even against enemies with high DEF or Shields.
Furthermore, thanks to her Trait's [DMG Buffer Module], she can reduce damage taken by 40-60% (depends on Star Level), making her a durable, strong front-line presence.
Supreme Shield of Convallaria DetailsTrait Breakdown
| Trait Effect | Details |
| DMG Buffer Module | A gauge equal to her Max HP is displayed. Reduces damage taken by 40-60% (varies with Star Level Up), and the mitigated damage is stored in the gauge. When the gauge is full, damage can no longer be reduced. Filling the gauge accumulates [Co-op Charging] stacks (max 100). For each stack, P.ATK increases by 0.2-0.4% of Max HP (varies with Star Level). It's possible to manipulate the gauge with certain Skills. Some Skills also have effects that activate based on the gauge level. Filling it up boosts attack performance with [Co-op Charging], but once it's full, damage can't be reduced, lowering durability. Proper management according to the situation is necessary. |
| Sword of Convallaria, Unite! | Leader's Aura Lv. 1 Effect (1~2-stars): Increases ATK by 10% and DEF by 20% for all Sword of Convallariaallies in battle. Increases DMG dealt and [piercing DMG] dealt by 10%. Lv. 2 Effect (3-stars):Increases ATK by 10% and DEF by 20% for all Sword of Convallariaallies in battle. Increases DMG dealt and [piercing DMG] dealt by 10%. ✦ When [Rally Response] is triggered for the first time each round, recovers 1 NRG. Lv. 3 Effect (4~5-stars): Increases ATK by 10% and DEF by 20% for all Sword of Convallariaallies in battle. Increases DMG dealt and [piercing DMG] dealt by 10%; additionally increases by 10% if [Rally Response] skill is triggered. ✦ When [Rally Response] is triggered for the first time each round, recovers 1 NRG. |
Additionally, SP Maitha's [Rally Command] skills can self-trigger her [Rally Response] skills.
Rally Command Triggers Extra Effects
Some Skills have the [Rally Command] tag, and activating it can automatically trigger Skills with the [Rally Response] effect from herself or allies.
For example, by equipping [Full-Armored Attack!], [Whirling Hammer], and [Peak Performance], and then using the Rally Command Skill [Full-Armored Attack!], the Rally Response of all equipped skills will activate, dealing Piercing DMG to surrounding enemies twice and triggering NRG Recovery effects.
| Note! | As more characters with [Rally Response]s are added in the future, SP Maitha, who possesses Rally Command, may become an essential unit. |
|---|
Rally Responses of Sword of Convallaria

[Full-Armored Attack!] grants Rally Response to allies of the Sword of Convallaria
Faction, so by positioning units correctly, it's possible to trigger multiple instances of Piercing DMG, dealing overwhelming total damage.
Greatly Empowers SoC Faction Units

Because part of her Trait includes the Leader's Aura Sword of Convallaria, Unite!
, she can constantly provide significant buffs to allies of the Sword of Convallaria faction. Therefore, she is expected to strengthen not only existing characters but also future characters added to the faction.
Viable Support and Damage Sharing

She can also act as a support character through the damage reduction from [DMG Buffer Module] and the healing/buffs/taking 50% of an ally's damage from [Field Medic]. Since she can absorb damage on the front lines while buffing allies, she allows other Attackers to shine.
Conditional DMG and Low Mobility
While SP Maitha is a powerful attacker on her own, to unleash her true potential, you need to properly trigger allies' [Rally Response] effects. Additionally, her Move is low at 3, and while this can be somewhat compensated for by equipping [Bulwark Charge], she still needs mobility supports such as Taair or even Yennefer.
Star Level Up Priority & Recommended Stars for SP Maitha
Aim to Reach 3★ → 4★ → 5★
| Star Level Up Priority | Recommended Star Level |
|---|---|
| 3★ → 4★ → 5★ |
At 3-stars and 4-stars, the effect of the Sword of Convallaria, Unite! Aura increases, so if you want to strengthen the Sword of Convallaria Faction, you should prioritize Star Level Ups. At 5-stars, NRG consumption is reduced, making skill use much more manageable.
Shard Farming Priority GuideBest Builds for SP Maitha
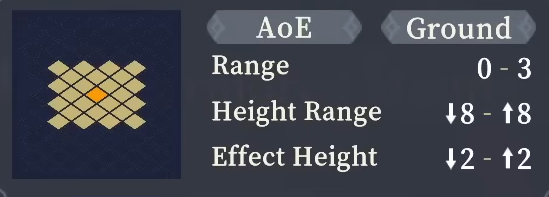
AoE Piercing DMG Build
| Basic Attack | Reaction | Ascension | |||||||||||||||||||||
|---|---|---|---|---|---|---|---|---|---|---|---|---|---|---|---|---|---|---|---|---|---|---|---|
 Arm Slam Arm Slam |  Reinforced Joints Reinforced Joints |  Will of Unbreakable Steel Will of Unbreakable Steel | |||||||||||||||||||||
| Skill | |||||||||||||||||||||||
 Full-Armored Attack! Full-Armored Attack! |  Whirling Hammer Whirling Hammer |  Peak Performance Peak Performance | |||||||||||||||||||||
| Weapon | Trinket | Tarot | |||||||||||||||||||||
 Supreme Assault Blade Supreme Assault Blade |  Deceptive Shadow Deceptive Shadow |  Murmur of Death Murmur of Death | |||||||||||||||||||||
This is a build that excels in using AoE Piercing DMG. At 5-stars, by replacing [Peak Performance] with [Full-Armored Maitha, Attack!], you can further increase damage dealt with stacks during [Co-op Charging].
Tank/Support Build
| Basic Attack | Reaction | Ascension | |||||||||||||||||||||
|---|---|---|---|---|---|---|---|---|---|---|---|---|---|---|---|---|---|---|---|---|---|---|---|
| Arm Slam |  Spiky Shield Spiky Shield | Will of Unbreakable Steel | |||||||||||||||||||||
| Skill | |||||||||||||||||||||||
 Field Medic Field Medic | Whirling Hammer |  Emergency Toolbox Emergency Toolbox | |||||||||||||||||||||
| Weapon | Trinket | Tarot | |||||||||||||||||||||
 Great Company on the Journey Great Company on the Journey | Deceptive Shadow |  Silence of The Hermit Silence of The Hermit | |||||||||||||||||||||
This is a build that supports allies by utilizing damage reduction from the Trait [DMG Buffer Module] and by equipping many Skills that excel at support. From the front lines, you can heal allies and apply numerous buffs while also taking 50% of the damage they receive.
Priority Skills
| Skill | Priority and Details |
|---|---|
| Full-Armored Attack! | ★★★★★ A powerful Skill that, in addition to dealing AoE Piercing DMG, causes allies of the |
| Whirling Hammer | ★★★★ Because it has Rally Response, this Skill is very powerful, as it can automatically activate after a Rally Command if you have enough NRG. Include it in your build if the character is 5-stars or you have sufficient NRG support. |
| Peak Performance | ★★★★ A Passive Skill with an NRG Recovery effect that can also be triggered by Rally Response. It is especially useful for supporting the high NRG Cost of [Full-Armored Attack!], particularly at 4-stars or below, making it a high-priority choice. |
| Reinforced Joints | ★★★★ A Reaction that grants Regeneration and increases the conversion effectof the DMG Buffer Module. This is generally the preferred Reaction for most builds. |
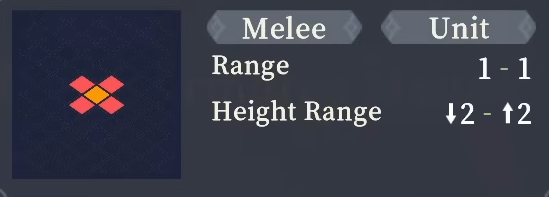
| Arm Slam | ★★★★ A Basic Attack that activates a Rally Command. This is generally the recommended Basic Attack for most builds. |
| Skill | Priority and Details |
|---|---|
 Bulwark Charge Bulwark Charge | ★★★ A Skill whose Passive increases Move by +1 and allows the user to perform a Charge. It helps compensate for SP Maitha's low Move, making it useful for stages that require greater mobility. |
| Field Medic | ★★★ This Passive redirects 50% of the damage taken by allies within 3 tiles of the user, and its activation grants multiple buffs and healing effects. It is a cornerstone Skill for support and tank builds. |
 Feverish Attack Feverish Attack | ★★★ A Basic Attack that can hit enemies from a Ranged distance. While it has situational advantages, the other Basic Attack is generally preferred. |
 Full-Armored Maitha, Attack! Full-Armored Maitha, Attack! | ★★★ A Passive that greatly increases SPD and raises charge value to the maximum. This allows you to fully benefit from the [Co-op Charging] buff starting from turn one, significantly boosting attack performance. Recommended at 5-stars or when reliable NRG supply is available. |
| Emergency Toolbox | ★★ A Decision Skill that lets you choose between [Field Repair Unit], which provides an instant heal and a durability buff for support and tank builds, and [Enhanced Charging Unit], which increases charge value and grants an attack buff for AoE-focused builds. Generally recommended for tank builds. |
| Spiky Shield | ★★ A Reaction that reduces damage taken and performs a Strike Back when hit by a Melee attack. Useful in tank builds or when clearing low-difficulty stages. |
 Maitha's Combo Maitha's Combo | ★★ This Skill can deal very high single-target damage, but its long cooldown of 4 makes it somewhat difficult to use consistently. Consider it for builds focused on single-target damage or Knockback. |
 Crystal Burst Twin-Shot Crystal Burst Twin-Shot | ★ A high-damage attack Skill that can Knockback enemies from a Ranged distance. Use it in stages where Knockback mechanics are required. |
 Field Field | ★ Use this Skill in tank builds when you want to reduce damage taken from AoE attacks. |
Recommended Gear, Tarots, & Engravings
Recommended Weapons for SP Maitha
| Supreme Assault Blade |  Tuning Hammer Tuning Hammer | Great Company on the Journey |
Since many of SP Maitha's effects scale with HP and P.ATK, she has strong synergy with Gear that increases these stats. Supreme Assault Blade is especially recommended for a Piercing DMG build, while Great Company on the Journey is particularly well-suited for a Support build.
Recommended Trinkets for SP Maitha
| Deceptive Shadow |  Shield of Justice Shield of Justice |  Maverick's Cloak Maverick's Cloak |
To increase Piercing DMG, Trinkets that increase ATK are highly recommended. Note that when using Shield of Justice, SP Maitha's Physical Shield may sometimes prevent the DMG Buffer Module from building up. In addition, Trinkets that increase HP or enhance Move also pair well with this build.
Recommended Tarots for SP Maitha
| Murmur of Death |  Temptation of The Devil Temptation of The Devil |  The Fool's Naivety The Fool's Naivety |
Death which increases Piercing DMG, and Devil, which boosts overall stats, are especially recommended. Other solid options include Hermit for increased durability in support builds, and Fool which increases HP.
Recommended Engravings for SP Maitha
| Resonance | Effect |
|---|---|
 Sword Sword Wand Wand | Before actively attacking, for each 1 tile traversed, increases ATK and DEF by 4%, up to 12%. The effect lasts until the start of the next turn, |
| Wand Wand | After using a [basic attack], [skill], [strike back], or [assisting attack], gains 1 random [Level 2 Attribute Buff]. |
Wand Cup Cup | At the end of the turn, there is a 50% chance to gain [Engraving Resonance]. Effect: When using an [active skill] next time, refunds the NRG consumed and resets the CD. The skill effect has a CD of 4 turns. (Does not trigger in real-time combat. The effect changes to increasing HP, ATK and DEF by 5%) |
Recommended combinations include Sword + Wand to increase stats, Wand + Wand to gain many buffs, and Wand + Cup to reduce NRG consumption.
SP Maitha Skill Unlock Priorities
Recommended Skill Set
* Tap a skill to view its details below.
Normal | RK13 | Unique |
|---|---|---|
| Field | RK11 | Full-Armored Maitha, Attack! |
| Feverish Attack | RK9 | Arm Slam |
| Field Medic | RK7 | Full-Armored Attack! |
| Reinforced Joints | RK5 | Spiky Shield |
| Emergency Toolbox | RK3 | Peak Performance |
| Bulwark Charge | RK1 | Crystal Burst Twin-Shot |
This is an example of an AoE Piercing DMG-focused build. We generally recommend this build.
Skill Details
| Bulwark Charge | Cost: 1 CD: 0 |
| (Piercing DMG) ✦ | |
 | |
| Crystal Burst Twin-Shot | Cost: 2 CD: 0 |
| (Piercing DMG) | |
 | |
| Emergency Toolbox | Cost: 0 CD: 2 |
| (Decision) Selects to use | |
 | |
| Peak Performance | Cost: - CD: - |
| (Passive) At the end of the turn, additionally recovers 1 NRG; when NRG is 0, additionally recovers 1 NRG. ✦ Gains | |
| Reinforced Joints | Cost: - CD: - |
| (Reaction) When having | |
| Spiky Shield | Cost: - CD: - |
| (Reaction) When hit by an active attack, the DMG taken is decreased by 10%. When receiving an Active Melee Attack, deals | |
| Field Medic | Cost: 3 CD: 0 |
| (Healing) ✦ | |
 | |
| Full-Armored Attack! | Cost: 4 CD: 0 |
| (Piercing DMG) ✦ Then, makes all Sword of Convallariaallies perform additional | |
 | |
| Feverish Attack | Cost: - CD: - |
| (Basic Attack) Deals 100% physical DMG and gains 20% | |
 | |
| Arm Slam | Cost: - CD: - |
| (Basic Attack) | |
 | |
| Field | Cost: - CD: - |
| (Aura) Decreases | |
| Full-Armored Maitha, Attack! | Cost: - CD: - |
| (Passive) Increases SPD by 200. At the start of the round, fills all | |
| Will of Unbreakable Steel | Cost: - CD: - |
| (Passive) | |
SP Maitha's Trait & Skills
SP Maitha's Trait
| Trait | Max Effect |
|---|---|
| [Supreme Shield of Convallaria] ✦ Increases max HP by 30%. ✦ ✦ Increases |
| Stars Unlocked | Effect |
|---|---|
 | ✦ Increases max HP by 25%. ✦ ✦ Increases |
 | ✦ Increases max HP by 20%. ✦ ✦ Increases |
 | ✦ Increases max HP by 15%. |
 | ✦ Gains ✦ At the start of the turn, gains corresponding stacks of ✦ The character's ✦ Increases max HP by 10%. |
SP Maitha's Base Skills
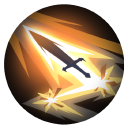
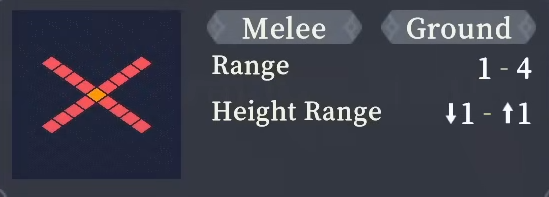
| Skill | Range |
|---|---|
 Slash Slash |  |
| [Basic Attack] Cost: - / CD: - (Basic Attack) Deals 100% Physical DMG. | |
| Whirling Hammer |  |
| [Skill] Cost: 1 / CD: 0 (Piercing DMG) Deals ✦ Gains | |
SP Skill
| Skill | Range |
|---|---|
 Maitha's Combo Maitha's Combo |  |
| [Skill] Cost: 2 / CD: 4 (Physical DMG) Maitha deals 20% DMG 1 time, 50% DMG 3 times, and she knocks the target back by 2 tiles. | |
When Maitha (Original) learns RK11 [Maitha's Combo] and SP Maitha is enhanced to 3-star, the SP Skill is unlocked.
Skills That Can Be Learned at RK1
| Skill | Range |
|---|---|
| Bulwark Charge | |
| [Skill] Cost: 1 / CD: 0 (Piercing DMG) ✦ | |
| Crystal Burst Twin-Shot | |
| [Skill] Cost: 2 / CD: 0 (Piercing DMG) | |
Skills That Can Be Learned at RK3
| Skill | Range |
|---|---|
| Emergency Toolbox | |
| [Skill] Cost: 0 / CD: 2 (Decision) Selects to use | |
| Peak Performance | - |
| [Skill] Cost: - / CD: - (Passive) At the end of the turn, additionally recovers 1 NRG; when NRG is 0, additionally recovers 1 NRG. ✦ Gains | |
Skills That Can Be Learned at RK5
| Skill | Range |
|---|---|
| Reinforced Joints | - |
| [Reaction] Cost: - / CD: - (Reaction) When having | |
| Spiky Shield | - |
| [Reaction] Cost: - / CD: - (Reaction) When hit by an active attack, the DMG taken is decreased by 10%. When receiving an Active Melee Attack, deals | |
Skills That Can Be Learned at RK7
| Skill | Range |
|---|---|
| Field Medic | |
| [Skill] Cost: 3 / CD: 0 (Healing) ✦ | |
| Full-Armored Attack! | |
| [Skill] Cost: 4 / CD: 0 (Piercing DMG) ✦ Then, makes all Sword of Convallariaallies perform additional | |
Skills That Can Be Learned at RK9
| Skill | Range |
|---|---|
| Feverish Attack | |
| [Basic Attack] Cost: - / CD: - (Basic Attack) Deals 100% physical DMG and gains 20% | |
| Arm Slam | |
| [Basic Attack] Cost: - / CD: - (Basic Attack) | |
Skills That Can Be Learned at RK11
| Skill | Range |
|---|---|
| Field | - |
| [Skill] Cost: - / CD: - (Aura) Decreases | |
| Full-Armored Maitha, Attack! | - |
| [Skill] Cost: - / CD: - (Passive) Increases SPD by 200. At the start of the round, fills all | |
Skills That Can Be Learned at RK13
| Skill | Range |
|---|---|
| Will of Unbreakable Steel | - |
| [Ascension Skill] Cost: - / CD: - (Passive) | |
Weapons That SP Maitha Can Equip
List of Weapons
 Brutal Axe
 Hollow Axe
 Denial Hammer
 Feast Axe
 Cornucopia Axe
 Gale Sword
 'Barbecue' Hammer
 Hammer Dragon Rise
 Surtr the Darkfire Axe
 Undying Flames
 Oathkeeping Star
 Formidable Axe
 Antimagic Axe
 Balanced Heavy Axe
 Battle-Hardened Axe
 Heavy Iron Axe
 Iron Axe
SP Maitha's Voice Actor & Release Date
SP Maitha Voice Actor
| VA | Japanese VA: Sayumi Suzushiro |
|---|
Released on Friday, January 23
SP Maitha was released on Friday, January 23. Since the character is added to the standard banner, they can still be obtained even after the limited-time banner ends.
SP Maitha's Skin
| Initial | Ascended |
|---|---|
 |  |
▲ Unlock Ascended Skin when character reaches Star Level 5.
After the victory of Iria, the leader's duties with the Convallaria Trading Post required constant travel. Maitha had grown tremendously through wartime trials, and everyone elected her as deputy leader. Warm and energetic, Maitha considers every person's needs while handling responsibilities with newfound maturity and skill. She transformed from an eager assistant into the capable Commander Maitha. During the first Convallaria Festival in peacetime, Maitha piloted a set of heavy armor with amazing strength to rescue the Mercenary Group from the crisis that could have caused devastating damage. Her sincere action earned everyone's devotion. While she carefully tends to others, they spontaneously support her in return.
As Iria embraces peace and rebirth, Maitha shines like morning sunlight with vibrant hope. She represents the new generation's boundless energy and potential. Her fully-armored form will serve as an unshakeable foundation for both the Town and the Mercenary Group. More than that, the Full- Armored Maitha is now charging toward the future alongside the new Iria!

