 Acambe
 Afra
Afra Agata
Agata Alexei
 Auguste
 Ayishah
 Beryl
Beryl Camelot
 Caris
Caris Ciri
Ciri Clara
Clara Cocoa
Cocoa Col
Col Credenza
 Dantalion
 Edda
Edda Estra
Estra Falin
Falin Faycal
 Flavia
 Garcia
 Geralt
 Gloria
 Guzman
 Hasna
Hasna Heshan
 Homa
Homa Iggy
Iggy Inanna
 Kianshir
 Kiya
Kiya Kvare
Kvare Layla
Layla Leonide
 LilyWill
 Lukamar
 Lutfi
Lutfi Luvata
 Magnus
 Maitha
 Marcille
 Miguel
 Momo
Momo Nergal
 NonoWill
 Nungal
 Nydia
Nydia Pamina
 Parsifal
 Pooch Runrun
 Rawiyah
 Rico
Rico Safiyyah
 Samantha
 SchackLulu
 Selina
 Senshi
 Shahnaz
 Shams
Shams Simona
 SP Faycal
 SP Inanna
 SP Maitha
 SP Nungal
 SP Rawiyah
 SP Safiyyah
 SP Samantha
 Taair
Taair Teadon
 Triss
Triss Tristan
 Xavier
 Yeganeh
 Yennefer
 Yserinde
Build and skill tree guide for Team Meteor in Sword of Convallaria (SoC). See the best gear (weapon/trinket/tarot), skin, tier, and review here!
Table of Contents
Team Meteor's Tier & Basic Info
 | |
| Rarity |  Legendary Legendary |
|---|---|
| Role |  Watcher Watcher |
| Faction |  Papal States Papal States Fortitude Fortitude |
Movement Stats
| Move | Stand | High Jump | Low Jump |
|---|---|---|---|
| 3 | Normal | 2 | 2 |
Team Meteor's Tier
| Overall Rating | Reroll Rating | ||||
|---|---|---|---|---|---|
▶ Character Tier List | ▶ Reroll Tier List | ||||
| Single-Target Rating | Multi-Target Rating | ||||
User Score
Review & How to Get
| Review | - Attacks Excel in Range and Knockbacks - Conditional 10 Tile Range and Knockbacks - Generates and Stacks Shields - Enhances Abilities with Stacks |
|---|---|
| How to Get | - Obtain from Gacha (Summon) |
Team Meteor Pros and Strength
Team Meteor's Character Overview
- Excels in range and knockbacks
- Generates Fat Storage Stacks
- Powerful Passive Ability
- Needs the right party
Excels in Range and Knockbacks
Team Meteor excels in both range and knockback, and depending on skill and buff conditions, their range and knockback distance can exceed 10 tiles.
Team Meteor can create major advantages by aiming for fall kills or collision damage against troublesome enemies, making them a uniquely valuable asset in certain levels and stages.
NRG Recovery is Crucial


Primary skills such as [Victory Meteor Piercing the Sky] and [Stylish Confident Strike] have no cooldown, but consume a large amount of NRG, making it crucial to pair them with reliable NRG recovery methods.
Enhance Team Meteor with star upgrades, other characters’ skills, or tactical abilities for a more consistent performance.
Generates Fat Storage Stacks

The [Fat Storage] effect gained from skills and traits can be stacked to create large physical and magical shields. This not only increases Team Meteor's survivability, but also enhances the performances of some skills—such as increasing their range and knockback effects. Therefore, it is crucial to strategically decide which skills you want to use to build stacks, and which skills will spend stacks.
Beware of Losing Stacks

When either the physical or magical shield gained from [Fat Storage] is broken, all stacks will be dispelled. Therefore, you must decide whether to leverage Team Meteor's durability as a tank, or safely build stacks to enhance skill performance.
Fat Storage Mechanics and Effects
Powerful Passive Ability

The passive ability [Remarkable Tonnage Worth Boasting] extends the knockback distance of skills, as well as deals additional damage upon collision. This ability also allows Team Meteor to deal bonus damage to enemies with [Knockback Immunity], so make sure to include this skill in your build to counter foes who can nullify knockback effects.
Needs the Right Party
While it is possible to transfer [Fat Storage] to allies and grant them powerful shields with [Battlefield Snack of Morale], Team Meteor possesses no other support skills and cannot apply debuffs either.
However, with the right setup, Team Meteor boasts the highest knockback distance and range among all current characters, along with their excellent durability. So consider the stage and your party composition carefully to bring out Team Meteor's full potential!
Star Level Up Priority & Recommended Stars for Team Meteor
Aim to Reach 3★ → 5★
| Star Level Up Priority | Recommended Star Level |
|---|---|
| 3★ → 5★ |
Raising Team Meteor’s star levels boosts their stats and increases the number of [Fat Storage] stacks gained through various actions. At 3-stars, they gain more stacks when actively consuming [Fat Storage] or after active attacks. If you use Team Meteor frequently, aim for 5-stars to further increase stack gain and unlock NRG recovery.
Shard Farming Priority GuideBest Builds for Team Meteor
Knockback Build
| Basic Attack | Reaction | Ascension | |||||||||||||||||||||
|---|---|---|---|---|---|---|---|---|---|---|---|---|---|---|---|---|---|---|---|---|---|---|---|
 Hot Grilled Meat Impact Hot Grilled Meat Impact |  Comfortable Fat Reserve Comfortable Fat Reserve |  In Full Bloom In Full Bloom | |||||||||||||||||||||
| Skill | |||||||||||||||||||||||
 Victory Meteor Piercing the Sky Victory Meteor Piercing the Sky |  Remarkable Tonnage Worth Boasting Remarkable Tonnage Worth Boasting |  Cooperation Division of Labor Cooperation Division of Labor | |||||||||||||||||||||
| Weapon | Trinket | Tarot | |||||||||||||||||||||
 Cornucopia Axe Cornucopia Axe |  Space-time Ring Space-time Ring |  Course of Fortune Course of Fortune | |||||||||||||||||||||
This is a build that focuses on playing around the long range and knockbacks of [Victory Meteor Piercing the Sky]. The passives and Trinket supplements Move, while the Weapon and Tarot support with NRG regeneration. Move freely around the battlefield and aim for fall kills and collisions!
Single-target Build
| Basic Attack | Reaction | Ascension | |||||||||||||||||||||
|---|---|---|---|---|---|---|---|---|---|---|---|---|---|---|---|---|---|---|---|---|---|---|---|
 Armor-Piercing Strike Armor-Piercing Strike | Comfortable Fat Reserve | In Full Bloom | |||||||||||||||||||||
| Skill | |||||||||||||||||||||||
 Stylish Confident Strike Stylish Confident Strike | Remarkable Tonnage Worth Boasting |  Flash of Brilliant Wisdom Flash of Brilliant Wisdom | |||||||||||||||||||||
| Weapon | Trinket | Tarot | |||||||||||||||||||||
 'Barbecue' Hammer 'Barbecue' Hammer |  Shield of Justice Shield of Justice |  Verdict of Justice Verdict of Justice | |||||||||||||||||||||
This is a single-target build that focuses on attacking with [Stylish Confident Strike]. With 2 or more stacks of [Fat Storage], you can deliver powerful blows every turn. If you can support critical hits with other characters or by adding stars to Team Meteor, you can swap out [Flash of Brilliant Wisdom] for [Cooperation Division of Labor].
Priority Skills
| Skill | Priority and Details |
|---|---|
| Cooperation Division of Labor | ★★★★★ Greatly boosts Attack and Defense. When [Fat Storage] is 4 or less, it increases ranged Skill range and Move by +1; at 5+, these bonuses go up to +2. A powerful passive—especially strong for positioning knockbacks, so slot it with priority. |
| Comfortable Fat Reserve | ★★★★★ When uninjured, grants Bound Resistance and +1 Fat Storage stack each turn. An excellent Reaction since [Fat Storage] is a key to mechanic empowering your main Skills, making this almost always worth equipping. |
| Victory Meteor Piercing the Sky | ★★★★★ This Skill scales in damage, range, and knockback based on [Fat Storage]. At maximum, it can reach Range of 13, a knockback of 12 tiles, and reach 210% damage—devastating when you can aim for falling-kills or have NRG-recovery supports. Prioritize equipping it in those cases. |
| Hot Grilled Meat Impact | ★★★★★ A long-range Basic Attack that includes a knockback effect. Generally, you’ll want this as your default Basic Attack. |
| Remarkable Tonnage Worth Boasting | ★★★★★ Deals bonus damage and extends knockbacks against enemies immune to the standard knockback. If you're focused on penetrating resistant foes or boosting knockback range, this Skill is essential. |
| Stylish Confident Strike | ★★★★ A rare single-target Skill without knockback or charge. With 2 [Fat Storage] stacks it gives +40% Crit Rate; at 4 stacks, +2 Range; at 6 stacks, Armor Piercing. Equip this when prioritizing single-target damage. |
| Skill | Priority and Details |
|---|---|
 Battlefield Snack of Morale Battlefield Snack of Morale | ★★★ Allows transferring your [Fat Storage] stacks to allies, greatly boosting their durability. It’s excellent for supporting [Assisting Cover] units or low‑durability attackers—consider it for counter‑centric team strategies. |
 Righteous Lightning Ambush Righteous Lightning Ambush | ★★★ Instant knockbacks—great for falling-kills. You can take out two enemies in a single turn by pairing it with non-instant Skills. Use it on tight maps or where collisions are frequent. |
| Flash of Brilliant Wisdom | ★★ Grants 4 [Fat Storage] stacks and boosts Critical. Equip it when you need more [Fat Storage] and lack Crit support from allies in single-target battles. |
 Fair Duel of Many Against Few Fair Duel of Many Against Few | ★★ At 10 Fat Storage stacks, grants –90% damage taken. Its niche versatility can help tackle specific mechanics or act as a decoy—consider it for specialty stage tactics. |
 Righteous Hammer of Unity Righteous Hammer of Unity | ★ A Team Meteor skill with low NRG cost and short range. Useful on tight maps—but otherwise optional. |
 Front Defense Front Defense | ★ High damage reduction but no counters. With [Comfortable Fat Reserve] being stronger, this Reaction is lower priority. |
| Armor-Piercing Strike | ★ Low effect but the only Basic Attack fromTeam Meteor that applies debuffs. If you don't need knockback or range, it’s still a viable option. |
Recommended Gear, Tarots, & Engravings
Recommended Weapons for Team Meteor
| Cornucopia Axe | 'Barbecue' Hammer |  Denial Hammer Denial Hammer |
For knockback builds using Team Meteor, the [Cornucopia Axe] is your best bet thanks to its NRG recovery effect. If you’d rather shift toward a damage-focused build, the ["Barbecue" Hammer] is a solid pick. And if you want to push enemies farther with your Charge Skills, the [Denial Hammer] is a great choice for maximizing both damage and knockback distance.
Recommended Trinkets for Team Meteor
| Shield of Justice |  Maverick's Cloak Maverick's Cloak | Space-time Ring |
There’s no single best trinket for Team Meteor, but we recommend options that boost your overall stats—like the [Shield of Justice], [Maverick's Cloak], and [Cage Mask]. The [Space-time Ring] is also a great pick, especially when you need to reposition for fall kills or knockback setups.
Recommended Tarots for Team Meteor
| Course of Fortune | Verdict of Justice |  Temptation of The Devil Temptation of The Devil |
If you're aiming purely for fall kills, [Fate] is a great pick thanks to its NRG recovery. If you want to focus on damage output, equip Tarots like [Justice] or [Heirophant]. Other useful choices include [Devil], which boosts overall stats, and [Chariot], which increases movement.
Recommended Engravings for Team Meteor
| Resonance | Effect |
|---|---|
 Wand Wand Cup Cup | At the end of the turn, there is a 50% chance to gain [Engraving Resonance]. Effect: When using an [active skill] next time, refunds the NRG consumed and resets the CD. The skill effect has a CD of 4 turns. (Does not trigger in real-time combat. The effect changes to increasing HP, ATK and DEF by 5%) |
 Sword Wand Sword Wand | Before actively attacking, for each 1 tile traversed, increases ATK and DEF by 4%, up to 12%. The effect lasts until the start of the next turn, |
Sword Pentacle Pentacle | When [unharmed], increases ATK and DEF by 12%. |
When focusing solely on fall kills or collision damage, [Wand + Cup] is recommended, since it can reduce NRG consumption to zero. Other useful combinations include [Sword + Wand] and [Sword + Pentacle], both of which boost Team Meteor's stats effectively.
Team Meteor Skill Unlock Priorities
Recommended Skill Set
* Tap a skill to view its details below.
Normal | RK13 | Unique |
|---|---|---|
| Fair Duel of Many Against Few | RK11 | Remarkable Tonnage Worth Boasting |
| Armor-Piercing Strike | RK9 | Hot Grilled Meat Impact |
| Stylish Confident Strike | RK7 | Victory Meteor Piercing the Sky |
| Front Defense | RK5 | Comfortable Fat Reserve |
| Cooperation Division of Labor | RK3 | Flash of Brilliant Wisdom |
| Battlefield Snack of Morale | RK1 | Righteous Lightning Ambush |
If you have Castalia to spare, unlock RK7 left, and RK1 and 3 right as needed.
Skill Details
| Battlefield Snack of Morale | Cost: 0 CD: 3 |
| (Support) | |
 | |
| Righteous Lightning Ambush | Cost: 0 CD: 3 |
| (Physical DMG) | |
 | |
| Cooperation Division of Labor | Cost: - CD: - |
| (Passive) When having | |
| Flash of Brilliant Wisdom | Cost: 0 CD: 3 |
| (Support) | |
 | |
| Front Defense | Cost: - CD: - |
| (Reaction) When hit by an active attack from the | |
| Comfortable Fat Reserve | Cost: - CD: - |
| (Reaction) Gains | |
| Stylish Confident Strike | Cost: 3 CD: - |
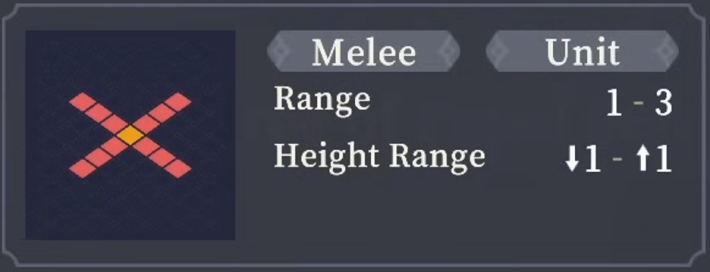
| (Magical DMG) Selects 1 enemy within a cross-shaped range of the character and deals magical DMG equal to 150% of P.ATK. When having 2 stacks of | |
 | |
| Victory Meteor Piercing the Sky | Cost: 4 CD: 0 |
| (Physical DMG) Selects 1 enemy within a cross-shaped range of the character, performs a | |
 | |
| Armor-Piercing Strike | Cost: - CD: - |
| (Basic Attack) Deals 100% physical DMG and inflicts | |
 | |
| Hot Grilled Meat Impact | Cost: - CD: - |
| (Basic Attack) Selects 1 enemy within a cross-shaped range of the character and performs | |
 | |
| Fair Duel of Many Against Few | Cost: 4 CD: 6 |
| (Physical DMG) Single-target attack. Deals 180% DMG. Before attacking, dispels all | |
 | |
| Remarkable Tonnage Worth Boasting | Cost: - CD: - |
| (Passive) After casting a non- | |
| In Full Bloom | Cost: - CD: - |
| (Passive) | |
Team Meteor's Trait & Skills
Team Meteor's Trait
| Trait | Max Effect |
|---|---|
| [Resolute Will of Meteor] After performing a non- |
| Stars Unlocked | Effect |
|---|---|
 | After performing a non- |
 | After performing a non- |
 | After a non- |
 | After a non- |
Team Meteor's Base Skills
| Skill | Range |
|---|---|
 Slash Slash |  |
| [Basic Attack] Cost: - / CD: - (Basic Attack) Deals 100% Physical DMG. | |
| Righteous Hammer of Unity |  |
| [Skill] Cost: 2 / CD: 0 (Physical DMG) Single-target attack. Deals 130% DMG and knocks the target back by 1 tile. After attacking, the character gains 2 stacks of | |
Skills That Can Be Learned at RK1
| Skill | Range |
|---|---|
| Battlefield Snack of Morale | |
| [Skill] Cost: 0 / CD: 3 (Support) | |
| Righteous Lightning Ambush | |
| [Skill] Cost: 0 / CD: 3 (Physical DMG) | |
Skills That Can Be Learned at RK3
| Skill | Range |
|---|---|
| Cooperation Division of Labor | - |
| [Skill] Cost: - / CD: - (Passive) When having | |
| Flash of Brilliant Wisdom | |
| [Skill] Cost: 0 / CD: 3 (Support) | |
Skills That Can Be Learned at RK5
| Skill | Range |
|---|---|
| Front Defense | - |
| [Reaction] Cost: - / CD: - (Reaction) When hit by an active attack from the | |
| Comfortable Fat Reserve | - |
| [Reaction] Cost: - / CD: - (Reaction) Gains | |
Skills That Can Be Learned at RK7
| Skill | Range |
|---|---|
| Stylish Confident Strike | |
| [Skill] Cost: 3 / CD: - (Magical DMG) Selects 1 enemy within a cross-shaped range of the character and deals magical DMG equal to 150% of P.ATK. When having 2 stacks of | |
| Victory Meteor Piercing the Sky | |
| [Skill] Cost: 4 / CD: 0 (Physical DMG) Selects 1 enemy within a cross-shaped range of the character, performs a | |
Skills That Can Be Learned at RK9
| Skill | Range |
|---|---|
| Armor-Piercing Strike | |
| [Basic Attack] Cost: - / CD: - (Basic Attack) Deals 100% physical DMG and inflicts | |
| Hot Grilled Meat Impact | |
| [Basic Attack] Cost: - / CD: - (Basic Attack) Selects 1 enemy within a cross-shaped range of the character and performs | |
Skills That Can Be Learned at RK11
| Skill | Range |
|---|---|
| Fair Duel of Many Against Few | |
| [Skill] Cost: 4 / CD: 6 (Physical DMG) Single-target attack. Deals 180% DMG. Before attacking, dispels all | |
| Remarkable Tonnage Worth Boasting | - |
| [Skill] Cost: - / CD: - (Passive) After casting a non- | |
Skills That Can Be Learned at RK13
| Skill | Range |
|---|---|
| In Full Bloom | - |
| [Ascension Skill] Cost: - / CD: - (Passive) | |
Weapons That Team Meteor Can Equip
List of Weapons
 Brutal Axe
 Hollow Axe
 Feast Axe
 Tuning Hammer
 Gale Sword
 Hammer Dragon Rise
 Great Company on the Journey
 Surtr the Darkfire Axe
 Supreme Assault Blade
 Undying Flames
 Oathkeeping Star
 Formidable Axe
 Antimagic Axe
 Balanced Heavy Axe
 Battle-Hardened Axe
 Heavy Iron Axe
 Iron Axe
Team Meteor's Voice Actor & Release Date
Team Meteor Voice Actor
| VA | Japanese VA: Hieda Nene & Okamoto Kousuke |
|---|
Released on Friday, May 23
Team Meteor was released on Friday, May 23. Since the character is added to the standard banner, they can still be obtained even after the limited-time banner ends.
Team Meteor's Skin
| Initial | Ascended |
|---|---|
 |  |
▲ Unlock Ascended Skin when character reaches Star Level 5.
Aside from minor issues like their terrible financial situation, loss of contact with Radiant City, and dinner distribution plans, which can be overcome with passion and perseverance, Team Meteor shines brightly like a white meteor streaking across the sky.
Note: The above content is self-reported by Fiamma, the captain of Team Meteor.

