
Check out this Kingdom Hearts 3 (KH3) ReMind DLC guide on all Lucky Emblem Locations. Including Lucky Emblem rewards, where to find them, and more.
Table of Contents
- ReMind: Lucky Emblem Locations
- Olympus: Lucky Emblem Locations
- Twilight Town: Lucky Emblem Locations
- Toy Box: Lucky Emblem Locations
- Kingdom of Corona: Lucky Emblem Locations
- Monstropolis: Lucky Emblem Locations
- Arendelle: Lucky Emblem Locations
- The Caribbean: Lucky Emblem Locations
- San Fransokyo: Lucky Emblem Locations
- 100 Acre Wood: Lucky Emblem Locations
- Lucky Emblem Rewards & Recommended Items
- Lucky Emblems - Overview
ReMind - Lucky Emblem Locations
No ReMind DLC Lucky Emblems


There are no Lucky Emblems to be bound in any of the episodes in the KH3 ReMind DLC. Check the link below to know more about the DLC & its contents!
Check Out ReMIND DLC News Here!Olympus - Lucky Emblem Locations
Olympus - Location Map
Mount Olympus

Thebes

Olympus

Olympus - Lucky Emblem Detailed Location
| No. | Map | Location |
|---|---|---|
| 1 |  | Thebes / Mound |
| 2 |  | Thebes / Main Street On the debris of the building |
| 3 |  | Thebes / Citizen's Square On the stairs of the public square |
| 4 |  | Thebes / Mound Up the stairs behind the save point |
| 5 |  | Mount Olympus / Cliff Road On the Pillar when climbing the cliff |
| 6 |  | Mount Olympus / Cliff Road On the wall where a small waterfall is |
| 7 |  | Mount Olympus / Cliff Road Above the pillar overlooking the valley in the middle of the road |
| 8 |  | Mount Olympus / Cliff In the place where the enemies appear on the cliff |
| 9 |  | Olympus / Corridor Stairs to the north of the save point |
| 10 |  | Olympus / Corridor Near the 9th station where you got on the straight rail |
| 11 |  | Olympus / Smith Workshop On the studio building stand |
| 12 |  | Olympus / Cloud Peak Scenery Outside |
Twilight Town - Lucky Emblem Locations
Twilight Town - Location Map

Twilight Town - Lucky Emblem Detailed Location
| No. | Map | Location |
|---|---|---|
| 1 |  | Town District / Tram Square On the Shop wall |
| 2 |  | Town District / Tram Square Above the Tram |
| 3 |  | Town District / Tram Square Above the Moogle Shop's Chimney |
| 4 |  | Town District / Tram Square On the Shadow on the Screen |
| 5 |  | Town District / Tram Square Dish on Table in the Terasse |
| 6 |  | Town District / Off-Street Forest Door Connecting Forest and the Waterway |
| 7 |  | Town District /Off-Street Forest Outer Wall Near the 6th Emblem |
| 8 |  | Town District /Off-Street Forest Wall to the East Side from the 7th Emblem |
| 9 |  | Town District /Near Mansion Outer Wall Near Mansion Entrance |
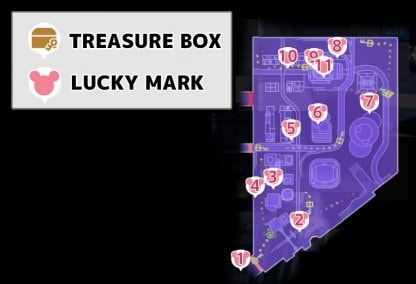
Toy Box - Lucky Emblem Locations
Toy Box - Location Map
Andy's Home

Hall 1F

Lower Air Duct

Hall 3F

Toy Box - Lucky Emblem Detailed Location
| No. | Map | Location |
|---|---|---|
| 1 |  | Andy's Home Shelf On The Left Side Of The Door |
| 2 |  | Andy's Home On the Streetside Roof |
| 3 |  | Andy's Home Between the 2 Planters At the Entrance |
| 4 |  | Andy's Home On the Car in the Street to the East Side of the Map |
| 5 |  | Galaxy Toys / Hall:1F Wall Behind the Cashier |
| 6 |  | Galaxy Toys / Hall:1F Floor After Breaking Down the Toy Shelf |
| 7 |  | Galaxy Toys / Lower Air Duct Wall to the Back After Jumping Out the Air Duct |
| 8 |  | Galaxy Toys / Hall:3F Jump on the UFO in the 2F from the 3F |
| 9 |  | Galaxy Toys / Baby Toy: Dolls Disco Ball Viewed from Above the Showcase |
| 10 |  | Galaxy Toys / Hall: 3F Lower Part of the Robot |
| 11 |  | Galaxy Toys / Hall: 1F Statue Just Outside of the Entrance |
Kingdom of Corona - Lucky Emblem Locations
Kingdom of Corona - Location Map
Tower / Forest

Swamp

Swamp / Camp

Garden

Main Street / Port

Kingdom of Corona - Lucky Emblem Detailed Location
| No. | Map | Location |
|---|---|---|
| 1 |  | Tower / Forest Rock Formation Seen From Above the Tower Roof |
| 2 |  | Forest / Swamp Stone Wall Near the Small Lake |
| 3 |  | Forest / Swamp Barrel in the Cave |
| 4 |  | Forest / Bay Right Side of the Bridge to the Town |
| 5 |  | Corona / Main St. Outer Wall on the Town's Clock Tower |
| 6 |  | Corona / Port Castle Wall in the City |
| 7 |  | Corona / Port Outer Wall of Tower Near the Water |
| 8 |  | Corona /Port Near the 7th Emblem, Barrel Close to the Water |
| 9 |  | Corona / Port Pedestal Near the Lighthouse in the Port |
Monstropolis - Lucky Emblem Locations
Monstropolis - Location Map
Lobby & Office

Upper Storage

Factory B1F ~ 1F

Passageway

Tank Yard

Monstropolis - Lucky Emblem Detailed Location
| No. | Map | Location |
|---|---|---|
| 1 |  | Monsters Inc. / Laughter Floor Paperwork Folder on the Desk |
| 2 |  | Monsters Inc. / Laughter Floor On Floor to the Right Left Floor |
| 3 |  | Door Storage / Upper Storage Wall to the Furthest End |
| 4 |  | Door Storage / Upper Storage Wall With Number A85 |
| 5 |  | Factory / 1F Staircase Near Conveyor Floor |
| 6 |  | Factory / 1F Paint Spill Near the Tank, Further Across the 2nd Emblem's Path |
| 7 |  | Factory / 2F Wall to the Bottom Right Part of Map |
| 8 |  | Power Station / Passageway Locker Next to the Desk |
| 9 |  | Power Station / Passageway Upper Part of Wall in Path Leading to Outside |
| 10 |  | Power Plant / Tank Yard Tip of the Pipe on the Wall |
| 11 |  | Power Plant / Back Way to Door Storage Puddle Seen from Above the Stairs |
Arendelle - Lucky Emblem Locations
Arendelle - Location Map
Northern Mountain / Rime Forest

Icy Labyrinth

Northern Mountain / Canyon

Northern Mountain / Mountain Ridge (Ice Wall)

Northern Mountain / Snowy Cliff

Northern Mountain / Snow Field

Northern Mountain / Foot of Mountain

Arendelle - Lucky Emblem Detailed Location
| No. | Map | Location |
|---|---|---|
| 1 |  | Northern Mountain / Rime Forest Tree on the Ledge After Jumping from the Tall Rock |
| 2 |  | Icy Labyrinth / Mid Beyond the Destroyable Ice Door, On a Wall With Room with a Bridge |
| 3 |  | Icy Labyrinth / Lower Wall in Lower Part of Cave, in Dead End |
| 4 |  | Icy Labyrinth / Mid On Wall Visible From Bridge Near Pit Leading to Lower Area |
| 5 |  | Icy Labyrinth / Upper Rock Visible From the Stone Pillar in the Grand Hall on Map to the Right |
| 6 |  | Northern Mountain / Mountain Ridge On Wall Near Mountain Ridge Further Down |
| 7 |  | Northern Mountain / Ice Wall Cliff Ridge After Climbing Down the Mountain Ridge and Jumping Across |
| 8 |  | Northern Mountain / Ice Wall On Snowy Wall Near the Mountain Ridge |
| 9 |  | Northern Mountain / Snow Field Snow on the Rock Seen From Above the Cliff |
| 10 |  | Northern Mountain / Snow Field Logs On the field, near where you befriended Marshmallow |
| 11 |  | Northern Mountain / Foot of Mountain Stone in the Blizzard Area |
The Caribbean - Lucky Emblem Locations
The Caribbean - Location Map
The Caribbean Sea

Port Royal

Underwater Cave

The Caribbean - Lucky Emblem Detailed Location
| No. | Map | Location |
|---|---|---|
| 1 |  | Port Royal / Port Near the Boat Afloat In Village |
| 2 |  | Port Royal / Port Pillar in Village Building |
| 3 |  | Port Royal / Waterfront Shore Side Near House in Village |
| 4 |  | Port Royal / Waterfront Plate on the Port Entrance |
| 5 |  | Port Royal / Fort Rope Pile Seen From Above the Viewing Point |
| 6 |  | Port Royal / Fort Iron Ball in the Cell |
| 7 |  | Isla Verdemontana Island Seen from Above the Island |
| 8 |  | Isle of Luck |
| 9 |  | Horseshot Island Island Ledge Seen from the Boat |
| 10 |  | Small Island East of Thornrock Island Broken Barrel |
| 11 |  | Ship's End Sunken Ship to the South East of Exile Island |
| 12 |  | Sandbar Isle Stone in the Lake in the Island |
| 13 |  | Sandbar Isle Coral in the Lake in the Island |
San Fransokyo - Lucky Emblem Locations
San Fransokyo - Location Map
San Fransokyo - Lucky Emblem Detailed Location
| No. | Map | Location |
|---|---|---|
| 1 |  | Garage Cord On The Wall to the Otherside of Save Point |
| 2 |  | Downtown / South Area: Day Bush Seen From Above The Building With Pharmacy Sign |
| 3 |  | Downtown / South Area: Night Light On Building, Seen From Building Bottom Right Edge of the Map |
| 4 |  | Downtown / South Area: Day Statue Above A Building To The North of Save Point |
| 5 |  | Downtown / South Area: Day Left Side of Mid-zone, Spider's Nest Shaped Roof |
| 6 |  | Downtown / South Area: Day Ground on the Tall Building In The Center |
| 7 |  | Downtown / South Area: Day Above The Floating Fish In The Sky |
| 8 |  | Downtown / South Area: Day Top Right of the Map, Stairway on Building With Railway |
| 9 |  | Downtown / South Area: Day Tunnel Near The 8th Emblem, Light Shining In The Tunnel |
| 10 |  | Downtown / South Area: Day Yellow Car Near The Railway Bridge Near The 9th Emblem |
| 11 |  | Downtown / South Area: Day Above The Thin Pillar On The Building In Upper Center Part Of The Map |
100 Acre Wood - Lucky Emblem Location Guide
100 Acre Wood - Lucky Emblem Detailed Location
| No. | Map | Location |
|---|---|---|
| 1 |  | In Bucket Near The Laundry |
| 2 |  | Side Of The Giant Pumpkin |
| 3 |  | Between the Tree In The Distance |
Lucky Emblem Rewards & Recommended Items
List Of Lucky Emblem Rewards
| Lucky Emblems | Reward |
|---|---|
| 1 | AP Boost |
| 3 | Mega-Potion |
| 5 | Expert's Ring |
| 10 | Thundara Trinket |
| 15 | Moon Amulet |
| 20 | Magic Boost |
| 25 | Star Charm |
| 30 | Ribbon |
| 35 | Buster Band + |
| 40 | Power Boost |
| 45 | Master Necklace |
| 50 | Wisdom Ring |
| 55 | Defense Boost |
| 60 | Orichalcum Ring |
| 65 | Cosmic Belt+ |
| 70 | Royal Ribbon |
| 75 | None |
| 80 | Orichalcum+ |
| 85 | None |
| 90 | Mickey Brooch |
Get Proof Of Promise
By collecting all 90 Lucky Emblems, you will get an item called a Proof of Promise, which can be used to get a new Keyblade.
Check Out The Proof Of Promise Here!Recommended Items To Get
| Item | Criteria For Choosing Lucky Emblems Needed |
|---|---|
| Royal Ribbon | The Royal Ribbon provides up to 40% elemental resistance, protecting you from a lot of damage when hit by enemies with elemental attacks. Lucky Emblems: 70 |
| Ribbon | The Ribbon only provides 30% elemental damage resistance but since you only need 30 Lucky Emblems to redeem it, it'll be easier to get. Lucky Emblems: 30 |
| Wisdom Ring | A good accessory for Donald Duck, this ring has the chance to recover the wearer's HP when consuming MP. This will keep Donald alive throughout a lot of battles. Lucky Emblems: 50 |
| Expert's Ring | The Expert's Ring greatly increases your maximum AP. This is great for players who like to have a lot of abilities equipped. Lucky Emblems: 5 |
| Mickey Brooch | This accessory gives the user MP Hastega and Endless Magic. Recovering MP during battle will be faster plus Endless Magic allows you to continuously use Grand Magic. Lucky Emblems: 90 |
What Are Lucky Emblems?
Mickey-Shaped Emblems in Different Worlds

Note that each world will feature a Hidden Emblem in the shape of Mickey Mouse's head! If you see one, open your camera and take a picture!
How to Take a Picture of the Lucky Emblem / Hidden Mickey
- 1. Find a Lucky Emblem
- 2. Press your touchpad to open the Camera
- 3. Press R1 to take a picture
What Do You Get From Lucky Emblems?
Receive Great Items

Items will be rewarded to you whenever you shoot a certain number of Lucky Emblems. This is a great way to obtain helpful items that may give you status effect boosts!
Unlock Secret Movie
In order to unlock the Secret Movie, you will need to find & shoot a number of Lucky Emblems. The number of Lucky Emblems you need to find will depend on the difficulty that you choose for the playthrough!
Check Out Difference In Difficulty LevelsRequired No. of Lucky Emblems per Difficulty
| Difficulty | Required Emblems |
|---|---|
| Beginner | Shoot all Lucky Emblems |
| Normal | Shoot Lucky Emblems (Medium Amount) |
| Proud | Shoot a Lucky Emblem |
Can Be Tracked In Mobile App

You can keep track of which Lucky Emblems you have gotten and are still missing through the Kingdown Hearts 3 partner mobile app. This makes collecting them all easier!
Kingdom Hearts 3 (KH3) Related Article
Story Walkthrough & Guides
| 0. Opening | 1. Olympus |
| 2. Twilight Town | 3. Toy Box |
| 4. Kingdom of Corona | 5. Monstropolis |
| 6. Arendelle | 7. The Caribbean |
| 8. San Fransokyo | 9. Keyblade Graveyard |
| 10.Scala Ad Caelum | After Beating the Main Story |

