This guide covers the Best Armor for Beginners in LET IT DIE: INFERNO (LID). Including how to choose the right Armor to prioritize and which Armor Perks are useful.
Table of Contents
Best Armor for Beginners
List of Recommended Armor by Parts
| Part | Armor Name | Recommendation/Effect |
| Head | Deadpan Afro | Recommendation: ★★★★★ Health +250 |
| Love Bomb Skull | Recommendation: ★★★★・ Health +200 Guard +25 Stamina Recovery +20 | |
| Torso | Deadpan Jersey | Recommendation: ★★★★★ Health +350 Guard +5 |
| Love Bomb Blouse | Recommendation: ★★★★・ Health +300 Guard +25 Stamina Recovery +20 | |
| Legs | Deadpan Pants | Recommendation: ★★★★★ Health +250 |
| Love Bomb Skirt | Recommendation: ★★★★・ Health +250 Guard +25 Stamina Recovery +20 | |
| Feet | Teen Spirit Loafers | Recommendation: ★★★★★ Health +20 Stamina Recovery +20 |
| Deadpan Sandals | Recommendation: ★★★★・ Health +60 |
We have listed recommended beginner Armor for each part: Head, Torso, Legs, and Feet. Prioritize Armor that provides a large boost to Health, followed by pieces that increase Guard and Stamina Recovery.
How to Choose Armors
Prioritize Armor with High Health

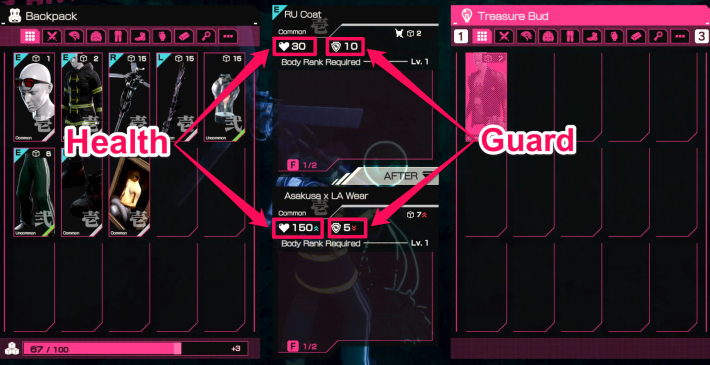
Armor is equipment that mainly increases Health, though some pieces also improve Guard or Stamina Recovery speed. Since Guard only reduces damage when you actively use it, beginners should generally prioritize armor that provides a large boost to Health.
How to Get Weapons and ArmorShoes Gives Less Health, so Prioritize Perks

Among all Armor pieces, Feet Armor provides the lowest Health increase, so prioritize equipping options with high Stamina Recovery or Movement Speed +X%. In particular, Movement Speed +X% is extremely powerful, making it worth equipping immediately or keeping in Storage.
Beyond Demon Gate Labyrinth, Guard is Important
If your playstyle focuses on Guarding and Guard Counter, prioritizing Guard increase is a strong option. From the Body Rank 3 Demon Gate Labyrinth onward, enemy attacks become much more intense, making increased Guard especially valuable.
 Tips! Tips! | If your Guard is 100, you will no longer take Damage when Guarding. |
|---|
Best When Using a Counterattack Healing Core

Equipping a Body Core with 'Health (per Counterattack)' restores 200 Health per Counterattack, making a Guard-focused playstyle and higher Guard especially effective for smoother Exploration.
Best Cores to UseChoose Armor with Strong Perks

Even within the same Armor piece, performance varies based on its Perks. Always choose the version with stronger Perks, with Stamina Recovery +X%, Guard +X%, and Movement Speed +X% being the top priorities.

