 Acambe
 Afra
Afra Agata
Agata Alexei
 Auguste
 Ayishah
 Beryl
Beryl Camelot
 Caris
Caris Ciri
Ciri Cocoa
Cocoa Col
Col Credenza
 Dantalion
 Edda
Edda Estra
Estra Falin
Falin Faycal
 Flavia
 Garcia
 Geralt
 Gloria
 Guzman
 Hasna
Hasna Homa
Homa Iggy
Iggy Inanna
 Kiya
Kiya Kvare
Kvare Layla
Layla Leonide
 LilyWill
 Lukamar
 Lutfi
Lutfi Luvata
 Magnus
 Maitha
 Marcille
 Miguel
 Momo
Momo Nergal
 NonoWill
 Nungal
 Nydia
Nydia Pamina
 Parsifal
 Pooch Runrun
 Rawiyah
 Rico
Rico Safiyyah
 Samantha
 SchackLulu
 Senshi
 Simona
 SP Faycal
 SP Inanna
 SP Maitha
 SP Nungal
 SP Rawiyah
 SP Safiyyah
 SP Samantha
 Taair
Taair Teadon
 Team Meteor
 Triss
Triss Tristan
 Xavier
 Yennefer
 Yserinde
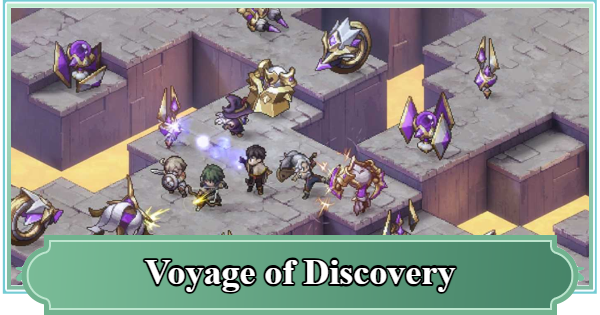
This is a Voyage of Discovery guide for Sword of Convallaria (SoC). Read on to learn how to progress the event, as well as recommended adventure styles, blessings, and rewards!
Table of Contents
How to Progress
Progression Loop
- "Explore" at any difficulty
- Utilize blessings
- Finish the run for adventure coins
- Redeem rewards
- Repeat
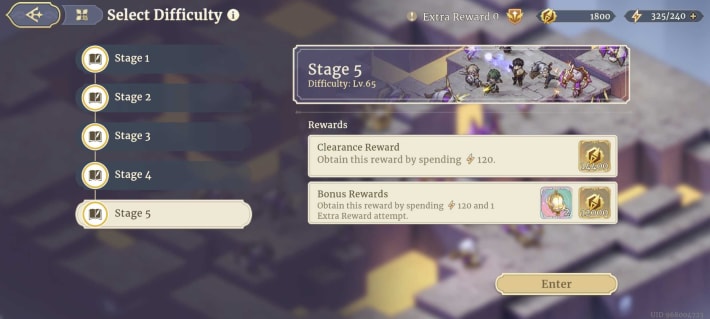
Explore at Any Difficulty

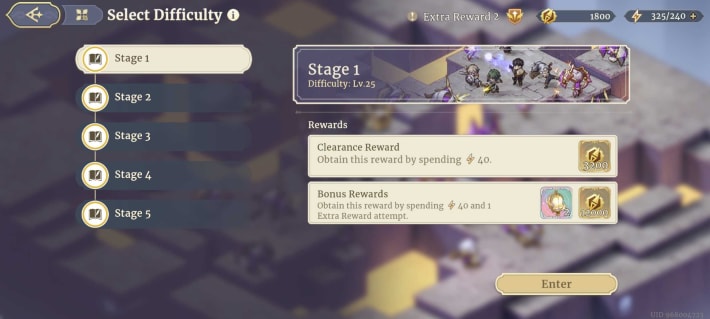
"Start to Explore" is where you battle through 7 random stages at a difficulty of your choice. You can get more "Adventure Coins" at higher difficulties, so for Stamina efficiency, we recommend challenging the highest difficulty stage you can clear.
Guideline for Each Difficulty
| Difficulty | Recommended Character Lv |
| Difficulty 1 | Lv20 |
| Difficulty 2 | Lv30 |
| Difficulty 3 | Lv40 |
| Difficulty 4 | Lv50 |
| Difficulty 5 | Lv60 |
Be Aware of Stage Mutations
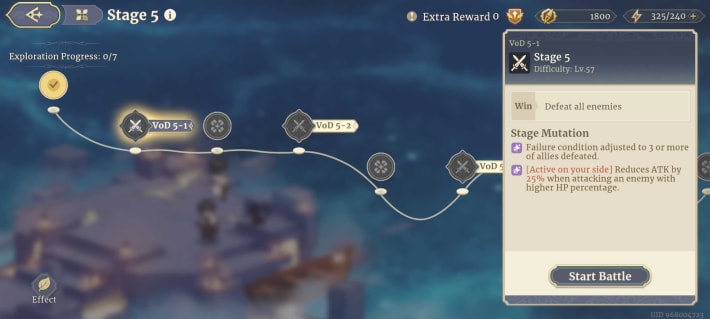
In each battle, there are various "Stage Mutations" effects for each stage. It can become difficult to complete the stage if you don't pay attention to these effects, so be sure to check them beforehand and form an appropriate team.
Utilize Blessings
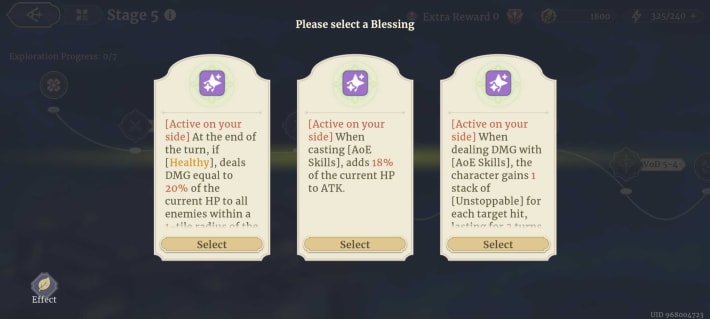
Utilize the buffs presented after clearing each stage to progress. Also, the types of buffs offered will change depending on the "Adventure Style" you choose after selecting the difficulty. It's recommended to acquire buffs that match your strengthened characters and preferred tactics.
Finish the Run for Adventure Coins
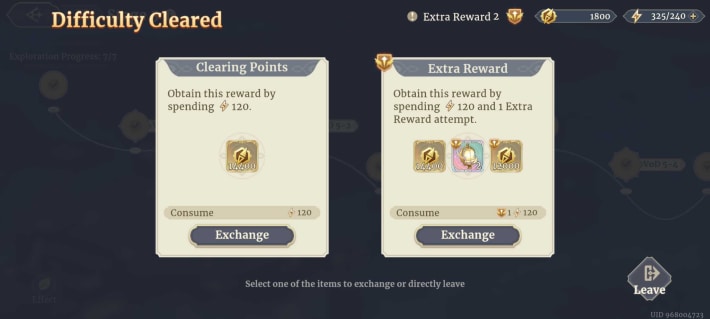
By clearing the final boss stage, you can obtain "Adventure Coins" corresponding to the difficulty. You can get various rewards in exchange for Adventure Coin, so collect a lot by clearing higher difficulty explorations or obtaining Extra Rewards.
Exchange Astral Shards for Legendary Gear
By progressing through the event missions, you can also obtain "Astral Shards," which can be exchanged for any Legendary Gear or random Signature Weapons/Gear.
Adventure Styles and Best Blessings
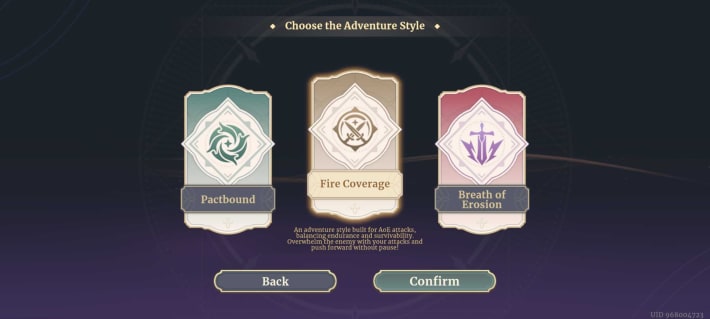
| ▼ Pactbound | A summoning-focused adventuring style that lets you call powerful allies to fight by your side. Work in unison with your summons to crush any enemy daring enough to stand in your way. |
|---|---|
| ▼ Fire Coverage | An adventure style built for AoE attacks, balancing endurance and survivability. Overwhelm the enemy with your attacks and push forward without pause! |
| ▼ Breath of Erosion | An adventure style that excels in DoT. No matter how your enemies struggle, they will wither away under your relentless assault! |
Adventure Styles are similar to archetypes
in other games. Your selected adventure style will dictate the blessings that can appear during your run, as well as your preferential characters. Among the available adventure styles, there's Pactbound
, Fire Coverage
, and Breath of Erosion
.
The strategies included below are what we used to complete runs in the Stage 5 difficulty. Feel free to tweak your setup, and use our guide as a foundation for your own runs!
Pactbound Strategy
Video Clear
Recommended Blessings
| ||
|---|---|---|
| [Active on your side] Gains an additional team skill: Summon [Apostle - Strength of Immortal]: A powerful defensive unit specializing in Assisting Cover and Strike Back. Converts shield value into huge DMG. Can be used up to 1 time per battle. | ||
| [Active on your side] All [summoned charactrers] add 20% of max HP to ATK, not exceeding 200%. | [Active on your side] All [summoned characters] recover 30% HP after dealing DMG, and inflict piercing DMG equal to the recovered amount. | [Active on your side] When dealing Crit DMG, there is a 50% chance for the character to gain [Dodge] for 1 turn and recovers 30% HP and 1 NRG. |
| [Active on your side] All [summoned characters] have their HP increased by 100% and gain [Physical Reflection] or [Magical Reflection]. Effect: Reflects 75% of the DMG received back to the attacker. | [Active on your side] All [summoned characters] gain [Preempt] and [Strike Back] against ennemies within 2 tiles of themselves, dealing [Piercing DMG] equal to 80% of their P.ATK plus M.ATK values. | [Active on your side] When defeated, recovers 20% HP Immediately. C: 3 turns. When [Resolve] is triggered, increases ATK and DEF by 15%, up to 45%. |
Of the Adventure Styles, Pactbound is the easiest to play since the player can largely rely on the Apostle of Strength to both tank and eliminate most of the enemies. The harder part is getting the correct blessings, but assuming that you do, you can focus on keeping your party alive while you use the Apostle to clear out the stage.
Recommended Characters
| Alexei | Our Pactbound strategy involves allowing the Apostle to do most of the heavy lifting. This means your party's job is to survive in the meantime. Alexei's durability allows him to take the attention of one side of the map while your apostle takes care of the other side. If you happen to get the blessing that affects Strike Backs for all characters, Pamina can also be a viable alternative. |
| Flavia | Because our blessing list includes many that affect [summoned units], characters like Flavia, and Inanna can become reliable healers since they have their own summons. Flavia in particular does not support as well as Inanna, but she has a more powerful and flexible summon. |
| Falin | The Apostle - Strength of Immortal converts its shield value into damage. As such, characters and blessings that grant shields contribute to both your team's survivability, as well as your Apostle's damage. |
The blessings we aimed for include bonuses to Strike Back, HP, and summoned characters. Therefore, we want to build our party around characters that can summon, Strike Back, or provide Shields. Consider Falin, Alexei, Pamina, and Flavia. Don't neglect to include other supports and secondary damage dealers as needed!
Fire Coverage Strategy
Video Clear
Recommended Blessings
| ||
|---|---|---|
| [Active on your side] ✦ When attacking, gains [✗ Resolve]. ✦ When defeating enemies, makes the target explode and deals [AoE DMG] equal to 40% of the attacker's current HP to all enemies within a 1-tile radius of the target. DMG type matches the [Basic Attack] DMG type. Can be triggered up to 1 time per round. | ||
| [Active on your side] ✦ When casting [AoE DMG] skills, increasses DMG by 15% for each 1 enemy hit, up to 60%. ✦ When casting [non-AoE DMG] skills, decreases DMG by 20%. | [Active on your side] When attacking, if hitting 2 or more enemies, generates 40% [Life Steal], dispels 2 [buffs] from targets and inflicts 2 random [Level 2 Debuffs] for 2 turns. | [Active on your side] When actively attacking, if hitting 3 or more enemies, dispels 2 [buffs] and pulls all enemies toward skill center, dealing [AoE DMG] equal to 10% of the attacker's current HP. Can be activated up to 1 time per round. |
| [Active on your side] ✦ Immune to [Disruption]; ✦ Skills that require preparation can be cast instantly. | [Active on your side] For every 1 enemy within 3 tiles of the character, decrease DMG taken by the character by 10% up to 40%. | [Active on your side] ✦ At the start of battle, gains [△Move II]; ✦ When using [AoE] skills for the first time, does not cunsume skill NRG and does not reset CD. |
Fire Coverage is not as auto-play friendly as Pactbound, since you will not have a unit that can absorb attacks like the Apostles. Our strategy heavily relies on positioning for the best AoE attacks, as well as having access to characters that can recover NRG and use multiple AoE attacks. Where Pactbound emphasizes defensive play, Fire Coverage focuses on positioning and early aggression.
Recommended Characters
| Luvata | Luvata stands out as a great AoE attacker since she can deal respectable damage, while also creating [burning tiles]. Assuming you can secure the blessing that allows you to group enemies, Luvata can affect a very wide area, making it easy to deal AoE damage with your next attackers. Note however that Luvata is slow, meaning she will need a SPD buff to take her turn ahead of her allies. Alternatively, Caris and Beryl can benefit from our blessings as well, since they can instantly use their preparation skills with the right blessings. |
| Taair | Taair fills multiple essential roles in the party since you will likely be running multiple AoE attackers with little to no defensive capabilities. He can provide heals, buffs, dispels, and most importantly, NRG recovery. As most big AoE skills in the game will deplete your character of NRG, having a character that can quickly replenish NRG will make a noticeable difference. |
| SP Rawiyah | SP Rawiyah is a physical AoE attacker that can quickly eliminate grouped enemies with multiple attacks. While her standalone damage will seem quite low, it will quickly add up as she uses more and more attacks during her turn. Even more so if you can secure more fitting blessings than we were able to. Furthermore, you can pair her with OG Rawiyah equipped with [Gale Spin Attack] and [Gale - Void Slash] SP skill as a secondary attacker. |
The selected blessings for Fire Coverage heavily focus on utility for AoE attackers. This is largely because characters like Luvata and SP Rawiyah already deal damage, but are sorely lacking in defensive options, and utility.
Depending on the characters you have available, you may want to include more blessings that boost attack, but if you have access to glass cannons
, we recommend selecting blessings that increase your survivability instead.
Breath of Erosion Strategy
Video Clear
Recommended Blessings
| ||
|---|---|---|
| [Active on your side] ✦ When attacked by enemies, performs [Preempt] and can inflict 1 stack of [Soul Wound] for 2 turns. Can be triggered up to 1 time per round. ✦ For every 1 [DoT] the attacker has, decreases DMG taken by the character by 10%, up to 40%. | ||
| [Active on your side] ✦ Increases max HP by 20%; ✦ At the end of the turn, inflicts 1 stack of [Infection] on all enemies within a 1-tile radius of the character. | [Active on your side] When actively dealing DMG, if the target has 5 or more [debuffs] or triggers [Crit], immediately resolves all [DoT] on enemies (but not consumed). Can be activated up to 1 time per round. | [Active on your side] ✦ Increases Crit by 20%; ✦ After dealing [Crit] DMG, dispels 2 [buffs] from the target and inflicts 1 stack of [Soul Wound] for 2 turns. Can be activated up to 1 time per round. |
| [Active on your side] ✦ Increases [DoT] dealt by 10%. ✦ When actively attacking, if the target has 2 or more types of [DoT], increases ATK by 20% and dispels 1 [buff]. | [Active on your side] ✦ Increases max HP by 20%; ✦ After dealing [DoT], dispels 1 [buff] from the target and inflicts 2 random [Level 2 Debuffs]. | [Active on your side] Increases the maximum range of Ranged Skills by 1 tile. |
Despite leaning towards DoTs as its main source of DMG, the Breath of Erosion adventure style was actually the fastest run since the numerous DoTs quickly melt enemies. Our strategy utilizes aggressive tactics that positions some of our characters within range of the enemies in order to apply as many debuffs as possible. Take 1 or 2 blessings that make your party more survivable to make it easier to wait for your DoTs to do the work for you.
Recommended Characters
| Kvare | Kvare is one of, if not the best character to use with Breath of Erosion. His SPD and Range allows him to quickly apply his DoTs from a safe distance. There are occasions where Kvare will already have multiple debuffs on the enemy before your other party members can even reach them. With Breath of Erosion focusing so heavily on DoTs, players should definitely prioritize slotting Kvare. |
| Lutfi | Lutfi works fantastically well with Breath of Erosion, especially when combined with the blessing that applies Infection to surrounding enemies, since using [Decoy] pulls enemies to adjacent tiles. If your Lutfi is not yet at 5-stars, note that using him here becomes slightly less efficient since you will always risk losing him whenever he has no invisibility. |
| Luvata | With blessings that increase both Crit and DoTs, Luvata becomes a perfect fit as a character that can benefit from both. Alternatively, you could use a Rk13 Miguel, or a Beryl to create burning tiles, but without Luvata's buff that makes allies immune to burning tiles, navigating the stages can become more complicated. |
The blessings included in the Breath of Erosion adventure style included a lot of crit-based buffs. Which works perfectly with characters like Luvata and Lutfi who can deal damage using either. Kvare, on the other hand is recommended simply because he is a very powerful standalone DoT unit that will perform consistently even without the right blessings.
How to Farm Adventure Coins
Clear the Hardest Difficulty
By clearing the hardest difficulty that you can, you will receive more Adventure Coin. However, as the difficulty increases, the enemies' levels become higher and they become stronger, so if you don't want to put in the effort, or are not yet at max voyager level, it's viable to repeatedly clear low-difficulty stages.
Adventure Coins Obtained per Stamina
| Difficulty | Coins Obtained | Coins Obtained per 1 Stamina |
| Difficulty 1 | 3200 | 80 |
| Difficulty 2 | 5100 | 85 |
| Difficulty 3 | 7200 | 90 |
| Difficulty 4 | 9500 | 95 |
| Difficulty 5 | 14400 | 120 |
Difficulty 5 allows you to obtain a particularly large number of coins, so if your characters are strong enough, we recommend challenging Difficulty 5 at least twice a week.
Obtain Extra Rewards

Regardless of the difficulty, by consuming an Extra Rewards, you can obtain 12,000 coins and "Secret Fates". Extra Rewards recovers twice every Sunday at 24:00 and can be accumulated.
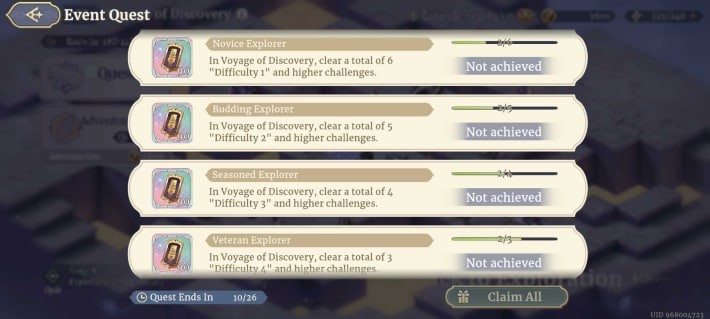
Clear Event Quests
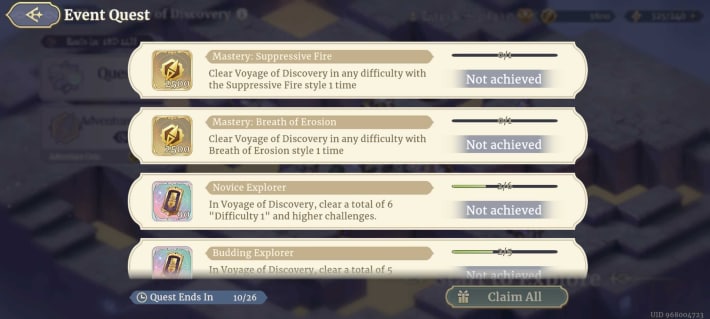
You can acquire Adventure Coins by completing Event Quests. There are three types of missions: "Clear VoD at a specified difficulty or higher," "Clear VoD using a specific Adventure Style," and "Collect a specified number of Adventure Coins." Challenge the stages to complete these Event Quests within the event period.
Adventure Depot Priority Rewards
Gift Exchange Priority
| Priority | Exchange Item |
| ★★★★★ | - Random Legendary Trinket Box |
| ★★★★・ | - Random Legendary Weapon Box - Unnamed Talent Materials - Mysterious Rank Medals |
| ★★★・・ | - Unnamed Legendary Engravings Box - Radiant Ores |
| ★★・・・ | - Radiant Powder(*Recommended for beginners) - Common Exp - Elysium Coins - Tarot Essence |
| ★・・・・ | Others |
Talent Materials are used in large quantities for enhancement, so exchange for them as much as possible. After exchanging for high-priority items, we recommend redeeming Radiant Powder, Common Exp, Elysium Coins, and Tarot Essence as needed, since these have no exchange limit.
| Pro Tip! | The above recommendations assume that the player is at max Voyager lv. Beginners should take the Trinkets, Weapons, Elysium Coins, and Radiant Powder as needed. |
|---|
What is the Voyage of Discovery?
Event Overview
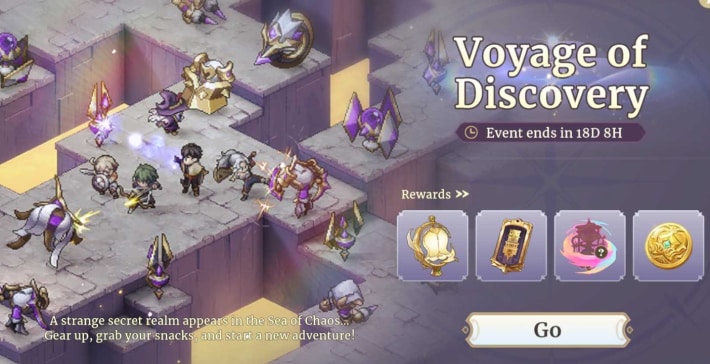
Voyage of Discovery is a Rogue-like
event where you clear stages divided into 5 difficulties to collect Adventure Coin and Astral Shards, and obtain various rewards. Stages are randomly generated, and buffs are selected before each stage. It's important to train various characters to be as prepared as possible.

Active Events
| List of Current Events |
|---|
 Luminous Azure Luminous Azure |
Previous Events
| List of Previous Events | ||
|---|---|---|
| Chew It, Iria Food! | Elysium Feast | Eternal Awakening |
| Voyagers' Conundrum | Universal Derivation | - |

