
Read this Borderlands 3 story mission walkthrough guide of Cold as the Grave. Including mission tips, boss fight battles, and more!!!
Table of Contents
Story Progression & Walkthrough
| << Previous Part | Next Part >> |
|---|---|
| Going Rogue | Blood Drive |
Cold as the Grave Pt 1 Walkthrough
Cellars ~ Aurelia Walkthrough Map
Eden-6 - Floodmoor Basin Map


Eden-6 - Blackbarrel Cellars Map

Cellars ~ Aurelia Walkthrough Chart
| No. | Procedure |
|---|---|
| 1 | Head to Knotty Peak and talk to Wainwright |
| 2 | Head to Reliance and meet up with Clay |
| 3 | Follow Clay to the Blackbarrel Cellars |
| 4 | Follow your objective marker through the Cellars to find the barrel delivery pipe |
| 5 | Open the door to the Gunpowder Mill & clear the area of enemies |
| 6 | When the area is clear, head to the pipe |
| 7 | Activate the pipe - clear the area when enemies spawn after the 2nd activation |
| 8 | Activate the pipe a 3rd time, destroy the barrel & grab the Vault Key fragment |
| 9 | Head to the objective marker to enter the conveyor system & find Wainwright |
| 10 | Defeat Aurelia |
| 11 | Check on Hammerlock & Jakobs then head into the Estate Grounds |
5., 7. Clear Area Of Enemies
Use Elemental Weapons For Damage Over Time

When facing off a slew of enemies, be sure to bring elemental weapons. Hitting an enemy with an elemental weapon can do damage over time, allowing you to leave them to die while facing off with other foes.
Corrosive Can Tear Down Yellow Bars

When you encounter an enemy with a yellow bar above its HP, use a corrosive weapon against them. This will bring that yellow shield down.
10. Aurelia Has Aggressive Ice-Based Attacks

The boss in this part of the mission is Hammerlock's sister, Aurelia. She deals a lot of ice-based attacks that home on you, do AoE damage, and more. Bring electricity & fire weapons to damage her shield and health.
Cold as the Grave Pt 2 Walkthrough
Estate Grounds ~The Graveward Walkthrough Map
Eden-6 - Blackbarrel Cellars Map

Eden-6 - The Floating Tomb Map

Estate Grounds ~The Graveward Walkthrough Chart
| No. | Procedure |
|---|---|
| 1 | Find the 2 statues in the garden & recreate their deaths |
| 2 | Follow the marker to get into the Neglected Solarium |
| 3 | Find the 3rd statue and shoot it |
| 4 | Follow your marker again to get to the bridge and activate it |
| 5 | Head across the bridge to enter The Floating Tomb |
| 6 | When you get to the ruins entrance, give the Vault Key fragment to Tannis |
| 7 | Wait for the key to be created |
| 8 | Take the Vault Key and jump down to place it into the pedestal |
| 9 | Defeat Grave and Ward |
| 10 | After defeating Grave and Ward, The Graveward will appear - fight and defeat it |
| 11 | After defeating The Graveward, wait for Tannis then observe her |
| 12 | Enter the Vault and take the Eridian Synchronizer |
| 13 | After looting the Vault, go back to Tannis and talk to her |
| 14 | Head back to Sanctuary & talk to Lilith to complete the mission |
1~3. Recreate Deaths Of Statues
Shoot Head Of Talkot Jakobs

The nearest statue you will find in the estate ground is that of Talkot Jakobs. Shoot him in the head to complete the objective.
Shoot Back of Maddox Jakobs

The 2nd statue to the left of Talkot Jakobs is the one of Maddox Jakobs. Go behind him and shoot him in the back to activate the statue.
Shoot Hands Of Wharton Jakobs

The last statue will be inside the Neglected Solarium. After clearing the area, shoot the statue of Wharton Jakobs on one of his hands to activate it.
9. Use Electricity Weapons Vs. Grave & Ward

When you place the Vault Key into the pedestal, 2 Guardians named Grave & Ward will appear to attack you. Their HP bars are blue, so make sure to bring a strong electricity weapon to fight against them.
The Graveward Appears After Grave & Ward

The Graveward is the Vault Guardian that you need to face after defeating Grave and Ward. It has a long HP bar and different acid-based attacks.
Aurelia - Boss Battle Tips
Watch Out For Ice Attacks

Aurelia does a lot of ice attacks that can damage you from afar. She'll summon ice spikes from the ground and also send ice pillars towards you. Keep your distance to avoid taking too much damage.
Use Electricity Weapons To Bring Shield Down

Aurelia has a pretty high shield that can make it hard to damage her. If you have any, switch to an electricity weapon to bring her shield down, allowing you to hit her HP bar.
Shoot Aurelia's Ice Pedestal To Bring Her Down

When Aurelia summons an ice pedestal to stand on, shoot it down to make her fall to the ground. She'll stay on the ground for a few seconds, giving you time to do some critical shots.
Destroy Ice Pod To Stop Her Healing

Aurelia heals herself and puts her shield up when she takes too much damage. She encases herself in an ice pod so shoot the 3 pillars to break it and stop her from healing.
Keep Distance When Giant Snow Ball Floats Up

Aurelia will summon a giant snow ball that floats up into the ceiling. Immediately move away from it as it sends out batches of snow balls that can cumulatively do heavy damage.
The Graveward - Boss Battle Tips
Use Fire-Based Weapons For Heavy Damage

The HP Bar of The Graveward is red, making it vulnerable to fire attacks. Make sure to bring a strong fire weapon in this boss fight.
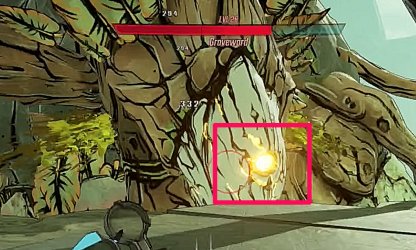
Yellow Orbs Are Weak Spots

The Graveward has several weak spots in its body - in its head, chest, and both of its arms. It does certain moves to expose these weak spots so make sure to target them.
Deal Enough Damage To Drop Graveward
If you deal enough damage to The Graveward, it will drop onto the platform, exposing its biggest weak spot on its head. Use your most powerful guns and skills to do big damage to its health.
Tilts Platform So Be Careful Not To Fall

When the monster dips down, it'll move the platform and tilt it to one side. Be careful and keep jumping to avoid falling over and having to restart the boss fight from the beginning.
Shoot Acid Orbs To Get Ammo

When the enemy tilts the platform, it'll send green acid balls towards you. Shoot to destroy them and they will drop ammo.
Spits Acid & Enemy Mobs

When The Graveward grabs onto the platform and spits acid onto it, it will spawn enemy mobs. These will actively attack you so watch out.
Use Mobs To Get Second Wind
If your HP bar goes down and you are in the "Fight For Your Life" situation, use the enemy mobs that The Graveward has summoned to gain Second Wing & continue the fight.
Don't Stand In Front Of Laser

After you drop The Graveward, it'll do a counter attack sand hit you with powerful lasers. Be sure not to stand right in front of it to avoid getting hit by the beams.
Jump Over Large Laser Beams

The Graveward also does a large scale laser beam attack that sweeps across the entire platform. Head to the edge and jump over it to suffer minimal damage.
Story Progression & Walkthrough
| << Previous Part | Next Part >> |
|---|---|
| Going Rogue | Blood Drive |

