 Acambe
 Afra
Afra Agata
Agata Alexei
 Auguste
 Ayishah
 Beryl
Beryl Camelot
 Caris
Caris Ciri
Ciri Clara
Clara Cocoa
Cocoa Col
Col Credenza
 Dantalion
 Edda
Edda Estra
Estra Falin
Falin Faycal
 Flavia
 Garcia
 Geralt
 Gloria
 Guzman
 Hasna
Hasna Heshan
 Homa
Homa Iggy
Iggy Inanna
 Kianshir
 Kiya
Kiya Kvare
Kvare Layla
Layla Leonide
 LilyWill
 Lukamar
 Lutfi
Lutfi Luvata
 Magnus
 Maitha
 Marcille
 Miguel
 Momo
Momo Nergal
 NonoWill
 Nungal
 Nydia
Nydia Pamina
 Parsifal
 Pooch Runrun
 Rawiyah
 Rico
Rico Safiyyah
 Samantha
 SchackLulu
 Selina
 Senshi
 Shahnaz
 Shams
Shams Simona
 SP Faycal
 SP Inanna
 SP Maitha
 SP Nungal
 SP Rawiyah
 SP Safiyyah
 SP Samantha
 Taair
Taair Teadon
 Team Meteor
 Triss
Triss Tristan
 Xavier
 Yeganeh
 Yennefer
 Yserinde
This is an Early Game Guide for Sword of Convallaria (SoC)! Learn how to progress past Chapters 1-3, what to do if you get stuck, and even tips and tricks to help you get started!
Table of Contents
How to Progress Through the Early Game
Prioritize Clearing Fool's Journey 3-17
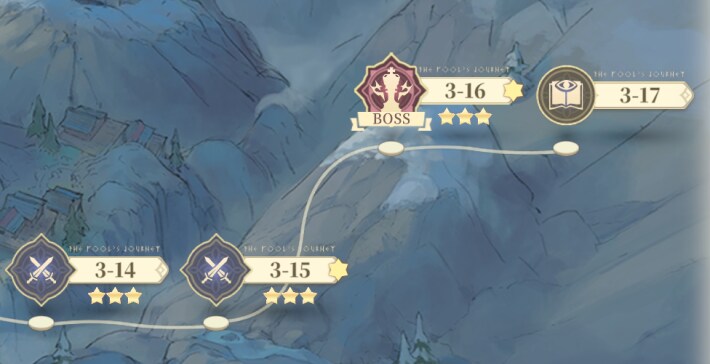
Once you start playing Sword of Convallaria, your first goal should be to clear Chapter 3-17 of theFool's Journey. Endurance recovery takes time so remember to progress through it daily until you've cleared 3-17.
Content Unlocked via the Fool’s Journey
| Stage | Unlocked Content |
| 0-4 | Gear |
| 0-6 | Auto-Play Function |
| 0-7 | Spiral of Destinies |
| 0-9 | Crossing Worlds: Rank-up Trial |
| 1-6 | Crossing Worlds: Level-up Training Interior Customization |
| 1-12 | Crossing Worlds: Star Trial |
| 1-17 | Crossing Worlds: Memory Retrieval |
| 1-18 | Character Bonds |
| 2-7 | Crossing Worlds: Radiant Forging |
| 2-11 | Crossing Worlds: Tower of Conquest |
| 2-17 | Crossing Worlds: Weaponry Trial |
| 3-16 | Crossing Worlds: Tarot Residual |
| 8-5 | Engravings |
Progressing through the Fool's Journey allows you to access vital parts of the game where you can farm resources to improve your cast of characters. Aim to get through 3-16 as you continually enhance your characters.
Prologue: The Rift Walkthrough
- Progress through the Fool’s Journey
- 0-6: Deploy an Additional Unit
- 0-7: Push the Boss Into the Fire
- Name the Mysterious Cat
- Speak to the Cat
- 0-9: Knock the Boss Out of Bounds
- 0-10: Reach the Designated Area

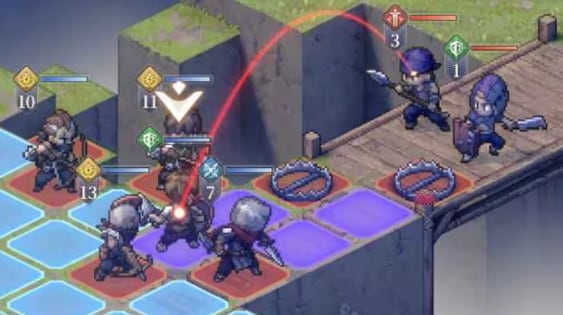
In the early game, proceed with tackling the Prologue of the Fool’s Journey to unlock various content. The prologue can be cleared without training characters simply by utilizing the knockbacks of Maitha.

In 0-6, you can deploy one more unit before the battle starts. This increases the number of active characters that you control, essentially allowing you to clear the stage in fewer turns.
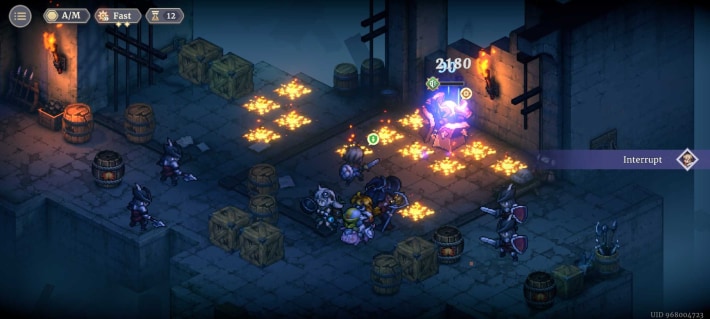
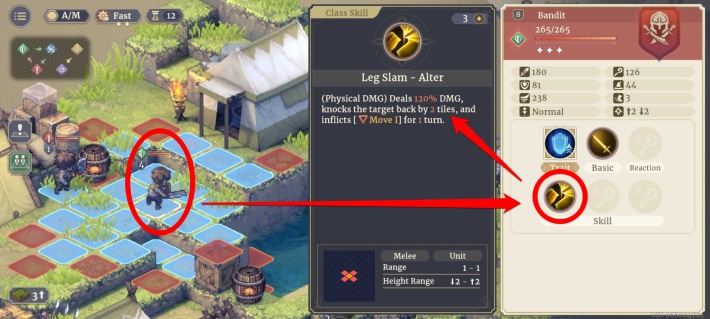
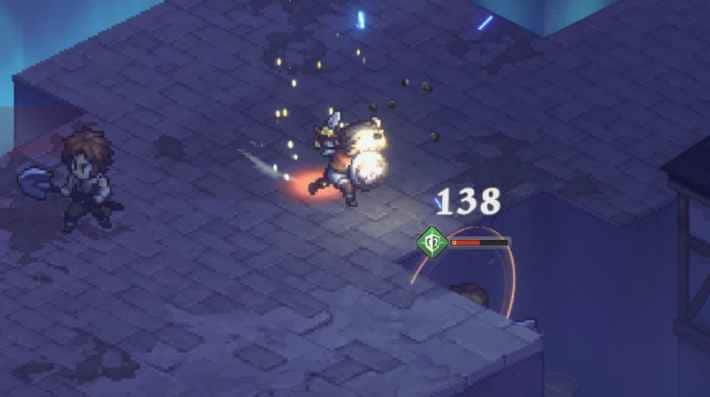
The boss that appears in 0-7, Calamity Spawn Barrier
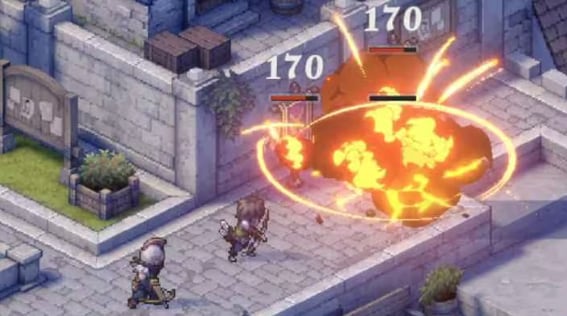
, has very high HP. Use Maitha's [Leg Slam] to push the boss into the fire and defeat it with damage over time.

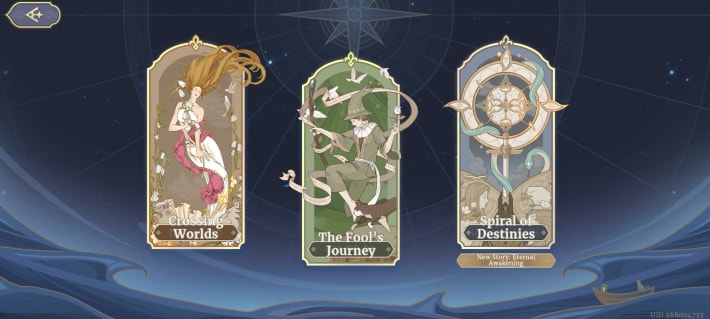
After clearing 0-7, you will automatically be taken to the challenge screen for Spiral of Destinies. You can return to the previous screen by tapping the arrow in the upper left. You're free to continue playing SoD, however, we recommend proceeding with Fool's Journey first, to unlock various content.
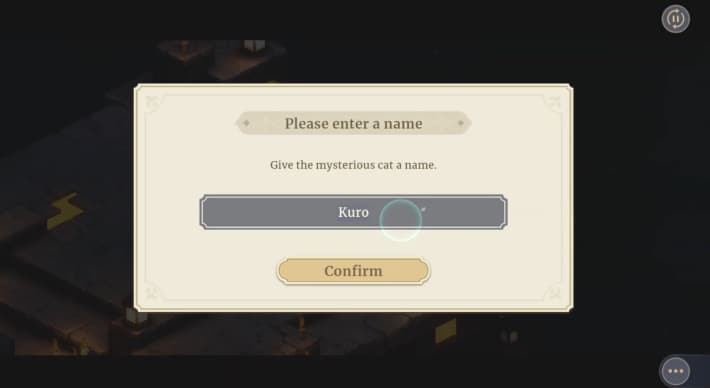
Grant the mysterious cat a name. If you want to change the name after naming it, you need to purchase a Nameless Tarot
from the shop for 200 Hope Luxites.
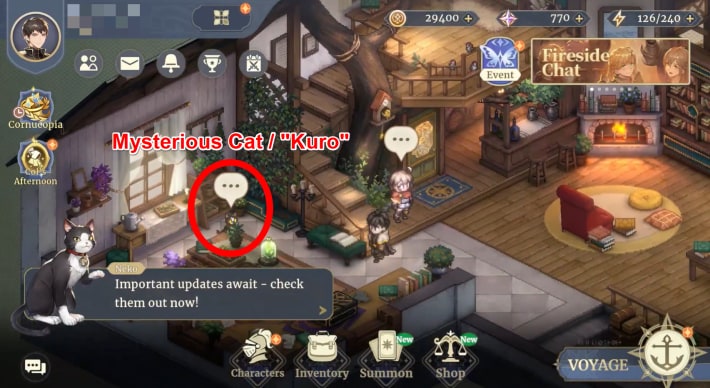
Speak to the cat on the left side of the stairs in your home. After the conversation ends, you need to head to the port.
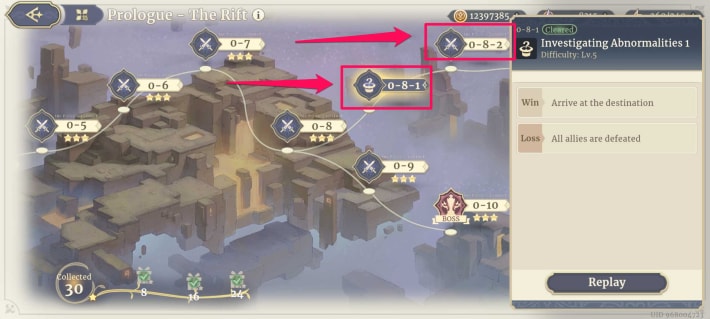
Clearing branched stages like 0-8-1 does not affect the story's progression. You can get additional rewards from treasure chests as you advance through the stages, so it's recommended to attempt them when you have extra time or Endurance (Stamina).

In 0-9, you will fight Calamity Spawn Barrier
again. It's much stronger than the last time you fought it, however, it still isn't immune to knockbacks, allowing you to quickly clear the quest by knocking it into the lava/pitfall with knockbacks rather than depleting its HP.
By clearing 0-9, Crossing Worlds will be unlocked, where you can collect enhancement materials for characters and Gear. If you feel your characters are under-leveled, collect enhancement resources here.
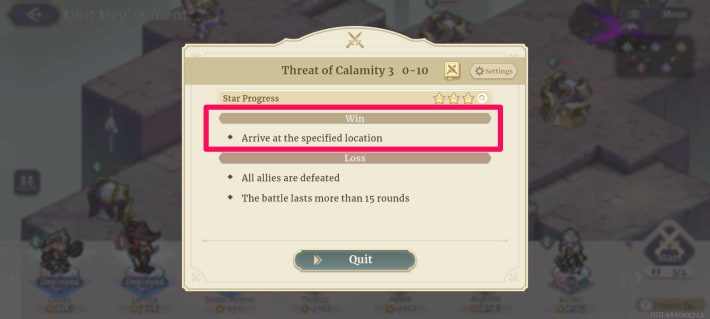
In the final stage of the prologue, you don't need to defeat the enemies. You clear the stage by moving to the designated point, so focus on getting there without being defeated.
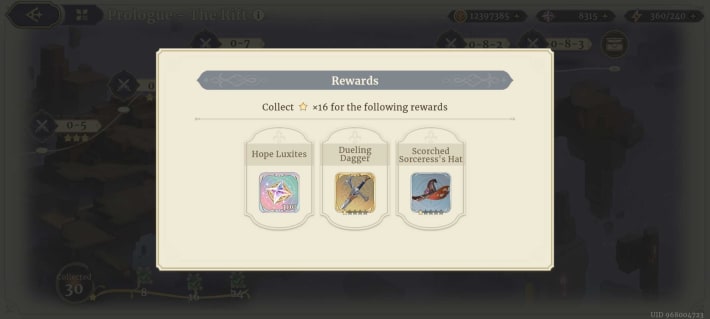
Don't forget to collect the rewards you get based on the number of stars collected. You can obtain items like Hope Luxites and Gear.
Chapter 1: Army of One Walkthrough
- 1-1: Phantom Rawiyah
- 1-2: Utilize Explosive Barrels
- 1-4: Protect the Villagers
- 1-5: Sustain Rawiyah
- Raise your Voyager Level
- 1-7: Utilize Boulders
- 1-9: Escort the Villagers
- 1-13: Use Tactical Skills
- 1-17: Use What You've Learned
- Place the Tarot in the Astarium
For the Chapter 1 stages, a Phantom
Rawiyah will join the battle. She is a high-durability attacker with knockback, Strike Back, and self-healing, so make effective use of her to progress through Chapter 1.
The bandits that appear on the left side of the screen have a knockback skill. Falling into the water results in instant death, so we recommend avoiding the water during this fight.
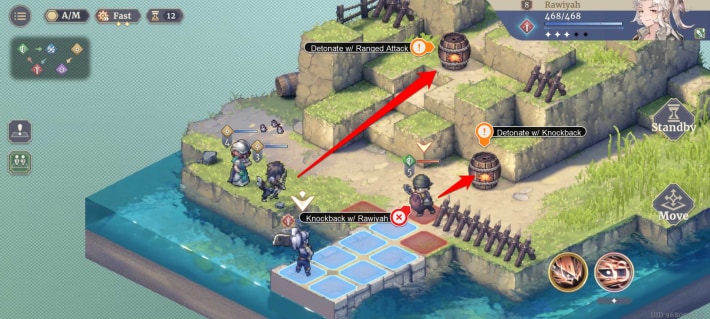
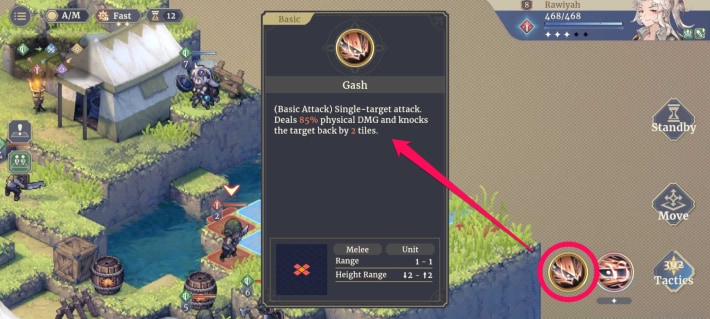
Use Rawiyah's basic attack, [Gash] and the Recruited Archer's ranged attacks to detonate the Explosive Barrels and defeat the enemies. Afterwards, the reinforcements that rush in can be defeated with auto-play.
Unlike usual stages, you need to defeat all the enemies before all the villagers are defeated. These villagers cannot deal any damage, and neither can they be controlled.

Stage 1-5 has a special rule where you lose if Rawiyah is defeated. If you proceed with auto-play, Rawiyah may potentially be defeated, so make sure to have other characters act with her and use gimmicks like explosive barrels to achieve victory.
By clearing 1-5, you unlock the more difficult Hard Mode. Clearing Hard Mode does not affect story progression, but it does offer additional Hope Luxites, so proceed whenever you have the time.
Even though progressing through the Fool’s Journey should be your first priority, playing Fool's Journey exclusively will bottleneck your account and lock you out of other content due to an insufficient Voyager Level. The EXP needed for leveling up is best gathered from Daily Quests and Crossing Worlds.
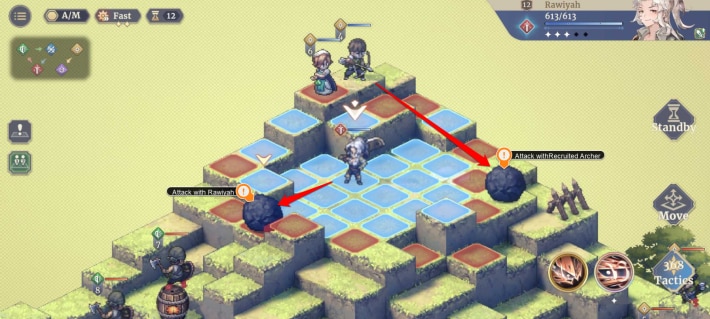
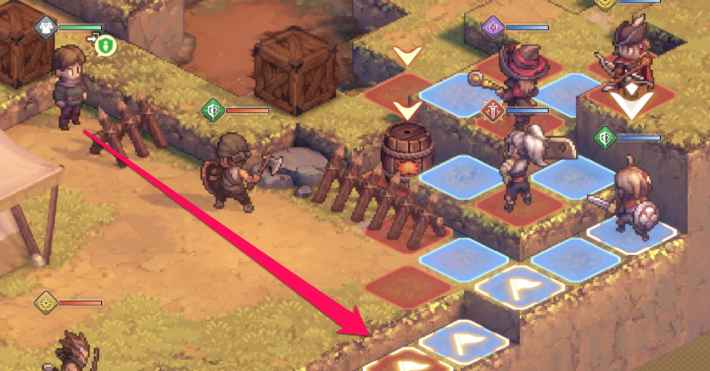
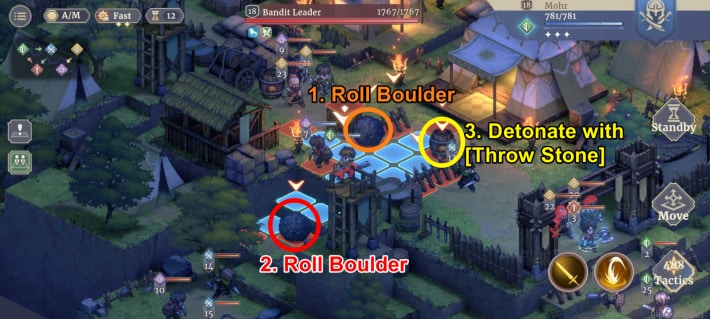
Use Rawiyah and the Recruited Archer to roll Boulders downhill and wipe out the enemies. Afterwards, the reinforcements that rush in can be defeated with auto-play.
You clear stage 1-8 by escorting the villagers to the designated point. You don't need to defeat all the enemies, so you can pour your focus on defeating enemies that are too close, or standing in the way.
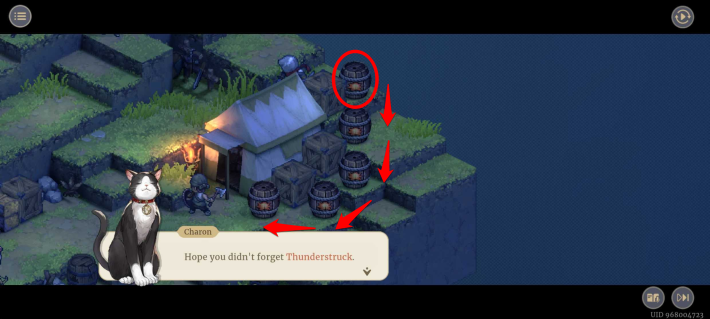
With the Thunderstruck Tactical Skill, you can attack enemies at a distance or trigger explosive barrels. It's a powerful skill that allows you to deal damage without taking attacks from enemies, enabling you to defeat them efficiently.
A very large number of enemies appear in 1-17. Route the enemies by making full use of reinforcements, various gimmicks, and tactical skills that arrive after one turn.
The key to clearing the stage is the two allies who rush in as reinforcements. They don't have stats as powerful as your Elysium Characters, but they play a crucial role in leading you to victory by making effective use of gimmicks.
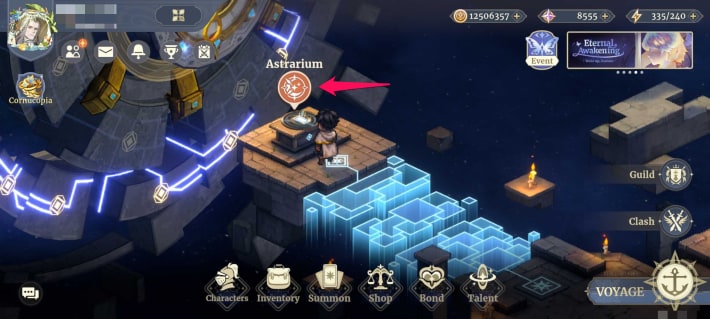
By placing the Tarot cards in the Astarium in Elysium, Chapter 2 'Brothers' will be unlocked.
By moving to the bottom right of the house' interior, you can exit. After leaving the house, you can access the Astarium at any time by heading towards the docks.
Chapter 2: Brothers Walkthrough
- 2-3: Destroy the Enemy Banners
- 2-9: Create Burning Tiles
- 2-11: Be Wary of AoE Attacks
- 2-16: Utilize Gimmicks to Escape
- 2-17: Weaken the Enemies First
- Place the Tarot in the Astarium
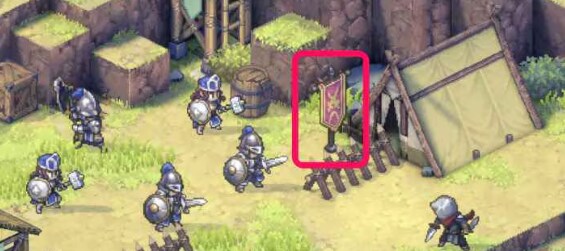
While the maroon [Enemy Banner] remains standing, the stats of all enemies are greatly increased, so prioritize destroying it to make clearing the stage more manageable. Enemy Banners will appear in many stages from now on, so always remember to prioritize destroying them.
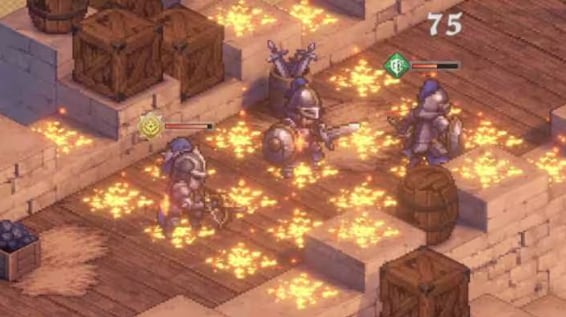
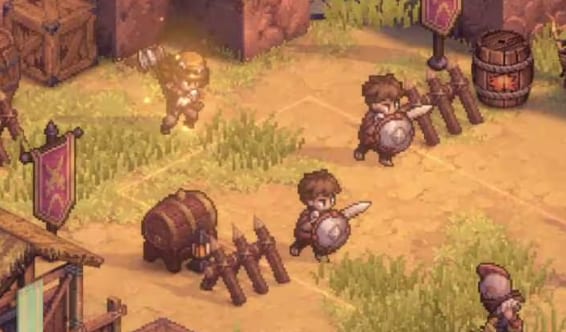
Walking on [Burning] tiles created by [Liquor Barrels and Oil Lamps] will cause damage, so roll barrels to ambush the advancing enemies and efficiently chip away at their HP.
The enemy Axemen primarily use an area-of-effect attack that takes one turn to prepare. You can avoid damage by positioning yourself outside of the attack range.

Use the nearby [Liquor Barrel] and [Recovery Item] to escape. You can [Act Again] by standing by on top of a Recovery Item, allowing Lutfi to cover a greater distance in a single turn.
Utilize gimmicks like barrels to create Burning tiles, and target Enemy Banners to even the playing field. Also, the boss Safiyyah summons enemies, so it's important to prioritize defeating her to avoid a prolonged battle.
By placing the Tarot cards in the Astarium towards the docks, Chapter 3 Book of Vlderians will be unlocked.
Chapter 3: Book of Vlderians Walkthrough
- Utilize Support Characters
- 3-3: Use Vlder's Rattan Ball
- 3-6: Rescue the Vlderians
- 3-9: Use Ancestral Power Cautiously
- 3-13: Utilize Traps and Allies
- 3-16: Be Wary of Enemy Reinforcements
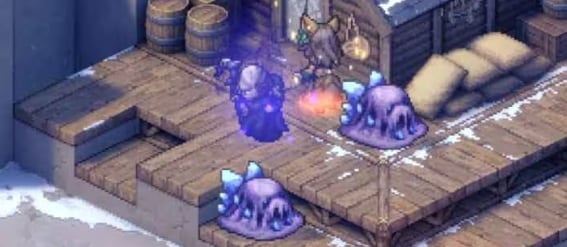
In Chapter 3, NonoWill and LilyWill will join as 'support' characters depending on the stage. NonoWill excels at AoE attacks and damage over time, while LilyWill is great at Ranged attacks, so take these into account as you play through the stages.
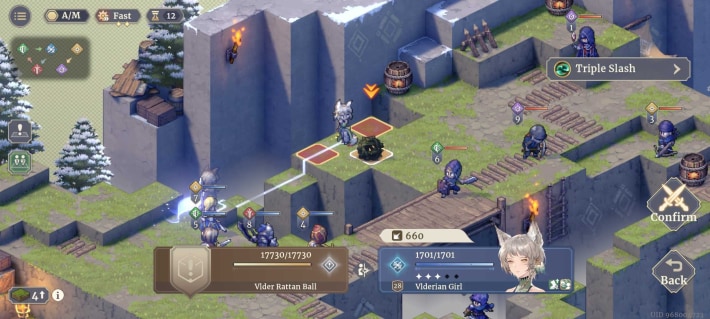
Utilize the Rattan Ball by attacking it to make it roll. Upon colliding with an enemy, it causes knockback. It also spawns 4 [Thornbush] that apply [Infection], so by using it well, it's possible to damage groups of enemies.

The enemy Defenders are holding Vlderians captive, so you can rescue them by defeating the Defenders. Prioritize defeating the enemy Defenders before proceeding through the stage as usual.
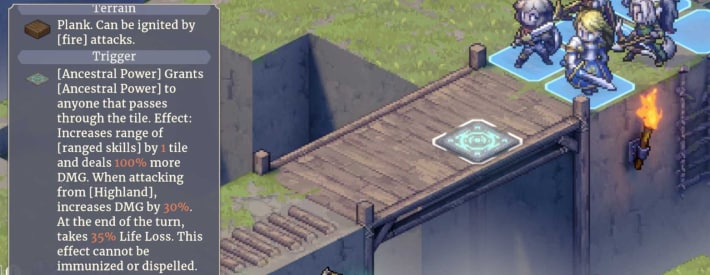
Walking over an [Ancestral Power] tile causes the character to lose HP every turn in exchange for increased range and damage. If you are confident in your party, you can ignore Ancestral Power tiles, but if not, use them strategically to deal massive damage.
Utilize the [Trap]s, since they can interrupt an enemy's action when stepped on. Also, two reinforcements will appear midway, so be sure to utilize them to defeat the enemies.
When you defeat the Darklight Elder, two reinforcements will appear. You will have to defeat them as well to clear the stage, so try to save HP and NRG in preparation for the incoming reinforcements.
Progression Priorities
Prioritize The Fool’s Journey
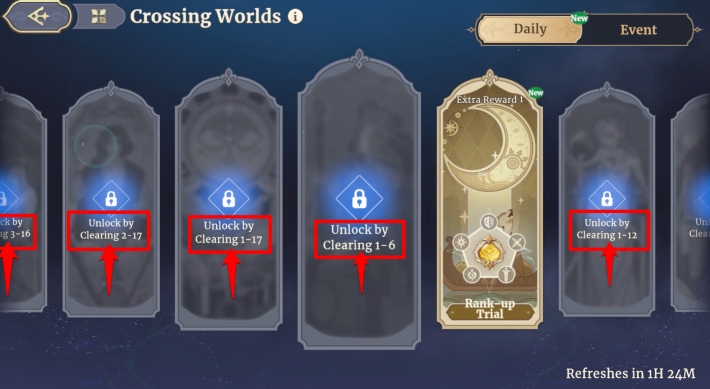
Aim to unlock all stages in Crossing Worlds by clearing 3-17 of *The Fool’s Journey*. Once you clear 3-17, ‘Tarot Residual’, where you can obtain Tarot, will become available, and all stages of Crossing Worlds will be unlocked.
Progress Spiral of Destinies Anytime
The Spiral of Destinies features branching routes and a rich standalone storyline. Progressing through SoD earns the player various rewards via raising your Insight Level, but since completing a run takes a significant amount of time, it’s best to spend your Endurance first before committing to an SoD run.
| Pro Tip! | While starting out, prioritize the Fool's Journey over Spiral of Destinies to unlock more content! Once everything is unlocked, play SoD at your own pace! |
|---|
Beginner Tips and Tricks
- Increase Battle Speed
- Use Terrain Effectively
- Long-Press to Move Characters
- Avoid Using Auto Play
- Tap Speech Bubble to Move
Increase Battle Speed
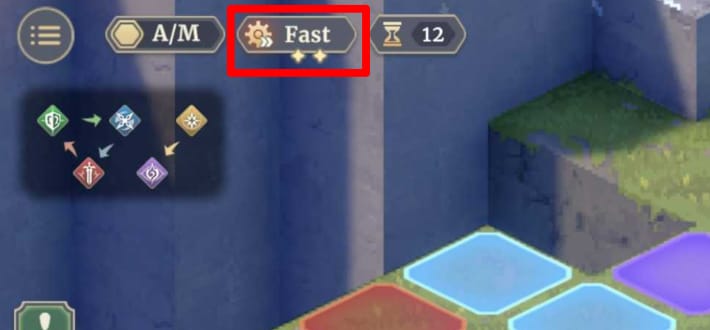
Increasing the speed makes animations, movement, attacks, etc. much faster. Essentially, using the fastfoward
function allows you to save real-world time by shortening the duration of clearing stages. You can increase game speed and more by tapping the “Fast” button in the upper-left corner of the battle screen.
Use Terrain Effectively
Every stage in Sword of Convallaria will have its own gimmicks
present on the map. Things like explosive barrels, traps, turrets, and pitfalls can all be exploited to gain the upper hand. Therefore, characters that have knockback skills, such as Maitha, are indispensable since they can shove enemies into these hazardous tiles.
Enemies Can Also Trigger Gimmicks
It's important to note that enemies can also take advantage of terrain and gimmicks. Remember to position your characters so they aren’t pushed into hazards by enemy knockbacks.
Long-Press to Move Characters
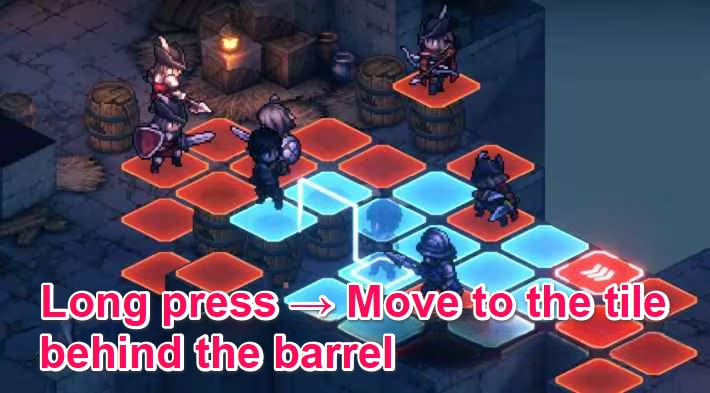
If the tile you're trying to move to is difficult to select, such as behind an obstacle, long-press/hold the character to manually specify the destination.
Avoid Auto-Play
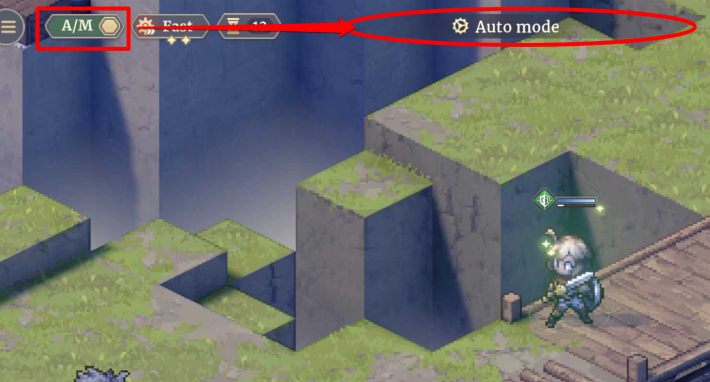
After clearing Stage 0-6, you can enable auto-play by tapping the “A/M” button in the upper-left corner of the battle screen. Characters under the AI's control do not account for terrain effects or gimmicks, so it’s not ideal while your characters are still weak, especially when you're trying to get past a particularly troublesome stage.
Tap the Speech Bubble to Move
By tapping the text displayed at the bottom of the screen, your character will automatically move to the designated destination. This is helpful for those who are still unfamiliar with the layout of Elysium.
What to Do When You Get Stuck
- Raise your Voyager Level
- Train your Characters
- Check your Gear
- Re-evaluate your Party
Raise your Voyager Level
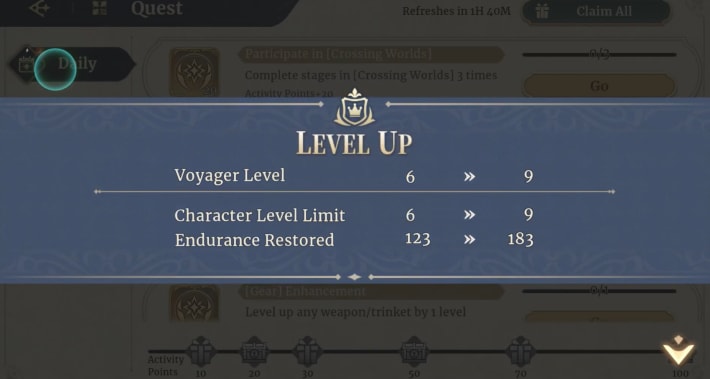
Some of the game's content is gated behind Voyager Level requirements before you can challenge them. If you're unable to proceed due to your Level, collect Voyager EXP in Crossing Worlds while simultaneously gathering training materials for your characters and Gear.
Train your characters
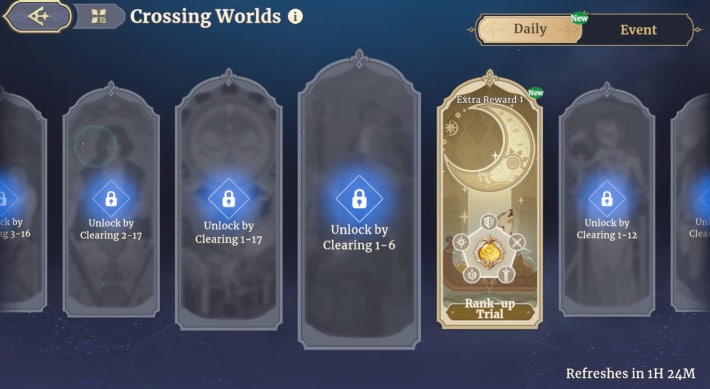
If you're stuck early on, start by checking how well your characters are trained. Enhancement materials can be farmed in Crossing Worlds, which is unlocked after clearing Stage 0-9 of the Fool's Journey.
Equip and Enhance Gear
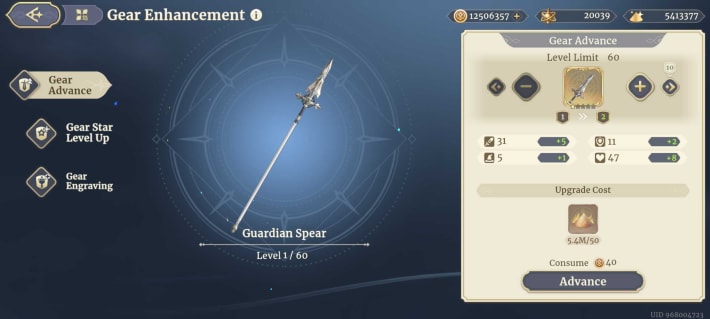
Since character level is bottlenecked by your current Voyager Level, an alternative way of empowering your characters is by boosting their stats via equipped Gear. Make sure to upgrade a few key pieces, just enough to equip your main party, before attempting to progress.
Re-evaluate your Party
- Take Advantage of Role Matchups
- Support Allies with Passives
- Consider Turn Order and Movement Range
- Utilize Stage Hazards and Traps
Ensure your team setup takes advantage of enemy weaknesses. Even if your characters are slightly underleveled, fighting with the right type matchups can help you overcome tough enemies.
Sword of Convallaria (SoC) Related Articles

Tier Lists
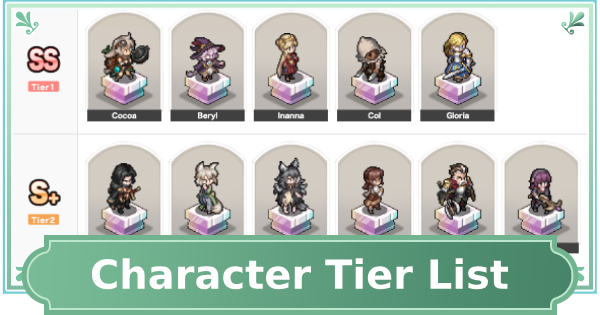 Character Tier List
 Gear Tier List
 Reroll Tier List
News & Updates
| Latest News | |
|---|---|
| Latest News | List of Available Banners |
| Upcoming Characters | 1st Anniversary Update |
| Redeem Codes List (October 2025) | |

