
Check out how to solve all the mysteries in this guide! This guide shows how to solve puzzles, images & locations which are tied to each stage.


Featured Related Articles
Table of Contents
All Puzzle List - Overview

All Puzzles List
| No. | Puzzle | Rewards |
|---|---|---|
| 1 | Lion Statue Puzzle | Lion Medallion |
| 2 | Unicorn Statue Puzzle | Unicorn Medallion |
| 3 | Maiden Statue Puzzle | Maiden Medallion |
| 4 | Generator Room Puzzle | Generator Room Switchboard |
| 5 | Jail Switchboard Puzzle | Generator Room Switchboard |
| 6 | Private Collection Room Puzzle | Parking Garage Key |
| 7 | Gear Puzzle | Electronic Part key item |
| 8 | Blocks Puzzle | Scissors |
| 9 | Chess Puzzle | Opens the door |
| 10 | Switch Puzzle | Brings back the power |
| 11 | Greenhouse Control Room Code Puzzle | Opens the way to the lounge |
| 12 | Drug Testing Lab Code Puzzle | Opens the way to the Drug Testing Lab |
| 13 | Greenhouse Lab Chemical Puzzle | Receive the Dispersal Catridge |
In this guide, we separated stories into sections and introduce mysteries you will need to face. By solving those puzzles, you will receive key items to go to the final stage of the game.
Opening ~ RPD - Puzzle List
The Lion Statue Puzzle
Side A (1st Playthrough) (Leon / Claire)

Side B (2nd Playthrough) (Leon / Claire)

Solution
| 1st Slot | 2nd Slot | 3rd Slot | |
|---|---|---|---|
| Side A (1st Playthrough) | Lion | Leaf | Bird |
| Side B (2nd Playthrough) | Crown | Flame | Bird |
You need to match 3 designs. The puzzle solves when designs match to a certain combination.
When Solved
Get Lion Medallion
The Unicorn Statue Puzzle
Side A (1st Playthrough) (Leon / Claire)

Side B (2nd Playthrough) (Leon / Claire)

Solution
| 1st Slot | 2nd Slot | 3rd Slot | |
|---|---|---|---|
| Side A (1st Playthrough) | Pisces | Scorpio | Aquarius |
| Side B (2nd Playthrough) | Twins | Scale | Small Snake |
You need to match 3 designs. The puzzle solves when designs match to a certain combination.
When Solved
Get Unicorn Medallion
The Maiden Statue Puzzle
Side A (1st Playthrough) (Leon/Claire)

Side B (2nd Playthrough) (Leon/Claire)

Solution
| 1st Slot | 2nd Slot | 3rd Slot | |
|---|---|---|---|
| Side A (1st Playthrough) | Rusted Face | Rusted image above leaf symbol | Rusted symbol above bird |
| Side B (2nd Playthrough) | Ram | Harp | Bird |
You need to match 3 designs. The puzzle solves when designs match to a certain combination.
When Solved
Get Maiden Medallion
Check Out Story Walkthrough List Here!Parking Lot ~ RPD (Chief's Office) - Puzzle List
Generator Room Puzzle (Leon)
Side A (1st Playthrough) (Leon)

Side B (2nd Playthrough) (Leon)

Solution
| 1st Lever | 2nd Lever | 3rd Lever | 4th Lever | |
|---|---|---|---|---|
| Side A (1st Playthrough) | OFF | OFF | ON | ON |
| Side B (2nd Playthrough) | OFF | ON | ON | OFF |
You need to match 4 On/Off levers to a certain pattern. The puzzle solves when 4 levers match to a certain combination.
When Solved
Get Generator Room Switchboard
Check Out Leon A Walkthrough Pt.3 Here!Jail Switchboard Puzzle
Side A (1st Playthrough) (Leon)

Side B (2nd Playthrough) (Leon)

Solution
| Route |
|---|
| Check the above images and follow the way it is done |
Create a path that connects all three wires from the corners of the box to solve the puzzle.
When Solved
Open the Jail
Check Out Leon B Walkthrough Pt.3 here!Private Collection Room Puzzle
Side A (1st Playthrough) (Claire)

Side B (2nd Playthrough) (Claire)

Solution
| Route |
|---|
| Check the above image and follow the way it is done |
Create a path that connects all three wires from the corners of the box to solve the puzzle.
When Solved
Parking Garage Key
Check Out Claire A Walkthrough Pt.3 Here!Gear Puzzle - Side A (1st Playthrough) & B (Leon/Claire)

Solution
| 1 | Go through 3F Police Station 3F then move towards the East Storage Room - find the Large Gear inside this room |
|---|---|
| 2 | Put the Large Gear on the machine to your right to lower the Stairs |
| 3 | Head up the Stairs and get the Small Gear from the machine behind the Bell |
| 4 | Use the Small Gear on the machine by the bottom of the Stairs |
| 5 | Take the Large Gear from the first machine, and climb back up the Stairs |
| 6 | Put the Large Gear in the machine where you found the Small Gear to make the Bell ring |
First of all, get the gear at 3F East Storage Room of the Police Station and follow the above steps.
When Solved
The Boxed Electronic part falls onto the floor. Make sure to inspect the box to get the Electronic Part Key Item.
Check Out All Story Walkthrough Here!Play As Sherry (Claire Only) - Puzzle List
The Blocks Puzzle Side A (1st Playthrough) & B (Claire)

Solution
| 1st Block | 2nd Block | 3rd Block | 4th Block | 5th Block |
|---|---|---|---|---|
| Square | Triangle | Circle | Star | Triangle |
You need to find a certain combination of blocks, where all figures match. Make sure to pick up the block first hidden inside the doll behind you when you start this section.
When Solved
Get A Scissors
Check Out Play As Sherry Guide For Claire!Sewers ~ vs. G
The Chess Puzzle
Side A (1st Playthrough) (Leon/Claire)

Side B (2nd Playthrough) (Leon/Claire)
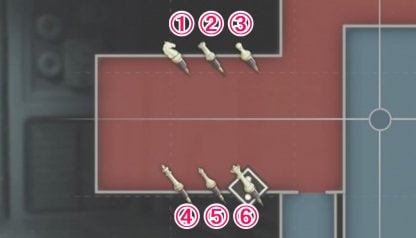
Solution
| Side A (1st Playthrough) | Side B (2nd Playthrough) | |
|---|---|---|
| 1 | King Plug | Knight Plug |
| 2 | Queen Plug | Rook Plug |
| 3 | Pawn Plug (Default is OK) | Pawn Plug (Default is OK) |
| 4 | Knight Plug (Default is OK) | King Plug |
| 5 | Rook Plug | Bishop Plug |
| 6 | Bishop Plug (Default is OK) | Queen Plug |
You need to locate plugs corresponding to the locations above.
When Solved
Opens the door
The Switch Puzzle
Side A (1st Playthrough) (Leon/Claire)

Side B (2nd Playthrough) (Leon/Claire)

Solution
| 1st Lever | 2nd Lever | 3rd Lever | 4th Lever | |
|---|---|---|---|---|
| Side A (1st Playthrough) | ON | ON | OFF | ON |
| Side B (2nd Playthrough) | OFF | ON | ON | ON |
The solution is to flip the corresponding switches in the picture.
When Solved
Bring back the power
Check Out Leon A Walkthrough Pt.6 Here!Laboratory ~ Ending - Puzzle List
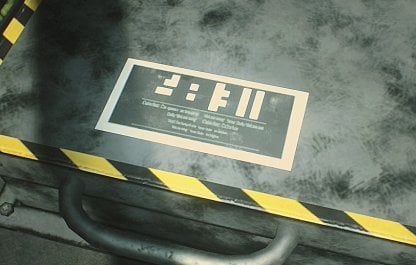
The Greenhouse Control Room Code Puzzle

In this puzzle, you need to input symbols on the panel to match a certain series of codes found in the area to open the Drug Testing Lab, and the hatch in the Greenhouse that leads to the lounge area.
Greenhouse Hatch Code Solutions
Side A (1st Playthrough) (Leon/Claire)

Side B (2nd Playthrough) (Leon/Claire)
Solution
| Code Shape |
|---|
| Input the code as shown in the above image |
You need to match the shapes of codes displayed to a certain pattern. You can input these codes directly on the panel without finding the codes on the map.
When Solved
Opens the hatch leading down to the lounge.
The Drug Testing Lab Code Solution
Side A (1st Playthrough) (Leon/Claire)

Side B (2nd Playthrough) (Leon/Claire)

Solution
| Code Shape |
|---|
| Input the code as shown in the above image |
You need to match the shapes of codes displayed to a certain pattern. You can input these codes directly on the panel without finding the codes on the map.
When Solved
Unlocks door to the Drug Testing Lab.
Check Out Leon B Walkthrough Pt.6 Here!Greenhouse Lab Chemical Puzzle
Side A (1st Playthrough) (Leon/Claire)
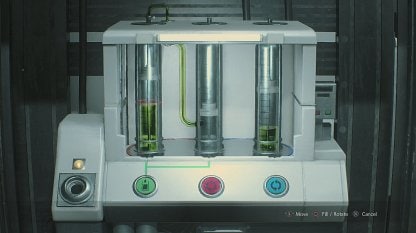
Side B (2nd Playthrough) (Leon/Claire)

Solution
| Side A (1st Playthrough) | SideB | |
|---|---|---|
| 1 | Press the middle button Swap the location of the cylinder (Medium: Large: Small) | Press right button Swap cylinder place (large: small: medium) |
| 2 | Press left button Transfer from large cylinder to medium cylinder | Press the middle button Swap the location of the cylinder (small: large: medium) |
| 3 | Press the right button Swap the location of the cylinder (Medium: Small: Large) | Press left button to transfer from large to small |
| 4 | Press the middle button Swap the location of the cylinder (Small: Medium: Large) | Press right button Swap cylinder place (Small: Medium: Large) |
| 5 | Press left button Transfer from small cylinder to small cylinder | Press the middle button Swap the location of the cylinder (Medium: Small: Large) |
| 6 | Press right button Swap cylinder place (small: large: medium) | Press left button to transfer from small to medium |
| 7 | Press the middle button Swap the location of the cylinder (large: small: medium) | Press right button Swap cylinder place (medium: large: small) |
| 8 | Press left button Transfer from small cylinder to large cylinder | Press the middle button Swap the location of the cylinder (large: medium: small) |
| 9 | - | Press left button to to transfer from the middle. |
Note!
If you clear this puzzle with the least number of moves, you'll unlock the achievement "Genius Pharmacist".

