
This is a map guide for the Mines in Arena Breakout. Discover extraction points, spawn points, free safe locations, and high-tier/mid-tier areas.
Table of Contents
*This article is based on information from the Season 8 test server. Please note that information may differ from the official release version.
Official Map Introduction Video
Mines Map

Tunnel Added to the West Side of Detention Mine from S8

From Season 8, a tunnel has been added to improve access to the Detention Mine. When passing through by vehicle, it is necessary to disable the barricade.
Click here for a video of the tunnel supply spots


How to Disable the Barricade
Activating the lever in the control room on the south side of the tunnel will disable the barricade inside the tunnel. After disabling, it becomes possible to pass through the tunnel by car.
Extraction Points
| Extraction Point Name | Extraction Point Location |
| 1. Terminus Parking Lot |  |
| 2. Road to Marlos |  |
| 3. Tunnel Entrance |  |
| 4. Mine Overlook Area 1 |  |
How to Extract
When you approach the red smoke, an icon saying "Request Extraction" will appear. Tapping the icon starts a countdown, and you can extract after 100 seconds. Also, if you extract while in a vehicle, you can take it with you.
| Requesting extraction notifies other players, so be careful of extraction campers! |
Efficient Movement by Vehicle
Find Vehicles Within the Raid

Mines is the largest map, and moving on foot can take a lot of time. Find vehicles placed on the map to make your travel to destinations more efficient.
| From S7, it is no longer necessary to bring vehicles in advance! |
No Keys Needed to Drive Cars

Before S7, corresponding keys were needed to drive, but this has now been abolished. Any car can be driven, so if you want to use one, get into a nearby one.
Free Safe Locations
There are 11 Free Safes in Mines
As it is the largest map in AriBure, it has the most free safes among all maps. The safes in Detention Mine, Hostel, and the 6th floor of the central building in Hillside Park can be investigated without a waiting time.
Detailed Locations of Each Free Safe
| Cargo Station Fuel Depot |  |
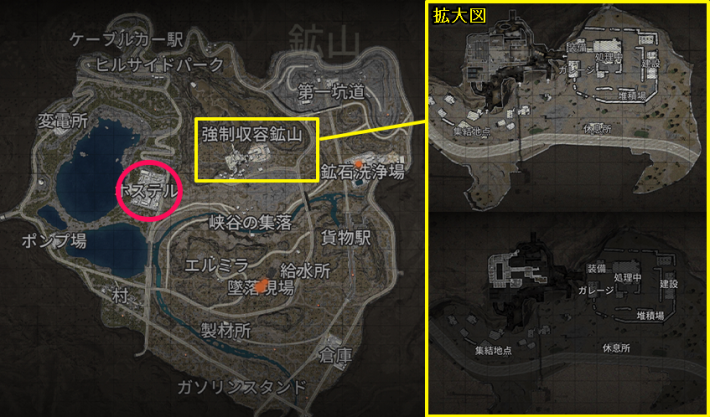
| Hostel Employee Dormitory 2nd Floor |  |
| Gas Station Central Building 2nd Floor |  |
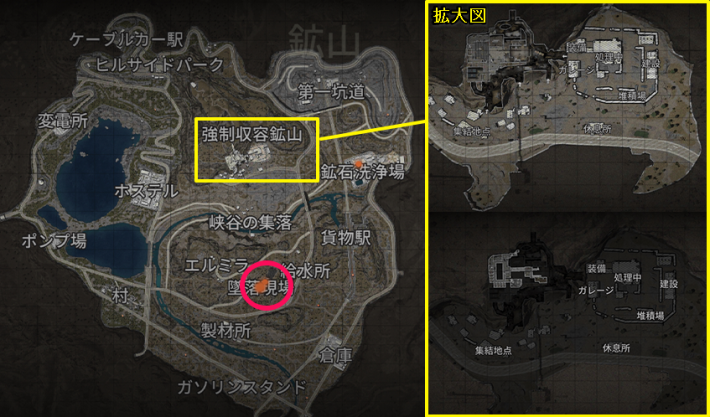
| Crash Site Near Cockpit |  |
| Crash Site 2nd Floor of East Fuselage |  |
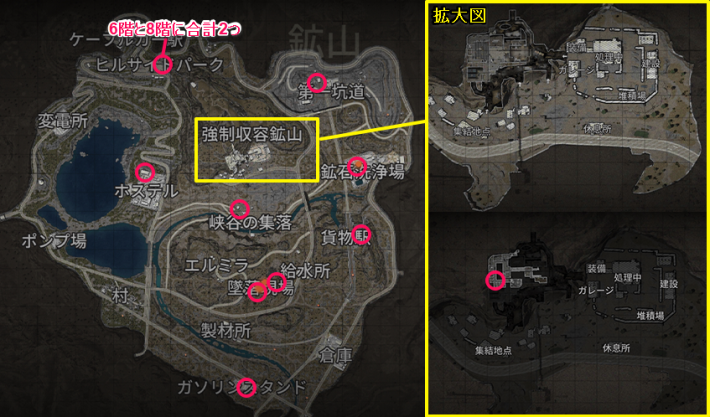
| Hillside Park Central Building 8th Floor |  |
| Hillside Park Central Building 6th Floor |  |
| Detention Mine Room North of Server Room |  |
| No. 1 Tunnel Central Building of Transport Area |  |
| Valley Settlement Midway on North Path |  |
| Ore Washing Plant 3rd Floor of West Building |  |
High-Tier/Mid-Tier Areas
[High-Tier] Detention Mine

![]()
This is a hotly contested area where players tend to gather, and including key rooms, there are three safes installed. It's possible to enter the mine, and there are many exploration spots, offering a chance for high-value raids.
[Mid-Tier] Cargo Station

![]()
It is divided into west and east areas, with many supply spots and a free safe located in the east area. If you spawn on the east side, this is one of the landmarks you'll want to visit.
[Mid-Tier] Hostel

![]()
There is a free safe in the "Employee Dormitory" on the north side, and a large number of exploration spots in the central "Miner's Residence". The Hostel has many drawers and clothing items, making it an ideal place to aim for high-value supplies like keys.
Supply Spot Introduction
Landmark Quick Reference
Gas Station

East Side
| Reference Video | https://youtu.be/oIrgWlTIZuA |
A free safe is installed on the 2nd floor of the large central building. On the 1st floor, there are material containers and toolboxes where exchange items can be found.
West Side
| Reference Video | https://youtu.be/c_hN_AKrDkI |
Three storage cases are placed on the 1st floor of the building located on the west side. It's recommended to stop by when you want to procure armor in Impostor mode, etc.
Warehouse

Temporary Warehouse
| Reference Video | https://youtu.be/H6_mzmWJIcA |
Many weapon-related supplies such as weapon cases and ammo cases are placed here. Stop by if you're about to run out of ammo.
Loading Area North
| Reference Video | https://youtu.be/atKXct3FUqg |
Multiple storage cases and ammo cases are installed in the upper area after climbing the slope. There are also home PCs and toolboxes, allowing you to obtain a wide variety of items.
Loading Area South
| Reference Video | https://youtu.be/H9kuJAlFDW0 |
This is a place where you can loot many weapon cases and storage cases. Stop by if you want to get weapon attachments, etc.
Sawmill

North Side
| Reference Video | https://youtu.be/5a3zAL0teSE |
Material containers and suitcases are placed, allowing you to obtain exchange items. There are also multiple weapon cases, so you can find ammo and attachments.
South Side
| Reference Video | https://youtu.be/H9kuJAlFDW0 |
Since there are multiple gym bags, it is suitable for finding food and water. Also, it's a place where you can aim for high-value supplies from clothing and suitcases.
Village

West Side
| Reference Video | https://youtu.be/hd0QKeTm2iQ |
Storage cases and food are placed inside the houses, so stop by if you want to procure food locally. You can also obtain exchange items from PCs and suitcases.
East Side
| Reference Video | https://youtu.be/Iku1VOma8OI |
There are fewer places to loot compared to the west side, but it's a place where you can aim for high-value supplies from expert toolboxes and common jackets.
Pump Station

Inside Building
| Reference Video | https://youtu.be/ozWYXpFGAxg |
Many toolbox-type supply spots are placed here. If you want to obtain exchange items, stop by this landmark.
Outside
| Reference Video | https://youtu.be/21-tz0voWB0 |
Multiple weapon cases and storage cases are installed, allowing you to obtain weapon-related items. There is an airdrop tank behind the stairs, so don't forget to explore it.
Elmira

South Side
| Reference Video | https://youtu.be/7me7_DOw-r4 |
Many supply spots are installed around the central warehouse. There are toolboxes and containers, so stop by when you want to acquire exchange items.
North Side
| Reference Video | https://youtu.be/bJRD8awbvu8 |
Storage cases are placed in the house above the stairs and the house on the hill. It can be used as an equipment exploration spot when playing in Impostor mode.
Crash Site
| Reference Video | https://youtu.be/g452juBzz_o |
Free safes are installed near the cockpit and at the east crash site. Both safes will unlock after waiting for 1 minute, so lock them simultaneously to shorten the waiting time.
Watering Station

West Side
| Reference Video | https://youtu.be/FVXuqP9345M |
Inside the red building on the west side, many first aid kits and ammo cases are placed. Visit to resupply if your healing items or ammo are low.
East Side
| Reference Video | https://youtu.be/3_Mgerd8l6U |
In the two-story building on the north side, multiple drawers and jackets are placed. You can aim for high-value keys, so explore when you pass by.
Cargo Station

West Side
| Reference Video | https://youtu.be/pdbVSzq9fIU |
Multiple chemical warfare suits are placed, so explore if you want to get chemicals. Also, the key room "Admin Office" is on the 2nd floor.
East Side
| Reference Video | https://youtu.be/PxmvBAY2eLE |
A free safe is in the northeast room on the 1st floor, and winter coats and office drawers are placed nearby. It's one of the places to visit to aim for high-value raids.
Valley Settlement

North Side
| Reference Video | https://youtu.be/yg3EqzLY5Qk |
A free safe is installed midway up the slope. The settlement has multiple supply cases where military items can be obtained.
South Side
| Reference Video | https://youtu.be/-3l5ftzxt7M |
There are few loot spots, but toolboxes and suitcases are placed. When using the extraction point, explore during the waiting time.
Hostel
Employee Dormitory
| Reference Video | https://youtu.be/hIheeewPw40 |
A free safe is placed in the north room on the 2nd floor. Also, many PCs are placed, making it a spot to aim for high-value items.
Miner's Residence 1st Floor
| Reference Video | https://youtu.be/upQdCJROtYY |
There are gym bags and first aid kits, which can be used when you want to procure food and healing items. Also, many clothing items are placed, so try to aim for high-value supplies like keys.
Miner's Residence 2nd Floor
| Reference Video | https://youtu.be/Jf5ePsWTrws |
Weapon cases and attachment cases are placed. Stop by if you want to get weapon-related items or resupply ammo.
Office Area
| Reference Video | https://youtu.be/7sPvvVpzliA |
Business suitcases and winter coats are placed, making it a spot to aim for rare items. You can also procure equipment from storage cases and weapon cases.
Southeast Building
| Reference Video | https://youtu.be/1SlVqM1KX6Y |
Document cases and multiple clothing items are placed. Although there are few places to explore, it's a spot where you can aim for high-value supplies like keys.
Substation

West Side
| Reference Video | https://youtu.be/qM2Ech-EIuA |
Material containers and toolboxes are placed, allowing you to obtain exchange items. There are also two first aid kits, so you can procure healing items.
East Side
| Reference Video | https://youtu.be/xfXXaMn9g5Y |
There are few supply spots, but grenade cases and ammo cases are placed. Use it as a resupply point if your ammo is depleted.
Detention Mine

Assembly Point
| Reference Video | https://youtu.be/nERR12ifo-A |
Although there are many buildings, there are no supply spots in the west settlement. If exploring, loot the ammo cases and weapon cases in the east buildings.
Garage Area
| Reference Video | https://youtu.be/7zRy-uwT6r8 |
Various supply spots such as weapon cases and airdrop tanks are placed. Since it's a high-tier area, explore aiming for high-value items.
Detention Mine 1st Floor
| Reference Video | https://youtu.be/SS5yLn-hGNo |
A free safe is installed in the room north of the server room. Supply spots are abundant, but enemy NPCs are roaming, so it's recommended to explore after eliminating them.
Detention Mine 2nd Floor
| Reference Video | https://youtu.be/d3m76vhntmA |
There are fewer places to loot compared to the 1st floor, so stop by when using the "Mail Storage Room" key. Also, document cases and ammo cases are placed in the east room.
Ore Washing Plant

West Side
| Reference Video | https://youtu.be/okhIaluJbs4 |
A free safe is installed on the 3rd floor of the building. Also, three chemical warfare suits are placed, so use them when you want to obtain chemicals or healing items.
East Side
| Reference Video | https://youtu.be/LNc31ohh0Hg |
Multiple weapon cases, storage cases, etc., are placed. Explore when procuring equipment during a raid.
No. 1 Tunnel

Rest Area
| Reference Video | https://youtu.be/IXskzwWFvaY |
There are no supply spots other than in the central building. Inside the building, there are gym bags, storage cases, etc., which can be used for replenishing food and water.
Transport Area
| Reference Video | https://youtu.be/0HwzEJbdYvk |
A free safe is installed in the building next to the railway. Many suitcases are also placed, allowing you to obtain exchange items.
Building North of Workshop
| Reference Video | https://youtu.be/sWxMnshj47A |
On the 1st floor, there are many spots to obtain exchange items such as PCs and suitcases. On the 2nd floor, storage cases and weapon cases are placed, allowing you to acquire equipment.
Building East of Workshop
| Reference Video | https://youtu.be/dBPqkLJ8OTE |
Multiple gym bags are placed, making it a recommended spot for obtaining food and water. Also, since there are many clothing items, explore aiming for keys, etc.
Hillside Park

South Building
| Reference Video | https://youtu.be/x64mZOdNf6E |
Multiple weapon cases, storage cases, etc., are placed. Also, there are first aid kits, so use them when you want to procure healing items.
Central Building 1st-6th Floors
| Reference Video | https://youtu.be/QqhpXiWEdm8 |
There is a free safe in the back room on the 6th floor. It's also a spot with many clothing items and document cases. There's a possibility of obtaining high-value supplies like keys, so don't forget to loot it.
Central Building 7th-8th Floors
| Reference Video | https://youtu.be/flQgLNRntWw |
A free safe is installed on the 8th floor. The infirmary on the 7th floor has first aid kits, so explore there if you need healing items.
Cable Car Station

Building A
| Reference Video | https://youtu.be/nf3d2gKPQ8g |
There are multiple first aid kits, so stop by if your healing items are depleted. Clothing items and suitcases are also placed, making it a spot to aim for high-value items.
Building B
| Reference Video | https://youtu.be/eKWGv2MDIcQ |
Multiple suitcases are placed, allowing you to obtain exchange items. Also, since there are many gym bags, use it when you want to procure food and water.
South Side
| Reference Video | https://youtu.be/buUjwQ2x6XU |
Multiple drawers and clothing items are installed, making it a place to aim for high-value supplies like keys. Inside the Cable Car Station, there are weapon cases and storage cases, so use it for procuring equipment.
Key Room Summary
Key Usage Locations

Cable Car Control Room

| Reference Video |
| https://youtu.be/MQm5PiFd050 |
| Types of Supply Spots |
| - Safe x1 - Supply Case x1 - Tactical Parts Case x1 - Home PC x1 |
Archive Room

| Reference Video |
| https://youtu.be/6vSSEuWBrIg |
| Types of Supply Spots |
| - Safe x1 - Winter Coat x2 - Office Drawer x1 |
Office

| Reference Video |
| https://youtu.be/pCPoYWAGn8M |
| Types of Supply Spots |
| - Winter Coat x2 - Common Jacket x1 - Advanced Weapon Case x1 - Business Suitcase x1 - Medium Weapon Case x1 - Document Case x1 |
Mail Storage Room

| Reference Video |
| https://youtu.be/VG-Z3G1Tpes |
| Types of Supply Spots |
| - Electronic Safe x1 - Home PC x1 - Military PC x1 - Document Case x1 - Office Drawer x1 - Storage Case x1 |
Director's Office

| Reference Video |
| https://youtu.be/jHMMqojk6c0 |
| Types of Supply Spots |
| - Safe x1 - Military PC x1 - Winter Coat x1 |
Employee Office

| Reference Video |
| https://youtu.be/hl_bdTl9Xt4 |
| Types of Supply Spots |
| - Electronic Safe x1 - Safe x1 - Document Case x1 - Home PC x1 - Drawer x1 |
Dormitory 3 Room 302

| Reference Video |
| https://youtu.be/a8jOmQz1xDw |
| Types of Supply Spots |
| - Winter Coat x1 - Office Drawer x1 |
Control Room

| Reference Video |
| https://youtu.be/6JV0eaUBa_k |
| Types of Supply Spots |
| - Electronic Safe x1 - Winter Coat x1 - Advanced Weapon Case x1 - Military PC x1 - Office Drawer x1 - Expert Toolbox x1 - Storage Case x1 - Document Case x1 |
Duty Room

![]()
| Reference Video |
| https://youtu.be/mXDbDt5a3qA |
| Types of Supply Spots |
| - Safe x1 - Expert Toolbox x1 - Office Drawer x1 - Winter Coat x1 |
Break Room

| Reference Video |
| https://youtu.be/Ok-ooKUvA64 |
| Types of Supply Spots |
| - Safe x1 - Gym Bag x1 - Document Case x1 |
Mines Bosses
Porrero Information

![]()
| Main Equipment | RPK16 / AN-94 Matzka 2 Helmet 6B23 Body Armor |
| Boss Token | Mines Key |
Recommended Weapon Types for Deployment
| Weapon Type | Recommendation Level/Overview |
| Assault Rifle Light Machine Gun | [Recommendation Level] ★★★★・ - Effective at close to medium range - Adaptable to various situations |
| Submachine Gun | [Recommendation Level] ★★・・・ - Effective in indoor combat - Map favors long-range weapons |
| Marksman Rifle | [Recommendation Level] ★★★★★ - Effective at medium to long range - Mines has many open areas |
| Bolt Action Rifle | [Recommendation Level] ★★★★★ - Many sniper spots - Effective against vehicles |
| Carbine | [Recommendation Level] ★★★★・ - Effective at medium to long range - Low ammo consumption |
| Shotgun | [Recommendation Level] ★・・・・ - Short effective range - Few opportunities to shine |
