
How to Control & Recommended Settings in Arena Breakout. See for recommended button settings, button layouts for each grip, and more!
Controls
HUD Icons

| HUD | Description | |
| 1. | Raid Time Remaining | Displays the remaining time. If time runs out, it will be treated as a death. |
| 2. | Health Status | You can check your health status and abnormal conditions. |
| 3. | Open Map | Open the map to place pins or check extraction points. |
| 4. | Open Inventory | Organize your bag and rig. |
| 5. | Lean | Tilt your upper body to peek while hiding behind cover. |
| 6. | Move | Move by tilting the stick. |
| 7. | Use Item/ Switch | Switch weapons or use items in your rig/pocket. |
| 8. | Reload | Perform a reload. |
| 9. | Check Remaining Ammo | You can check the approximate remaining ammo in the magazine. |
| 10. | Crouch | Crouch/Uncrouch |
| 11. | Prone | Go prone/Stand up |
| 12. | Jump | Jump/Vault over obstacles |
| 13. | Fire | Firing without ADS reduces accuracy. |
| 14. | ADS | Look down the sights. |
| 15. | Walk Silently | Tapping allows you to walk slowly, significantly reducing footstep sounds. |
| 16. | Loot/Pick Up | Loot resources or pick up dropped items. |
Button Setting Styles
3 Button Setting Styles

From Settings, select "Controls" to customize buttons and change movement and firing styles. Find a style that suits you to make controls more comfortable.
Left-Side Setting
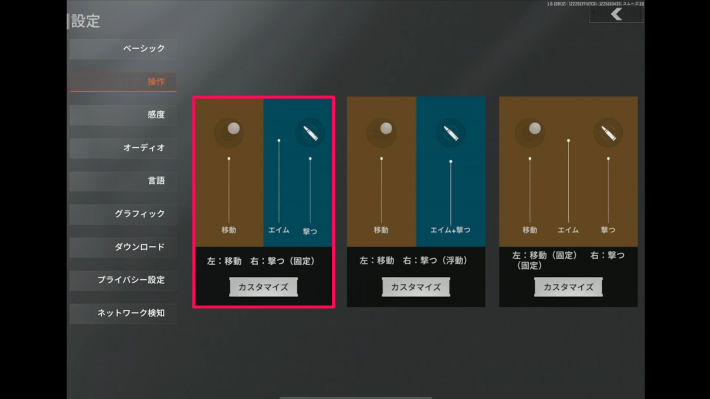
| Move | Aim | Fire |
| Outside left-side buttons | Outside right-side buttons | Fire button |
This is the default button style. Swiping anywhere on the left side of the screen, other than the set buttons, allows you to move. To aim, swipe anywhere other than the buttons on the right side of the screen.
Center Setting

| Move | Aim | Fire |
| Outside left-side buttons | Outside right-side buttons Swipe | Outside right-side buttons Tap or Long Press |
Movement and aiming are the same as the left-side setting, but the firing method is different. Tapping anywhere on the right side of the screen (other than buttons) performs a single shot, and long-pressing enables burst fire.
Right-Side Setting

| Move | Aim | Fire |
| Move button | Outside screen buttons | Fire button |
This setting fixes the move button, and swiping anywhere on the screen (other than buttons) allows you to aim. If you want to aim use the left side of the screen, choose this setting.
Recommended Button Setting Style

The left-side setting or the right-side setting is recommended. If you want to move freely, choose the left-side style. If you want to move within a defined area, choose the right-side style. The center style has a risk of misfiring because aiming and firing are performed simultaneously.
Recommended Button Layout Settings
Set Frequently Used Buttons within Thumb Reach

Buttons related to combat are important, and it's recommended to set crouch, prone, and lean buttons within thumb reach. Since two fire buttons can be set, one can be deactivated.
Recommended Button Setting for 2-Finger Grip

This button setting is recommended for those who operate with two fingers. The left thumb can control movement, lean, and open map/inventory buttons. The right thumb controls ADS, fire, and reload. It's also arranged for crouch, prone, and jump.
Recommended Button Setting for 3-Finger Grip

This is the recommended button setting for those who operate with three fingers. The fire button is placed so it can be pressed with the left index finger. With two fingers, it's difficult to aim while tracking an enemy during ADS. By pressing the fire button with a third finger, it's possible to fire while tracking during ADS.
For 2-Finger and 3-Finger Grips, Set ADS Mode to "Tap"
For 2-finger and 3-finger grips, set the ADS mode to "Tap". If set to "Long Press", you'll have to keep pressing the ADS button while firing. The "Tap" setting, where one press keeps the weapon aimed, is recommended. To cancel aiming, press the ADS button again.
Recommended Button Setting for 4-Finger Grip

This is the recommended button setting for those who operate with four fingers. The index fingers can press the ADS and fire buttons. Since the right thumb can move more freely, the lean button is moved to the right. Operating with four fingers is difficult, but once you get used to it, the freedom of button placement increases. This is a recommended button layout for advanced players.
Recommended Settings
Turn on Cross Hair
| Recommended Setting |
| On |
Turning on the Front Sight setting displays a dot constantly in the center of the screen. Enabling this feature makes it easier to search for supplies and select targets.
Loot Priority
| 1. |  |
| 2. |  |
Turning on Loot Priority grants the player who defeated the enemy and the player who assisted the right to loot first. If you want to secure loot from defeated enemies, turn this setting on before entering a raid.
  Point! Point! | If you turn on Loot Priority, you will be matched with other players who also have it turned on! |
Gyroscope
| Recommended Setting | |
| Always On | Always allows view control with gyro |
| Scope On | Allows view control with gyro only when ADSing |
You can control your view by moving the device up, down, left, and right. It's more intuitive than finger controls and makes fine view adjustments much easier.
Graphics
| Recommended Setting | |
| Graphics Quality | Smooth ~ HD |
| Frame Rate | High or above |
If the graphics settings are too high, processing may become heavy, but setting them too low can also hinder gameplay. It's recommended to lower the graphics quality to some extent while securing the frame rate.
Check settings in Training

When you change options, you can use Training to check how they feel in the actual game. You can freely enter and exit Training, so be sure to try it out once before heading into a raid.
