
Introducing recommended routes for the Farm in Arena Breakout. This guide explains recommended Farm routes in Arena Breakout, divided into two types: exploration-focused and combat-focused. If you want to know the recommended routes for the Abre Farm, please refer to this guide.
Table of Contents
Starting from the West Side
Recommended Exploration-Focused Route

| Image | West Side Route |
 | 1. Grain Trade Center Move from spawn point to Grain Trade Center - Focus on searching PCs and drawers - Water and food can also be procured |
 | 2. Stables Move from Grain Trade Center to Stables - A free safe is located on the 2nd floor of the Stables - Advanced weapon case on the west side of the Stables |
 | 3. Loading Area Move from Stables through the north side to Loading Area - Grenade case inside the Loading Area - Two common jackets on the south side |
 | 4. Extraction Move from Loading Area to extraction point |
If Starting North of Artificial Lake, Rush to the Stables

The north side of the Artificial Lake is the closest spawn point to the Stables, so hurry to the Stables and loot the free safe.
If Starting at Cliff Road, Rush to the Motel
If you start from Cliff Road, the Motel is the closest. It's recommended to loot the Motel's 2nd floor where the free safe is, then pass through the south side of the map, loot the Villa, and head to the extraction point.
Recommended Combat-Focused Route

| Image | West Side Route |
 | 1. Grain Trade Center Move from spawn point to Grain Trade Center - Check if other squads have spawned nearby - If you can occupy the 2nd floor, engage them |
 | 2. Stables Move from Grain Trade Center to Stables - Combat is likely around the Stables - Beware of snipers from the 2nd floor of the Stables |
 | 3. Motel Move from Stables to Motel - Beware of ambushes near the entrance - Smoke grenades are effective when entering |
 | 4. Extraction Move from Motel to extraction point |
Precautions When Extracting from the Restricted Area

This extraction point has a line of sight from the 2nd floor of the house that can be entered with a key. Enemy players may be lurking, aiming at the extraction point, so keep your aim on the window and be ready to return fire.
Starting from the East Side
Recommended Exploration-Focused Route

| Image | East Side Route |
 | 1. Villa Move from spawn point to Villa - There is a storage case on the 2nd floor - Lots of clothing |
 | 2. Southern Wheat Field Move from Villa to Southern Wheat Field - First aid kit and drawer on the 1st floor of the hut - Suitcase and drawer on the 2nd floor of the hut |
 | 3. Stables Move from Southern Wheat Field to Stables - A free safe is located on the 2nd floor of the Stables - Advanced weapon case on the west side of the Stables |
 | 4. Grain Trade Center Move from Stables to Grain Trade Center - Focus on searching PCs and drawers - Water and food can also be procured |
 | 5. Extraction Move from Grain Trade Center to extraction point |
Precautions When Extracting from the Stone Wall

Recommended Combat-Focused Route

| Image | East Side Route |
 | 1. Villa Move from spawn point to Villa - Check if other squads have spawned nearby - Sniping from the 2nd-floor window is recommended |
 | 2. Motel Move from Villa to Motel - Enter from the south iron stairs - Entering the Motel from the basement is recommended |
 | 3. Stables Move from Motel to Stables - Beware of returning groups from the north side of the Stables - Check if the safe is still there |
 | 4. Extraction Move from Stables to extraction point |
Tips for Achieving High-Value Raids
Take the Bullets from Defeated Enemies

Bullets can be stocked up to 60 rounds, and if the penetration level is high, they can be sold for a high price. If an enemy has a magazine, be sure to check its contents. If they have a large magazine, it's also recommended to refill it with bullets and take it back.
Check Weapon Attachments

If you already have two weapons, it's difficult to bring back more as it will take up inventory space. Individual attachments don't take up much space, so if there are parts with a high value per slot, remove them and take them back.
Use Backpacks and Rigs Efficiently

Some rigs have more storage capacity than their own slot size. If you want to bring back a lot of supplies, use rigs taken from enemies to store them efficiently.
Loot High-Tier and Mid-Tier Areas

| List of Mid-Tier or Higher Landmarks | ||
| Motel | Stables | Loading Area |
| Grain Trade Center | Villa | - |
Landmarks with higher tiers are more likely to spawn high-rarity supplies. Earning by defeating enemies is good, but earning by exploring is also one of the ways to enjoy Abre. If you are not good at combat, try exploring mid-tier or higher locations to aim for high-value raids.
Recommended Supply Spot List
- Weapon Cases
- Drawers
- PCs
- Clothing
Main Goal is to Escape Alive
Head to an Extraction Point Once You Have Enough Supplies

If you fail to extract, you will lose all the supplies you've gathered. There's a limit to how much you can carry out in a single raid, so heading to an extraction point when your backpack is nearly full is a viable strategy.
Utilize Conditional Extraction Points as Well

Conditional extraction points become available 10 minutes after the raid starts. Depending on the situation, use these extraction points. If you have a Safe Container, it's recommended to prepare the 3,000 Koen required for extraction beforehand and deploy with it.
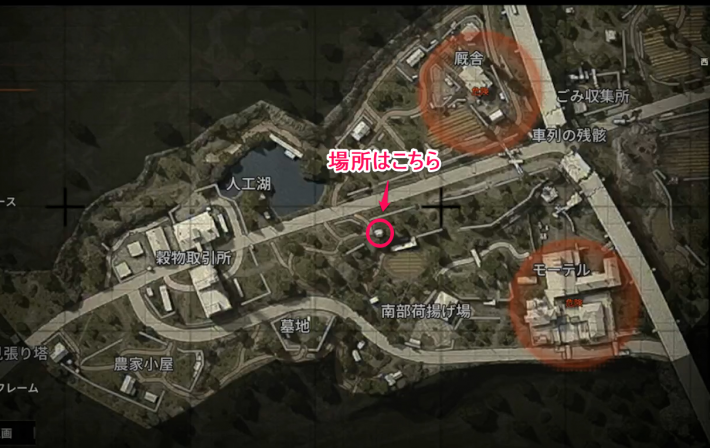
Hidden Supply Spots in the Farm
Hidden Spots on the West Side
Boat North of Artificial Lake

| Image | Contents |
 | Common Jacket x1 General Toolbox x1 |
Hut Southeast of Artificial Lake
| Location | Contents |
 | Common Jacket x1 Supplies on top of the barrel |
Southern Loading Area

| Location | Contents |
 | Large Weapon Storage Box x1 Gym Bag x1 |
North Side of Motel

| Location | Contents |
 | Wooden Weapon Case x1 Armor on the desk Armor on the wooden box |
Hidden Spots on the East Side
Garbage Collection Point

| Location | Contents |
 | First Aid Kit x3 |
West Side of Northern Forest

| Location | Contents |
 | Ammo Storage Case x1 Wooden Weapon Case x1 |
Center of Northern Forest

| Location | Contents |
 | Abandoned Case x1 |
