Port Map Guide in Arena Breakout. The guide includes information on spawn points, extraction points, and more. Use this as reference to learn more about the Port in Arena Breakout.
Table of Contents
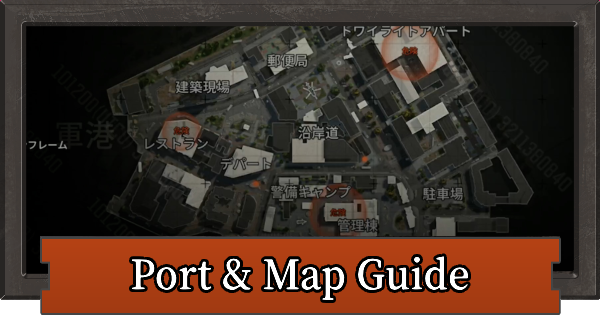
Port Map

Extraction Points (Contractor)
| Extraction Point Name | Extraction Point Location |
| 1. Sewer Entrance |  |
| 2. North of Post Office |  |
| 3. Helipad |  |
| 4. Administration (West) |  |
| 5. Tulip Street (East) |  |
| 6. West Outpost |  |
Helipad Extraction Procedure
Press the switch in the tent on the east side of the helipad, and you can extract by helicopter after 2 minutes. There is no waiting time, but be aware that the helicopter door closes 3 seconds before takeoff.
How to Enter the Sewer Entrance
You can enter the "Sewer Entrance" extraction point from the red building near the coastal road. Red smoke is a landmark. There are many places to ambush, so be wary of extraction campers as you head to the extraction point.
Port High-Tier/Mid-Tier Areas
[High-Tier] Administration Building

Located on the south side of the map, this is Port's largest hot zone. A boss spawns here, and there is also a free safe. There are grenade traps in the Administration Building area, so watch your step.
[Mid-Tier] Restaurant

Located on the west side of the map, a free safe is located on the second floor. There is a high probability of encountering enemy players at the start of the raid, so explore the surroundings with caution.
Beware of Grenade Traps Around the Administration Building
List of Grenade Trap Locations
| Administration Building 3F Hallway next to stairs (2 locations) |  |
| Administration Building 3F Near free safe |  |
| Administration Building 2F In front of Administration Building break room (locked room) |  |
| Administration Building 2F End of south hallway |  |
| Administration Building 2F Next to emergency stairwell door |  |
| Administration Building 2F Near west entrance |  |
| Administration Building 2F Entrance to room behind central stairs |  |
| Administration Building 1F Entrance to room next to central stairs |  |
| Administration Building 1F North entrance |  |
| Administration Building 1F Hallway near north entrance |  |
| General Store South Entrance |  |
How to Disarm Grenade Traps

There is a grenade next to the trap, and an item acquisition button will appear when you approach it. You can disarm the trap by tapping this. You can also replenish grenades, so actively disarm them.
Ropes Can Be Avoided by Jumping

If you want to leave it intentionally for enemy detection or to disarm traps placed behind cover, you can avoid it by jumping. If you don't want to make noise by jumping, detouring is also an option.
Supply Spot Introduction
Administration Building

1F
Many weapon cases and first aid kits are located on the 1st floor of the Administration Building. If you need medical supplies, consider stopping by.
2F
Document cases and storage cases are located on the 2nd floor of the Administration Building. There are also PCs, so actively explore if you are looking for high-value supplies.
3F
On the 3rd floor of the Administration Building, a free safe is located on the floor to the left after going up the stairs. A boss spawns in this area, so if the alarm sounds, defeat the boss before opening the free safe.
Guard Room

If you have the Guard Room key, you can enter the Guard Room from the outer wall. There are few supply spots, so if you don't have the key, it's okay not to stop by.
Security Camp

There are various supply spots in the Security Camp. Office drawers and jackets are placed here, so it's recommended to loot for keys.
Warehouse No. 1

Many toolboxes are located in Warehouse No. 1, and supplies that spawn from PCs may be placed directly on computer desks. Many items have a high value per slot, so check them out when you stop by.
Twilight Apartments

1F
There is a cafeteria on the 1st floor of Twilight Apartments, where food and drinks may be found. If you want to restore your energy or hydration gauges, it's a good idea to procure them here.
2F
Various supply spots are located on the 2nd floor of Twilight Apartments. A business suitcase is placed in the room to the right of the main stairs, so check it if you are looking for high-value supplies.
3F
The 3rd floor of Twilight Apartments has a bedroom, and a free safe is located next to the bed. It's a detour if you go from the central stairs, so it's recommended to use the west stairs.
Post Office

Document cases and gym bags are located in the Post Office. Also, if you go to the back entrance of the Post Office, there is a military camp, and supplies are also placed there.
Construction Site

The Construction Site is a vertically long landmark, and storage cases and expert toolboxes are located on the 3rd floor. When you stop by nearby, it's recommended to explore mainly the 3rd floor.
Restaurant

1F
Many food items and first aid kits are located on the 1st floor of the Restaurant. If you need healing supplies in Impostor mode, explore the 1st floor of the Restaurant.
2F
A free safe is located under the desk in the center of the 2nd floor of the Restaurant. There is also an advanced weapon case, making it a landmark where you can easily aim for high-value supplies.
General Store

A free safe is located in the room on the central west side of the General Store. The General Store is located in the center of the map and has a very high enemy encounter rate. If you are not good at combat, try to avoid it.
Department Store

The Department Store has a rare supply spot, "Abandoned Case." The upper floors have many exploration spots, and if your purpose is exploration, it's recommended to loot mainly the upper floors.
Free Safe Locations
There are 4 Free Safes in Port

The free safes in Port are located in four landmarks. Since Port is a small map, all safes are highly contested. If you spawn nearby, hurry to loot the free safes. Be careful as a boss spawns in the Administration Building.
Detailed Location of Each Spot
| Restaurant 2F |  |
| Twilight Apartments 3F Bedroom on the west side |  |
| Administration Building 3F Room near the stairs |  |
| Building near Coastal Road Room on the west side |  |
Locked Room Summary
Key Usage Locations

Image List of Locked Rooms
| Twilight Apartments C202 |  |
| Twilight Apartments B302 |  |
| Workshop |  |
| Post Office |  |
| Administration Building Break Room |  |
| Secret Warehouse |  |
| Security Camp |  |
| Port Hotel |  |
Post Office

The locked room on the left after entering the Post Office. Contains 1 document case, 1 business suitcase, and 1 office drawer. There's a chance for supplies to the right of the door, so don't forget to check.
Twilight Apartments B302

A locked room on the 3rd floor of Twilight Apartments. Contains 1 safe, 2 suitcases, 1 document case, 1 drawer, and 2 winter coats. This locked room has a lot of lootable spots.
Twilight Apartments C202

A locked room on the 2nd floor of Twilight Apartments. Contains 1 home first aid kit, 1 winter coat, 1 suitcase, and 1 storage case. If you plan to operate around Twilight Apartments, bring this key.
Workshop

The locked room in the Workshop, next to Twilight Apartments. Contains 1 grenade case, 1 large weapon case, 1 medium weapon case, and 1 military PC. There are also supplies next to the military PC, so be sure to check.
Port Hotel

A locked room on the 2nd floor of the Restaurant. Contains 1 electronic safe, 1 large weapon case, and 1 winter coat. Since you can open an electronic safe which tends to have high-value supplies, prioritize heading to the Restaurant if you spawn on the north side.
Secret Warehouse

A locked room on the 3rd floor of the Administration Building. Contains 1 electronic safe and 1 munitions container. Guns may also be hanging on the wall; it's recommended to just take the attachments. There are also supplies on the shelf at the back of the room, so be sure to check.
Administration Building Break Room

A locked room near the emergency stairs on the 2nd floor of the Administration Building. Contains 1 safe, 1 general toolbox, 1 drawer, and 1 wooden weapon case. Grenade traps are often set in the hallway leading to the locked room, so watch your step.
Security Camp

A locked room on the west side of the Security Camp. Contains 1 safe, 1 winter coat, and 1 gym bag. If you plan to operate around the Administration Building, bring this key.
Hidden Spots in Port
Civic Square

| Image | Supply Spot Contents |
 | - Ammunition Case x2 - Advanced Weapon Case x1 - Long Weapon Case x1 - Document Case x1 - First Aid Kit x1 |
Rooftop of Building South of Restaurant

| Image | Supply Spot Contents |
 | - Gym Bag x1 - Grenade Case x1 - Medium Weapon Case x1 |
Bench on East Side of Coastal Road

| Image | Supply Spot Contents |
 | - Ammunition Case x3 - Grenade Case x1 |
Building South of Parking Lot

| Image | Supply Spot Contents |
 | - Storage Case x1 |
Next to Stairs on South Side of Administration Building

| Image | Supply Spot Contents |
 | - Tactical Parts Case x1 - Wooden Weapon Case x1 |
Balcony on 2F of Administration Building

| Image | Supply Spot Contents |
 | - Ammunition Case x3 |
Building on West Side of Administration Building

| Image | Supply Spot Contents |
 | - Common Jacket x1 - Gym Bag x1 |
Tent North of Post Office

| Image | Supply Spot Contents |
 | - Gym Bag x1 - Toolbox x1 |
Recommended Weapon Types for Deployment
| Weapon Type | Recommendation/Overview |
| Assault Rifle light Machine Gun | [Recommendation] ★★★★・ - Handles short to medium range - Effective for shooting from indoors to outdoors |
| Submachine gun | [Recommendation] ★★★★★ - Many indoor areas, excels in short-range combat - High mobility |
| Marksman Rifle | [Recommendation] ★★★・・ - Effective for shooting from indoors to outdoors |
| Bolt-action rifle | [Recommendation] ★★・・・ - Map is small - Long barrel, poor handling |
| Carbine | [Recommendation] ★★★・・ - Effective for shooting from indoors to outdoors |
| Shotgun | [Recommendation] ★★★・・ - Many indoor areas, excels in short-range combat |
Port Boss Spawns
Karl Spawns in the Administration Building

He leads 3-4 henchmen and wears Level 5 body armor. He does not wear a helmet, so a headshot can result in a one-shot kill even with low penetration ammunition.
Basic Information
| Spawn Location | Administration Building |
| Weapon and Ammunition | RPK16 / 5.45×39mm BP AEK / 7.62×39mm BP |
| Body Armor | KN Field Commander Body Armor |
| Boss Token | Torn Ribbon |
Spawn Can Be Determined by Passing Through the Administration Building Gate
When you enter the Administration Building, if an alarm sounds, it's a sign that the boss has spawned. If you want to avoid fighting the boss, pass through the gate to check.
Alarm Can Be Destroyed on the West Side of the Administration Building
| Location on Map | Actual Image |
 |  |
The alarm will not stop ringing until the boss is defeated. It can be distracting when trying to hear footsteps, so it's recommended to destroy it upon entry.
