
This is a guide on unlocking the hidden character Norbelle in Unicorn Overlord. Read to learn more about Norbelle, how to register her in the archive, and how to use her in combat.
This article contains spoilers. Please exercise caution when viewing.
Table of Contents
- How to Unlock the Hidden Character (Norbelle)
- Best Farming Method for Free Stage Inter 1
- [Hard] Strategy for the Liberation of Sohm
- Best Farming Method for Free Stage Advanced
- [Hard] Unicorn Overlord Strat (Pre-Galerius)
- [Hard] Unicorn Overlord Strat (Post-Galerius)
- Unlock Conditions for Hidden Character (Norbelle)
How to Unlock Norbelle
| Condition | Challenge 'Unicorn Overlord' before clearing 'The Priestess, Abducted' |
|---|---|
| Time Required | Around 20 hours |
| Benefits | - Unlock limited Class Compendium - Unlock limited Archive - Unlock Scarlett's limited voice lines - Unlock Archive for BAD END Details on Unlocked Elements Here |
| Development Status | Level 40+ recommended Renown B (Class Change & 4-person formation) |
| Difficulty | CASUAL or NORMAL ※For TACTICAL, using Cornu Ash is recommended ※For EXPERT, Renown A is desirable depending on development status |
| Difficult Parts | - Liberation of Sohm - Unicorn Overlord |
▼CASUAL difficulty recommended
- Complete All Quests Except 'Priestess, Abducted'
- Farm Free Stage Intermediate 1 to reach Lv21
- Exchange Celestial Shards
- Clear the Liberation of Sohm
- Purchase Steel Weapons in Sohm
- Farm Free Stage Advanced to earn Renown
- Clear three Level 40 liberation battles
- Perform Class Changes
- Farm Free Stage Advanced to Reach Lv40
- Clear 'Unicorn Overlord'


To collect allies, Honors, Renown, equipment, and items necessary for leveling up and clearing difficult parts, complete all quests and collect all obtainable items in accessible areas, excluding 'The Priestess, Abducted'. In particular, the Hallowed Corne Ash and Lapis Pendant are essential for the difficult Liberation of Sohm.
| Goal | Collect the following items - Hallowed Corne Ash ×1 - Lapis Pendant ×5 - Celestial Shard ×60 or more |
|---|
| Quest/Location | Collected Item/Explanation |
|---|---|
| Quest 'An Angel's Request' | Hallowed Corne Ash Lapis Pendant Obtainable as a clear reward. Cleared by consuming 30 Celestial Shards at the church. |
| Quest 'Ancient Magic Circle Novice 1' | Lapis Pendant Obtainable as a clear reward. |
| Quest 'Cornia Map 5' | Lapis Pendant Obtained by investigating the location of 'Cornia Map 5'. The location is the western edge of the coast reached by taking a boat from Fontille Harbor. The map can be found at the quarry. |
| Found in the field (After Auch joins) | Lapis Pendant ×2 Immediately after crossing the bridge east of Reedpreli Village, examine the rock wall with a face beyond the northern forest. At Espoir Church in northwestern Cornia, examine the northern structure. |

You can obtain at least 63 Celestial Shards up to 'The Priestess, Abducted'. The article 'Recommended Exchanges and Farming Methods for Celestial Shards' shows the locations where Celestial Shards can be found, so please refer to it.
| Character Name | Reward if Not Recruited |
|---|---|
 Mandrin Mandrin | Celestial Shard ×15 Can exchange Celestial Shards for excellent equipment |
 Monica Monica | Celestial Shard ×30 Can exchange Celestial Shards for excellent equipment |
 Tatiana Tatiana | Elixir ×5 Can obtain super powerful healing items Effect: Revives all unit members & fully restores HP |
After clearing the Norbelle route, if you do not plan to play the normal route, it is more efficient not to recruit Mandrin, Monica, or Tatiana. Especially since Monica yields 30 Celestial Shards upon execution, choose according to your playstyle.

Rebuilding towns allows you to earn Honors and Renown, which are necessary for unlocking formation slots and class changes, so rebuild all towns. Only the rebuilding of Sud Town requires 'Fine Timber Scrap', which cannot be obtained at this time, so you can skip Sud Town.

Let's farm Free Stage Intermediate 1 to level up. The Bronze Training Tome obtained here triples EXP gain for characters Lv20 or below, allowing efficient leveling up to Lv21. Use the Bronze Training Tomes so you don't exceed the maximum of 99.
Best Farming Method for Free Stage Inter 1 Here
| Goal at this point Level the following characters to Lv21 | |||
|---|---|---|---|
 Alain Alain |  Yahna Yahna |  Sharon Sharon |  Josef Josef |
 Clive Clive |  Adel Adel |  Rolf Rolf |  Auch Auch |
| Tatiana |  Hired Gryphon Knight Hired Gryphon Knight | ||

Hiring a Gryphon Knight at Fort Plaine is recommended. They are the highest level Gryphon Knights hireable at this point, and it's conveniently located near Free Stage Intermediate 1. For growth type, High Luck, which increases evasion, is recommended.

Obtain items and recruit Ochlys by exchanging Celestial Shards. Ochlys joins after exchanging 30 Celestial Shards, but Ochlys's joining level depends on your allies' levels, so exchanging Celestial Shards after leveling up is recommended. Recommended items for exchange are as follows.
| No. Celestial Shards | Best Exchange Items |
|---|---|
| 60 | - Lapis Pendant ×2 - Hallowed Corne Ash ×2 |
| 70 | - Lapis Pendant ×3 - Hallowed Corne Ash ×1 - White Cat-Ear Hood ×1 |
| 80 | - Lapis Pendant ×2 - Hallowed Corne Ash ×2 - White Cat-Ear Hood ×1 |
※If you have 90 or more, prioritize exchanging for Pendants.

It's recommended to use it for the powerful skill 'Spinning Edge' that Alain learns at Lv30 after class change. Equip the White Cat-Ear Hood on a character in Alain's unit other than Alain, and use Quick Act to activate Spinning Edge twice in a row.

Celestial Shards can also rarely be obtained at quarries. If you are short, it might take time, but getting them through mining is an option.

Once you're prepared, clear the first difficult part, 'Liberation of Sohm'. Due to the level difference, you'll face a tough battle even on CASUAL difficulty. We've posted recommended formations, items, and strategy steps to clear it, so please take a look.
Detailed Strategy for Liberation of Sohm Here

The steel weapons sold at the armorer in Sohm are recommended as they have the second highest physical attack after Testarossa, mentioned later. Purchase all steel weapons, and if you're short on weapons, buying demonic iron weapons is also an option.

You can obtain 'Testarossa' by talking to the NPC in the hut west of Sohm. It's the weapon with the highest physical attack currently available, and its sub-effects are also excellent, so be sure to get it.

Farm Free Stage Advanced to earn Renown points needed for class change. Class change unlocks at Renown Rank B (1750 Renown pts). You can earn about 250 pts by clearing the three Lv40 liberation battles mentioned later, so if you earn 1500 pts here, you'll reach the required Renown pts.
Efficient Farming Method for Free Stage Advanced Here
| Goal at this point | Earn Renown up to 1500 pts |
|---|
In Free Stage Advanced, you can also obtain Silver Training Tome, which grants a large amount of experience, so farm it while also leveling up. You can't obtain more Tomes if you exceed the maximum of 99, so use them before reaching 99.
| Recommended Characters for Leveling | |||
|---|---|---|---|
| Alain | Yahna | Sharon | Josef |
| Clive | Adel | Rolf | Auch |
| Tatiana | Hired Gryphon Knight |  Mordon Mordon | |

Once you've accumulated 1500 Renown pts, clear the three Level 40 liberation battles. Your level should be quite high by now, so it's less difficult than the Liberation of Sohm. You can mostly use the same formation as the Best Formation for Free Stage Advanced.
| Goal at this point | Reach Renown 1750 pts (Renown Rank B) |
|---|

In the Soirée-Calm Village Liberation Battle, archer units will provide support fire from watchtowers across the river that are inaccessible by ground units. Since they are troublesome, use a formation led by a flying character like Ochlys to defeat these archer units.

Class Change unlocks when you reach Renown Rank B (1750 pts) by farming free stages and clearing liberation battles. You'll get a significant power boost through stat increases, more AP/PP, and learning powerful skills, so use your accumulated Honors to perform class changes.
| Goal at this Point Class Change the Following Characters (Possible with 425 Honors) | |||
|---|---|---|---|
| Alain | Yahna | Sharon | Clive |
| Adel | Rolf | Auch | Tatiana |
| Hired Gryphon Knight | Mordon |  Travis Travis |  Melisandre Melisandre |
 Hired Sellsword Hired Sellsword | |||

You can hire a Sellsword at Fort Longeve in eastern Cornia. The skill Meteor Slash, learned by the advanced class Swordmaster, is useful against the final boss Galerius. Being able to strike first makes it easier to deal damage, so the Speedster growth type is recommended.
Farm Free Stage Advanced again, aiming for Lv40. With an average level of 35+ and after class changes, you can farm it quickly. We've posted an efficient farming method, so please refer to it.
Fast Farming Method for Free Stage Advanced Here
| Goal at this Point Level the Following Characters to Lv40 | |||
|---|---|---|---|
| Alain | Yahna | Sharon | Josef |
| Clive | Adel | Rolf | Auch |
| Tatiana |  Hired Gryphon Ruler Hired Gryphon Ruler | Mordon | Travis |
| Melisandre |  Hired Swordmaster Hired Swordmaster | ||

Finally, clear 'Unicorn Overlord'. If you don't defeat Norbelle, who appears at the same time as Galerius, the Class Compendium won't be filled, so be sure to defeat Norbelle. We've introduced recommended formations and tactics, so please take a look.
| Detailed Unicorn Overlord Strat Here | |
|---|---|
| Before Galerius Appears | After Galerius Appears |
Best Farming Method for Free Stage Inter 1
Best Farming Formation
| Gryphon Knight Unit | ||
|---|---|---|
| Josef | Adel | Clive |
| Gryphon Knight (Set as Leader) | ||
Set the hired Gryphon Knight as the leader and use Fast Haste to go straight to the boss for fast farming. With three cavalry units, mobility is also high. When Adel and Clive reach Lv15 and learn Cavalier, the attack power of all cavalry increases, further improving farming efficiency.
Best Farming with Catapult for Average Lv14 or Lower

Free Stage Intermediate 1 has two deployment patterns: Pattern 1 with the boss in the southeast, and Pattern 2 with the boss in the east. For both, using the catapult near your base allows for efficient clearing. When your characters' levels are low, farm using this method.
Pattern 1 (Southeast Boss) Catapult Launch Position

Using the catapult as follows allows you to destroy 8 enemies and a barricade, starting with 6 Brave.
| Catapult Launch Position | Explanation |
|---|---|
 | <1st Shot> By firing at a position where the Hoplite and White Knight are to the upper left of the impact point, you can defeat 5 enemies at once, including the 3 cavalry units attacking from the east. |
 | <2nd Shot> By firing at a position where the cavalry is at the left edge of the impact point, you can defeat the 2 cavalry units and the infantry attacking from the south at once. |
 | <3rd Shot> Destroy the left side of the barricade. |
Pattern 2 (East Boss) Catapult Launch Position

Using the catapult as follows allows you to destroy 8 enemies and a barricade, starting with 6 Brave.
| Catapult Launch Position | Explanation |
|---|---|
 | <1st Shot> Wait until the 2 infantry units move to the left of the town before firing. By firing at a position where the watchtower is to the left of the impact point, you can defeat the 4 attacking infantry units and the enemy in the watchtower at once. |
 | <2nd Shot> By firing at a position where the ballista is to the bottom right of the impact point, you can also destroy 3 barricades. |
 | <3rd Shot> Defeat the 2 cavalry units in front of the boss. |
Best Farming by Going Straight to Boss for Average Lv15+

If your unit's average level is 15 or higher, farming by going straight to the boss is the fastest and most efficient. For both patterns, deploy the Gryphon Knight unit immediately at the start and use Fast Haste to go straight to the boss for fast farming.
Pattern 1 (Southeast Boss) Farming
If your movement speed is slow, enemies from the east will reach your base, leading to defeat, so use Fast Haste to increase movement speed.
Pattern 2 (East Boss) Farming
If your movement speed is slow, you might take a lot of damage from ballistae and be unable to defeat the boss, so use Fast Haste to increase movement speed.
Strategy for the Liberation of Sohm
Benefits of Challenging Liberation of Sohm Early
- Unlocks stages good for leveling up
- Can purchase excellent equipment in Sohm
- Can obtain the powerful weapon 'Testarossa'
The main benefit of liberating Sohm early is being able to efficiently strengthen your units. You can significantly power up by accessing the Free Stage Advanced, which becomes available after liberation, and by purchasing equipment in Sohm. Additionally, you can receive the powerful weapon 'Testarossa' from an NPC.
Best Strategy Formation

Challenge the Liberation of Sohm with five units: Alain's unit, a cavalry unit, an assist archer unit, an assist magic unit, and an assist healing unit. Basically, Alain's unit will do the fighting and accumulate Brave, while the other units provide support.
Alain's Unit
※You can check character equipment and tactic configurations by switching tabs.
| Alain's Unit | ||
|---|---|---|
| Hired Gryphon Knight | ||
| Yahna | Sharon | Alain |
| Equipment | |
|---|---|
 Crush Axe Crush Axe |  Ruffian's Tassets Ruffian's Tassets |
 Hallowed Corne Ash Hallowed Corne Ash | |
| No. | Action | Condition 1 | Condition 2 |
|---|---|---|---|
| 1 | High Swing | Cavalry-type enemy | |
| 2 | Crush | ||
| 3 | War Cry | ||
| 4 | Wing Rest | Own HP is below 100% |
| Equipment | |
|---|---|
 Crimson Sword Crimson Sword |  Azure Crest Shield Azure Crest Shield |
 Rookie Egg Rookie Egg | |
| No. | Action | Condition 1 | Condition 2 |
|---|---|---|---|
| 1 | Cavalry Slay | Cavalry-type enemy | Enemy with AP >= 1 |
| 2 | Active Break | Enemy with AP >= 1 | |
| 3 | Lean Edge | ||
| 4 | Luminous Cover | Prioritize back row ally | |
| 5 | Noble Guard |
| Equipment | |
|---|---|
 Lifetree Staff Lifetree Staff | Hallowed Corne Ash |
 Lapis Pendant Lapis Pendant | |
| No. | Action | Condition 1 | Condition 2 |
|---|---|---|---|
| 1 | Resurrection | ||
| 2 | Heal | Ally with HP <= 75% | |
| 3 | Lifesaver | Own HP is <= 75% | |
| 4 | Refresh | ||
| 5 | Quick Heal | Ally with HP < 100% |
| Equipment | |
|---|---|
 Iron Staff Iron Staff | Hallowed Corne Ash |
| Lapis Pendant | |
| No. | Action | Condition 1 | Condition 2 |
|---|---|---|---|
| 1 | Magic Missile | Prioritize armored enemy | Enemy count >= 2 |
| 2 | Ice Shard | Prioritize armored enemy | |
| 3 | Foresight | ||
| 4 | Magic Saber |
Advances on the front line, accumulating Brave with Alain's leader effect. The hired Gryphon Knight has an advantage against cavalry, making it easier to evade and launch powerful attacks against the initial cavalry unit in the liberation battle and in the boss fight. Equip Alain with the Rookie Egg to level him up as much as possible during the battle.
Other Recommended FormationsCavalry Unit

| Josef's Unit | ||
|---|---|---|
| Clive | Adel | Josef |
| Rolf | ||
Used solely to cast Rolf's Brave Skill 'Arrow Rain' at the start. Formed mainly with high-mobility cavalry to quickly return to base after Arrow Rain. Equipment and skills can be anything.
Assist Archer Unit

| Rolf's Unit | ||
|---|---|---|
| Rolf (Deploy later) | ||
 Hired Hunter Hired Hunter | Hired Hunter | Hired Hunter |
Initially formed with 3 hired Hunters, but after returning the cavalry unit above to base, deploy Rolf in the front center and send them out. Provides assist fire during Alain's unit's battles. The hired Hunters' levels can remain as they were at hiring, and equipment/skills are flexible.
Assist Magic Unit

| Auch's Unit | ||
|---|---|---|
| Auch | ||
 Hired Wizard Hired Wizard |  Hired Witch Hired Witch | Hired Wizard |
Provides assist magic during Alain's unit's battles. You can choose hired Wizards and Witches as you like. Their levels can remain as they were at hiring, and equipment/skills are flexible.
Assist Healing Unit

| Tatiana's Unit | ||
|---|---|---|
| Tatiana | ||
 Hired Cleric Hired Cleric | Hired Cleric | Hired Cleric |
Provides assist healing during Alain's unit's battles. The hired Clerics' levels can remain as they were at hiring, and equipment/skills are flexible.
Recommended Items and Preparation Count
It's recommended to use Magic Mines against normal enemies and Magic Bombs against bosses to weaken them before fighting. Use Beckoning Bells to save travel time and make enemies step on Magic Mines. Use Liqueurs and healing items for each battle, recover stamina with Smoked Nuts, and counter enemy assists with Wind Spirit Stones.
| Item Name | How to Obtain/Preparation Count/Effect |
|---|---|
 Magic Bomb Magic Bomb | Purchase from Black Market Trader (Max 2) Preparation Count: 2 Damages enemy units and gimmicks in the specified area |
 Magic Mine Magic Mine | Purchase in Prashvari Town, etc. Preparation Count: 4+ Sets a Magic Mine at the specified location |
| Item Name | How to Obtain/Preparation Count/Effect |
|---|---|
 Beckoning Bell Beckoning Bell | Purchase in Prashvari Town, etc. Preparation Count: 4+ For 10 seconds, makes the specified enemy unit move towards you (ineffective against enemies stationed in towns, forts, or bases) |
 Wind Spirit Stone Wind Spirit Stone | Purchase in Citadel of Barbatimo Preparation Count: 3+ Prevents allied units from taking assist attacks (Effect Duration: 1 battle) |
 Power Liqueur Power Liqueur | Purchase in Ouvrir Harbor, etc. Preparation Count: 10+ Increases own unit's damage dealt by 30% (Effect Duration: 1 battle) |
 Guard Liqueur Guard Liqueur | Purchase in Ouvrir Harbor, etc. Preparation Count: 10+ Reduces own unit's damage taken by 30% (Effect Duration: 1 battle) |
 Healing Potion S Healing Potion S | Purchase in Ouvrir Harbor, etc. Preparation Count: 15+ Restores 30 HP to the target |
 Healing Bottle S Healing Bottle S | Purchase in Ouvrir Harbor, etc. Preparation Count: 5+ Restores 20 HP to all members of the unit |
 Revival Orb S Revival Orb S | Purchase in Ouvrir Harbor, etc. Preparation Count: 10+ Revives a KO'd target and restores 25% HP |
 Smoked Nuts Smoked Nuts | Purchase in Ouvrir Harbor, etc. Preparation Count: 5+ Restores 1 Stamina to own unit |
Quest Strategy
- Attack 2 Units With Arrow Rain at the Start
- Return Cavalry Unit and Deploy Alain's Unit
- Defeat the Enemy on the Bridge in the 2nd-3rd Battle
- Lure 2 Units With Beckoning Bell
- Make Enemies Step On Magic Mines Before Attacking
- Move Assist Archer Unit to the Watchtower
- Move Assist Magic/Healing Units Near the Boss
- Move Alain's Unit Near the Boss & Defeat Druid Unit
- Defeat Boss With 2 Magic Bombs + Attack

Deploy the cavalry unit with Rolf to the upper left of your base and use Arrow Rain to attack the cavalry unit stationed on the bridge and the heavy armor unit above it. This Arrow Rain will leave only the Doom Knight in the front row of the bridge's cavalry unit, creating a very advantageous situation for the Gryphon Knight.

Return the cavalry unit to base to recover 1 Brave, then deploy Alain's unit. Use Power Liqueur and Guard Liqueur to maximize damage dealt and minimize damage taken, then fight the enemy on the bridge.

Even with type advantage and more HP, the level difference is too large, and you'll take significant damage. Use items like Revival Orb S or Healing Potion S to restore HP, regroup, and re-engage.

After healing the damage taken in the first battle, engage again. You should be able to defeat the enemy on the bridge in the 2nd or 3rd battle. Use Power Liqueur and Guard Liqueur every time to deal as much damage as possible and reduce damage taken.

Defeating strong enemies yields a lot of experience, and character levels will rise quickly. At this point, your levels are still too low to fight the quest boss, but by defeating as many enemies as possible and leveling up, your stats will rise enough to take on the boss.

You're not yet strong enough to win a straight fight, so use a strategy of making enemies step on Magic Mines to reduce their HP before fighting to earn experience. The magic unit in the watchtower and the archer unit in the ruins won't move, so use Beckoning Bell to lure them, then use Magic Mine.
The archer unit in the ruins is far away, so you'll need to use Beckoning Bell twice to get them close to Alain's unit. Keep an eye on the archer unit and use the bell again when the effect wears off to continue luring them. Chasing them is not recommended as it increases the risk of running out of time.

Beckoning Bell doesn't work on bosses stationed in bases, so the strategy of making them step on Magic Mines won't work. Be careful not to use Beckoning Bell on the boss. Incidentally, ruins are not considered bases, so the aforementioned archer unit stationed in the ruins can be lured.

Set Magic Mines in the enemy's path. The heavy armor unit will step on the Magic Mine first and take damage, so engage the heavy armor unit with Alain's unit. Don't forget to heal HP and apply buffs with Power Liqueur and Guard Liqueur.
Making an enemy step on Magic Mines twice can defeat them, but you won't get experience, and your characters won't level up. You want to level up characters during the quest to prepare for the boss fight, so only make each enemy step on a Magic Mine once.

Around this area, you're likely to take damage from enemy assist fire and assist magic, so consider using Wind Spirit Stone. Used effectively, it can significantly reduce damage taken.

The archer unit in the ruins is stronger than other enemies. It's recommended to fight them with the support of two assist units (archer and magic) after deploying them later.

After fighting the heavy armor unit once, you'll gain 1 Brave, so deploy the assist archer unit. Don't forget to move Rolf from the cavalry unit and set him as the leader of the assist archer unit. After deployment, send them towards the watchtower. Also, have them assist Alain's unit's battles along the way.

Defeating 3 enemies will give you 2 Brave. When you have enough Brave, deploy the assist magic unit, then the assist healing unit. There are enemy Magic Mines on the path, so you'll need to adjust your route to avoid stepping on them.

Move Alain's unit towards the boss and use Beckoning Bell to lure the Druid unit in the lower left. Like other enemies, make the Druid unit step on a Magic Mine before attacking and defeating them.

Use Magic Bomb twice on the boss to deal damage and weaken them before attacking. If Alain's unit has leveled up, you can defeat them by fully utilizing assists and buffs from Power Liqueur.

After using Magic Bomb twice, the remaining boss unit consists of a Paladin and a Sainted Knight (cavalry). The Gryphon Knight, who is effective against cavalry, is useful against the boss unit, so we recommend including them in Alain's unit.
Best Farming Method for Free Stage Advanced
For Average Lv34 or Lower, Farm by Defeating All Enemies
Can Farm with Almost the Same Formation as Liberation of Sohm
The differences from the Liberation of Sohm formation are Mordon in the back row of the cavalry unit (Josef's unit) and Rolf in the front row of the assist archer unit (Rolf's unit).
Recommended Formation List| Alain's Unit | ||
|---|---|---|
| Hired Gryphon Knight | ||
| Yahna | Sharon | Alain |
| Josef's Unit | ||
|---|---|---|
| Clive | Adel | Josef |
| Mordon ※Changed | ||
| Rolf's Unit | ||
|---|---|---|
| Rolf ※Changed | ||
| Hired Hunter | Hired Hunter | Hired Hunter |
| Auch's Unit | ||
|---|---|---|
| Auch | ||
| Hired Wizard | Hired Witch | Hired Wizard |
Farming Method

Station Alain's unit at the shield wall and intercept incoming enemies with support from the assist archer and assist magic units. There's a risk of assist units being defeated by enemy Arrow Rain, so once you have enough Brave, deploy the cavalry unit and prioritize defeating the archer unit in the watchtower.
| Order | Clear Procedure |
|---|---|
| 1 | Deploy Alain's unit, assist archer unit, and assist magic unit. |
| 2 | Station Alain's unit at the shield wall to intercept enemies. ※Receive support from assist units as needed. |
| 3 | Once Brave is accumulated, deploy the cavalry unit to defeat the archer unit in the watchtower. ※Risk of assist units being defeated by Arrow Rain II. |
| 4 | Once the shield wall is destroyed, use Alain's unit to defeat the magic unit in the central watchtower. |
| 5 | Station the assist archer unit in the central watchtower and defeat all remaining enemies with Alain's unit and the cavalry unit. ※If Brave accumulates, weaken enemies with Rolf's Arrow Rain. |
| 6 | Move the assist magic unit near the boss and defeat the boss with Alain's unit, supported by assist units. ※Dealing damage with Arrow Rain beforehand makes it easier. |
For Average Lv35+, Best Farming by Going Straight to Boss
Best Farming Formation
| Alain's Unit | ||
|---|---|---|
| Alain | Adel | Clive |
| Mordon | ||
If average level is 35+ and everyone has class changed, fast farming by going straight to the boss is possible with this formation. It's recommended to buff Mordon's attack with the passive skill 'War Cry' from Ruffian's Tassets.
Fast Farming Method
There are two enemy deployment patterns, but for both patterns, fast farming is possible by sending the cavalry unit straight to the boss in the upper right of the map. For the pattern where there are no enemies in the central watchtower, shifting the deployment position slightly to the right allows you to go straight to the boss without encountering enemies.
Strategy for Unicorn Overlord (Pre-Galerius)
Best Strategy Formation
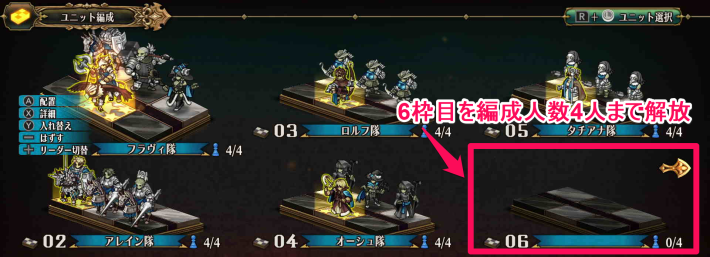
Challenge Unicorn Overlord with five units: Alain's unit, a flying unit, an assist archer unit, an assist magic unit, and an assist healing unit. Basically, Alain's unit and the flying unit will attack, while the other units provide support. Also, since the 6th slot will be used in the Galerius fight, unlock the 6th slot to a 4-person formation capacity.
Alain's Unit

※You can check character equipment and tactic configurations by switching tabs.
| Alain's Unit | ||
|---|---|---|
| Clive | Adel | Alain |
| Sharon | ||
| Equipment | |
|---|---|
 Royal Sword Cornix Royal Sword Cornix | Azure Crest Shield |
| Hallowed Corne Ash | Lapis Pendant |
| No. | Action | Condition 1 | Condition 2 |
|---|---|---|---|
| 1 | Spinning Edge | ||
| 2 | Cavalry Slay | Cavalry-type enemy | Enemy with AP >= 1 |
| 3 | Lean Edge | ||
| 4 | Rapid Order | ||
| 5 | Luminous Cover | Prioritize back row ally | |
| 6 | Noble Guard |
| Equipment | |
|---|---|
 Testarossa Testarossa |  Cavalryman's Buckler Cavalryman's Buckler |
| Lapis Pendant |  Bastion Sabatons Bastion Sabatons |
| No. | Action | Condition 1 | Condition 2 |
|---|---|---|---|
| 1 | Pile Thrust | ||
| 2 | Wild Rush | Enemies in front/back rows | |
| 3 | Assaulting Lance | ||
| 4 | Cavalry Guard | ||
| 5 | Guard Act | ||
| 6 | Knight's Chase | ||
| 7 | Cavalier | ||
| 8 | Quick Guard |
| Equipment | |
|---|---|
 Steel Lance Steel Lance |  Baroque Shield Baroque Shield |
| Lapis Pendant |  Guardian Gauntlets Guardian Gauntlets |
| No. | Action | Condition 1 | Condition 2 |
|---|---|---|---|
| 1 | Pile Thrust | ||
| 2 | Wild Rush | Enemies in front/back rows | |
| 3 | Assaulting Lance | ||
| 4 | Guard Fight | ||
| 5 | Knight's Chase | ||
| 6 | Cavalier | ||
| 7 | Quick Guard |
| Equipment | |
|---|---|
| Lifetree Staff | Hallowed Corne Ash |
| Lapis Pendant |  Leather Hood Leather Hood |
| No. | Action | Condition 1 | Condition 2 |
|---|---|---|---|
| 1 | Resurrection | ||
| 2 | Sacred Heal | Ally with HP <= 75% | |
| 3 | Heal | Ally with HP <= 75% | |
| 4 | End Resurrect | ||
| 5 | Lifesaver | Own HP is <= 75% | |
| 6 | Refresh | ||
| 7 | Quick Heal | Ally with HP < 100% |
Role is to defeat surrounding enemies with high mobility and attack power. Weak against flying and armored units, so try to advance with the assist archer and assist magic units.
Flying Unit

※You can check character equipment and tactic configurations by switching tabs.
| Gryphon Ruler Unit | ||
|---|---|---|
| Hired Gryphon Ruler | ||
| Yahna | Mordon | Josef |
| Equipment | |
|---|---|
 Steel Axe Steel Axe | Hallowed Corne Ash |
 Warrior's Medallion Warrior's Medallion |  Silk Scarf Silk Scarf |
| No. | Action | Condition 1 | Condition 2 |
|---|---|---|---|
| 1 | Aerial Smite | Prioritize cavalry-type enemy | Enemy in row with >= 2 units |
| 2 | Fatal Fall | Enemies in front/back rows | |
| 3 | High Swing | Prioritize cavalry-type enemy | |
| 4 | Gryphon Glide | ||
| 5 | Wing Rest | Own HP is below 100% |
| Equipment | |
|---|---|
 Steel Sword Steel Sword |  Bird Hunter's Buckler Bird Hunter's Buckler |
| Lapis Pendant |  Talisman of Life Talisman of Life |
| No. | Action | Condition 1 | Condition 2 |
|---|---|---|---|
| 1 | Divine Cross | ||
| 2 | Heal | Ally with HP <= 75% | |
| 3 | Slice | Enemy with lowest HP | |
| 4 | Aerial Guard | When attacked by flying type | |
| 5 | White Barrier | ||
| 6 | Holy Guard | ||
| 7 | Chase |
| Equipment | |
|---|---|
| Steel Axe | Lapis Pendant |
| Warrior's Medallion | Ruffian's Tassets |
| No. | Action | Condition 1 | Condition 2 |
|---|---|---|---|
| 1 | Line Buster | ||
| 2 | Assault Blow | Enemy with HP <= 50% | |
| 3 | Heavy Buster | Prioritize armored enemy | |
| 4 | War Cry | ||
| 5 | Heavy Counter | ||
| 6 | Outrage |
| Equipment | |
|---|---|
 Steel Staff Steel Staff | Lapis Pendant |
 Magician's Medallion Magician's Medallion |  Silk Hood Silk Hood |
| No. | Action | Condition 1 | Condition 2 |
|---|---|---|---|
| 1 | Ice Coffin | Prioritize armored enemy | Enemy in row with >= 2 units |
| 2 | Magic Missile | Prioritize armored enemy | Enemy count >= 2 |
| 3 | Ice Shard | Prioritize armored enemy | |
| 4 | Foresight | ||
| 5 | Magic Saber |
Mainly responsible for defeating bosses. The area around the boss is often filled with obstacles like Magic Mines and Caltrops, so flying movement, which can ignore these, is useful. The Gryphon Ruler's Fast Haste II also supports by increasing allies' movement speed.
Other Recommended FormationsAssist Archer Unit

| Rolf's Unit | ||
|---|---|---|
| Rolf | ||
| Hired Hunter | Hired Hunter | Hired Hunter |
Since assist power depends on the leader's abilities, equip Rolf with a Steel Bow and Brown Beret to increase his physical attack. The hired Hunters' levels don't need to reach 40, and their equipment/skills are flexible.
Assist Magic Unit

| Auch's Unit | ||
|---|---|---|
| Auch | ||
| Hired Wizard | Hired Witch | Hired Wizard |
Since assist power depends on the leader's abilities, equip Auch with a Steel Staff and Leather Hood to increase his magic attack. The hired Wizards' and Witches' levels don't need to reach 40, and their equipment/skills are flexible.
Assist Healing Unit

| Tatiana's Unit | ||
|---|---|---|
| Tatiana | ||
| Hired Cleric | Hired Cleric | Hired Cleric |
Since assist power depends on the leader's abilities, equip Tatiana with a Steel Staff and Leather Hood to increase her magic attack. The hired Clerics' levels don't need to reach 40, and their equipment/skills are flexible.
Recommended Items and Preparation Count
Use Liqueur-type items to apply buffs when fighting strong enemies like Galerius and bosses. Since it will be a long battle, items that restore HP and stamina are also valuable.
| Item Name | How to Obtain/Preparation Count/Effect |
|---|---|
| Power Liqueur | Purchase in Ouvrir Harbor, etc. Preparation Count: 10+ Increases own unit's damage dealt by 30% (Effect Duration: 1 battle) |
| Guard Liqueur | Purchase in Ouvrir Harbor, etc. Preparation Count: 10+ Reduces own unit's damage taken by 30% (Effect Duration: 1 battle) |
| Item Name | How to Obtain/Preparation Count/Effect |
|---|---|
| Healing Potion S | Purchase in Ouvrir Harbor, etc. Preparation Count: 15+ Restores 30 HP to the target |
| Healing Bottle S | Purchase in Ouvrir Harbor, etc. Preparation Count: 5+ Restores 20 HP to all members of the unit |
| Revival Orb S | Purchase in Ouvrir Harbor, etc. Preparation Count: 10+ Revives a KO'd target and restores 25% HP |
| Smoked Nuts | Purchase in Ouvrir Harbor, etc. Preparation Count: 5+ Restores 1 Stamina to own unit |
Quest Strategy
- 1. Start from the northeast (Fort Portre).
- 2. Defeat Berisarius.
- 3. Defeat Horonius.
- 4. Defeat Theodora.
- 5. Intercept beastman units at the campsite.
- 6. Defeat Narces.

You can choose from 5 starting points for the Unicorn Overlord quest. The recommended starting point is the northeast, starting from Fort Portre. Attack westward sequentially from the northeast.

At the start, deploy Alain's unit, the flying unit, and the assist archer unit. Send Alain's unit and the assist archer unit to the watchtower, and the flying unit towards Berisarius. It's easier to defeat Berisarius after the assist archer unit arrives at the watchtower, so have the flying unit take down the enemy at Fort Locr first.

Use the Gryphon Ruler's Fast Haste II at the start when your allies are gathered near the base. This increases the movement speed of all deployed units, allowing for more efficient advancement, so it's recommended.

Be aware that enemies are hidden in the forest southwest of your base. You might be caught off guard and take heavy damage while advancing, so defeat them first.

Unicorn Overlord has many enemies, and stamina can deplete easily, so use facilities like ballistae and catapults to conserve stamina as much as possible while fighting.

Rolf's Arrow Rain II can attack Berisarius and surrounding enemies simultaneously. To make it easier for the flying unit to defeat Berisarius, weaken Berisarius and nearby enemies first.

Approaching Berisarius will cause numerous Magic Mines to be placed around him, but flying units can ignore them and approach Berisarius directly.

Horonius is difficult to approach due to being surrounded by rivers and fire, but using a flying unit allows you to ignore these obstacles and head straight for him. Deploy the assist magic and assist healing units from Fort Locr, and send Alain's unit and the assist units towards Mont Cerise Fort in the southwest.

In the battle against Horonius, positioning assist units on the opposite bank of the river will allow their assists to reach. Defeating him with only the flying unit is difficult, so send assist units. Also, fight with buffs from Power Liqueur and Guard Liqueur.

After defeating Horonius, your stamina and HP are likely to be very low, so gather at the nearby campsite to recover stamina and HP.

Approaching Theodora will cause numerous Caltrops to be placed around her, so use a flying unit, which can ignore Caltrops, to defeat Theodora. Have the assist units temporarily return to base from Mont Cerise Fort, and send Alain's unit to liberate Etangili Fort to the west.

While Alain's unit is heading to Etangili Fort, if you have 6 or more Brave, use Wild Rush II back and forth to defeat the enemies at the facilities. They are protected by barricades, but Wild Rush II can break through them. After defeating them, head back to Etangili Fort.

After Alain's unit liberates Etangili Fort, re-deploy the assist units. This allows you to quickly move the low-mobility assist units from east to west. Afterwards, have everyone head to support the defeat of Theodora. Destroy barricades with Mordon's Heavy Swing II.

Before fighting Theodora, defeat the enemies at the surrounding ballistae and catapults, and seize the ballistae. Using ballistae allows you to defeat Theodora without taking damage. As mentioned before, if you defeat the ballistae and catapults first with Wild Rush II, it will be easier.

After defeating Theodora, a large number of beastman units will attack. Move to the campsite near where Theodora was and intercept the beastman units there. Enemies summoned by Narces will also attack, so wait at the campsite until things calm down, recover, and once you're ready, head to defeat Narces.

Send Alain's unit and the flying unit to defeat Narces, and have the assist units temporarily return to base from Etangili Fort to prepare for the second half of the battle. There are few surrounding enemies, and your characters' levels should be high, so you can win the Narces fight sufficiently even without assists.

Immediately after defeating Narces, allied units will be subjected to a control spell and attack Alain's unit. The control spell can be removed by purification, but if the distance is too close, combat might start before purification, leading to friendly fire, so keep some distance between Alain's unit and other allied units when defeating Narces.
Strategy for Unicorn Overlord (Post-Galerius)
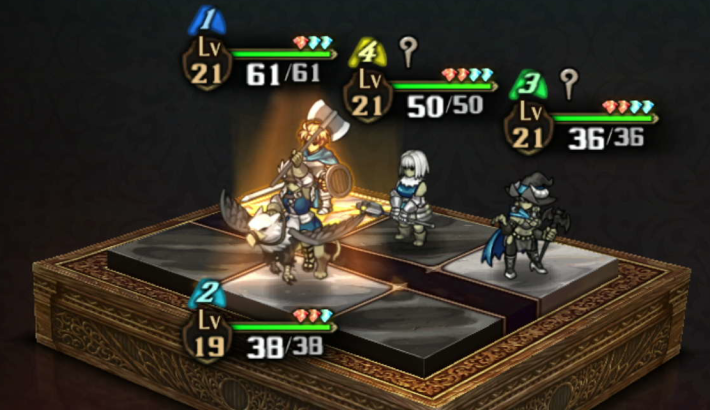
Norbelle Appears Before Galerius

After Galerius appears, Norbelle will appear before him. If you don't defeat this Norbelle, the Class Compendium won't be unlocked, so defeat Norbelle before defeating Galerius. There's unique dialogue with Alain, so if you're interested, try fighting Norbelle with Alain's unit.
Quest Strategy
- Purify Allies & Breach Gate With Flying Unit
- Re-Deploy From Base to Earn Brave.
- [Important] Unlock Norbelle's Class Compendium Entry.
- Return Units to Base and Reorganize.
- Defeat Galerius.

First, purify the allies affected by the control spell. You can enter the area where Galerius is by destroying the castle gate, but destroying the gate takes time. It's recommended to have the flying unit fly over the wall and liberate a base, allowing all units to enter easily through the base.

Deploy all units from the base liberated by the flying unit, and earn Brave by defeating enemies and liberating bases in preparation for the Galerius fight. You'll be returning 3 units to base later, so accumulating around 7 Brave is sufficient.

At this point, the Unicorn Ring's power has not yet been released, so the range of 'Purify' used to remove the control spell is limited to the area around Alain's unit. Move allies within the purification range centered on Alain's unit.

When Galerius's Brave gauge fills up, he will use the control spell, so create distance between your allies before that happens. If they are close together when the control spell hits, combat might start before you can use Purify, leading to your units defeating each other.

To unlock Norbelle's Class Compendium entry, you need to defeat Norbelle. Be careful, as defeating Galerius first will prevent the Class Compendium entry from being unlocked.

From here, you will fight Galerius, so reorganize your units for the Galerius fight. Return Alain's unit, the assist archer unit, and the assist magic unit to base, rebuild their formations, and deploy them.
Best Formation for Galerius Strategy Here

Galerius uses Darkness Armor, which nullifies up to 6 hits, making it difficult to deal damage. The Swordmaster's Meteor Slash can deal 9 hits at once, easily removing the attack nullification, so a Swordmaster formation is recommended.

After reorganizing and deploying, fight Galerius. With Brave Skills, Power Liqueur, Guard Liqueur for buffs, and full use of assists, you can defeat him in about two battles. Even if you can't defeat him quickly, use healing items to the fullest and persevere until you win.
| Skill | Effect/User |
|---|---|
| Brave Order | Increases damage dealt by nearby allied units, reduces damage taken, and guarantees a first strike (Effect: 20% Duration: 1 battle) User: Alain |
| Guard Haste | Creates a zone that reduces damage taken by allied units within it (Effect: 20% Duration: 10 seconds) User: Monica |
| Clairvoyance | Clears the fog of war at the designated location and reveals enemy units within range (Duration: 30 seconds If combat occurs within range, ally accuracy +50) User: Selvie |
Best Formation for Galerius Strategy
Alain's Unit

※You can check character equipment and tactic configurations by switching tabs.
| Alain's Unit | ||
|---|---|---|
| Clive | Adel | Alain |
| Melisandre | ||
| Equipment | |
|---|---|
| Royal Sword Cornix | Azure Crest Shield |
| Hallowed Corne Ash | Lapis Pendant |
| No. | Action | Condition 1 | Condition 2 |
|---|---|---|---|
| 1 | Cavalry Slay | Cavalry-type enemy | Enemy with AP >= 1 |
| 2 | Lean Edge | ||
| 3 | Rapid Order | ||
| 4 | Luminous Cover | Prioritize back row ally | |
| 5 | Noble Guard |
| Equipment | |
|---|---|
| Testarossa | Cavalryman's Buckler |
| Lapis Pendant | Bastion Sabatons |
| No. | Action | Condition 1 | Condition 2 |
|---|---|---|---|
| 1 | Assaulting Lance | ||
| 2 | Cavalry Guard | ||
| 3 | Guard Act | ||
| 4 | Knight's Chase | ||
| 5 | Cavalier |
| Equipment | |
|---|---|
| Steel Lance | Baroque Shield |
| Lapis Pendant | Guardian Gauntlets |
| No. | Action | Condition 1 | Condition 2 |
|---|---|---|---|
| 1 | Assaulting Lance | ||
| 2 | Guard Fight | ||
| 3 | Knight's Chase | ||
| 4 | Cavalier | ||
| 5 | Quick Guard |
| Equipment | |
|---|---|
| Steel Sword |  Templar's Sword Templar's Sword |
| Hallowed Corne Ash |  Swan Plume Swan Plume |
| No. | Action | Condition 1 | Condition 2 |
|---|---|---|---|
| 1 | Meteor Slash | ||
| 2 | Sharp Edge | ||
| 3 | Charged Act | ||
| 4 | Parry |
Galerius starts by using Darkness Armor, nullifying up to 6 hits. Melisandre's Meteor Slash can land 9 hits at once, making her extremely effective against Darkness Armor.
| Point | If Meteor Slash hits first, all subsequent attacks will deal full damage, improving damage efficiency. Therefore, ensure Melisandre has the highest initiative by increasing her initiative with items like Swan Plume. |
|---|
Travis's Unit

※You can check character equipment and tactic configurations by switching tabs.
| Travis's Unit | ||
|---|---|---|
| Travis | ||
| Hired Swordmaster | Auch | Rolf |
| Equipment | |
|---|---|
| Crimson Sword | Hallowed Corne Ash |
| Lapis Pendant | Silk Scarf |
| No. | Action | Condition 1 | Condition 2 |
|---|---|---|---|
| 1 | Toxic Throw | Enemy not poisoned | |
| 2 | Passive Steal | Enemy with PP >= 1 | |
| 3 | Active Break | ||
| 4 | Sneak Edge | ||
| 5 | Evade |
| Equipment | |
|---|---|
 Steel Bow Steel Bow | Warrior's Medallion |
 Brown Beret Brown Beret |  Azure Gem Azure Gem |
| No. | Action | Condition 1 | Condition 2 |
|---|---|---|---|
| 1 | Single Shot | ||
| 2 | Chase | ||
| 3 | Eagle Eye |
| Equipment | |
|---|---|
| Steel Staff | Magician's Medallion |
| Silk Hood | Leather Hood |
| No. | Action | Condition 1 | Condition 2 |
|---|---|---|---|
| 1 | Fireball | ||
| 2 | Chase Magic | ||
| 3 | Counter Magic |
| Equipment | |
|---|---|
| Steel Sword |  Winged Knight's Sword Winged Knight's Sword |
 Mercenary's Eyepatch Mercenary's Eyepatch | Swan Plume |
| No. | Action | Condition 1 | Condition 2 |
|---|---|---|---|
| 1 | Meteor Slash | ||
| 2 | Sharp Edge | ||
| 3 | Charged Act | ||
| 4 | Parry |
Like Melisandre in Alain's unit, the hired Swordmaster is included as a counter to Darkness Armor. Since this unit has lower firepower than Alain's unit, inflict poison/burn with Travis or Auch, and chip away at HP using status ailments as well.
| Point | Similar to Melisandre, ensure the hired Swordmaster has the highest initiative by increasing their initiative with items like Swan Plume. |
|---|
Assist Archer Unit

| Hunter Unit | ||
|---|---|---|
| Monica | ||
| Hired Hunter | Hired Hunter | Hired Hunter |
Supports the Galerius fight with Monica's Guard Haste and assist fire. To perform assist fire, set a hired Hunter as the leader. Equipment and skills for each character are flexible.
Assist Magic Unit

| Wizard Unit | ||
|---|---|---|
 Selvie Selvie | ||
| Hired Wizard | Hired Witch | Hired Wizard |
Supports the Galerius fight with Selvie's Clairvoyance and assist magic. To perform assist magic, set a hired Wizard or Witch as the leader. Equipment and skills for each character are flexible.
Assist Healing Unit (No Change)

| Tatiana's Unit | ||
|---|---|---|
| Tatiana | ||
| Hired Cleric | Hired Cleric | Hired Cleric |
No change from before Galerius appears. Support the Galerius fight with assist healing. Equipment and skills for each character are flexible.
Unlock Conditions for Hidden Character (Norbelle)
Unlock by Challenging the Final Boss Before 'The Priestess, Abducted'

- 1. Clear 'Unicorn Overlord' without clearing 'The Priestess, Abducted'.
└Unlocks Norbelle's Archive and Class Compendium entry - 2. Clear 'The Priestess, Abducted'.
└Resume play after the bad ending.
└Unlocks Norbelle's voice - 3. Use IDeA's Mirror on Scarlett.
The hidden character (Norbelle) is unlocked by clearing 'Unicorn Overlord' without clearing 'The Priestess, Abducted'. In that state, further clearing 'The Priestess, Abducted' and then using IDeA's Mirror on Scarlett after she rejoins will allow you to select Norbelle's voice.
How to Change Scarlett's Appearance to Norbelle
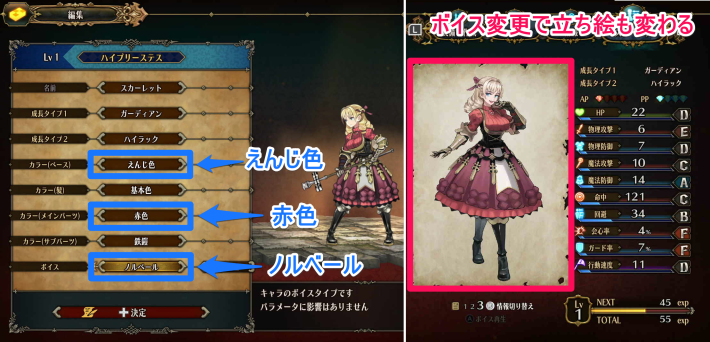
After class changing Scarlett to High Priestess, using IDeA's Mirror and applying the following settings will allow you to change her appearance to resemble Norbelle, though her name will remain Scarlett.
| Setting Item | Setting Value |
|---|---|
| Color (Base) | Maroon |
| Color (Hair) | Default |
| Color (Main Parts) | Red |
| Color (Sub Parts) | Iron Armor |
| Voice | Norbelle |
Norbelle-Related Unlocks and Conditions
| Unlock Condition | Unlocked Element |
|---|---|
| Start 'Unicorn Overlord' before 'The Priestess, Abducted' | - Scarlett 'Page of Despair' - Unicorn Overlord 'Page Without the Maiden' - Unicorn Overlord 'Northern Army - Lion Beastman Page' - Unicorn Overlord 'Capital Tragedy - Blood Maiden Page' |
| Defeat Norbelle | - High Priestess 'Norbelle' |
| Clear 'The Priestess, Abducted' after clearing the Norbelle defeat route | Can change Scarlett's voice to Norbelle's using IDeA's Mirror (portrait also changes) |

