This is a guide for Possessed Dreadnought in Unicorn Overlord. It includes the locations, strategy points, and recommended team compositions for the Possessed Dreadnought.
Possessed Dreadnoughts are not registered on the in-game map, so be careful not to forget their locations.
Clear Rewards
Location
Reward
Cornia (Istania Citadel)
Celestial Shards×40
Cornia (Walled City Barbatimo)
Illusory Dewdrops×10
Drakenhold
Coliseum Coins×2000
Elheim
Fevrite×5
Bastorias
Meteorites×5
Albion
Idea Hand Mirrors×10
Possessed Dreadnought (Istania Citadel)
Enemy Formation
Equipment Composition
Abyssal Greatsword
Dragonstone Ice Shield
Crimson Crystal Pendant
Azure Crystal Pendant
Skill Effects
Heaven's Judgment Kill *Activates when own HP is 50% or less
Physical Potency: 20 / Hits: 7 / Accuracy Multiplier: 100%Attacks all enemies If target is flying, Potency +30 If target is stunned, own PP +2
Piercing Thunder Fang
Physical Potency: 100 / Hits: 1 / Accuracy Multiplier: 100%Performs a piercing attack on enemy front and back rows If target is defeated, own PP +1
Dragon Rend
Physical Potency: 100 / Hits: 2 / Accuracy Multiplier: 100% Guard UnblockableAttacks a single enemy
Judgment
Physical Potency: 100 / Hits: 1 / Accuracy Multiplier: True Hit Ranged, Guard Unblockable, Cover UnblockableActivates at end of battle Attacks all enemies Ignores 50% of target's defense, and recovers own HP by 100% of damage dealt
Focus Energy
Activates before attacking with an active skill Removes all debuffs and makes own next attack a True Hit and Critical Hit
Phantom Leg *Activates when own PP is 2 or more
Physical Potency: 50 / Hits: 1 / Accuracy Multiplier: 100%Activates when attacked by an active skill Attacks one enemy row Inflicts Stun and Passive Seal on target
Grand Punisher
Physical Potency: 50 / Hits: 1 / Accuracy Multiplier: 100% Ranged, Ground Attribute, Simultaneous Activation LimitActivates at start of battle Performs a preemptive attack on all enemies Target's AP -1, PP -1
Strategy Points
How to Defeat the Possessed Dreadnought
The enemy is only one Possessed Dreadnought, but you won't win unless you reduce its HP to 0, so strategies like those in the Arena, where you win by reducing PP and having more remaining HP, won't work.
Breakers are Effective
Skills like Heavy Buster and Line Buster, learned by Breakers, are unblockable and ignore 100% of the target's defense if they are heavy armor type. They are very effective at dealing damage to the heavy armor type Possessed Dreadnought and are crucial for depleting its HP.
Defeating it Makes Possessed Dreadnoughts Appear
Upon defeat, Possessed Dreadnought units with formations utilizing the characteristics of each area will appear in their respective areas.
Example Strategy Formation
*You can check the character's equipment and strategy composition by switching tabs.
Hodrick's Unit
Hodrick
Mordon
Yahna
Nina
Equipment
Sacred Spear
Grand Parise
White Cat-Ear Hood
Amethyst Crystal Pendant
No.
Action
Condition 1
Condition 2
1
Great Shield
Own PP is 2 or less
2
Sting
Enemy with lowest Phys. Def.
3
Quick Act
4
Line Cover
When row is attacked
5
Heavy Cover
Prioritize back row allies
Equipment
Sacred Axe
Illusory Crown
Hero's Medallion
Lapis Pendant
No.
Action
Condition 1
Condition 2
1
Line Buster
Enemy row with 2+ units
2
Assault Blow
Enemy with 25% HP or less
3
Heavy Buster
Prioritize heavy armor enemies
4
Outrage
5
Heavy Counter
Equipment
Sacred Rod
Magician's Medallion
Crimson Crystal Pendant
Azure Crystal Pendant
No.
Action
Condition 1
Condition 2
1
Ice Coffin
Enemy row with 2+ units
2
Magic Missile
Enemy with lowest Mag. Def.
2+ enemies
3
Ice Shot
Enemy with lowest Mag. Def.
4
Focus Sight
Equipment
Royal Axe Drangash
Warrior's Medallion
Crimson Crystal Pendant
Azure Crystal Pendant
No.
Action
Condition 1
Condition 2
1
Line Buster
Enemy row with 2+ units
2
Assault Blow
Enemy with 25% HP or less
3
Heavy Buster
Prioritize heavy armor enemies
4
Outrage
5
Heavy Counter
Mainly use two Breakers to reduce the boss's HP. Yahna supports by granting True Hit to the Breakers with Focus Sight, while also attacking with magic. Hodrick is placed in the front row to protect the three in the back row. This 4-person formation can clear even on EXPERT difficulty.
*You can check the character's equipment and strategy composition by switching tabs.
Viking
Equipment
Sacred Axe
Unfetterer
Amethyst Crystal Pendant
Counter Earring
No.
Action
Condition 1
Condition 2
1
Wide Breaker
2
Roll Axe
3
Smash
1
Battle Horn
2
Frenzy
3
End Blow
Saint Knight
Equipment
War God's Crimson Sword
Azure Crest Shield
Amethyst Crystal Pendant
Thawing Amulet
No.
Action
Condition 1
Condition 2
1
Saint Blade
Own HP is 100% or more
2
Line Heal
Ally with less than 100% HP
3
Hush
1
Cure Freeze
2
Line Barrier
When row is attacked
3
Holy Guard
4
Magic Barrier
Gryphon Ruler
Equipment
Meteorite Axe
Azure Crystal Pendant
Gust Bracelet
Elite Beret
No.
Action
Condition 1
Condition 2
1
Aerial Smite
Prioritize cavalry enemies
2
Fatal Fall
3
High Swing
Prioritize cavalry enemies
1
Fast Break
2
Gryphon Glide
3
Feathering
4
Wing Rest
Own HP is less than 100%
Bishop
Equipment
Radiant Staff
Amethyst Crystal Pendant
Aurora Ring
Ruby Pendant
No.
Action
Condition 1
Condition 2
1
Radiant Heal
2
Sacred Heal
Ally with less than 100% HP
3
Heal
Ally with less than 100% HP
1
Mighty Shield
2
End Resurrect
3
Life Save
Own PP is 50% or less
4
Refresh
5
Quick Heal
Ally with less than 100% HP
Possessed Dreadnought
Equipment
Abyssal Greatsword
Dragonstone Ice Shield
Crimson Crystal Pendant
Azure Crystal Pendant
No.
Action
Condition 1
Condition 2
1
Heaven's Judgment Kill
Own HP is 50% or less
2
Piercing Thunder Fang
3
Dragon Rend
1
Judgment
2
Focus Energy
3
Phantom Leg
Own PP is 2 or more
4
Grand Punisher
Landsknecht
Equipment
Royal Sword Cornix
Crimson Crest Shield
Hero's Medallion
Sacred Symbol
No.
Action
Condition 1
Condition 2
1
Bastard Cross
2
Killing Chain
Enemy with 50% HP or less
3
Mega Slash
1
Bull Force
2
Revenge Guard
3
Follow Slash
Strategy Points
Use All Dispel
The enemy uses Battle Horn at the start of battle to grant unblockable guard to all allies. This unblockable guard poses a risk of wiping out the front row as they can't endure attacks, so use All Dispel quickly to remove it. All Dispel can be used by equipping the Liberator's Staff.
Weapon
Effect
Liberator's Staff
Magic Attack: 14 Skill: All Dispel
Endure Heaven's Judgment Kill with Ominous Wall
Heaven's Judgment Kill, used by the boss when its HP is 50% or less, can devastate your allies if taken directly. Ominous Wall is recommended to counter this. If you protect the back row from piercing attacks with cover skills, the back row can endure Heaven's Judgment Kill while maintaining the attack nullification buff.
Activates before another ally is attacked Covers a single ally with medium guard Target's Defense +20%Lord / High Lord
Heavy Cover
Activates before another ally is attacked Covers a single ally with large guardHoplite/Cataphract
Advance Cover
Activates before another ally is attacked Covers a single ally with medium guard Own AP +1Dark Marquis (Sword)
Evil Cover
Activates before another ally is attacked Covers a single ally with medium guard Steals 1 PP from targetDark Marquis (Spear)
Grow Cover
Activates before another ally is attacked Covers a single ally with medium guard Makes target's next attack a True HitNameless Towerkeeper's Shield
Quick Cover
Activates before another ally is attacked Covers a single ally with medium guardSquire's Shield / Squire's Greatshield
Fast Cover
Activates before another ally is attacked Covers a single ally with medium guard Makes target's next action speed the fastestWind Shield Caecias / Wind Greatshield Sciron
Endurance Cover
Activates before another ally is attacked Covers a single ally with large guard Grants self a buff to withstand one fatal blowZenoiran Knight's Greatshield
Activate Ominous Wall at the Start of Battle
Use Cover Skills to Block Piercing Hits
Withstand Heaven's Judgment Kill.
Activate Ominous Wall at the Start of Battle
Use Alcina's Ominous Wall at the start of battle. This grants all allies a buff that nullifies one attack, allowing the back row to preserve this buff until the late game to endure Heaven's Judgment Kill.
Use Cover Skills to Block Piercing Hits
To preserve the back row's attack nullification buff, it's crucial to counter front-to-back piercing attacks. Place two characters with cover skills in the front row and set the cover skill condition to Prioritize back row allies to prevent damage to the back row from piercing attacks.
Withstand Heaven's Judgment Kill
If the back row can preserve the attack nullification buff until the late game, the back row will not take damage from Heaven's Judgment Kill, and the front row can minimize damage by guarding.
Example Strategy Formation
*You can check the character's equipment and strategy composition by switching tabs.
*You can check the character's equipment and strategy composition by switching tabs.
Doom Knight
Equipment
Dark Knight's Battleaxe
Zenoiran Knight's Shield
Amethyst Crystal Pendant
Ring of the Dead
No.
Action
Condition 1
Condition 2
1
Desperate
Own HP is 50% or less
2
Dark Flame
3
Venom Axe
4
Revenge Axe
1
Endurance Guard
2
Demon Trade
3
Blood Arts
Own HP is less than 100%
4
Revenger
Wyvern Ruler
Equipment
Icerain Spear
Azure Crystal Pendant
Ruby Pendant
Fire Dragon Ring
No.
Action
Condition 1
Condition 2
1
Icicle Dart
Prioritize scout enemies
2
Tempest Drive
Prioritize cavalry enemies
Own HP is 50% or less
3
Fire Breath
Prioritize cavalry enemies
4
Fall Thrust
Prioritize cavalry enemies
1
Dragon Roar
2
Deflect
3
Grand Counter
Wyvern Ruler
Equipment
Orchis Spear
Crimson Crystal Pendant
Talisman of Life
Counter Earring
No.
Action
Condition 1
Condition 2
1
Tempest Drive
Prioritize cavalry enemies
Own HP is 50% or less
2
Fire Breath
Prioritize cavalry enemies
3
Fall Thrust
Prioritize cavalry enemies
1
Dragon Roar
2
Deflect
3
Grand Counter
Druid
Equipment
Cursed Poison Staff
Amethyst Crystal Pendant
Necromancer's Lantern
Black Plume
No.
Action
Condition 1
Condition 2
1
Poison Curse
2
Curse Hazard
2nd action
3
Defense Curse
4
Offense Curse
5
Passive Curse
1
Vanitas
2
Cursed Swamp
3
Quick Curse
Possessed Dreadnought
Equipment
Abyssal Greatsword
Dragonstone Ice Shield
Crimson Crystal Pendant
Azure Crystal Pendant
No.
Action
Condition 1
Condition 2
1
Heaven's Judgment Kill
Own HP is 50% or less
2
Piercing Thunder Fang
3
Dragon Rend
1
Judgment
2
Focus Energy
3
Phantom Leg
Own PP is 2 or more
4
Grand Punisher
Shieldshooter
Equipment
War God's Crimson Bow
Mirage Greatshield
Crimson Crystal Pendant
Black Plume
No.
Action
Condition 1
Condition 2
1
Heavy Bolt
Prioritize flying enemies
2
Toxic Bolt
Prioritize flying enemies
3
Power Bolt
Prioritize flying enemies
1
Aid Cover
2
Quick Reload
3
Medical Aid
Ally with less than 100% HP
Strategy Points
Prepare for Poison with Equipment
The enemy will use poison skills like Venom Axe, Poison Curse, and Toxic Bolt on the front row. Enduring becomes difficult if poisoned, so the front row should nullify poison with the recommended equipment below. Conversely, the back row has a low risk of being poisoned, so no countermeasures are needed.
Poison Nullifying Equipment Easy to Use in Front Row
Sacred Sword
Sacred Axe
Sacred Spear
Scorpion Stinger
Radiant Shield
Viper Shield
Sacred Symbol
Ring of the Dead
Gravekeeper's Boots
Gravekeeper's Lantern
Fluffy Cape
Antidote Amulet
Inflict Stun to Seal Deflect
The two Wyvern Rulers in the front row use Deflect to nullify the first hit of melee physical damage. If they use it repeatedly, attacks on the boss will be delayed and you won't be able to defeat it, so stun them to stop Deflect. Dead Spinning or Thunderstruck, which can stun an entire row, are recommended.
Tips
Wyvern Rulers have high evasion, so combining with skills that grant True Hit, like Hawkeye or Eagle Eye, will make it more stable.
Debuffs are Effective
Other than the boss's Focus Energy, enemies cannot remove debuffs, so it's recommended to include a Druid specialized in debuffs. Defense Curse, which lowers enemy defense, is very effective as you need to deplete the enemy's HP completely.
Example Strategy Formation
*You can check the character's equipment and strategy composition by switching tabs.
Berengaria's Unit
Nigel
Hodrick
Berengaria
Selvie
Yunifi
Equipment
Wind Sword Notos
Azure Greatshield
Ring of the Dead
Sniper's Amber Lens
No.
Action
Condition 1
Condition 2
1
Dead Spinning
Enemy row with 2+ units
Front row enemy
2
Inferno
3
Burn Edge
4
Hawkeye
5
Dead End
6
Phantom Edge
Equipment
Sacred Spear
Grand Parise
Heavy Infantry's Medallion
Azure Crystal Pendant
No.
Action
Condition 1
Condition 2
1
Great Shield
Own PP is 2 or less
2
Sting
Enemy with lowest Phys. Def.
3
Line Cover
When row is attacked
4
Heavy Cover
Prioritize back row allies
Equipment
Hellebore Axe
Radiant Shield
Sniper's Amber Lens
Crimson Crystal Pendant
No.
Action
Condition 1
Condition 2
1
Dead Spinning
Enemy row with 2+ units
2
Diabonator
Enemy with status ailment
Own PP is 3 or less
3
Carnage
4
Hawkeye
5
Blood Chase
6
Pain Axel
7
One-Eyed War Princess
Equipment
Wind Staff Euros
Unicorn Seal
Illusory Crown
Azure Crystal Pendant
No.
Action
Condition 1
Condition 2
1
Defense Curse
Prioritize front row enemies
1st action
2
Defense Curse
Prioritize back row enemies
3
Quick Curse
Equipment
Wind Bow Apeliotes
Warrior's Medallion
Black Plume
Amethyst Crystal Pendant
No.
Action
Condition 1
Condition 2
1
Glacial Rain
2+ enemies
2
Mystic Arrow
Heavy armor enemy
3
Sonic Shaft
Prioritize flying enemies
4
Eagle Eye
5
Triple Counter
Effective Action Speed
1
2
3
4
5
Selvie
Yunifi
Nigel
Berengaria
Hodrick
Although the enemy's Cursed Swamp lowers action speed from the start of battle, Selvie nullifies it due to the effect of the Unicorn Seal. Therefore, Selvie will effectively act before Yunifi, who has the fastest base action speed.
*You can check character equipment and tactics by switching tabs.
Elven Fencer
Equipment Setup
Magic Iron Sword
Amethyst Pendant
Black Bird Feather Ornament
Royal Scarf
No.
Action
Condition 1
Condition 2
1
Mirage Stab
2
Gremlin Glaive
Enemies in front and back rows
3
Lightning Sword
1
Evade Act
2
Weak Remove
3
Sylphid Barrier
Possessed Dreadnought
Equipment Setup
Abyssal Greatsword
Dragon Rock Ice Shield
Crimson Stone Pendant
Azure Stone Pendant
No.
Action
Condition 1
Condition 2
1
Heavenly Prison Kill
Own HP 50% or less
2
Fang Thrust Swift Thunder
3
Dragon Sever
1
Judgment
2
Charge Ki
3
Phantom Leg
Own PP 2 or more
4
Grand Punisher
Elven Fencer
Equipment Setup
Magic Iron Sword
Amethyst Pendant
Gold Circlet
Thunder Ring
No.
Action
Condition 1
Condition 2
1
Mirage Stab
2
Gremlin Glaive
Enemies in front and back rows
3
Lightning Sword
1
Evade Act
2
Weak Remove
3
Sylphid Barrier
Elven Archer
Equipment Setup
Icefall Bow
Amethyst Pendant
Black Cat Ear Hood
Ice Snow Ring
No.
Action
Condition 1
Condition 2
1
Icicle Arrow
Prioritize flying enemies
2
Mystic Saber
Front row allies
1st action
3
Wind Arrow
Prioritize flying enemies
1
Quick Act
2
Pure Field
3
Share Heal
4
Quick Cure
Sorceress
Equipment Setup
Ice Storm Staff
Amethyst Pendant
Magia Soul
Azure Stone Pendant
No.
Action
Condition 1
Condition 2
1
Blizzard
2
Ice Coffin
Prioritize armored enemies
Enemy row with the most units
3
Magic Missile
Prioritize armored enemies
2 or more enemies
4
Ice Shot
Prioritize armored enemies
1
Dispel
2
Quick Cast
3
Foresight
4
Magic Saber
Elven Archer
Equipment Setup
Aluminista
Crimson Stone Pendant
White Cat Ear Hood
Azure Stone Pendant
No.
Action
Condition 1
Condition 2
1
Checkmate
2
Icicle Arrow
Prioritize flying enemies
3
Mystic Saber
Front row allies
1st action
4
Wind Arrow
Prioritize flying enemies
1
Quick Act
2
Pure Field
3
Share Heal
4
Quick Cure
Strategy Points
Use Immediate Glacial Rain
Defeat non-boss enemies with Yunifi's True Strike & Critical Glacial Rain, equipped with Sniper's Amber Lens. Raise Yunifi's Action Speed to 54 or higher, and by using Quick Act to cast Glacial Rain immediately, you can defeat them before the enemy moves.
Accessory
Effect
Sniper's Amber Lens
Skill: Hawkeye Accuracy +20
White Cat Ear Hood
Skill: Quick Act PP+1 / Action Speed +10
Black Cat Ear Hood
Skill: Quick Act PP+1 / Action Speed +10
Steal PP with a Rogue
Steal all PP with a Rogue's Passive Steal to restrict the boss's actions. It's recommended to inflict Guard Seal with a Druid's Defense Curse, as this will almost certainly allow you to steal PP. At the start of battle, the enemy gains Debuff Immunity, but you can inflict Guard Seal with the following steps.
Debuff All Enemies at Battle Start
Cast Defense Curse on the Front Row
Steal PP with Passive Steal
Debuff All Enemies at Battle Start
The enemy applies Debuff Immunity to all units at the start of battle with Pure Field, so you should apply an AoE debuff at the start to remove it. Berengaria's One-Eyed War Princess is recommended as the opening skill.
Adjust the Action Speed for the Opening Debuff
You want the opening debuff to hit after the enemy's Debuff Immunity, so set the action speed of the character using the opening debuff to 52 or less.
Cast Defense Curse on the Front Row
Cast the Druid's Defense Curse on the front row. The enemy Elven Archer in the back row will use Quick Cure to remove debuffs from the front row, but it will target the Elven Fencer closest to the Elven Archer, so the Possessed Dreadnought's debuff will not be removed.
Steal PP with Passive Steal
Since Guard Seal is applied by Defense Curse, Passive Steal can steal PP almost certainly without being guarded.
Strategy Team Composition Example
*You can check character equipment and strategy configurations by switching tabs.
*You can check character equipment and strategy configurations by switching tabs.
Werefox
Equipment Configuration
Meteorite Lance
Crimson Shard Pendant
Lucky Coin
Royal Scarf
No.
Action
Condition 1
Condition 2
1
2
3
1
2
3
Werefox
Equipment Configuration
Death Pillar
Crimson Shard Pendant
Demon's Shackles
Royal Scarf
No.
Action
Condition 1
Condition 2
1
2
3
4
1
2
3
Werebear
Equipment Configuration
King Axe Drangash
Heavenly Mirror Greatshield
Azure Stone Pendant
Angel's Feather Ornament
No.
Action
Condition 1
Condition 2
1
Own HP is 50% or less
2
3
1
2
Front row ally
3
4
5
Wereowl
Equipment Configuration
Cardinal Mace
Azure Stone Pendant
Sage Hood
Crimson Shard Pendant
No.
Action
Condition 1
Condition 2
1
Front row ally
2
Ally with less than 100% HP
3
Front row ally
4
Front row ally
1
2
3
Possessed Dreadnought
Equipment Configuration
Abyss Greatsword
Dragonstone Ice Shield
Crimson Shard Pendant
Azure Stone Pendant
No.
Action
Condition 1
Condition 2
1
Heavenly Prison Kill
Own HP is 50% or less
2
Fang Thrust Swift Thunder
3
Dragon Sever
1
Judgment
2
Focus Ki
3
Phantom Leg
Own PP is 2 or more
4
Grand Punisher
Werebear
Equipment Configuration
Vanish Hammer
Champion's Tower Shield
Amethyst Shard Pendant
Heavy Infantry Medallion
No.
Action
Condition 1
Condition 2
1
2
Own HP is 50% or less
3
4
1
2
3
4
Strategy Points
Fight During the Day for Lower Difficulty
The Possessed Dreadnought in Bastorias has non-boss units composed of beastmen, who are strengthened at night. The difficulty is lower during the day, so choose daytime to fight.
Protect AP/PP with Ominous Wall
The boss uses Grand Punisher at the start of the battle, which steals 1 AP and PP from all units. Losing AP/PP reduces attack opportunities and makes it harder to deplete their HP, so defend against it by granting attack nullification to all allies doing it.
Defeat Non-Boss Enemies with Line Buster
Breaker skills are effective against heavy armor type Werebears. There are also two high-evasion Werefoxes lined up, but you can defeat them together by making the column attack a guaranteed hit with a Sorceress's , then you can defeat them together. Landing Line Buster three times will nearly wipe out all non-boss enemies.
Withstand Heavenly Prison Kill with Cursed Jail
Alcina's is recommended against the boss's attacks. The boss uses Focus Ki Cursed Jail activates after, so it is unaffected by the debuff removal from Focus Ki and also nullifies the critical hit buff. This greatly reduces the power of Heavenly Prison Kill.
Strategy Team Composition Example
*You can check character equipment and strategy configurations by switching tabs.
*You can check the character's equipment and tactics by switching tabs.
Feather Sword
Equipment
Pursuer's Rapier
Radiant Shield
Lapis Pendant
Winged Banner
No.
Action
Condition 1
Condition 2
1
Self is buffed
2
3
1
Front row ally
2
3
Self is buffed
4
5
Feather Shield
Equipment
Winged Crest Sword
Winged Crest Greatshield
Ruby Pendant
Holy Symbol
No.
Action
Condition 1
Condition 2
1
2
3
1
2
Self is debuffed
3
Feather Shield
Equipment
Windcleaver Falchion
Hero's Greatshield
Lapis Pendant
Phantasmal Crown
No.
Action
Condition 1
Condition 2
1
Prioritize flying enemies
2
3
4
1
2
3
Self is debuffed
4
Feather Bow
Equipment
Wind Bow Apeliotes
Lapis Pendant
Guardian Ring
Heavy Infantry Medallion
No.
Action
Condition 1
Condition 2
1
Prioritize flying enemies
2
Prioritize flying enemies
3
Prioritize flying enemies
1
2
3
Front row ally
4
Possessed Dreadnought
Equipment
Abyssal Greatsword
Dragonstone Ice Shield
Ruby Pendant
Lapis Pendant
No.
Action
Condition 1
Condition 2
1
Celestial Doom
Own HP 50% or less
2
Swiftfang Strike
3
Dragon Rend
1
Judgment
2
Focus Spirit
3
Phantom Step
Own PP 2 or more
4
Grand Punisher
Feather Rod
Equipment
Meteorite Rod
Ruby Pendant
Holy Symbol
Talisman of Life
No.
Action
Condition 1
Condition 2
1
Front row ally
2
Own AP 2 or more
3
1
Ally with less than 100% HP
2
Ally with less than 100% HP
3
Ally with less than 100% HP
Strategy Points
Open with Debuffs and Preemptive Attacks
Feather Shield is troublesome if allowed to act, as it repeatedly uses Invincible, which recovers PP with Mystic Shield and nullifies attacks. Counter it with the following flow: Consume PP with an opening debuff → Force Invincible use with Yunifi's Glacial Rain → Finish with Line Buster.
Inflict Debuffs at the Start of Battle to Consume PP
Use Glacial Rain to Make Them Use Invincible
Finish Them off With Line Buster
Consume PP by Inflicting Debuffs at the Start of Battle
When Feather Shield is debuffed, it reflects the debuff with Weak Specular. By making it consume 1 PP here, you can reduce the number of times Invincible is activated. For opening debuff skills, Berengaria's One-Eyed War Princess, etc., are recommended.
Use Glacial Rain to Force Invincible
Use Quick Act to have Yunifi immediately cast Glacial Rain. This allows you to defeat enemies in the back row while forcing Feather Shield to use Invincible. This leaves Feather Shield with 1 PP remaining, making it unable to use Invincible, which costs 2 PP.
Adjust Yunifi's Action Speed
If you set Yunifi's action speed to 50 or higher and the fastest in the unit, she can cast Glacial Rain preemptively.
Finish with Line Buster
By hitting the front row with Breaker's Line Buster, you can minimize Feather Shield's Invincible use and defeat all enemies except the boss. Since Feather Shield has high evasion, it's recommended to ensure a hit with items like Sniper's Lens.
Adjust Breaker's Action Speed
If you set Breaker's action speed to 36 or higher and lower than Yunifi's, they can use Line Buster after Glacial Rain. Be careful, as if it's below 36, Feather Shield will act first, recover PP, and repeatedly use Invincible.
Steal AP with Berengaria
Steal AP from the last remaining boss with Berengaria's Carnage to prevent them from using the powerful all-target attack, Heaven's Judgment. If you steal even 1 AP, they will consume 2 AP with Gato-Totsurai, leaving them with 1 AP and unable to use Heaven's Judgment. After that, just keep attacking the boss to win.
Example Strategy Formation
*You can check character equipment and tactics by switching tabs.
Your feedbacks will be checked by our staffs and will be attended to accordingly. Please be advised that we may not reply to every individual feedbacks.


 Abyssal Greatsword
 Dragonstone Ice Shield
 Crimson Crystal Pendant
 Azure Crystal Pendant


 Hodrick
 Mordon
 Yahna
Yahna Nina
Nina Sacred Spear
 Grand Parise
 White Cat-Ear Hood
 Amethyst Crystal Pendant
 Sacred Axe
 Illusory Crown
 Hero's Medallion
 Lapis Pendant
 Sacred Rod
 Magician's Medallion
 Royal Axe Drangash
 Warrior's Medallion
 View Enemy Equipment and Tactics
 Unfetterer
 Counter Earring
 War God's Crimson Sword
 Azure Crest Shield
 Thawing Amulet
 Meteorite Axe
 Gust Bracelet
 Elite Beret
 Radiant Staff
 Aurora Ring
 Ruby Pendant
 Royal Sword Cornix
 Crimson Crest Shield
 Sacred Symbol
 Liberator's Staff


 Alain
Alain Alcina
 Heavy Infantry's Medallion
 Unicorn Holy Sword
 Parrying Shield
 Unicorn Ring (Final)
 Ancient Crown
 Azure Greatshield
 Black Plume
 View Enemy Equipment and Tactics
 Dark Knight's Battleaxe
 Zenoiran Knight's Shield
 Ring of the Dead
 Icerain Spear
 Fire Dragon Ring
 Orchis Spear
 Talisman of Life
 Cursed Poison Staff
 Necromancer's Lantern
 War God's Crimson Bow
 Mirage Greatshield
 Sacred Sword
 Scorpion Stinger
 Radiant Shield
 Viper Shield
 Gravekeeper's Boots
 Gravekeeper's Lantern
 Fluffy Cape
 Antidote Amulet


 Nigel
Nigel Berengaria
 Selvie
 Yunifi
 Wind Sword Notos
 Sniper's Amber Lens
 Hellebore Axe
 Wind Staff Euros
 Unicorn Seal
 Wind Bow Apeliotes
 View Enemy Equipment & Tactics
 Magic Iron Sword
 Royal Scarf
 Gold Circlet
 Thunder Ring
 Icefall Bow
 Black Cat Ear Hood
 Ice Snow Ring
 Ice Storm Staff
 Magia Soul
 Aluminista
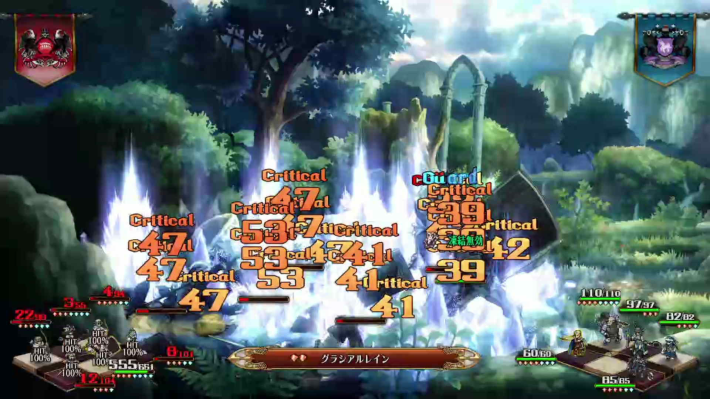


 Travis
 Dusk Cloak
 Angel's Feather Ornament
 View Enemy Equipment & Tactics
 Meteorite Lance
 Lucky Coin
 Death Pillar
 Demon's Shackles
 Heavenly Mirror Greatshield
 Cardinal Mace
 Sage Hood
 Vanish Hammer
 Champion's Tower Shield


 King Staff Albior
 Wind Axe Boreas
 View Enemy Equipment & Tactics
 Pursuer's Rapier
 Winged Banner
 Winged Crest Sword
 Winged Crest Greatshield
 Holy Symbol
 Windcleaver Falchion
 Hero's Greatshield
 Guardian Ring
 Meteorite Rod
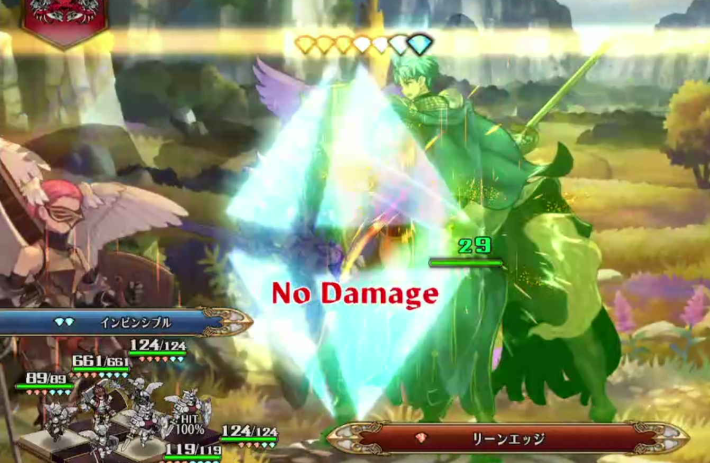


 Sniper's Lens
