
These are guides for team composition in Unicorn Overlord. This article summarizes unit formation examples for the early game (3 members), mid-game (4 members), and late game (5 members). Use this as a reference for your Unicorn Overlord unit formations.
Table of Contents
List of Formation by Progression
Early Game 3-Member (Before Drakenhold)
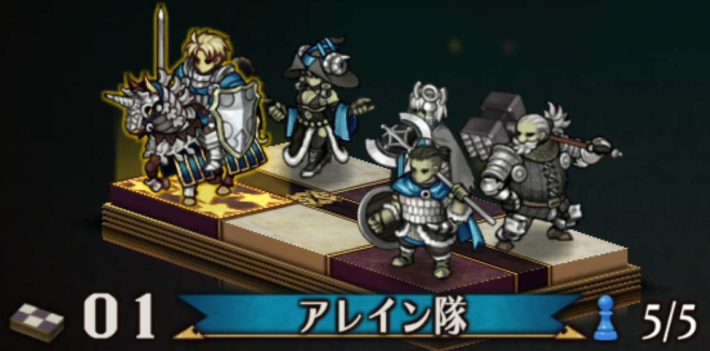
 Alain's Unit Formation
 Clive's Unit Formation
 Ochlys's Unit Formation
 Assist Magic Formation
Mid-Game 4-Member (Drakenhold - Elheim)
  Alain's Unit Formation Alain's Unit Formation |  Rose Knights Formation Rose Knights Formation |
 Berengaria + Selvie Formation Berengaria + Selvie Formation |  Assist Ranged Formation Assist Ranged Formation |
 Cavalry + Gilbert Formation Cavalry + Gilbert Formation |
Late Game 5-Member (Bastorias - Albion)
 Alain's Unit Formation Alain's Unit Formation |  Breaker Formation Breaker Formation |
 Glacial Rain Formation Glacial Rain Formation | 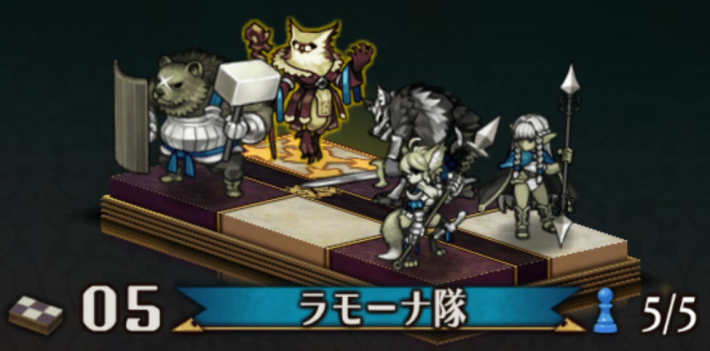 Beastren Formation Beastren Formation |
 Featherfolk Formation Featherfolk Formation |
Basic Team Composition Tips
Placement Based on Defense & Evasion

The front row is susceptible to physical attacks, so classes with high physical defense or evasion are recommended. Conversely, mages and archers who are weak to physical attacks should be placed in the back row to be protected by the front row.
Recommended Classes for Front/Back Row
| Front Row | [High Physical Defense] Hoplite/Cataphract [High Evasion] Thief/Rogue Wyvern Knight/Wyvern Ruler Gryphon Knight/Gryphon Ruler |
|---|---|
| Back Row | Hunter/Sniper Shooter Cleric/Bishop Wizard/Warlock Witch/Sorceress Shaman/Druid |
Prioritize Balance and Mobility

In quests, you will face various enemy classes within a single stage, so a well-balanced formation that complements its weaknesses is recommended. Since there is also stage movement, utilize the mobility of cavalry and shortcuts via flight.
Same-Type Units OK in Assist/Cavalry Roles

For assist units that support allies with ranged attacks or magic, including many classes of the same type will increase assist power. Skills like Cavalier held by Great Knights and Knight's Chase can be activated for other cavalry-type allies, so a formation with many cavalry units is also viable.
Prioritize Matchup Advantage in the Arena

In the arena, you can change your formation for each battle, so it's easier to win by creating a formation that exploits enemy weaknesses. Basically, cavalry is strong against infantry, fliers against cavalry, and infantry (archers) against fliers. Consider these matchups when forming your team.
Early Game Tips (Before Drakenhold)
Early Game Formation Points
In the early game, you can clear stages with enough firepower without thinking too deeply. There are few classes available, so focus on formations that can easily deal damage.
- Form a team centered around Alain, who is strong both offensively and defensively
- Josef, available from the start, is powerful
- Clive's attack power increases when formed with other cavalry
- Magic is effective against armored units
- Flying units ignore terrain, have high evasion, and are strong against cavalry
Build a Balanced Team Around Alain

Alain's Lean Edge, which he learns from the start, is a powerful skill that attacks and heals simultaneously. He also has guard skills, making him excellent in both offense and defense. First, try forming a team centered around Alain, who is easy to use in any role.
Josef is Strong from the Start

Josef starts at Lv20 with high stats, allowing him to attack aggressively from the early game. As an advanced class, Paladin, he has 2 AP and 2 PP each, making it easy to defeat enemies in a single battle. He can restore HP with Heal, increasing the unit's durability.
Higher Speed & Attack via Cavalry Formation

Forming a unit with highly mobile cavalry increases mobility, which is useful for hunting down enemy assists attacking from a distance. Also, Clive's Cavalier, which he learns at Lv15, increases the attack power of cavalry units in the same row. By leveling him up, you can strengthen your cavalry units.
Magic is Effective Against Armored Units

Armored enemies have high physical defense, and if you can't defeat them, you'll likely take damage from back-row attacks. Instead, their magic defense is low, so include Yahna or Auch in your formation and attack with magic.
Warrior and Soldier Skills are Also Effective
Warriors like Mordon and Kitra can use Heavy Buster to attack armored units, ignoring their defense. Chloe, a Soldier, can use Long Thrust for a piercing attack on both front and back rows, making it easy to damage the back row.
Flying Units: Terrain-Free, Evasive, Cavalry Strong

Flying units like Ochlys and Fran, who join in the early game, can move ignoring stage terrain, and due to their high evasion, they can be placed in the front row to evade attacks. Furthermore, Fran, a Gryphon Knight, deals heavy damage to cavalry. However, they are weak against archers who have true strike and deal heavy damage to flying units.
Early Game Formation Examples
Formation Example 1: Alain's Unit Formation

| Alain's Unit | ||
|---|---|---|
 Alain Alain(Leader) | ||
 Auburn Auburn |  Yahna Yahna | |
Alain and Auburn handle physical attacks, while Yahna handles magical attacks in this versatile formation. If you run out of stamina while advancing, recover it with Auburn's Vitalize. When the 4th slot is unlocked, you'll want to add a healer like Sharon to the other back-row slot.
| Tips | Can be formed after clearing "The Swamp Witch" (Early Cornia) |
|---|
Formation Example 2: Clive's Unit Formation

| Clive's Unit | ||
|---|---|---|
 Josef Josef |  Clive Clive(Leader) | |
 Mordon Mordon | ||
With two cavalry units, this formation moves quickly and can proactively take down distant enemies like enemy assist units. Clive learns Cavalier at Lv15, which can increase his own and Josef's attack power. Mordon deals damage to armored units. If HP gets low, Josef's Heal comes in handy.
| Tips | Can be formed after clearing "Liberation of Fort Barbatimo" (Early Cornia) |
|---|
Formation Example 3: Ochlys's Unit Formation
| Ochlys's Unit | ||
|---|---|---|
 Ochlys Ochlys(Leader) | ||
 Rolf Rolf |  Nina Nina | |
The flying unit Ochlys, when set as leader, can move ignoring terrain. Flying units often fight other flying units, so Rolf is included to make it easier to hunt them. Nina deals damage to armored units.
| Tips | Can be formed after clearing "The Winged Knight" and "Thief Hunt," and exchanging 30+ Divine Shards at a church with Sharon in your army (Mid Cornia) |
|---|
Formation Example 4: Assist Magic Formation

| Auch's Unit | ||
|---|---|---|
 Hodrick Hodrick | ||
 Witch Witch(Can also be hired) |  Auch Auch(Leader) | |
While supporting allies with assist magic, Hodrick can endure if a battle starts. Use the Witch's Teleport to move near watchtowers or allies to provide support.
| Tips | Can be formed after clearing "The Magician of the Ruins" (Late Cornia) |
|---|
Mid-Game Tips (Drakenhold - Elheim)
Formation Points
The powerful flying class Wyvern Knight appears, making strategy more important. Also, make sure to raise individual character abilities through Class Change, which becomes available from mid-game.
- Recruit Rosalinde before Drakenhold
- Use archers to counter flying units
- Selvie's debuffs give an advantage in battle
- Selvie and Berengaria have excellent synergy
- Gilbert's buffs are useful until the late game
Recruit Rosalinde Before Drakenhold

If you go to the Labyrinth of the Elves, the entrance to Elheim, before stopping by Drakenhold, Rosalinde will join without a battle. She can use Cure Heal to restore HP and remove debuffs, so she can be included in formations as a healer.
Use Archers to Counter Flying Units

From Drakenhold, Wyvern Knights will appear, and battles against flying units will become more difficult. Counter them by including archers, who are their weakness, in your formation.
Selvie's Debuffs Give an Advantage in Battle

Selvie the Shaman specializes in debuffing enemies. Even with unfavorable matchups or power differences, debuffs can mitigate these and make comeback victories possible.
Selvie and Berengaria Have Excellent Synergy

Berengaria, who joins in Drakenhold, has Diabolator, which increases in power against enemies with status ailments and also recovers PP. Selvie's Defense Curse can inflict the Guard Seal status ailment on an entire row, making her synergy with Berengaria excellent.
Gilbert's Buffs are Useful Until the Late Game

Gilbert has a wealth of buff skills for allies, making him easy to incorporate into formations and expected to be active until the late game. If you miss recruiting Gilbert, he won't join until the final phase of the story, so check his recruitment method carefully.
Mid-Game Formation Examples
Formation Example 1: Alain's Unit Formation

| Alain's Unit | ||
|---|---|---|
| Alain (Leader) | ||
| Auburn |  Sharon Sharon | Yahna |
A formation adding Sharon to the early game Alain's unit. Sharon's HP recovery increases durability, and she can also remove debuffs. Promoting Alain to High Lord increases his mobility and makes him stronger against infantry.
| Tips | Can be formed from early Drakenhold |
|---|
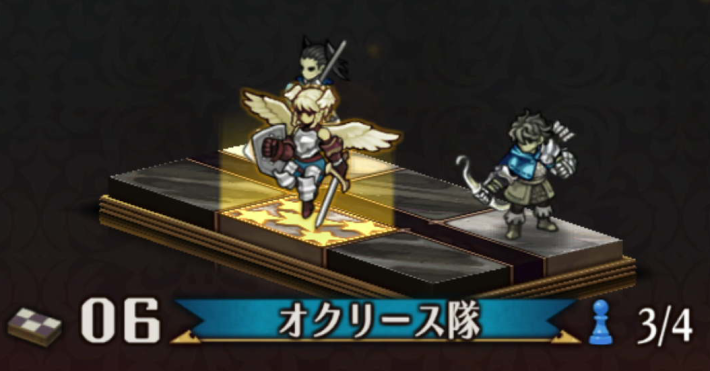
Formation Example 2: Rose Knights Formation

| Fran's Unit | ||
|---|---|---|
 Virginia Virginia | ||
 Miriam Miriam |  Kitra Kitra |  Fran Fran(Leader) |
Composed of Rose Knights members. Virginia's Vertical Edge is strong against fliers, and Iron Ripper is strong against armored units. Fran is effective against cavalry. Fran's flight allows movement while using Blade Wave to hunt enemy assist units. It can handle all sorts of enemies and is well-balanced.
| Tips | Can be formed after clearing "Liberation of Mier Checkpoint" (Early Drakenhold) |
|---|
Formation Example 3: Berengaria + Selvie Formation

| Renault's Unit | ||
|---|---|---|
 Berengaria Berengaria | ||
 Scarlett Scarlett |  Renault Renault(Leader) |  Selvie Selvie |
Berengaria's skills are more effective against enemies debuffed by Selvie. If Selvie's action speed is slower than others, equip items like the Swan Plume to apply debuffs first. Scarlett is included as a reviver in case allies fall. Any cavalry unit is fine for mobility.
| Tips | Can be formed after clearing "The Black-Clad General" Berengaria temporarily leaves but rejoins after clearing "Heir to the Dragonlands" (Late Drakenhold) |
|---|
Formation Example 4: Assist Ranged Formation

| Liza's Unit | ||
|---|---|---|
 Liza Liza(Leader) | ||
 Shooter Shooter(Can also be hired) | Shooter (Can also be hired) | Witch (Can also be hired) |
Use the Witch's Teleport to move near allies or watchtowers to support them. In battle, Liza the Shieldshooter protects the back row.
| Tips | Shooters can be hired after liberating Pritzwald Fortress in "A Rose Blooms on the Rocks" or Hozant Fortress in "Joint Battle" (Late Drakenhold). |
|---|
Formation Example 5: Cavalry + Gilbert Formation

| Clive's Unit | ||
|---|---|---|
 Monica Monica |  Adel Adel | Clive (Leader) |
 Gilbert Gilbert | ||
Clive & Adel's Cavalier strengthens cavalry, and Gilbert's buffs further enhance them. If Gilbert's action speed is slower than others, equip items like the Swan Plume to apply buffs first. This formation can handle most enemies except armored, flying, and scout types. Monica is included as a healer.
| Tips | Can be formed after clearing "Heir to the Dragonlands" (Late Drakenhold) |
|---|
Late Game Tips (Bastorias - Albion)
Formation Points
In Bastorias, Yunifi and Beastren units join, and in Albion, Featherfolk units join. Beastren and Featherfolk units' performance changes depending on whether it's day or night, so be mindful of the in-game time. From the late game, 5-member formations also become available.
- Yunifi's Glacial Rain is powerful
- Beastren performance UP at night
- Buy Slumbering Flowers from Black Market
Yunifi's Glacial Rain is Powerful

Yunifi, who joins in Bastorias, has Glacial Rain, which requires charging but is a very powerful total 180 potency AoE attack + Freeze infliction. If it activates, enemies will be nearly wiped out, and survivors will be unable to move due to Freeze.
Beastren Performance UP at Night

Beastren units' stats and skill effects increase, and their mobility also increases to be equal to or greater than cavalry, only at night. Regarding mobility, the flying Beastren unit Wereowl becomes particularly easy to use. By skillfully using the "Slumbering Flower" to switch between day and night, you can maintain the night state.
Buy Slumbering Flowers from Black Market

Slumbering Flowers can be obtained in various places, but the Black Market Traders in Bastorias and Albion are the most efficient, allowing you to purchase them repeatedly for 3000G.
Featherfolk Gain Skill Buffs by Daylight

All Featherfolk units are flying types and can move ignoring stage terrain. Also, their skill effects increase only during the day, so it's recommended to use them during the day, opposite to Beastren units.
Late Game Formation Examples
Formation Example 1: Alain's Unit Formation
| Alain's Unit | ||
|---|---|---|
| Auburn | Alain (Leader) | |
| Mordon | Sharon | Yahna |
A firepower-focused formation adding Mordon to the mid-game Alain's unit. Auburn lowers enemy physical defense, and Mordon's Line Buster wipes out the front row. This formation has difficulty hitting high-evasion enemies like flying or scout types, so grant True Strike with items like the Sniper's Lens.
| Tips | Can be formed from early Bastorias |
|---|
Formation Example 2: Breaker Formation

| Hilda's Unit | ||
|---|---|---|
 Hilda Hilda(Leader) |  Cataphract Cataphract(Can also be hired) | |
| Kitra |  Sorceress Sorceress(Can also be hired) | Nina |
Two Breakers are placed in the back row. Breaker attacks are generally unguardable and effective against armored units. Line Buster, learned at Lv30, is particularly powerful as an unguardable & un-coverable attack on an enemy row. For countering flying or scout types, combining with the Sorceress's Farsight is recommended.
| Tips | Can be formed from early Bastorias |
|---|
Formation Example 3: Glacial Rain Formation

| Renault's Unit | ||
|---|---|---|
| Hodrick | Renault (Leader) | |
| Scarlett |  Yunifi Yunifi |  Primm Primm |
A formation that devastates enemies with Yunifi's Glacial Rain. Primm and Scarlett's healing and Hodrick's guards protect Yunifi while she charges. When Scarlett reaches Lv35 and learns Great Blessing, durability further increases, making it easier to cast Glacial Rain.
| Tips | Can be formed after clearing "The Raging Snows" (Early Bastorias) |
|---|
Formation Example 4: Beastren Formation

| Ramona's Unit | ||
|---|---|---|
 Dinah Dinah |  Bertrand Bertrand | |
 Rosalinde Rosalinde |  Govil Govil |  Ramona Ramona(Leader) |
A Beastren-centric formation whose mobility, stats, and skill effects increase at night. The flying unit Ramona and high-evasion Dinah are weak to archers, so Bertrand protects them. Armored units are covered by Rosalinde's magic attacks.
| Tips | Can be formed after clearing "Those Who Resist, Those Who Do Not" (Late Bastorias) |
|---|
Formation Example 5: Featherfolk Formation

| Fodokia's Unit | ||
|---|---|---|
 Bryce Bryce |  Fodokia Fodokia(Leader) | |
 Sanatio Sanatio |  Ithilion Ithilion |  Railanor Railanor |
A Featherfolk-centric formation whose skill effects increase during the day. Fodokia's Magic Reflect makes them strong against magic users. Featherfolk, being flying units, are weak to archers, so Bryce protects them. Armored units are covered by Ithilion's magic attacks. Sanatio is the HP healer.
| Tips | Can be formed after clearing "The Path to the Great Cathedral" (Late Albion) |
|---|

