
This is an early game guide for Unicorn Overlord. It covers early game party formation, weapons, leveling up, recruitment, and more. Please use this as a reference for progressing through the early stages of Unicorn Overlord.
Table of Contents
Early Game Quest Walkthrough Chart
If you want to recruit allies, always choose the top dialogue option (e.g., "Forgive" or "Recruit") during story segments.
- Main "The Unicorn Ring"
- Main "The Call to Action"
- Character Joins: Aubin - Main "Expand Unit Size 2→3"
- Unlocks: Unit size 3 - Main "Change Equipment"
- Unlocks: Change Equipment - Main "Procuring Arms"
- Unlocks: Armorer and Provisioner - Sub "A Solitary Resistance"
- Character Joins: Rolf
*If you choose to "Spare" Gammel, he will join later. - Sub "As The Tricorns Ride"
- Character Joins: Bruno - Sub "The Winged Knight"
- Character Joins: Sharon
- Unlocks: Field Quest "An Angel's Request"
*If you choose to "Spare" Mandrin, he will join later. - Field "An Angel's Request"
- Character Joins: Ochlys
*Clear by collecting 30 Divine Shards and exchanging them. - Main "The Ravaged Swamp" *Recommended Level 5
- Character Joins: Yahna - Liberation "The Battle for Barbatimo"
- Character Joins: Mordon - Sub "The Self-Effacing Sorcerer"
- Character Joins: Auch - Sub "The Mercenary's Trial"
- Character Joins: Berenice - Sub "The Province of Famine"
- Character Joins: Adel - Sub "Uprooting the Rock Rats"
- Character Joins: Nina - Field "Sigil's Trial, Beginner 1"
- Character Joins: Selvie - Main "The Priestess, Abducted" *Recommended Level 8
- Characters Join: Scarlett, Kitra, Fran, Miriam - Clear 4 Liberation Quests outside of Elheim
- Character Joins: Renault - Choose from 3 routes
- To Drakenhold (Recommended)
- Explore unexplored areas of Cornia
- To Elheim
Tips for Early Game Unit Formation
Form Units with Alain and Josef
 Alain Alain | - Powerful leader effect that increases Brave earned - Strong initial skill Lean Edge - Versatile Brave Skills |
 Josef Josef | - Starts at Lv20 with high stats - Starts with 2 AP and 2 PP - Has healing abilities |
Among the characters available in the early game, Alain and Josef stand out for their high performance. Therefore, form units centered around each of them and operate them separately . For specific formation examples and more detailed explanations, please check the article below.
Check Leader Effects and Movement Types

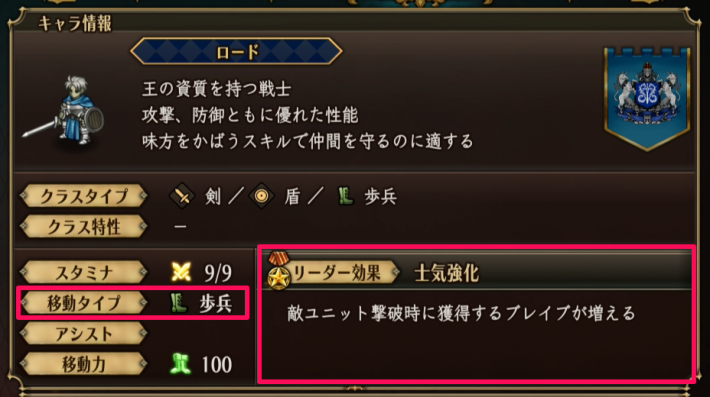
When forming units, consider "Leader Effects" and "Movement Types" when selecting a leader. For example, Alain's leader effect, which increases Brave earned, is powerful. Also, cavalry types have fast movement speed, and flying types can move regardless of terrain. Select leaders based on these characteristics .
Prepare Flying Units for Anti-Cavalry + Assault

Flying units can often effectively counter enemy units that appear in the early game. The advantage of being able to move regardless of terrain is significant, and having them will make progression much easier. You can prepare Gryphon Knights by hiring them at forts , so utilize them from the very beginning.
Prepare Classes to Counter Armored Units

Armored enemies that appear in the early game require countermeasures, and you will struggle if you challenge them unprepared . Don't forget to include classes like Witches for magic attacks or Warriors. Also, equip weapons with magic attacks, such as the Rune Sword, when forming your units.
Key Points for Early Game Progression
- Difficulty Can Be Changed Anytime
- Clear Quests and Gather Characters
- Be Mindful of Unit Compatibility and Combinations
- Aim for 4 Members per Unit Through Unit Expansion
- Aim to Clear “The Priestess, Abducted”
Difficulty Can Be Changed Anytime

You can change the difficulty anytime on the field by opening "Options" in "System" from the "Field Menu." Changing the difficulty does not affect experience points or rewards, so lower the difficulty if you find enemies too strong or challenging.
Clear Quests and Gather Characters

Some quests, including side quests, will have new allies join upon completion. If you don't have enough characters, quest progression will become significantly more difficult. Instead of rushing through main quests, make sure to explore areas thoroughly to gather allies .
Be Mindful of Unit Compatibility and Combinations

Once you've gathered some characters, form units while being mindful of their compatibility and combinations. A common reason for defeat is being unable to break through the enemy's front line to attack their back line . By changing the unit you deploy based on the enemy's formation, you should be able to break through.
Aim for 4 Members Per Unit Through Unit Expansion

When you've accumulated Renown and Honors, liberate forts and expand your units. Increasing the number of members per unit makes progression easier than increasing the number of units, so if both are possible, prioritize unit expansion .
Aim to Clear "The Priestess, Abducted"

. Even if your level is sufficient, you will struggle if you haven't expanded and organized your units. Strengthen your units by referring to the points above.
Things to Do Early On
- Pick Up Items in the Field
- Obtain Equipment From Various Locations
- Liberate Facilities
- Station Guards
Pick Up Items in the Field

Pick up items you find on the field from the early game. In particular, Divine Shards can be exchanged for equipment and are also a trigger for Ochlys to join. It's recommended to collect them diligently whenever you find them .
Don't Forget to Visit Palevia Island

After restoring the port town of Ouvrir, you can go to Palevia Island (the tutorial area). You can pick up items there as well, so be sure to head there to collect them after restoration.
Obtain Equipment from Various Locations

Even in the early game, you can obtain equipment through various methods such as shops in different locations, quest rewards, Treasure Maps, and Divine Shard exchanges. Updating equipment significantly improves character performance, so gather them thoroughly in preparation for what's to come.
Recommended Early Game Equipment to Obtain
| Weapon Name | How to Obtain/Abilities |
|---|---|
 Runic Sword Runic Sword | Purchase at Ouvrir Port Town - Physical Attack 8 / Magical Attack 14 - Magical Defense +3 - Magic Weapon |
 Runic Spear Runic Spear | Purchase at Berengaria Village - Physical Attack 8 / Magical Attack 14 - Magical Defense +3 - Magic Weapon |
 Crimson Epee Crimson Epee | Purchase at Nordplage Town - Physical Attack 14 - Action Speed +3 - Active Break |
 Lyrical Wand Lyrical Wand | Purchase at Fortified City Barbatimo - Magical Attack 13 - AP +1 - Act Heal |
 Azure Crest Shield Azure Crest Shield | Purchase at Fortified City Barbatimo - Physical Defense 5 - Guard Rate 20% - Normal Guard Damage Reduction +25% - PP +1 |
 Ruby Pendant Ruby Pendant | Obtain via Divine Shard exchange - AP +1 |
 Sapphire Pendant Sapphire Pendant | Obtain via Divine Shard exchange - PP +1 |
Liberate Facilities

When you find facilities during exploration, visit them to register them on your map. If liberation battles occur, actively challenge and liberate them. This will allow you to travel from the map, reducing travel time and enabling more efficient exploration .
Station Guards

You can station guards in towns and cities by completing restoration requests. Stationing guards will automatically collect materials and rewards for you . There are no downsides, such as not being able to add them to your units, so remember that liberation and stationing guards go hand in hand.

