
Check out this guide for a walkthrough of Tucma up to Nahua Crater, including Lady Lottie battle, Xolot Reservoir, tips, item location, recommended Temtem & more!!!
Table of Contents
Story Progression
| Previous Part | Next Part |
|---|---|
| Anak Volcano + 3rd Dojo | Quetzal + 4th Dojo |
Board The Narwhal
Narwhal Walkthrough
| No. | Procedure |
|---|---|
| 1 | Board The Narwhal |
| 2 | Fight Clan Belsoto |
Point Of No Return


Before boarding the Narwhal, make sure you are completely done with everything you want to do in Omninesia, as you won't be able to come back for a while. In particular, make sure you buy Balms, Smoke Bombs & also use the Crystal Skates to get all possible chests, as you won't be able to use them for a while.
2 Battles On The Narwhal
You will face off against one pair of Clan Belsoto members, followed by a boss battle with Lady Lottie. Heal your Tems after the first battle so you're ready for the boss!
Clan Belsoto Fight
Lady Lottie Boss Fight
Rematch With Lady Lottie

| Temtem Level | Type | Weakness |
|---|---|---|
| Kalabyss Lvl. 34 | | x2 |
| Pocus Lvl. 32 | | x2 |
| Barnshe Lvl. 35 | | x2x4 |
| Raican Lvl. 35 | | x2 |
| Granpah Lvl. 35 | | x2 |
Electric Moves Are A Must

4 of Lady Lottie's Tems are very weak to Electric moves, so Electric moves will be absolutely necessary. Consider waiting until your opponents have exhausted their stamina to switch in! Then, use Ganki's Electric Storm or Nessla's Chain Lightning to hit both targets for massive damage.
Granpah Gets Tired Quickly
Granpah tends to use Hypoxia, which does massive damage but also drains its stamina. As such, the next turn it will often Cheer Up or rest. Use this time to revive or heal! Consider bringing a Nature/Wind type to resist Wind attacks. Just be careful not to have your Nature-type destroyed by Raican.
Recover Your Lost Gear
Talk To Crew And Get Your Items Back

After the cutscene, you will find yourself on the ground in Tucma with limited visibility & unable to use your map! Talk to all the crew members & get your items back.
Staff And Item Location Map
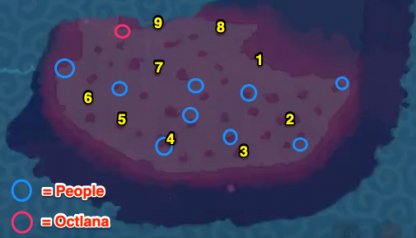
| Number | Item |
|---|---|
| 1 | TCO12: Rend |
| 2 | Archipelago Map |
| 3 | Chamomile |
| 4 | 2x Full Restore |
| 5 | Grease |
| 6 | 6x Balm+ |
| 7 | Temessence Vial |
| 8 | 5x TemCard+ |
| 9 | Growth Enhancer |
You will start near the #1 on the map. Go around in a clockwise fashion visiting every spot. Blue circles are people & yellow numbers correspond to the items in the above table.
Eastern Tucma
| No. | Procedure |
|---|---|
| 1 | Head East |
| 2 | (Optional) Fight 2 Tamers and get items |
| 3 | Go North until you reach Naolin |
Catchable Temtem In This Area
Tamers & Their Temtem
Tamers in Tucma tend to have a very wide variety of Temtem, but Toxic types have unsurprisingly increased significantly. You'll really want to have a strong Wind move user on your team, and be careful with Nature and Water types, as they'll be easily wiped out.
| Temtem | Type | Weakness |
|---|---|---|
| Paharac | | x2 |
| Mushi | | x2 |
| Skail | | x2 |
| Kalabyss | | x2 |
| Sherald | | x2 |
| Barnshe | | x2x4 |
| Tental | | x2 |
| Orphyll | | x2 |
| Saipat | | x2 |
| Baboong | | x2 |
| Pewki | | x2 |
| Tateru | | x2 |
| Blooze | | x2 |
| Zephyruff | | x2 |
| Toxolotl | | x2 |
| Loali | | x2 |
| Raican | | x2 |
| Hocus | | x2 |
| Pigepic | | x2 |
| Sparzy | | x2 |
| Capyre | | x2 |
1. Head East And North

Follow the path on the map above for the optimal route to the next zone. At the start of that next zone, you will be able to heal again, so plan your returns carefully!
Smoke Bombs Take You Back To Octlana
Using a Smoke Bomb at this stage will bring you back to Octlana at the Crash Area. She will still heal your Tems and give you a Temessence Vial charge, so remember to do this!
(Optional) 2. Fight 2 Tamers For Some Enhancer Items

In the area where the road splits into 3, dropping down into the middle will pit you against 2 ambushing trainers, but will also give you the following 4 items, which increase your Tems TVs, making them more powerful.
- 1x Enhancer Cherry
- 1x Enhancer Pineapple
- 1x Enhancer Avocado
- 1x Enhancer Peach
3. Make Your Way To Naolin

If you reach the top of this zone, you will be greeted by the NPC Naolin, who will heal your Tems up and serve as your next "home" location for Smoke Bombs.
Xolot Reservoir + Nahua Crater
| No. | Procedure |
|---|---|
| 1 | Head West and South |
| 2 | Heal Up With Sugey To The South |
| 3 | Head Further West To Nahua Crater |
Catchable Temtem In This Area
| Temtem | Type | Weakness |
|---|---|---|
| Toxolotl | | x2 |
| Skunch | | x2x4 |
| Adoroboros | | x2 |
Tamers & Their Temtem
Tamers in Tucma tend to have a very wide variety of Temtem, but Toxic types have unsurprisingly increased significantly. You'll really want to have a strong Wind move user on your team, and be careful with Nature and Water types, as they'll be easily wiped out.
| Temtem | Type | Weakness |
|---|---|---|
| Skunch | | x2x4 |
| Mastione | | x2 |
| Sherald | | x2 |
| Orphyll | | x2 |
| Loali | | x2 |
| Toxolotl | | x2 |
| Taifu | | x2 |
| Gazuma | | x2 |
| Adoroboros | | x2 |
| Babawa | | x4 |
| Mushook | | x2 |
| Oceara | | x2 |
| Bunbun | | x2x4 |
| Fomu | | x2 |
| Saipat | | x2 |
| Bigu | | x4 |
| Sparzy | | x2 |
| Capyre | | x2 |
| Deendre | | x2 |
| Platypet | | x2 |
| Raican Lvl. 35 | | x2 |
| Granpah | | x2 |
| Nidrasil | | x2 |
| Tuwai | | x2 |
| Blooze | | x2 |
| Ukama | | x2 |
1. Head West And South

In this area, head around and to the southern island. Once you reach here, you'll be able to heal and access a PC, so aim to get there as quickly as possible.
Recommended Level 35-40
Tems in this area are higher level & will demand more from your team. Consider grinding slightly, as it will help you down the line.
3. Head Further West To Nahua Crater

When you reach the end of this map, you will reach another heal point. It's worth noting that When you go north to progress the story, you will temporarily be unable to access the Temtem in your party!
Story Progression
| Previous Part | Next Part |
|---|---|
| Anak Volcano + 3rd Dojo | Quetzal + 4th Dojo |
Temtem - Related Articles
Go Back To The Top PageDatabase
| Database | |
|---|---|
| List Of All Temtem | Best Temtem Tier List | Rare Temtem Locations | Type Chart |
Main Story + Side Quests
| Main Story and Side Quests | |
|---|---|
| Main Story Guide & Walkthrough | All Bosses - List & Guides | Cultist Hunt Side Quest |
Beginner Tips
| Guides For Beginners | |
|---|---|
| Best Team For Early Game | |
| Best Starter To Pick | TV & SV Training Guide |